One week with the ICOM IC-7100

After deciding on a ham radio to purchase, I bought an ICOM IC-7100 from GigaParts. I could have purchased it locally by going into Ham Radio Outlet, but I didn’t want to leave the house and my first interaction with the store wasn’t very helpful. In addition to purchasing the radio, I knew that I also had to purchase a power supply. I went with a TekPower TP30SWV as it got decent reviews and looked like it would meet my needs.

Last Friday the radio arrived, I opened it up and put it on my desk. Unfortunately Amazon hadn’t delivered the power supply making the radio a nice looking paperweight for awhile! Looking at the connectors on the radio, I knew there was another piece I needed to solve and that was how to connect the radio power cable to the power supply. I went to Home Depot and bought some crimp connectors. Once the power supply arrived and I was able to determine the size of the posts on the back of it, I went ahead and crimped on some lugs.

Power Supply Connectors

Radio and Power Supply

I hooked up my antenna (I have it mounted outside on the deck and fed into the house), turned on the radio (I had already gone through the manual a few times), tuned it to a repeater frequency and waited. Later that evening, I decided to dive into programming some repeater frequencies using the RTSystems software I purchased to go along with the radio (I’m definitely not a Windows fan, but the choices are limited in programming the radio using a computer). After playing around with the radio for awhile, I happened to tune to the national 2m simplex calling frequency and had a nice chat with someone about 10 miles away. While this wasn’t a huge distance, I was pretty impressed as the handheld I had made it hard to basically reach anyone.

Controller

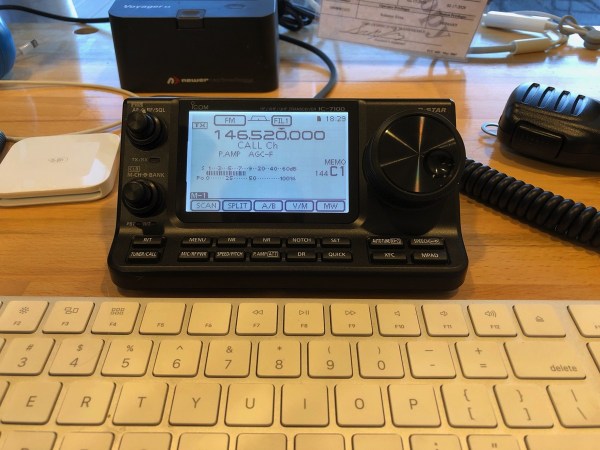
The built in speaker is pretty clear and others have said that I’m clear (depending on the repeater I hit). The controls feel solid and the screen is quite readable. I really like that the controller is small and can sit just behind my keyboard; it doesn’t clutter up my desk and lets me play with it while I’m working.

The radio has far too many controls to understand all of them right now, but I’m trying to learn bit by bit. It is no wonder that a company makes a simplified manual which I’ve put on my “to buy” list.

So far I’ve been playing with 2m and 70cm on both FM and D-Star. I’ve made a few contacts and done a bunch of listening.

Desk and Radio

Pros

  • The separate controller and radio makes it easy to have the controls sit right on my desk without cluttering it.
  • Touchscreen interface with context sensitive buttons helps navigate the large number of features.
  • Microphone feels quite sturdy. Much more of a quality product than the microphone I have for my Baofeng.
  • Ability to change transmit power makes it easy to reach repeaters. Some have said that where I live is a difficult RF area due to the hills.
  • Pre-amplifier helps to bring in somewhat weak signals.
  • Ability to add a name to each memory location is extremely convenient. The Baofeng lets me display a name or the frequency, but not both.
  • Programming repeaters on the radio is straightforward; not as easy as using the programming software, but not really difficult.
  • Ability to easily tune to weather channels.
  • Can adjust various filters, though I’m not quite sure how much use those are in UHF/VHF and repeater use.

Cons

  • D-Star interface (or maybe it is just D-Star) is not very intuitive. I’ll write about this separately.
  • The programming software is a “clone” in that it completely overwrites the radio. So I have to read from the radio, modify it and then write it back otherwise I lose anything I’ve done on the radio.

Summary

I think I’ve made the right choice with this radio. It seems to have everything I need and is performing well. We’ll see what happens when I start getting into HF, but for UHF/VHF I don’t know what else I need or would want. The touchscreen interface is easy to use and while my only other ham radio experience has been a Baofeng, I can see how the interface is more convenient than conventional interfaces that require repeatedly pushing buttons to cycle through options. Seasoned operators might be used to other rigs and could probably tell me the limitations of the IC-7100, but as a starter radio this fits the bill.

There is no comparison between this radio and the cheap Baofeng I have. The Baofeng is almost painful to use while this is fun and easy to use. I’m looking forward to getting a handheld radio and based on my initial impressions of this ICOM radio, the ICOM ID-51A PLUS2 will be the ready for me.

IPv6 on USG

Recently Ubiquiti released version 5.7.20 of its controller software. One of the features it added was GUI control of IPv6 for the UniFi Security Gateway. IPv6 was already available if you were willing to muck with a JSON file and configure it; I already had it setup, but my goal is to keep removing my custom configurations and use the GUI for setup. This will give me a better view of the configuration.

While some tech folks have been pushing for IPv6 support everywhere due to the lack of IPv4 addresses, IPv4 still hasn’t gone away. My provider, Spectrum (formerly Time Warner Cable), has IPv6 on its network and just for learning about it, I had everything setup and working pretty well. Yesterday I upgraded my controller and started looking at how to setup IPv6 via the GUI. It is actually quite straightforward. I am NOT an IPv6 expert, so please send me corrections.

  1. Find your USG in the devices tab of the controller and click on it.
  2. Click on Config.
  3. Under IPv6, select Using DHCPv6 and set the Prefix Delegation Size according to whatever your ISP uses. Mine is 56.
    USG Configuration
  4. Queue Changes and then wait for the USG to be completely provisioned.
  5. Go into settings, click on Network, and then click Edit next to your LAN.
  6. Locate the Configure IPv6 Network section.
  7. Click on Prefix Delegation next to IPv6 Interface Type (this may differ depending on your ISP).
    LAN IPv6 Configuration
  8. The rest of the defaults seem to work fine.
  9. Under DHCPv6/RDNSS DNS Control, I set it to Manual so that I can override the IPv6 DNS servers that my ISP advertises. This allows me to use Pi-Hole and the USG as DNS servers.
  10. Enter the IPv6 addresses of DNS servers you want to use under DHCPv6/RDNSS Name Server. This can be tricky as the IPv6 address could change (though not likely), I entered the link local prefix of fe80:: instead of the first four groups of hex digits in the hopes that if my IPv6 address changes, I don’t have to reconfigure. This appears to work, but I am not 100% sure it is correct.
  11. Click Save and wait for the USG to provision.
  12. Restart any devices or just wait for them to pick up the IPv6 address. You can goto IPv6 Test and see if everything works.

Why use IPv6 now? I have no idea, but figure I’d learn a little and prepare for the future. I hope this helps someone configure IPv6.

A layered approach to backups

[Update: 08 Mar 2018 – Style updates (thanks, Richard!) and added information about source code backups.]

For the last 20 years I’ve been pretty paranoid about backups. While my approach has changed over the years, one constant is that losing data is disastrous. I started with manual backups to floppy disks, then to Jaz disks where I’d rotate disks and store one at my parents’ house, then moved to burning DVDs that I’d put in a safe deposit box.

These days my routine is more refined: I use a modified 3-2-1 strategy to protect my data. If you’re not familiar with the 3-2-1 strategy, it is to have 3 copies of your data, on 2 different media, with 1 off-site backup.

Hardware

  • 2017 MacBook Pro as my main machine
  • 2012 MacBook Pro for my wife’s machine
  • 2013 Mac Pro
  • Akitio Thunder2 Quad attached to the Mac Pro with four 6 TB drives; 2 are dedicated to backups. The drives are arranged in JBOD.
  • 9 1 TB bare drives
  • Newer Tech Voyager S3 connected to my MacBook Pro for doing backups to the bare drives
  • HighPoint Dual-Bay Thunderbolt Dock that I move between the Mac Pro and my wife’s MacBook Pro for backing up to the bare drives.
  • Carbon Copy Cloner. I used SuperDuper! for many years, but switched last fall because CCC has more features that work in my current strategy. SuperDuper! is a great product for cloning drives and has some features that CCC doesn’t have.

Procedure

  1. My wife and I each have iCloud accounts with extra storage mainly to keep copies of our photos. Not only are the photos in iCloud, but they are synced to our MacBook Pros which are then backed up.
  2. Each of the machines in my house backs up to Time Machine. My MacBook Pro and my wife’s MacBook Pro do this over the network to my Mac Pro acting as a server. The Mac Pro does a local Time Machine backup to the Akitio. I don’t consider a network Time Machine backup to be a primary backup as the disc image that Time Machine creates seems to get corrupted far too often. I have no idea why, but it is a thorn in my side. Time Machine, however, has saved data on more than one occasion.
  3. Every day both of the laptops are set to backup their home directories using Carbon Copy Cloner to a disc image residing on the Mac Pro. The disc image is temporary storage, but an extra copy just in case.
  4. Every day the disc images from the home directories are backed up to a folder on a different drive on the Mac Pro. This takes the files out of the disc image.
  5. Every day my accounting data and my Paperless libraries are copied to iCloud Drive on my MacBook Pro. Since my Mac Pro is also connected to iCloud, this has the advantage of copying the data to the Mac Pro and keeping extra backups.
  6. A full backup of the Mac Pro is done daily using Carbon Copy Cloner to a partition on one of the Akitio’s drives.
  7. Each week I use a bare hard drive and the hard drive dock to make a full copy of each computer. This is a manual process, but easy to do. Carbon Copy Cloner is set to backup on connect.
  8. Each week I take a set of the bare drives to my safe deposit box. I have 3 sets of bare drives and rotate them weekly. The 2 sets that aren’t in the safe deposit box are stored in a First Alert 2037F Fire Safe.
  9. My source code for work and some of my projects is stored on github.com or bitbucket.org.

While my setup isn’t the simplest or least expensive, I don’t worry about losing data. Of course there are failure points in this setup but in general most of my data will be preserved in case of some type of data disaster.

Thinking about emergency power

Recently someone sent me a link to a video about creating a relatively inexpensive battery pack that recharges using solar panels. While I’m not sure I’d trust the way that it was made, in theory it sounds like a great way to deliver emergency power to someone in need. With more and more large scale natural disasters, being able to rapidly deploy emergency power is vital to helping people get back on their feet. While governments and companies are building ways to help a large number of people at once, I think the concept of having personal portable power for any emergency is something worth considering.

I’ve started looking at systems that I could use and GoalZero makes a number of systems that can provide adequate power in an emergency and recharge using solar. The systems, however, are just a tad too expensive for me to purchase right now. I could see myself getting one of the 400W units as it could power vital electronics in an emergency; vital being cell phone (if it even worked), portable radio, recharge flashlights (my flashlights pretty much all recharge via USB), and maybe a laptop to keep in touch. Of course, I’m sure I’ll kick myself if I need it and I was too cheap to purchase it, but for now I’m just going to leave it on the nice to have list.

Picking a HAM radio

Now that I’ve decided to go further with HAM radio, I have to pick a radio. My BaoFeng BF-F8HP is usable, but hard to program and not the best radio. I’ve decided that I want to get a handheld (VHF/UHF) radio as well as a base station radio that does HF/VHF/UHF. The base station radios that do HF/VHF/UHF have been referred to as “shack in the box” and don’t perform as well as standalone HF and VHF/UHF radios, but for starting out I’m fine with the limitations.

My criteria for picking a radio is:

  • HF/VHF/UHF
  • Reasonable cost
  • Made by one of the big 3, Icom, Kenwood or Yaesu
  • Compact as I have limited space on my desk.
  • Has to do a digital mode.

With that list, it helped me narrow down the choices. I’ve asked a few people and I’ve gotten different answers on what to get. All say to check for used equipment which is a great suggestion.

In looking at the Kenwood options, they have one current radio, the TS-2000 to consider. Unfortunately it only meets two criteria and that is made by one of the big 3 and is a HF/VHF/UHF radio. Moving onto Yaesu…Yaesu’s digital mode is System Fusion which seems proprietary to me (more so than D-Star and DMR though some argue that the encoder for D-Star is proprietary) which discounts all their radios. That leaves me with Icom.

I really like the looks of the Icom radios and they have one, the IC-7100 that meets my criteria. The radio was introduced in 2012, so it has been around awhile. Originally it cost about $1600 and now they are about $800 (with rebate). Looking for a used one shows that they are in a similar price range, so there is little reason to get a used one without a warranty.

Picking a radio was a lot easier than I thought even though I have very little knowledge of radios. I figure that the IC-7100 will be a decent entry level radio that won’t break the bank.

If anyone has thoughts about my choice, please drop me a comment!

HAM Radio in today’s world

When I was in middle school, our principal came to talk to the science club about HAM radio (yes, I was in science club). The most interesting part of his talk was when he demonstrated making a phone call via a phone patch. Since it was amateur radio, the phone call could be heard by anyone monitoring the frequency so it wasn’t a replacement for the phone. However, this made an impression on me, but not enough to get licensed.

Eleven years ago I was part of CERT (and still am) and someone offered a course to become licensed as an amateur radio operator. As the FCC had dropped the requirement for morse code for the Technician license and was dropping the requirement for the higher level classes as well, passing the test was less difficult. The question bank for all the classes is published which makes it easy to study. I passed and was issued the call sign KI6FRM. I did nothing with my license until two years ago when I was laid off from work. I had nothing to do so I decided to study for the General Class license. I spent about a month reading and studying the ARRL General Class License Manual. In addition to reading the book, I used an iOS app to take practice test after practice test until I had high confidence that I could pass. I passed and still did nothing with the license. I bought a BaoFeng BF-F8HP radio which is a cheap Chinese radio and figured out how to program it with CHIRP. I listened a bit, but never pushed the transmit button.

Fast forward another year and a half. I’ve been searching for a hobby for awhile and as I approached my 45th birthday, I realized that I’ll be “retiring” in 20 years and will have to find something to do with my time. HAM radio popped into my head and thought that I might as well try to pass the Extra Class test while my brain still worked and I could memorize the answers. I studied the ARRL Extra Class License Manual and used an iOS app by the same author as the other app (the app is functional, but not pretty). I was extremely nervous as there is a lot of material that I just couldn’t wrap my head around. While a lot of the material was familiar (I have an engineering degree and studied electronics), I didn’t know if I would be able to do it. My wife kept telling me that I had nothing to worry about; she was right, I passed on the first try and only missed 5 (you can miss 13 or 50 and pass)!

This time I’m determined to do something with my license. After my license came through the FCC, I decided to get a vanity call sign. The FCC dropped the fee for doing it a few years ago, so what did I have to lose? As an extra class operator, I had a lot more choices for call signs. Many people seem to like keeping their region in their call sign (California is region 6), but I just wanted something that sounded cool. My wife thinks that I’m a dork or a geek and keeps comparing HAM radio to CB by saying “breaker, breaker 1-9”. I’m OK with that, so I applied for and was granted KD0RK. Yup, I’m KD0RK and proud of it.

Now that I’m licensed for all amateur frequencies, I’m trying to put together all the pieces. There is a lot of information out there and a lot of different ways to use amateur radio. I’m particularly interested in emergency communications, so I’m exploring a radio (HT) to purchase and have my eye on the Icom ID-51A Plus2. This radio is a 2m/70cm radio (VHF/UHF) and only requires a technician license. I did purchase a Diamond Original X50A Antenna to help with my radio and am waiting to try it out.

My plan after getting used to local communications (through repeaters and such) is to explore HF. This is what interests me because I’ll be able to communicate without the Internet and talk to people all over the world. I read stories about HAM radio use in Puerto Rico after the hurricane and would potentially like to help out with something like that in the future. However, HF brings another aspect to the hobby that I have to learn including what antenna to get, what radio to buy, what frequencies to use, how does the weather affect propagation (yes, the manual went over this, but until it is used it is just theory), etc.

Back to the title of this article. Does HAM radio have a place in today’s society? I think it definitely has a place in emergency communication when cell phones may not be available or the circuits are simply jammed. In addition, while some think that the Internet has brought people together by always being in touch, I think written communication is less personal than voice communication. People seem to have no problem bullying others in public forums, but would likely never say what they write to someone. Is that true? I have no idea, but I’m willing to give it a try. A lot of aspects of radio communications have been replaced by the Internet, so many people don’t think it has a place. When the Internet comes crumbling down, what are we going to do? 😀

Scott

KD0RK

Review: UVC-G3-AF and UVC-NVR-2TB

[Updated 2/28: Added camera images]

As anyone that reads my blog can tell, I really like Ubiquiti networking gear. When I saw that they also had a video/NVR platform, I really wanted to try it. However, since I already had a working surveillance system, I couldn’t justify the cost to convert. Recently my father wanted a recommendation on a surveillance system and I started looking at options. There were a few complete systems at Costco, but they all received pretty mixed to poor reviews. I could point him to Nest cameras or a similar system, but each system was cloud based with a yearly fee. In addition, the cost of the cameras was a bit on the high side. With the Costco systems, I was concerned about ease of use and security of the cameras; many of the Chinese made/designed cameras have major security flaws that keep getting exposed. Securing these systems would take a lot of work and they would likely never receive firmware upgrades.

Once I added up the cost of 4 Ubiquiti UVC-G3 Cameras and a UVC-NVR, the Ubiquiti solution didn’t cost much more. The solution would have cost more, but I had a spare 8-Port UniF Switch (US-8-150W) sitting around that I gave my dad. My dad was onboard and he ordered all the components and some patch cords. We decided using 25 ft and 50 ft patch cords was easier than running structured wiring, so all we had to do was mount the cameras and string the patch cords in the attic.

I left most of the physical install to my dad and brother-in-law. Running the wires is never a straightforward task, but we got it done after a number of hours of work. We mounted the cameras so that they could be seen as I think it is a valuable deterrent.

IMG 0084

IMG 0089

While my dad doesn’t have an equipment rack like I do, his collection of equipment keeps gettin bigger!

IMG 0086

While the physical install was in process, I started the software setup and install. The initial setup was pretty straight forward. I hard reset the UniFi switch (it had my config on it) and adopted it. Then I set the switch to do 24V passive PoE (it is a UniFi switch) so that I didn’t have to use PoE adapters. Plugging in the NVR was easy and it started up without problems.

The NVR setup wizard had me setup a Ubiquiti account for my dad and then it locally discovered the NVR (using Chrome). I probably should have read the instructions, but I didn’t and had a little trouble with this. I thought that creating the Ubiquiti account would go through a process to adopt the local NVR; it really didn’t and I had to connect the NVR to my dad’s Ubiquiti account later.

Once I was able to access the NVR, it should have been a simple process to plug in each camera and adopt it. Unfortunately I didn’t read that I had to use ubnt/ubnt as the username and password. I simply left it blank and got no where. After a few resets of the camera and a web search, I properly entered the username and password and the cameras adopted without problems.

Image

Screen Shot 2018 02 18 at 11 58 26 AM

Driveway

Front

Fullscreen

After the software setup, I installed the iOS app, connected my Ubiquiti account (for testing I added a user for me) and was able to use the app to help adjust the cameras. The app needs work, but it is usable. As WiFi coverage on the outside of the house was spotty, the image kept freezing until I realized that I should just turn off WiFi and let the image stream over cellular.

Once we completed the install, I turned over the “keys” to my dad and let him configure the recording, motion detection, etc. I only gave him a basic overview as the software is pretty self explanatory which is great.

With the install completed, I decided to use the last camera for my own system and setup the UniFi video software on an Ubuntu virtual machine. The install was pretty straightforward and I decided to store the recordings on a Shared Folder (VMWare). I had to add the following to /etc/fstab:

    ./host:/ /mnt/hgfs fuse.vmhgfs-fuse allow_other,defaults,uid=109,gid=117 0 0

Where 109 and 117 are the uid and gid respectively of the unifi-video user. I also followed the instructions for installing a custom SSL certificate. I had some problems initially setting up the software as the UniFi Discovery Tool wouldn’t locate it, but after I connected directly to it instead of using https://video.ubnt.com, I was able to get it working. Will I keep it running? I still haven’t decided.

Pros

  • Unified interface for camera management including being able to change white balance, contrast, etc. on each camera.
  • Regular updates of the camera firmware and recording software.
  • A company concerned about security.
  • Free remote viewing system.
  • iOS app.
  • Decent video quality.
  • NVR is compact.

Cons

  • Remote browser viewing seems to require/prefer Chrome.
  • If you don’t already have a PoE switch, there is an extra cost involved. The 5 pack of cameras doesn’t come with PoE injectors. The PoE injectors are unwieldy if you have more than one camera as each requires an outlet.
  • Some discussion in the forums about quality of the iOS software.
  • Timeline won’t show multiple recordings at once.
  • Timeline feature needs some work.

Now that I have my dad’s whole system setup, I have to decide if it is worth replacing my 7 cameras with the UVC-G3 cameras. Since I already have a switch to power them and I’d run the software on a virtual machine, my cost is under $900. That’s a lot of money to spend when I have something that already works. I would get a better interface, easier remote viewing (right now I VPN into my home network to view the cameras), better video quality (my cameras are 720p), less concern over security issues in the cameras as Ubiquiti regularly updates the firmware and the recording software, and unified management of all the cameras (if I want to change the brightness or contrast on a camera, I have to connect directly to that camera and change the setting). However, the software I use now has a better timeline feature.

I’ll probably wait until something breaks before doing something; my system has been running (different hardware and software versions, but same cameras) for almost 5 years without a hiccup.

If you’re shopping for an NVR/camera setup, the Ubiquiti offering is interesting, but I think it needs a little work around the timeline feature and the iOS app before I can completely recommend it. While I don’t have much experience with other systems, this system takes a little technical know how as the switch has to be configured and the cameras adopted. For an installer to install this, I think it would be fine; for the average consumer I’d look elsewhere at least for now.

Cobbling Together a Home Automation System

I was introduced to home automation at a young age when my father installed an X10 system hooked to our alarm system. The basic gist of the automation was to turn on lights when we were away and to have all the lights in the house turn on if the alarm system activated. This was more than 30 years ago and was pretty simple in what he wanted to accomplish. Since then I’ve dabbled with the X10 Firecacker hooked to a Linux box, but really didn’t get serious about home automation until about four and a half years ago when we purchased our current house. We were remodeling the house we purchased, so I used the opportunity to design an automation system and briefly wrote about it.

Many lights, several outlets, and the thermostat in our house are using the ZWave protocol. This only covers part of the automation. All of the sensors (motion, window, and door) are on a standard DSC security system hooked up with an Envisalink module. The brains of the system is a VeraEdge with several third party plugins. Out of the box, the VeraEdge won’t talk to the sensors and has very basic decision making capability, so the Program Logic Event Generator plugin is needed. In addition, I put together a plugin for controlling my Russound audio distribution units that works by sending commands to a PortServer TS 4 MEI and then to the Russound’s RS-232 serial ports.

This whole system worked well for several years, but I wasn’t happy with the iOS app, so I created my own app a few years ago.

If this sounds like a lot of pieces and a lot of work, it has been a labor of love and an interesting hobby. Of course having a system working well isn’t a lot of fun if you like tinkering! When I received my first Amazon Echo two years ago, I was intrigued by the ability to control things by voice. My Vera (at the time) had no integration with the Echo, so I turned to a third party solution called HA Bridge by BWS Systems. It required more setup, but exposed scenes and devices so that they could be controlled by the Echo. (Vera now has native Echo support, but the way it is setup creates a delay in the response so I continue to use HA Bridge.) The new Routines in the Amazon Echo like adding one for “Good night” are an excellent addition, but has me scratching my head on if I should set that kind of thing up on the Echo, use the Vera natively, or use HA Bridge.

As an Apple fan, you’ll probably notice that I haven’t mentioned HomeKit, yet. HomeKit has been interesting, but due to the lack of interoperable components and hackability, I’ve pretty much ignored it. Some enterprising developers have created Homebridge which I’ve also setup. Why HomeKit and Echo support? Simple, with the HomeKit app on iOS 11 and the widget, I can easily turn lights on or off right from my iPad without switching to my app and without having to yell at the Echo. In addition, this allows me to control lights with my Apple Watch. I run HA Bridge and Homebridge on a Raspberry Pi so that it can easily sit on my IoT VLAN (I separate out IoT traffic from my main network).

This automation setup has been about 5 years in the making and I’m sure I’m not completely done with it. I keep looking at ways to simplify it with different components like maybe a new hub or new switches. However, every time I start looking into it I realize that I’d lose functionality. My wife tolerates my hobby and kind of likes some of the aspects of it as she warms up to them. Changing anything would be a change for the worse.

The more time and effort I put into my automation system, the more I realize that turnkey home automation is still a pipe dream. If someone has very simple needs then maybe he or she can get away with one system. The moment you want a choice in your components or want to do something that the major companies that do automation don’t want you to do, you have to either give up or cobble together a system.

Products used in my system:

Hardware

  • VeraEdge – main automation hub
  • DSC alarm system
  • Envisalink – alarm system to network
  • PortServer TS 4 MEI
  • Russound audio distribution units (no longer made) with RS-232 ports
  • Squeezebox audio units (no longer made)
  • Raspberry Pi for running Homebridge and HA Bridge
  • Amazon Echo
  • iPad/iPhone/Apple Watch

Software

Feel free to ask questions about my system. I’m always open to ideas and will keep actively exploring ways to improve my life through automation!

Setting up a UniFi Security Gateway for an On Demand iOS VPN

[UPDATE – 18 May 2020] In some recent iOS update (not sure which), certificates are no longer required to have an on demand VPN work. So I switched to using the built in L2TP VPN in the USG which requires very little configuration. My VPN profile has also changed and can be found here. This profile does on demand like before, but also automatically connects if something on my phone tries to access certain internal resources (I have AdGuard setup to handle DNS on my network). I use this for connecting to Home Assistant without port forwarding or anything like that.

[UPDATE – 06 Feb 2019] With the latest release of the OpenVPN app, the identifier has changed from net.openvpn.OpenVPN-Connect.vpnplugin to net.openvpn.connect.app. Without this change, the VPN profile will NOT work.

Following up on my widely popular post about Setting up an EdgeRouter Lite for an On Demand iOS VPN, I’ve decided to write about the same procedure, but on a Ubiquiti UniFi Security Gateway. Much of the procedure is the same, but for completeness I’ll include all the steps here.

An on demand VPN will automatically fire up when you’re on certain WiFi networks and under certain circumstances. This is quite useful if you use unknown WiFi networks and are concerned about security (you should be!).

This is a really long setup, but it is straightforward. If you’re intimidated by command lines and editing text files, this process is not for you!

Certificate Setup

  1. SSH into the USG. You’ll use the same username and password for connecting to the UniFi Controller.
  2. Setup a new certificate authority that will be used to create new client certificates for the VPN. Issue the following commands, one per line. Follow the prompts when you run the commands.
    configure
    sudo su
    cd /usr/lib/ssl/misc/
    ./CA.sh -newca
    
  3. Create a new server certificate and sign it. Follow the prompts when you run the commands; you’ll need to enter a password for the new request. We’ll remove it in another step.
    ./CA.sh -newreq
    ./CA.sh -sign
    
  4. Copy the certificate authority key and certificate to an area of the router that will survive a firmware upgrade.
    cp demoCA/cacert.pem demoCA/private/cakey.pem /config/auth/
    
  5. Also copy the server certificate to the same place.
    mv newcert.pem /config/auth/server.pem
    
  6. Display the certificate authority certificate using cat /config/auth/cacert.pem and then copy it into BBEdit or another text editor on your local computer; save it to your hard drive.

  7. Remove the password on the private key for the server so that the VPN server can start automatically.

    openssl pkcs8 -in newkey.pem -out /config/auth/server-pem.key
    
  8. Generate the Diffie-Hellman Paramters; this takes a long time.
    openssl dhparam -out /config/auth/dhp.pem -2 1024
    
  9. The next part is generating the client certificates. The recommendation is to have 1 client certificate per client. However, this would require me to have 1 for my iPad and 1 for my iPhone complicating setup. While having 1 certificate for both may not be recommended, it is the route I chose. When prompted, enter a password for the new key and then the last line will remove it. Don’t enter a challenge password.
    ./CA.sh -newreq
    ./CA.sh -sign
    mv newcert.pem client-cert.pem
    openssl pkcs8 -in newkey.pem -out client-key.pem
    
  10. Display the certificate using cat client-cert.pem and past it into BBEdit and then saved it.

  11. Do the same thing with the key using cat client-key.pem and saved it to my Mac.
  12. On my Mac, do the following in Terminal (make sure you’re in the same directory as where you saved the certificate and key). When exporting, set a password that you’ll use later.

    openssl pkcs12 -export -out client1.p12 -inkey client-key.pem  -in client-cert.pem
    

Note that the /config directory survives firmware upgrades. If you need to add client certificates later and the certificate authority you created is gone, you may have to start the setup over.

OpenVPN Server Setup

  1. Create a file called config.gateway.json and place it in the data directory for your UniFi Controller. I run my controller on a Mac and the path is ~/Library/Application Support/UniFi/data/sites/default. It should basically be as shown below. You’ll want to configure the OpenVPN network (10.0.5.0/24) if you use a different numbering scheme; this cannot be a network defined in the UniFi Controller. You should also change the DNS to servers you use. I don’t know if the push-route commands are absolutely necessary, but I put them in anyway as they appear to work.
    {
      "firewall": {
        "group": {
          "network-group": {
            "open_vpn_network": {
              "description": "OpenVPN Network",
              "network": [
                "10.0.5.0/24"
              ]
            }
          }
        }
      },
      "interfaces": {
        "openvpn": {
          "vtun0": {
            "local-port": "1194",
            "mode": "server",
            "openvpn-option": [
              "--comp-lzo",
              "--push redirect-gateway",
              "--push dhcp-option DNS 10.0.1.2",
              "--push dhcp-option DNS 10.0.1.1",
              "--duplicate-cn"
            ],
            "server": {
              "push-route": [
                "10.0.1.0/24",
                "10.0.5.0/24",
                "10.0.0.0/16"
              ],
              "subnet": "10.0.5.0/24"
            },
            "tls": {
              "ca-cert-file": "/config/auth/cacert.pem",
              "cert-file": "/config/auth/server.pem",
              "dh-file": "/config/auth/dhp.pem",
              "key-file": "/config/auth/server-pem.key"
            }
          }
        }
      },
      "service": {
        "nat": {
          "rule": {
            "7000": {
              "description": "OpenVPN to WAN",
              "log": "disable",
              "outbound-interface": "eth0",
              "protocol": "all",
              "source": {
                "group": {
                  "network-group": "open_vpn_network"
                }
              },
              "type": "masquerade"
            }
          }
        }
      }
    }
    
  2. Force a reprovision of the USG by selecting the USG, then clicking on the Config tab.

    Reprovision

  3. On the UniFi Controller, click on Settings and then Routing & Firewall.
  4. Click on Firewall at the top.
  5. Click Groups and add an OpenVPN port group.

    Screen Shot 2018 02 09 at 1 18 49 PM
  6. Switch over to Rules and setup an OpenVPN rule.

    OpenVPN Firewall
    Good work if you’ve followed along this far! Next up is the client setup which has a bunch of steps as well.

iOS Client Setup

  1. Locate the p12 file that you created on your Mac.
  2. Download Apple Configurator from the Mac App Store.
  3. Select New Profile from the File menu.

    New Profile

  4. Fill out the General information for the profile. You can leave the Identifier as is.
    General

  5. Click on Certificates and then press Configure. Select the .p12 file you created way back in the first part of the instructions.
    Select Certificate
  6. Give the certificate a name and enter the password you used when exporting the p12 file.
    Certificate Selected
  7. Select the VPN section and click Configure.
    Configure VPN

  8. Enter a name for the connection.

  9. Select Custom SSL for the Connection Type.
  10. Enter net.openvpn.connect.app for Identifier.
  11. Enter the hostname for the Server. I recommend your Dynamic DNS hostname here.
  12. Enter some username for the account; it won’t be used.
  13. Enter a placeholder key/value pair. You’ll edit this by hand later.
  14. Select Certificate for User Authentication and then pick the certificate you added earlier.
  15. Enable VPN On Demand. You’ll hand edit this later as well.
  16. Select a Disconnect on Idle value; I selected Never.
  17. Save the profile to your Desktop (or somewhere else). Don’t sign it as signing it will prevent you from editing it by hand which is needed to properly setup the VPN On Demand. Configurator doesn’t handle all the options present in current iOS versions.
    VPN Setup
  18. Open the .mobileconfig file in BBEdit. BTW, if you haven’t bought BBEdit, you should definitely buy it. While the current version offers basic functionality for free, this is a tool that should always remain in your tool belt.
  19. Look at the section called VPN. Mine is basically below. You’ll need to change a few entries.

        <key>VPN</key>
        <dict>
            <key>AuthName</key>
            <string>scott</string>
            <key>AuthenticationMethod</key>
            <string>Certificate</string>
            <key>DisconnectOnIdle</key>
            <integer>0</integer>
            <key>OnDemandEnabled</key>
            <integer>1</integer>
            <key>OnDemandRules</key>
            <array>
                <dict>
                    <key>Action</key>
                    <string>Disconnect</string>
                    <key>SSIDMatch</key>
                    <array>
                        <string>My Network 5 GHz</string>
                        <string>My Network</string>
                    </array>
                </dict>
                <dict>
                    <key>Action</key>
                    <string>Disconnect</string>
                    <key>InterfaceTypeMatch</key>
                    <string>Cellular</string>
                </dict>
                <dict>
                    <key>Action</key>
                    <string>Connect</string>
                    <key>InterfaceTypeMatch</key>
                    <string>WiFi</string>
                </dict>
                <dict>
                    <key>Action</key>
                    <string>Ignore</string>
                </dict>
            </array>
            <key>PayloadCertificateUUID</key>
            <string>SOME_IDENTIFER</string>
            <key>RemoteAddress</key>
            <string>vpn.example.com</string>
        </dict>
        <key>VPNSubType</key>
        <string>net.openvpn.OpenVPN-Connect.vpnplugin</string>
        <key>VPNType</key>
        <string>VPN</string>
        <key>VendorConfig</key>
        <dict>
            <key>dev</key>
            <string>tun</string>
            <key>proto</key>
            <string>udp</string>
            <key>remote</key>
            <string>vpn.example.com 1194</string>
            <key>cipher</key>
            <string>BF-CBC</string>
            <key>resolv-retry</key>
            <string>infinite</string>
            <key>nobind</key>
            <string>NOARGS</string>
            <key>persist-key</key>
            <string>NOARGS</string>
            <key>persist-tun</key>
            <string>NOARGS</string>
            <key>comp-lzo</key>
            <string>NOARGS</string>
            <key>link-mtu</key>
            <string>1542</string>
            <key>ca</key>
            <string>-----BEGIN CERTIFICATE-----\nMIID...bAqZZCQYgHwAh9bW\n-----END CERTIFICATE-----\n</string>
        </dict>
    </dict>
    
  20. Change the vpn.example.com references to your VPN address.

  21. For the section that starts with BEGIN CERTIFICATE for the ca, find the cacert.pem that you saved to your hard drive. Open that in BBEdit and remove all the returns in the file. After the first line replace the return with \n. Before the last line put a \n and then another one after the line. You should end up with a big long line!
  22. The OnDemandRules are described in Apple’s documentation. My setup basically says that if I’m on a trusted network, disconnect the VPN. When on cellular, also disconnect the VPN (I trust the cellular network for now). If I’m on any other network, connect the VPN. The last item just falls through, but I suspect it will never get there. In my example, change the names of the trusted SSIDs.
  23. The VendorConfig section are the OpenVPN options that should match the server.
  24. Save the file.
  25. Transfer the .mobileconfig file to your iOS device. I drop the file on AirDrop to my devices. If the formatting of the file is correct, the iOS device will ask you to install the file.
  26. In the VPN section in iOS Settings, Connect and cross your fingers. That’s it! Now when you wonder onto an unknown WiFi network, the VPN should automatically connect. It may take a few seconds for the connection to come up.

If you’ve made it this far, congratulations! I spent a few days working on this and hopefully I captured all the steps. Please send me corrections or feedback.

Notes

  1. I’ve noticed that sometimes iOS connects to my VPN even when it is on my network. The On Demand connection is evaluated when the network changes and I suspect iOS gets confused and starts evaluating the On Demand rules prior to getting an SSID.
  2. The default certificates are good for 1 year. So you’ll need to renew then after a year. I’ll cross that bridge when I come to it.
  3. If the certificate is compromised, I don’t know how to do certificate revocations.
  4. Treat the certificate and keys just as if they were passwords. This goes for the .mobileconfig file as well. The mobileconfig file has the password to the p12 file in clear text and anyone with that file can connect to your VPN and access your network.
  5. The OnDemand rules are evaluated when the device changes networks and may take a few seconds to bring up the VPN. I always wait for the VPN icon to come up before doing anything on my device.
  6. OpenVPN runs on UDP port 1194 by default. You can configure it for TCP 443, but I won’t go into that because it seems like a pain and requires more changes.
  7. In the latest iOS version (11.2.x), if your VPN is on demand, you cannot manually connect with it. You have to go into iOS Settings->General->VPN, tap the Info button next to the VPN and turn off “Connect On Demand”.
  8. Savvy readers will notice that I put the client certificate as a p12 file in the mobileconfig file and put it in the OpenVPN specific settings. There appears to have been a change to the OpenVPN client on iOS where the p12 certificate no longer works. You may be able to remove the certificate from the configuration, but I left it.

Preserving Metadata in Photos

During my recent task of scanning the rest of the photos that I had lying around, I found a CD that my parents had made with some photos on it. They burned it using iPhoto 6 (burning a CD was a feature of iPhoto years ago). I thought that I’d just be able to put the CD in and open the library in Photos with all the metadata preserved. Unfortunately Photos couldn’t read the library, so I was stuck with a bunch of JPEGs that had no metadata on them and the file dates aren’t the actual dates of the pictures. While I was able to drag all the pictures into Photos, I really would have preferred that the metadata be attached to the photos.

Apple has taken the approach that the original photos should not be modified and that any changes like the date or metadata should be stored in a database. This is great as long as the database doesn’t become corrupted and the application remains supported. I encountered the same type of issue when I was developing Paperless where I was allowing users to add a bunch of metadata to PDFs and I stored it in a database. Unlike Apple, I realized pretty quickly that if something happened to the database, I stopped supporting the application, or a user wanted to switch to another application, I wanted users to still have all the metadata associated with the PDFs. I discovered that PDFs can have keywords attached to them and I used this mechanism to write the data directly into the PDFs.

With Photos, if you drag a photo out of it and into the Finder, you get a copy of the original photo with none of the metadata that you enter in Photos attached to it. However, if you choose to export the photo there is an option to include the metadata which writes it as EXIF to the photo.

Screen Shot 2017 12 19 at 9 06 19 AM

This was the key to my concern about having the metadata in the photos themselves. I created a smart album which contained all photos that didn’t have a camera set on them (the assumption is that all photos that have the camera set in the EXIF have the correct photo date), exported all the photos, deleted the photos in Photos and re-imported them. Somewhat roundabout way to accomplish what I wanted, but my photos now have dates on them that will survive if Photos ever goes belly up.