Setting up an EdgeRouter Lite for an On Demand iOS VPN
Ever since I started my career, I've used Virtual Private Networks (VPN) to connect to a company network. My first experience is with AppleTalk Remote Access and I thought it was neat to be able to have my home computer on the work network. Over my career, I've used VPNs mostly as a user as I had no use for one as a home user.
When I setup cameras at my house over 3 years ago, I wanted to remotely connect to the cameras. Since I put together my own system, there wasn't an out of the box way to view the cameras (it does have a web interface, but I didn't want to directly expose that to the world). This gave me the first experience in setting up a VPN. I turned on Mac OS X Server's VPN, configured my iOS devices for the VPN and I was easily able to connect.
Recently I've been working with mobile device management (MDM) and one of the features that I've been reading about is on-demand VPN. I became curious about it and wanted to see if I could set it up more of an exercise than anything else, but also it would be useful to hop on any WiFi network and automatically connect to my home network. The iOS on-demand VPN requires that the VPN use certificate authentication instead of just a username and password. Unfortunately, the OS X Server's L2TP IPSec VPN doesn't support certificates, so I had to look to other options. Luckily, my EdgeRouter Lite can be configured as an OpenVPN server with certificate authentication. Given that, the only obstacle to setting this up was time and some futzing to get things right. I've scoured the web and managed to find the pieces to get things working.
The rest of this entry will document how to setup the server as well as the iOS client side. For the server setup, I followed this article, but had to make a few changes to get things to work the way I wanted. I then used another article to setup the iOS side.
This is a really long setup, but it is straightforward. If you're intimidated by command lines and editing text files, this process is not for you!
Certificate Setup
- SSH into the EdgeRouter Lite
- Setup a new certificate authority that will be used to create new client certificates for the VPN. Issue the following commands, one per line. Follow the prompts when you run the commands.
configure sudo su cd /usr/lib/ssl/misc/ ./CA.sh -newca - Create a new server certificate and sign it. Follow the prompts when you run the commands; you'll need to enter a password for the new request. We'll remove it in another step.
./CA.sh -newreq ./CA.sh -sign - Copy the certificate authority key and certificate to an area of the router that will survive a firmware upgrade.
cp demoCA/cacert.pem demoCA/private/cakey.pem /config/auth/ - Also copy the server certificate to the same place.
mv newcert.pem /config/auth/server.pem - Display the certificate authority certificate using
cat /config/auth/cacert.pemand then copy it into BBEdit or another text editor on your local computer; save it to your hard drive. -
Remove the password on the private key for the server so that the VPN server can start automatically.
openssl pkcs8 -in newkey.pem -out /config/auth/server-pem.key - Generate the Diffie-Hellman Paramters; this takes a long time.
openssl dhparam -out /config/auth/dhp.pem -2 1024 cp dhp.pem /config/auth - The next part is generating the client certificates. The recommendation is to have 1 client certificate per client. However, this would require me to have 1 for my iPad and 1 for my iPhone complicating setup. While having 1 certificate for both may not be recommended, it is the route I chose. When prompted, enter a password for the new key and then the last line will remove it. Don't enter a challenge password.
./CA.sh -newreq ./CA.sh -sign mv newcert.pem client-cert.pem openssl pkcs8 -in newkey.pem -out client-key.pem - Display the certificate using
cat client-cert.pemand past it into BBEdit and then saved it. - Do the same thing with the key using
cat client-key.pemand saved it to my Mac. -
On my Mac, do the following in Terminal (make sure you're in the same directory as where you saved the certificate and key). When exporting, set a password that you'll use later.
openssl pkcs12 -export -out client1.p12 -inkey client-key.pem -in client-cert.pem
OpenVPN Server Setup
- SSH into the EdgeRouter Lite if you haven't already.
- Exit out of sudo mode using
exitif you're still using the same session as before. - Enter configuration mode:
configure - Start editing the VPN tunnel (I didn't know that by entering a full path to an object, you didn't have to enter a full command for subsequent items):
edit interfaces openvpn vtun0 - Setup the server.
set mode server set local-port 1194 - Select a subnet. Choose a subnet that doesn't overlap with other subnets on your LAN. Notes have also indicated that you should pick an IP range that isn't used on other networks as you could have routing problems, but I'm not completely positive that is true. If you're routing everything over the VPN, the device should use that route first.
set server subnet 10.0.20.0/24 - Configure the TLS parameters
set tls ca-cert-file /config/auth/cacert.pem set tls cert-file /config/auth/server.pem set tls key-file /config/auth/server-pem.key set tls dh-file /config/auth/dhp.pem - The notes indicate for EdgeMax 1.8 firmware and higher, you can turn on IPv6 support. I'm not running that, yet, so I didn't do this.
set protocol udp6 - For my purposes, I want all the traffic to go over the VPN. I'm not sure if the second line is strictly needed.
set openvpn-option "--push redirect-gateway" set server push-route 10.0.1.0/24 - Since I run Pi-hole for blacklisting advertising, I want to continue to do that even when connected to my VPN. (Yes, I know websites make money off the ads, but the ads really need to get better and more relevant before I'll turn this off.) I set my DNS to the same entries that I set on the EdgeRouter's DHCP server.
set openvpn-option "--push dhcp-option DNS 10.0.1.2" set openvpn-option "--push dhcp-option DNS 10.0.1.1" - Now a few extra OpenVPN options. I allow the same certificate to be used by multiple clients, so I have that option as well as one to enable compression.
set openvpn-option --comp-lzo set openvpn-option --duplicate-cn - Next up are the firewall rules to allow clients to connect from the outside to the EdgeRouter Lite.
top edit firewall name WAN_LOCAL set rule 4 action accept set rule 4 description “OpenVPN” set rule 4 destination port 1194 set rule 4 protocol tcp_udp set rule 4 log disable - If you have an IPv6 firewall, you might add something like this.
top edit firewall name WANv6_LOCAL set rule 4 action accept set rule 4 description “OpenVPN” set rule 4 destination port 1194 set rule 4 protocol tcp_udp set rule 4 log disable - That's it for the server setup! Finally do:
commit save exit - Check that the OpenVPN server is running using:
ps -ef | grep openvpn
show openvpn server status
The last line can be used when clients are connected to monitor it.
Good work if you've followed along this far! Next up is the client setup which has a bunch of steps as well.
iOS Client Setup
- Locate the p12 file that you created on your Mac.
- Download Apple Configurator from the Mac App Store.
- Select New Profile from the File menu.

-
Fill out the General information for the profile. You can leave the Identifier as is.

- Click on Certificates and then press Configure. Select the .p12 file you created way back in the first part of the instructions.

- Give the certificate a name and enter the password you used when exporting the p12 file.

-
Select the VPN section and click Configure.

-
Enter a name for the connection.
- Select Custom SSL for the Connection Type.
- Enter
net.openvpn.OpenVPN-Connect.vpnpluginfor Identifier. - Enter the hostname for the Server. I recommend your Dynamic DNS hostname here. I wouldn't recommend a CNAME as I'll explain later.
- Enter some username for the account; it won't be used.
- Enter a placeholder key/value pair. You'll edit this by hand later.
- Select Certificate for User Authentication and then pick the certificate you added earlier.
- Enable VPN On Demand. You'll hand edit this later as well.
- Select a Disconnect on Idle value; I selected Never.
- Save the profile to your Desktop (or somewhere else). Don't sign it as signing it will prevent you from editing it by hand which is needed to properly setup the VPN On Demand. Configurator doesn't handle all the options present in current iOS versions.

- Open the .mobileconfig file in BBEdit. BTW, if you haven't bought BBEdit, you should definitely buy it. While the current version offers basic functionality for free, this is a tool that should always remain in your tool belt.
-
Look at the section called VPN. Mine is basically below. You'll need to change a few entries.
VPN AuthName scott AuthenticationMethod Certificate DisconnectOnIdle 0 OnDemandEnabled 1 OnDemandRules Action Disconnect SSIDMatch My Network 5 GHz My Network Action Disconnect InterfaceTypeMatch Cellular Action Connect InterfaceTypeMatch WiFi Action Ignore PayloadCertificateUUID SOME_IDENTIFER_REPLACE_WITH_WHAT_YOU_HAVE RemoteAddress vpn.example.com VPNSubType net.openvpn.OpenVPN-Connect.vpnplugin VPNType VPN VendorConfig dev tun proto udp remote vpn.example.com 1194 cipher BF-CBC resolv-retry infinite nobind NOARGS persist-key NOARGS persist-tun NOARGS comp-lzo NOARGS link-mtu 1542 ca -----BEGIN CERTIFICATE-----\nMIID...bAqZZCQYgHwAh9bW\n-----END CERTIFICATE-----\n cert -----BEGIN CERTIFICATE-----\nMIID...1jCCAr6gAwIBAgIBC\n-----END CERTIFICATE-----\n key -----BEGIN RSA PRIVATE KEY——\nMIIG4wIBAAKCAYEA...psUtuM+qAfu\n-----END RSA PRIVATE KEY-----\n - Change the
PayloadCertificateUUIDto whatever is already in your config file. - Change the vpn.example.com references to your VPN address.
- For the section that starts with
BEGIN CERTIFICATEfor theca, find the cacert.pem that you saved to your hard drive. Open that in BBEdit and remove all the returns in the file. After the first line replace the return with \n. Before the last line put a \n and then another one after the line. You should end up with a big long line! - For the
cert, repeat the above using the client-cert.pem from earlier. - For the
key, repeat the above using the client-key.pem from earlier. - The OnDemandRules are described in Apple's documentation. My setup basically says that if I'm on a trusted network, disconnect the VPN. When on cellular, also disconnect the VPN (I trust the cellular network for now). If I'm on any other network, connect the VPN. The last item just falls through, but I suspect it will never get there. In my example, change the names of the trusted SSIDs.
- The VendorConfig section are the OpenVPN options that should match the server.
- Save the file.
- Transfer the .mobileconfig file to your iOS device. I drop the file on AirDrop to my devices. If the formatting of the file is correct, the iOS device will ask you to install the file.
- In the VPN section in iOS Settings, Connect and cross your fingers. That's it! Now when you wonder onto an unknown WiFi network, the VPN should automatically connect. It may take a few seconds for the connection to come up.
If you've made it this far, congratulations! I spent a few days working on this and hopefully I captured all the steps. Please send me corrections or feedback.
Notes
- I mentioned earlier that a CNAME entry for my VPN server caused a problem and that is because if I'm connecting from inside my firewall (yes, I know it isn't needed), the client tries to go to the external IP address. By using an A DNS entry and doing the following on the EdgeRouter Lite:
configure
set system static-host-mapping host-name vpn.example.com inet 10.0.1.1
commit
save
You can have your client connect to the VPN from inside the firewall. This is useful if iOS gets confused and wants to connect to the VPN when it shouldn't.
-
I've noticed that sometimes iOS connects to my VPN even when it is on my network. The On Demand connection is evaluated when the network changes and I suspect iOS gets confused and starts evaluating the On Demand rules prior to getting an SSID. This isn't a big deal as my clients can connect to the VPN even on my own network.
- The default certificates are good for 1 year. So you'll need to renew then after a year. I'll cross that bridge when I come to it.
- If the certificate is compromised, I don't know how to do certificate revocations.
- Treat the certificate and keys just as if they were passwords. This goes for the .mobileconfig file as well. The mobileconfig file has the password to the p12 file in clear text and anyone with that file can connect to your VPN and access your network.
- The OnDemand rules are evaluated when the device changes networks and may take a few seconds to bring up the VPN. I always wait for the VPN icon to come up before doing anything on my device.
- OpenVPN runs on UDP port 1194 by default. You can configure it for TCP 443, but I won't go into that because it seems like a pain and requires more changes.
Comments
Unfortunately, it looks like Apple has pulled native OpenVPN support from iOS10; it tells you to use the app.
iOS 10 never had native OpenVPN support. With the configuration I’ve outlined, you just have to have the OpenVPN app installed (it’s actually pretty awful), but never have to touch it. You turn the VPN on or off via the iOS settings. (I just double checked on my iPad and nothing has changed.)
Hope that helps.
Huh, OK - thanks!
Thanks for this. Thought I’d pass along a couple things I ran into:
1) On my ER Lite ‘show openvpn server status’ did not work, it is ‘show openvpn status server’
2) OpenVPN did not like it when I jammed the certificate together with \n only after the certificate delimiters. Tried it again replacing all newlines with \n and OpenVPN was happy.
3) I needed ‘set service dns forwarding listen-on vtun0’ to get DNS working.
Thanks for the tips! It appears that I have #3 in my config, but I suspect that I put that in via the GUI.
I’m switching over to a USG soon and we’ll see how easily all this transfer over. (Yes, the USG is basically identical to the ERL, but having all my network configuration in one place will make it a little easier to manage.)
Just to clarify, by “OpenVPN app” are you referring to “OpenVPN Connect”? If yes, then is your “iOS Client Setup” in addition to the iOS OpenVPN Connect setup ?
Yes, it is OpenVPN Connect. My iOS Client setup replaces the iOS OpenVPN Connect setup; the profile has all of the setup in it. You never have to open the OpenVPN Connect app on iOS.
Thanks Scott. Could you help me understand how your “on-demand” client compares to the OpenVPN Connect client. Does the OpenVPN Connect client not support “On-Demand”? (excuse my ignorance).
By “On-Demand” do you mean the VPN connection is automatically established by the iOS client when a WiFi connection (or mobile broadband data connection) is established? I assume VPN login credentials are still required.
Hi Rob,
What I’ve described isn’t a standalone iOS VPN client; it uses the OpenVPN Connect client. iOS VPN clients don’t support on-demand connections without a profile as I’ve described as they need rules on when to connect.
On-Demand means that the VPN client connects when certain criteria is met. In my case, the criteria is that I connect to unknown WiFi networks. VPN credentials are definitely required. However, you must use certificate based authentication and not username/password authentication.
I hope that helps.
Scott,
Crystal clear. Thanks!
Does the On Demand work with your new USG the same as it works here? How is setting up the USG for a VPN compared to the ERL? I have a ERL now and just looking to possibly get a USG to replace it because I also have a UNI16-150 for running my security cameras and like the tighter integration and being able to see both in the GUI.
Hi Darren,
The On Demand VPN works similarly in the USG as the ERL. I followed my guide as well as the information here to configure the USG.
Having one interface for viewing my whole network is pretty nice and at this point, I see no reason to prefer the ERL over the USG.
Good luck!
Great, Thanks! Have you ever tried or have any thought on the USG-Pro vs the standard USG? I do have a rack mounted set up in a closet and I like that the pro is rack mountable but not sure the cost is worth it for an extra port and more CPU power…
Hi Darren,
While I would prefer to have my USG rack mounted, the USG Pro is completely overkill for my home setup. I’ve also read that its fans are quite noisy. The only piece of equipment that makes significant noise in my rack are the 3 hard drives I have in a case; the switches are silent and the fan on my Mac Pro is pretty quiet. I wouldn’t want to give up the relative quiet just to rack mount the USG.
I’m going to wait until the USG variant of the EdgeRouter 4 comes out before swapping out my USG. It is fanless and has an option for rack mounting it.
I’ve heard about new USG products coming out for a bit. Do you have any idea of an ETA on those products?
Thanks for all the info as usual!!
While I’d love to be in the know about new products, I have no information more than what I read in the forums, At this point, I’m not sure what a new router would do for me as Ubiquiti keeps improving the controller and those updates support the current USG.
Hey Scott, So I got a USG and I really like it. I set up a radius server vpn and I can get in from outside my network but not sure how secure that is and I’d prefer setting up the on demand like above. How much of your guide did you use and how much of the link?
I set up the certificates using your guide but the firewall rules using the link. I removed the “returns” in the certificate and also tried using \n for each line break like one of the comments mentioned. It either connects and then disconnects or just sits there and tries connecting depending on which way I tried… Not sure what I’m missing or where I should start over from…
Thanks Darren
Hi Darren,
Unfortunately I can’t remember what I used from my guide and the link. I believe I mostly used the link. You’ll want to check the logs on the USG to see why the connection is failing. Starting over using just the link is probably a good start. If you can get OpenVPN to connect, then you can move into the iOS profile stuff if you like.
OK, I am successfully connecting via OpenVPN now. I would love to dial in the on demand part. I’m getting a little lost in creating the .p12.
In my keys folder I have a client1.key, client1.csr, and client1.crt. it also created a .pem file for each client I created I think. ( They are just called 01.pem, 02.pem, etc)
I used the client1.key and client1.crt for the part you listed as: openssl pkcs12 -export -out client1.p12 -inkey client-key.pem -in client-cert.pem
and changed it to: openssl pkcs12 -export -out client1.p12 -inkey client1.key -in client1.crt
Is that correct because the mobileconfig file it created has some different things in it that come after your example listed in this blog.
Thank you!!
Hi Darren,
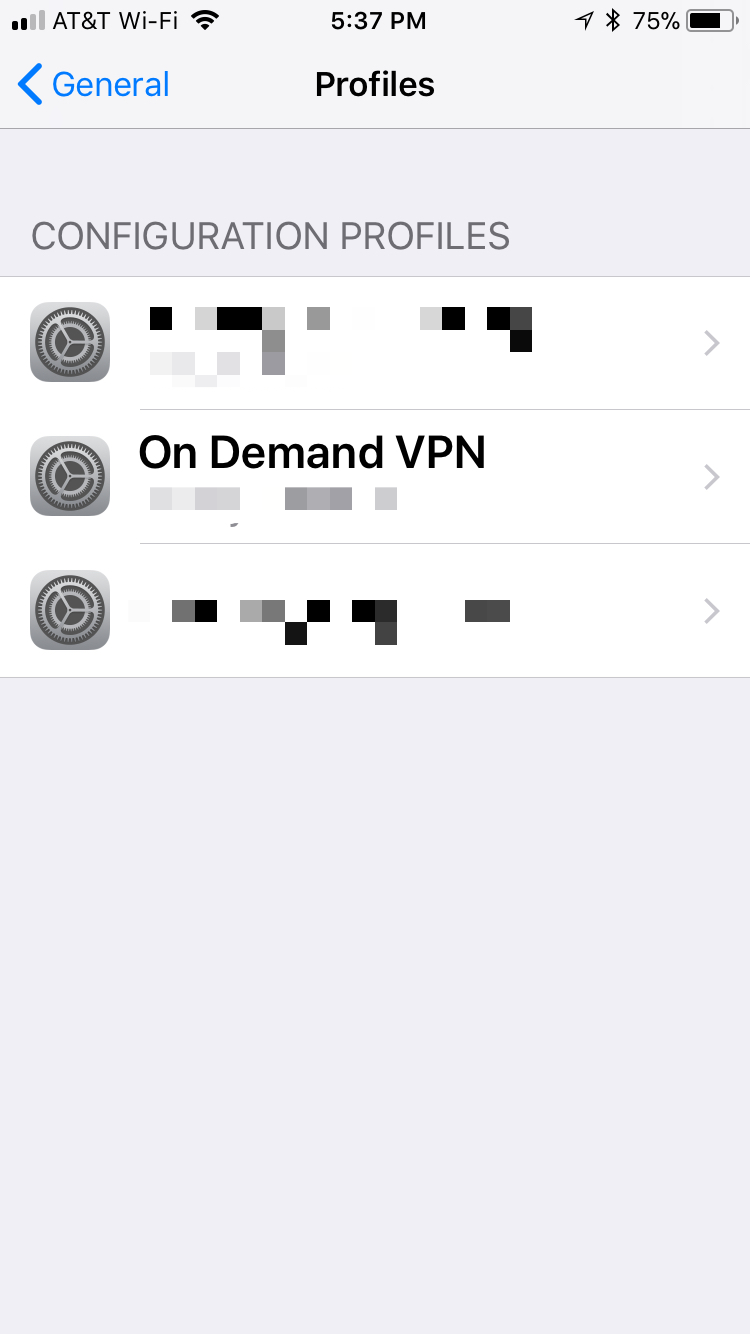
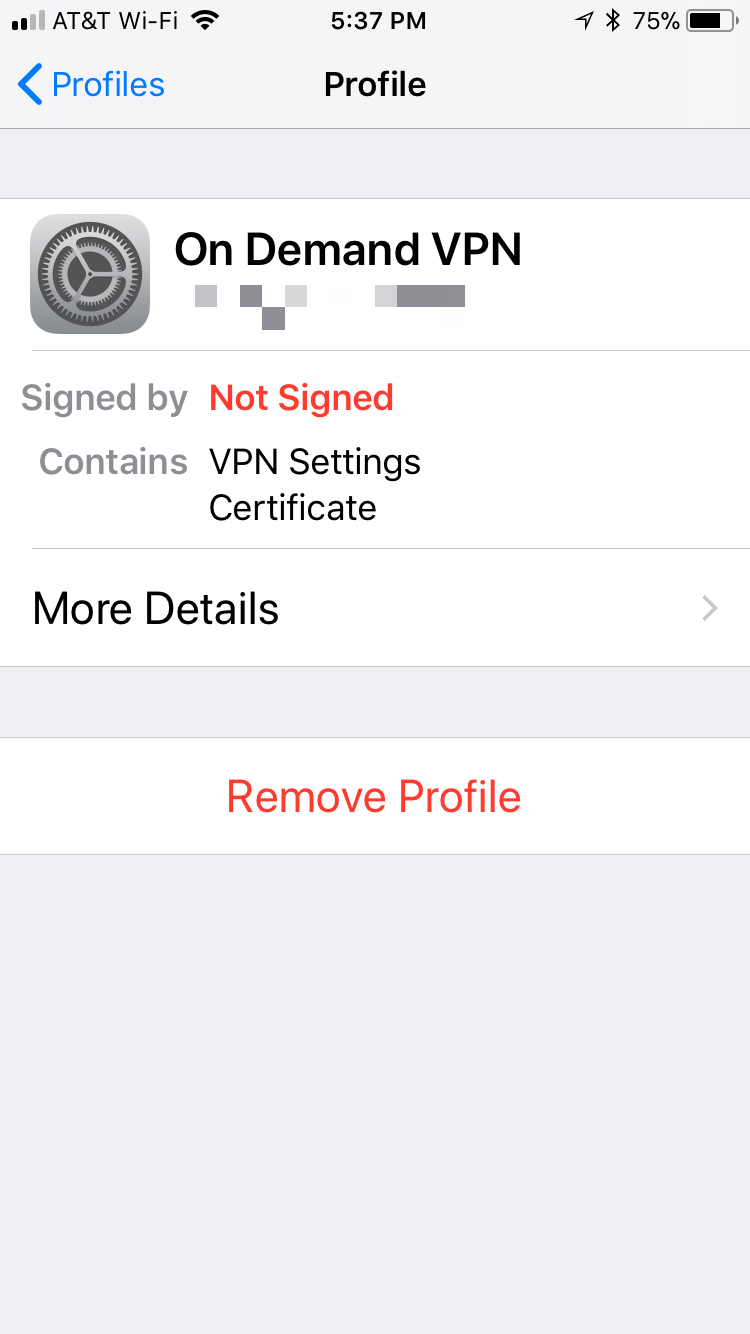
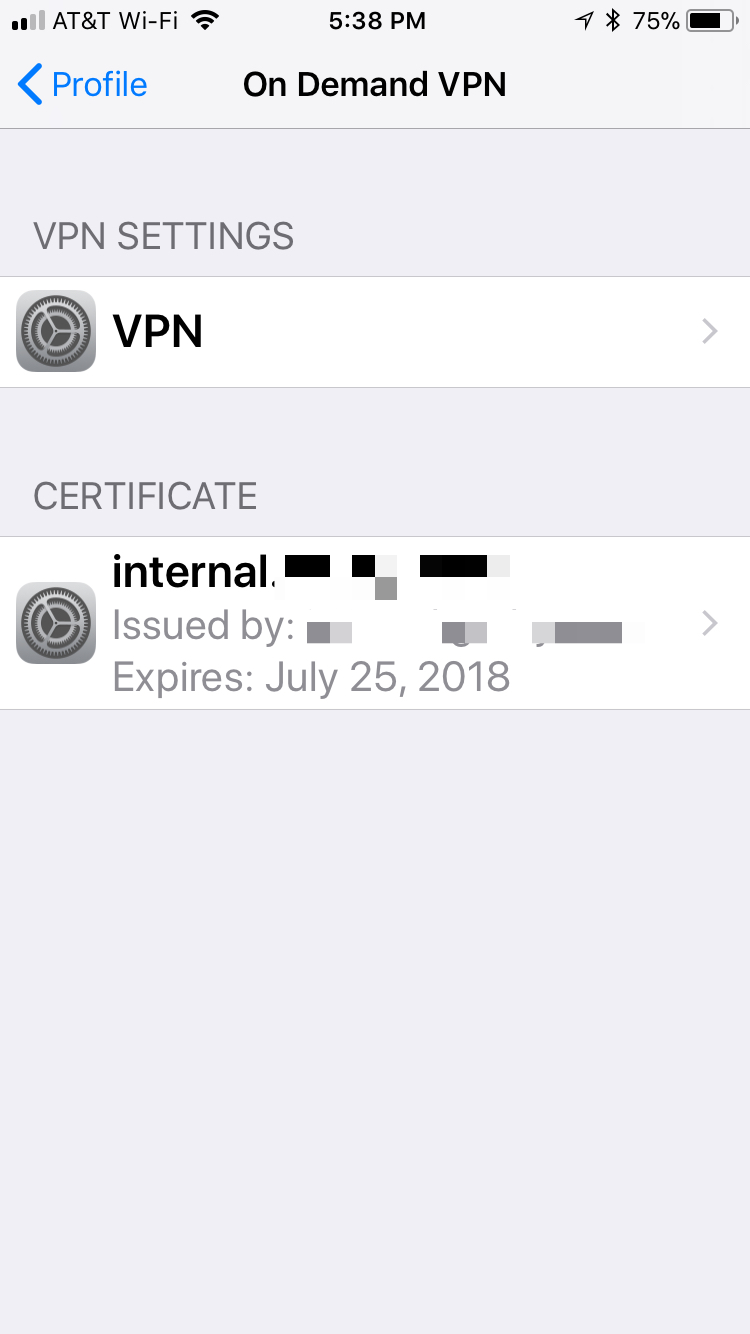
I thinkyour changes look correct, but I haven’t touched this in awhile. The mobileconfig file that Configurator creates will likely be slightly different than I posted. When you send the mobileconfig file to the iOS device, it will ask you for your password and install the certificate. You can then view the certificate in iOS profiles. The images below give you an example of what you will have.
While the on demand works well, I rarely use it as I now use a mobile hotspot. In addition, with iOS 11 a change was made such that if a profile is On Demand, you can’t connect to the VPN manually. This causes me to disable On Demand and connect manually.
Good to know. The main reason I was going for the on demand feature is I use Blue Iris on a PC for surveillance and it has geofencing capabilities. I was trying to have it change profiles when I came home or left. Since everything on the surveillance network is locked off though I can only connect via VPN to that PC except when home. I will have to set up some schedules instead.
Do you notice any significant battery drain if you keep VPN on all the time on your phone while out? Thanks for all your input and help!
Hi Darren,
For the VPN, I’d start over creating the certificates (if you can only connect with OpenVPN with a password) and make sure you can connect with a certificate using a desktop client like Tunnelblick. Once the certificates are working, then getting them to work in the profile should be easier.
I don’t use the VPN much, so I don’t know about battery drain. I only turn on the VPN when I need to connect to my cameras.
Keep at it; you’re figure this out soon.
Thanks, I will keep at it.
On a side note I was looking for a post I saw about mounting the USG to a board and rack mounting it and found a new thread where someone found a compatible mount. I just ordered one myself. Here is the thread and the link to the mount is about half way down the posts…
https://community.ubnt.com/t5/UniFi-Routing-Switching/Rackmounting-a-regular-USG/td-p/2144887
Hi Darren,
That looks pretty cool, but the shipping costs kill it for me. I’ll wait for the next small business USG and hope that it is rack mountable.
[…] up on my widely popular post about Setting up an EdgeRouter Lite for an On Demand iOS VPN, I’ve decided to write about the same procedure, but on a Ubiquiti UniFi Security Gateway. […]
I stumbled across this, this is exactly what im looking for…..kind of. Although this post is about 5 years old now, is there a way to help me configure this exact setup with the Unifi Controller Network, looks like unifi offers easy VPN but its L2TP? Is that an issue? Also, i can config the profile for my sons ipad, the VPN information works, and i can see it in our network under the VPN subnet, but i would like for his ipad to automatically connect to VPN outside our home network. We use AdGruard Home and i would love everything be routed through that.
You might look at this post for the USG line.