Review: Homax Caulking Tool

A few weeks ago, my father mentioned that he got one of the best tools for his tool box, a Homax Caulking Tool for smoothing a caulk joint. When I was at Wal-Mart, I picked up one of these tools (as part of a Homax kit) and put it away for the next time I did caulking. Caulking is one of those things that I hate as I always make a mess.

After finishing a drywall repair due to a plumbing leak, I had to put some tile back and caulking the top of the tile. (While some people grout the top, the rest of our downstairs has the top caulked.) Luckily the 6 year old tube of caulk outside was still good, so I applied the caulk, used the finishing tool and must say it was the easiest and cleanest way to caulk a joint. There is very little to say about this simple tool, except if you ever have to do caulking, this tool is a must have. As a standalone tool, it is less than $3 at the store and will save you a lot of headaches.

Pros

  • Easy to use.
  • Makes a very clean caulk bead.

Cons

None

Summary

Just get this tool as at some point during home ownership you’ll have to do some caulking; you won’t regret it.

Review: ParkZone Night Vapor

My interest in RC flying vehicles hasn’t stopped at helicopters. My wife bought me a ParkZone Night Vapor for Hanukkah. This plane is advertised as an intermediate plane, but also could be flown indoors. As I don’t have a back yard large enough to fly other planes such as the HobbyZone Champ, I thought that the Night Vapor would be cool to fly.

The first day that I tried to fly it, I had very little success; I flew it in the living room and was not able to maneuver it to turn it. A few weeks later, my father, son, and I spent a few hours flying in my garage (it’s a great place to fly when both cars are removed) and I started to get the hang of the Night Vapor. Since then I’ve spent more time flying and have gotten quite good at making turns in tight places. Today I flew it outside and managed not to crash it too much! My only slight problem is that I almost landed it in the pool, but other than that, I was doing pretty well. Of course, flying an RC plane is a lot different from helicopters. Planes need more space, has no reverse, and can’t turn on a dime. It is taking me a bit of practice to go from frustration to having fun. The hardest part for me is to remember that if I want the plane to dive, I need to push the right stick forward and not back.

While I’ve crashed the plane quite a bit, I’ve only had to do minor repairs on it. I had to replace the main motor (I think it was defective from the factory) and one of the gears. In addition, my dog wasn’t too happy when it flew close to him and he bit it ripping a small hole in it; clear packing tape fixed it right up. I’m quite surprised how durable it is despite having cellophane wings.

Pros

  • Very durable.
  • Flies in small places.
  • Flies well outside.
  • Not too hard to control once you get a hang of it.
  • Long battery life compared to the helicopters (I can get about 15 minutes out of a battery)

Cons

  • None

Summary

The Night Vapor is a lot of fun to fly indoors and out. I’m not sure that there are too many RC planes that can fly in relatively small rooms or a garage. The plane takes a little getting used tobe, but after a few flights, it gets a lot easier to handle. While I really enjoy flying the helicopters, flying this plane is a different experience that has its own joys. The extended flight time (about 2.5 times longer than the helicopters) is probably the biggest reason I’ve been flying it more. I have multiple batteries, but having to stop and change the batteries takes some of the fun out of the helicopters. Beginners might get a little turned off when they crash and get afraid of destroying it, but once they get over this, this plane can probably be flown by beginners.

Review: MailHub (plugin for Mail.app)

One of the things I do is “collect” software never knowing when I’ll use it, but there are a small staple of applications I use all the time. When I saw MailHub, a plugin for Mail.app, I quickly downloaded it and played with it for a few minutes. I don’t think I spent more than 10 minutes with it before I pulled out my credit card and purchased it! One of the problems with receiving so much email is what to do with it. I used to run rules on messages and kept having to setup new rules to move messages. This was inefficient for me, so dealing with messages as I read them seemed much more efficient.

If you don’t use rules in Mail, you have to use the mouse to move messages to different mailboxes/folders. For people like me that like to use the keyboard as much as possible, the process of reading a message, then moving my hand to the trackpad/mouse to file a message just wasn’t attractive. With MailHub one or two keystrokes is all it takes to move messages to mailboxes. To top it off, MailHub has smarts that tries to figure out where the messages will go and it does a pretty decent job. MailHub does a number of other things, but the ability to file messages quickly is ideal for me. My inbox is now down to zero as I deal with messages quickly as I read it.

The $19 cost for MailHub is peanuts as it saves me a significant amount of time. The plugin hasn’t affected the stability of Mail and is quite integrated into Mail.

Pros

  • Excellent integration with Mail.
  • Learns about where to file messages.
  • Easy to use keystrokes to file messages.
  • Low price.

Cons

  • Every update to Mail requires a plugin update. Mail plugins are not supported by Apple and with Snow Leopard, Apple has added a version ID to each Mail release, so plugins have to get updated. MailHub has been updated to support the new Mail versions.
  • Only works with Mail. This really isn’t a knock on MailHub, but I’ve started using Outlook for Mac to integrate with my work’s Exchange server and I miss MailHub when using Outlook

Summary

If you use Mail on the Mac and get more than just a few messages a day, MailHub is definitely worth a look. There is a 30 day trial, but I suspect that you’ll purchase it after just a few days. The plugin is well done and it’s simplicity makes it a breeze to use.

Review: Radio Thermostat CT-30 (3M Filtrete 50)

My wife has been complaining that the temperature on our thermostat is always wrong, reading too high. So, I’ve looked a few times at getting a replacement thermostat. However, since they cost $60-$70 for a regular programmable one, I’ve put it off until I did my research to find one that I liked. My biggest complaint about the thermostat was that programming it was a pain; we’re currently on the same routine 7 days a week as our son wakes up at the same time and goes to bed at the same time, so if I want to change the temperature or time, I need to copy the program across all 7 days. While not complicated, I don’t like the interface for doing it.

A friend of mine said he got a Radio Thermostat CT30 WiFi enabled thermostat. It sounded quite gimicky as who really needs to control the temperature sitting on the couch? I saw that the price was $99, so it was almost a no brainer to get it. For only $30-$40 more, I could get a new toy! This device is the same as the 3M Filtrete 50 which Home Depot apparently sells. I went to my local Home Depot and it had a spot on the shelf, but no units. A stock check showed no units in the county and none on order. Very strange. Anyway, I ordered it on a Saturday and it arrived the following Thursday.

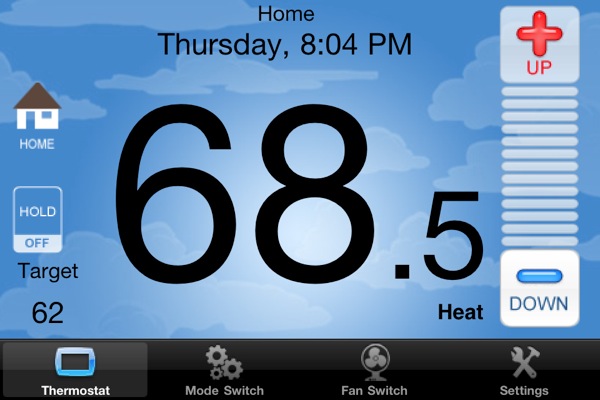
Before installing it, I read all the instructions online and it looked like I was good to go; I just had to hook up an extra wire at my furnace and connect it to the thermostat for power (the C wire). After finally figuring out which circuit my furnace was on, I turned off the power, hooked up the thermostat, fought with it to mount it (the wire in the wall wasn’t moving back into the wall for me to mount it flush), and turned the circuit breaker back on. A few minutes later, I was able to control the thermostat with my iPhone. That was very, very cool.

One thing that concerned me, however, was that the A/C compressor was making a clicking noise. I shut the power off again and was about to yank out the thermostat when I decided to try wiring the C wire different; this time I wired it to an unused lead on the furnace, not the C lead. It still provided 24 V AC, but wasn’t touching the compressor’s wires. This seemed to have solved the issue for me. Hopefully I didn’t blow up the relay for the compressor.

First thing I noticed is that the temperature read 3-4 degrees cooler than our old thermostat, so the new one actually did solve one problem. After poking around at the Radio Thermostat account page, I found out that I could quickly and easily program the thermostat from a web page. Another win! The thermostat pings a server every minute to update status and get new commands. This, of course, brings up the question of what happens when the company goes out of business. I have no idea, but the thermostat does have an internal web server so I could likely control it locally if needed.

Besides being able to set the current temperature while sitting on the couch, another win for the thermostat is being able to set the temperature when I’m not home. If I forget to hold the temperature so it doesn’t come on when we’re not home, I can use my iPhone and do that. In addition, I can change the temperature before I get home.


I haven’t even mentioned the touch screen display. The display is huge and quite easy to use. I gave my wife the 10 second tour of it (just enough to change the temperature) and it passed the “wife test” for ease of use. (She doesn’t like change, so introducing new tech in the house can sometimes be difficult; once she uses some of it, she likes it, but it’s the initial stage which is tough.)

Pros

  • Nice iPhone/iPad application to control temperature.
  • Programming can be done on a web site.
  • Temperature can be set remotely.
  • Large, easy to read touchscreen LCD.
  • Accurate temperature reading.

Cons

  • Price is a little more than a regular, programmable thermostat.
  • Relies on external server for communications. (If company goes under, the WiFi part may become useless.)
  • Installation can be quite tricky.

Summary

I’m not sure why I am so excited about a thermostat, but this is just too cool. Being able to control the temperature when I’m not home is very neat and being able to do the programming in seconds without having to consult the manual is very handy. If you know how to install a thermostat and know how to work with WiFi access points, this thermostat is a must get! Will there be better devices that do more coming soon? Of course, but if you are looking to replace your current thermostat, this is a no brainer.

Install this device at your own risk; I take no responsibility for any issues that may arise from installing this device.

Review: Brother 7840W Multifunction Printer

I’ve been a huge opponent of consumer grade all-in-one devices (printer, scanner, copy, fax), so when I was talking to some friends at lunch and they recommended Brother devices, I had to see for myself. My biggest complaint on these devices is that the drivers are just awful and perform poorly. I picked up a Brother MFC-7840W from Office Depot that was on sale for $229 (which is apparently now the regular price). I read Apple’s support article on which devices had support built into Mac OS X 10.6; a few years back at WWDC, Apple said that Snow Leopard would have much better scanner support, so having drivers included in the OS meant that at least I could blame Apple if it didn’t work well.

When I installed Snow Leopard, I didn’t install the Brother drivers, so I thought there would be a problem. However, I plugged an Ethernet cable into the device, powered it on and then configured it in Print & Fax. The device was recognized, but said that it would use a generic driver. No problem as Apple’s support article said that just do a software update after that and it would download the correct drivers. That’s precisely what happened. A few minutes later and it was all setup and I did a test print. Now that printing worked flawlessly, it was time to check out the scanning (I don’t have a phone jack on the side of the room where the device is, so I ignored the whole fax stuff and fax is something I never use).

I fired up Image Capture (Apple’s scanning/camera utility), selected the device and was easily scanning. I was pleasantly surprised as everything worked on the first try and scanning from the document feeder worked equally as well. So far, so good. The next step was to see how easily I could integrate scanning into an application using Snow Leopard’s ImageKit and if the Brother device worked with it. I’ve done worked with TWAIN and Image Capture and both were a nightmare. Apple has sample code called ImageKit Demo which is basically the Image Capture application. Code worked and I was scanning from within an app; there is minimal code to do this, so again I was pleased.

The Brother device also has the ability to scan directly to FTP. While I would have liked Scan to Email, Brother only put in email functionality to report status on the printer and even in that case, didn’t bother supporting SSL, so it doesn’t work with Gmail as an SMTP server. After a few minutes of thinking, I figured out a clever way to use Scan To FTP. I have a Mac Mini setup as a media center that is on all the time, so I turned FTP on (I dislike FTP as it is an ancient, insecure and hard to use protocol due to how it uses 2 TCP ports). I setup a profile using the Brother web interface to scan to a folder I setup on Dropbox. So after the scan comes in, it goes to the Dropbox folder and then transfers to my Mac pretty quickly.

BrotherDropbox.png

The downside of this is that it doesn’t like mediacenter.local as a host name, so I had to give it a static IP address (not a problem as I used my Time Capsule base station to assign a static address to my media center). Note that the Brother broadcasts itself via Bonjour, so the engineers at Brother clearly know about Bonjour and using Bonjour addresses. Turns out that this setup came in handy as I was in Portland the other day and needed something scanned, so I just asked my wife to put the item on the scanner, choose Scan to FTP from the front panel and a few minutes later, I had the file, all without my wife having to install drivers or learn how to use Image Capture (the drivers are on her computer as I setup the printer on her machine as well).

The printer is very fast compared to the HP LaserJet 2100 TN that I’ve had for 8 years (I bought it used off eBay), is quiet, and the scanning is a dream. The document feeder doesn’t do double sided scanning (at least not that I’ve found) and isn’t as fast as my Fujitsu ScanSnap, but it sure is convenient to scan directly from the front panel.

Pros

  • Easy setup.
  • Drivers are distributed with Snow Leopard.
  • No junky scanning application.
  • Web based interface for setup.
  • Networkable.
  • Convenient scanning.
  • Fast printing.
  • Decent price.
  • Quiet when it goes to sleep.

Cons

  • No scan to email from front panel.
  • Email settings for reports don’t handle SSL (no Gmail support).
  • Scan to FTP doesn’t recognize Bonjour addresses.
  • Not as fast as a dedicated scanner.

Summary

So far, this device has completely changed my mind on all-in-one devices. The easy to use scanning interface without a dedicated scanning application makes scanning a breeze. The printer is fast and produces decent output. When the device goes to sleep, it is virtually silent; I always turned my old printer off after using it as the buzzing drove me crazy. The sticker price isn’t that bad and overall this device is the machine I would like to have seen years ago. I had an HP and EPSON all-in-one device (both inkjet instead of laser like the Brother) that were both put out to pasture awhile ago due to their poor drivers and not so user friendly interface.

If you’re shopping for an all-in-one device, this Brother device may be for you. I’m extremely impressed with it and should have gone with Brother years ago (granted some of the Bonjour stuff and Scan to FTP might not have been there).

Review: OWC Mercury Extreme Pro SSD

As computers are the tools that I use to earn my living, I invest in getting the best machine for my needs and replace my main machine about every 2 years. My current MacBook Pro 15″, I bought in October 2008, so when Apple announced an event this past October, I was hoping for a significant update to the MacBook Pros, but instead they announced a new MacBook Air. (Apple did announce a 2.8 GHz option for the Core i7 MacBook Pros, but that wasn’t enough for me.) So I decided to wait until the next upgrade which I hope will be in the first half of next year.

What was I to do to squeak a little more performance out of my aging workhorse? While many developers have decked out Mac Pros with lots of RAM and horsepower, I prefer a laptop as it lets me work anywhere and having a main machine and a secondary machine is just a nightmare trying to find files (I’ve done that before). A colleague had mentioned that he had put an SSD into his development machine and seen a nice performance increase. So after a little research, I decided to get a Mercury Extreme SSD (240 GB) from OWC. Since Macs don’t support TRIM, I needed a drive that wouldn’t degrade performance over time leading me to the Mercury Extreme (since I purchased the drive, other drives have come onto market that apparently don’t require TRIM support in the OS).

Installation was as easy as any internal harddrive in a MacBook Pro (a few screws and presto) and copying my old drive to the SSD was very easy using SuperDuper!. I placed the old drive in my Voyager Q drive dock and waited for the copy to finish. Once the copy finished, I restarted and presto, it booted quickly and my SSD was running.

I’ve been using the SSD for about 1.5 months now and it has been working well with one exception. There is a firmware bug that causes the Mac to crash if the machine goes into hibernate mode and then you try to wake it. OWC has told me that a firmware upgrade should be available soon. I’ve only hit this twice as my machine rarely goes into hibernate.

Most of the speed tests I’ve seen on SSDs compare boot times, but I don’t reboot all that often, so while the speed is nice at startup, it’s kind of a pointless test for me. During everyday operation, I’m actually a little disappointed in the speed. I expected my machine to be blazingly fast after reading all the positives about SSDs. There are 3 factors that affect computer performance, processor speed, RAM, and I/O speed (hard drive/SSD is typically the limiting factor). Maybe I’m spoiled, but this upgrade was a bit expensive for the little gain I’ve seen (or maybe now I’m used to the faster speed and can’t remember the slower speed).

Pros

  • Decreases boot up time.
  • May have a small performance increase in overall machine operation.
  • Silent.
  • Less prone to damage causing by moving the machine (hard drive platters could get damaged if they aren’t parked before moving).

Cons

  • Expensive.
  • Performance increase may be minimal depending on how the machine is used.
  • Firmware bug crashes machine on wake from hibernate.

Summary

I’m not sure that adding an SSD is going to be worth it for most people. I’ve read lots of reviews showing the drives as amazing, but routinely show decreased boot up times which I only see rarely as I put my machine to sleep all the time instead of shut it down. SSDs are coming down in price, but still you can get a much larger 7200 RPM mechanical hard drive for a whole lot less and the 7200 RPM vs 5400 RPM that comes stock in most machines may be a better use of money (I’ve had a 7200 RPM drive in my machine since day one).

When I buy my next machine, I’ll definitely get an SSD in it direct from Apple as it will let me eek every last bit of performance out of the new machine. If the price of SSDs drop significantly, then replacing a mechanical drive with an SSD will become an easier decision.


Review: Apple Magic Trackpad

I’ve been using trackpads on my laptops for many years and used them on the desktop for awhile as well, so when my father started raving about the Apple Magic Trackpad, I thought I’d give it a try. I had read a few reviews of it and heard people talk about it on podcasts, so I thought I’d immediately like it. When I received it, I easily paired it to my MacBook Pro and tried to use it. As I had always been a mechanical click kind of person, I found the trackpad hard to use even though it had mechanical buttons in the front feet. I kept trying to use it for a few days and then simply put it away and forgot about it.

Last week we travelled to San Jose for Thanksgiving and stayed in a hotel (if you go some place for Thanksgiving, I highly recommend staying in a hotel instead of with the in-laws; much easier to have your own space for an extended stay). We put our son down pretty early and I didn’t want to disturb him with the mechanical clicking of my MacBook Pro’s trackpad, so I turned on tap to click. I spent several days learning how to use this feature and first, it was hard to use, but once I changed the double click settings to be slower, I got the hang of it. The hardest part was dragging as every time I was trying to drag, it would double click (hence changing the settings).

When we got back, I pulled out the Magic Trackpad and started to use it again. I had been using my Handshoe Mouse which I really like. My only complaint was all the dirt it picked up which made it feel gritty when I moved it. Within a few minutes, I understood what my dad had been saying about it. It works quite well once you turn on tap to click; if you use the mechanical click, it works poorly as dragging is almost impossible (at least for me). Now that I’ve been using the Magic Trackpad, I’m almost ready to put my mouse out to pasture. The only area that I seem to switch back to the mouse is when I use the iPhone Simulator and have to swipe up as it seems harder to do with a trackpad.


Pros

  • Takes up very little room.
  • Easy to pair with my Mac.
  • Reasonable price.
  • Very customizable (there is a free app called BetterTouch Tool that adds even more customizations).
  • Large surface area (larger than my MacBook Pro’s trackpad).

Cons

  • Mechanical clicking works poorly.
  • Tap to click/drag can take a little getting used to if you haven’t used it before.
  • Doesn’t come with rechargeable batteries (when I replace the batteries, I’ll use the Eneloop ones that I’ve had for a few years).
  • Bluetooth is sometimes annoying if I take my MacBook Pro in the other room and the trackpad randomly connects/disconnects (other room is maybe 15 feet away).

Summary

It seems that Apple is moving in the direction of touch for everything and the Magic Trackpad is a natural extension. If you’re tired of dragging a mouse around or cleaning a trackball, the Magic Trackpad is worth considering. The customizable gestures, including the pinch to zoom and swipes is the future of where Apple is going with input, in my opinion. The only real downside I see to the device is the learning curve, at least for me. If I hadn’t forced myself to get used to the tap to click, I would have definitely said that this device was a waste of money. However, once I figured out that this was my problem, I’m happily using the trackpad and am using my MacBook Pro’s internal trackpad more efficiently as well. I would not be surprised if Apple drops the mechanical click in the future.

Review: Blade CX3

First off, I have to admit that I’m getting addicted to RC helicopters which if I don’t watch myself is going to get quite expensive! Now that I have that off my chest, I’ve now purchased my third helicopter, this time a Blade CX3. This helicopter is a huge step up in terms of size from my Blade mCX2.

When I first got the helicopter, I was a little afraid to fly it. The bigger the helicopter, the more it would cost to repair. I flied it around my office a little bit, but due to its size, it’s pretty hard to do much with it. However, I did get the hang of it (it’s quite loud) and decided to give it a whirl outside. Well, I was a bit overconfident and on my first flight outside, it ended up on the roof and I caught it as it came crashing down on me. Luckily I was able to repair the fuselage damage with some clear tape and it was as good as new.

I’ve been having a lot of fun with it and am excited to fly it outside. However, there has to be very, very little wind to do anything with it. The times I’ve flown it outside, the wind is just a little too strong so that when I try to go forward full speed, it goes no where. It is teaching me how to control it in adverse conditions which is kind of interesting.

One of the maneuvers  that I’ve pretty much perfected on the mCX2 is landings in a single spot. On the CX3, this is much harder because of the ground effect created by the blades; flying it low is kind of difficult due to this (the blades are pushing down a bit of air causing the helicopter to go up). This is something that I’m keep attempting.

The CX3 doesn’t use anything that is the same as my mCX2, so I’ve already started collecting spare parts in the event of a crash. I’ve also had to pick up an extra battery as the 6 minute flight time is a bit short when it takes 2 hours to recharge the battery.

Many of the points below are similar to what I wrote about the mCX2. The two helicopters are quite similar as beginner helicopters.

Pros

  • Not too hard to control.
  • Moderate size allows me to fly outside.
  • Replacement parts aren’t that expensive.
  • Comes with battery charger.
  • Heading hold gyro attempts to keep the nose facing in the direction of travel.
  • It’s quite fast when flying inside.

Cons

  • Size makes it a bit large to fly inside and do anything interesting (very small circles).
  • Only comes with 1 battery.
  • Long recharge time (2 hours).
  • Navigation lights are optional (they look cool on the mCX2).
  • It’s noisy. In the house, it’s hard to really hear anything when it’s flying.
  • Time consuming to disassemble. I added a heat sink to it and it took me about an hour to take it apart and install the heat sink. Maybe it was just me, but I had a problem removing one of the motors to get the heat sink in.

Summary

The CX3, like the mCX2, is a beginner helicopter. I kind of see it as a stepping stone from the mCX2 as it is larger and can fly outside. I’m glad that I got the mCX2 first as it let me learn to fly and maneuvers. I haven’t abandoned my mCX2, but I find the CX3 a bit more challenging and more exciting. If you’re interested in RC helicopters and don’t have much room to fly, the mCX2 is the way to go. If you have more room and want to fly outside, the CX3 is the better choice.

I’m having a great time with my helicopters and am getting pretty good at flying.

Review: Blade mCX2

After getting a Syma S107 RC helicopter, I was quickly hooked on RC helicopters. I went to the local hobby shop, Discount Hobby Warehouse, and took a look at the Blade mCX2. When I mentioned to the guy at the shop that I had a cheap $30 helicopter, he said that the goal of the cheap ones is to not crash while the goal of the more expensive ones is to fly. I definitely could agree to the part about not crashing. I bought it and when I got home, I charged the battery and was off and running. I was easily able to fly it around for a few minutes until the battery died (I get about 6 – 6 1/2 minutes per charge). I’ve picked up a few more batteries and have been spending at least 20-30 minutes a day. I’m definitely a fan.

Everything I’ve been reading indicates that the coaxial helicopters (CX) are easy to fly and are beginner helicopters, so I think I picked the right one. The mCX2 is easy to fly inside (it is far too small to fly outside as the wind will knock it around). The entry price is reasonable (for a hobby), but the cost will quickly add up, so be prepared. I’ve already bought a few more batteries, a four port charger with AC adapter, and due to a crash, some spare parts.

Speaking of crashes, while the helicopter is easy to handle, if you want to start to get fancy, it’s quite maneuverable, so much so that it isn’t that hard to crash. I made the helicopter yaw a bit too much and then over corrected which lead to the crash. The crash cost me about $15 in parts to repair. Even though the parts are quite small, repairing it, isn’t that hard. It comes with a small phillips screwdriver and combined with a pair of locking forceps  that I got at an Army/Navy Surplus store, repairs just take a little time and not much skill.

The mCX2 uses parts that are shared with other helicopters made by Blade, such as the mSR and mCX Tandem Rescue, so if you get one and want to upgrade, you already have some pieces.

Pros

  • Compact size allows you to fly in the house.
  • Easy to control.
  • Captivating (I’m really hooked).
  • Challenging. While easy to control, I’m teaching myself how to land it in a small area which is proving to be easier said than done.
  • Easy to repair.
  • Individual parts aren’t that expensive.
  • Relatively durable. It handles small crashes well.

Cons

  • Price. Some may say that the price is a little high. I think the entry price isn’t bad, but it starts adding up quickly.
  • Only comes with 1 battery.
  • Short flight time. Due to the small size of the helicopter, it has to have a small battery, so this is understandable.
  • Only comes with a 1 port charger. Charging 1 battery at a time means you have to wait 30-40 minutes for it to charge between flights.
  • Charger runs on 4 AA batteries; AC adapter is optional. The manual says that the AA batteries will charge the battery 15-20 times. Since I started with 2 batteries, and I flew it as often as possible in the first few days, that the batteries only lasted 3-4 days. This cost savings is not very green and is extremely annoying. I went ahead and got a 4 port charger with an AC adapter and now I can run through 4 batteries and then charge them all up.
  • It’s addictive.

Summary

For some reason, I’ve always been fascinated with things that fly. So, when I tried my first helicopter a few weeks ago, I quickly realized that I may have found a hobby (up until now, I really haven’t had a hobby as an adult). The mCX2 is a great entry level helicopter and provides hours of fun. If you think that the cost of the helicopter is the end of spending money on it, I wouldn’t get it. The costs will start adding up quite quickly. I mentioned this helicopter to a friend (he already had a few other helicopters) and he bought it based on me talking about it. He seems quite pleased with it as well (his dogs aren’t pleased with it, however).

This helicopter is not a toy, so heed the age level on the box (14 and up). I’m not sure it is appropriate for a 14 year old, however.

I’m very happy with my purchase and can definitely recommend it to anyone that has ever been interested in RC helicopters.

Review: ezDesktop – VNC client for iPad/iPhone

I’ve been using a Mac Mini as my DVR/media center for about a year now and there are times when I have to pull out my laptop to control it despite having a Harmony Remote configured for it. If we want to watch shows on USA Networks, TNT, etc. in a web browser, I can’t control that with a remote (at least not until Google TV or the like comes out).

The other day I really didn’t want to use my laptop to control the Mac Mini, so I looked at VNC clients for the iPad. I found 2 that had free (trial) versions. Mocha VNC and ezDesktop. Mocha VNC Lite didn’t impress me. I turned on the VNC server on my Mac Mini, setup a password, and easily connected to it with ezDesktop. I played around with it, managed to navigate fairly easily with the iPad and did some web browsing. By the time I had done all this, my free session was up and I decided that it was worth the $6.99 to purchase the VNC module via the in-app purchasing.

I’ve been using it for a few days now and it works pretty well. The hardest part is moving windows and making the dock show (I have it set to hide on the Mac Mini). The keyboard that it displays has extra keys for command, control, etc. and screen refresh is quite good. It’s been nice to be able to control the TV right from the iPad and has given me a view into the future of using an iPad as a remote control for the TV.

They have another product that helps get to your computer when you’re away, but I didn’t need that, so I stuck to the cheapest version.

Pros

  • Easy to setup.
  • Decent frame rate.
  • Using it to move the mouse works well.
  • Extra keys for the keyboard are available.

Cons

  • Dragging windows is a bit difficult.
  • Moving the mouse to the screen edge to show the dock doesn’t always work.
  • Some part of the app (setup and help) could use a little polish.

Summary

If you have a need for a VNC client on the iPad (I haven’t tried it on the iPhone, yet), the free trial should give you plenty of time to evaluate it. When I have my laptop and I’m watching TV, it is only sort of relaxing; if I have my iPad, due to limited ability to do things on it, I find I am a bit more relaxed. So, ezDesktop is definitely working well for me as it allows me to sit in front of the TV and control all aspects of my Mac Mini without having my laptop. It’s worth the $6.99 for the app; the other VNC clients out there way have more bells and whistles, but ezDesktop seems to be a good fit for me.