-
Review: UVC-G3-AF and UVC-NVR-2TB
[Updated 2/28: Added camera images]
As anyone that reads my blog can tell, I really like Ubiquiti networking gear. When I saw that they also had a video/NVR platform, I really wanted to try it. However, since I already had a working surveillance system, I couldn't justify the cost to convert. Recently my father wanted a recommendation on a surveillance system and I started looking at options. There were a few complete systems at Costco, but they all received pretty mixed to poor reviews. I could point him to Nest cameras or a similar system, but each system was cloud based with a yearly fee. In addition, the cost of the cameras was a bit on the high side. With the Costco systems, I was concerned about ease of use and security of the cameras; many of the Chinese made/designed cameras have major security flaws that keep getting exposed. Securing these systems would take a lot of work and they would likely never receive firmware upgrades.
Once I added up the cost of 4 Ubiquiti UVC-G3 Cameras
and a UVC-NVR
, the Ubiquiti solution didn't cost much more. The solution would have cost more, but I had a spare 8-Port UniF Switch (US-8-150W)
sitting around that I gave my dad. My dad was onboard and he ordered all the components and some patch cords. We decided using 25 ft and 50 ft patch cords was easier than running structured wiring, so all we had to do was mount the cameras and string the patch cords in the attic.
I left most of the physical install to my dad and brother-in-law. Running the wires is never a straightforward task, but we got it done after a number of hours of work. We mounted the cameras so that they could be seen as I think it is a valuable deterrent.


While my dad doesn't have an equipment rack like I do, his collection of equipment keeps gettin bigger!

While the physical install was in process, I started the software setup and install. The initial setup was pretty straight forward. I hard reset the UniFi switch (it had my config on it) and adopted it. Then I set the switch to do 24V passive PoE (it is a UniFi switch) so that I didn't have to use PoE adapters. Plugging in the NVR was easy and it started up without problems.
The NVR setup wizard had me setup a Ubiquiti account for my dad and then it locally discovered the NVR (using Chrome). I probably should have read the instructions, but I didn't and had a little trouble with this. I thought that creating the Ubiquiti account would go through a process to adopt the local NVR; it really didn't and I had to connect the NVR to my dad's Ubiquiti account later.
Once I was able to access the NVR, it should have been a simple process to plug in each camera and adopt it. Unfortunately I didn't read that I had to use ubnt/ubnt as the username and password. I simply left it blank and got no where. After a few resets of the camera and a web search, I properly entered the username and password and the cameras adopted without problems.

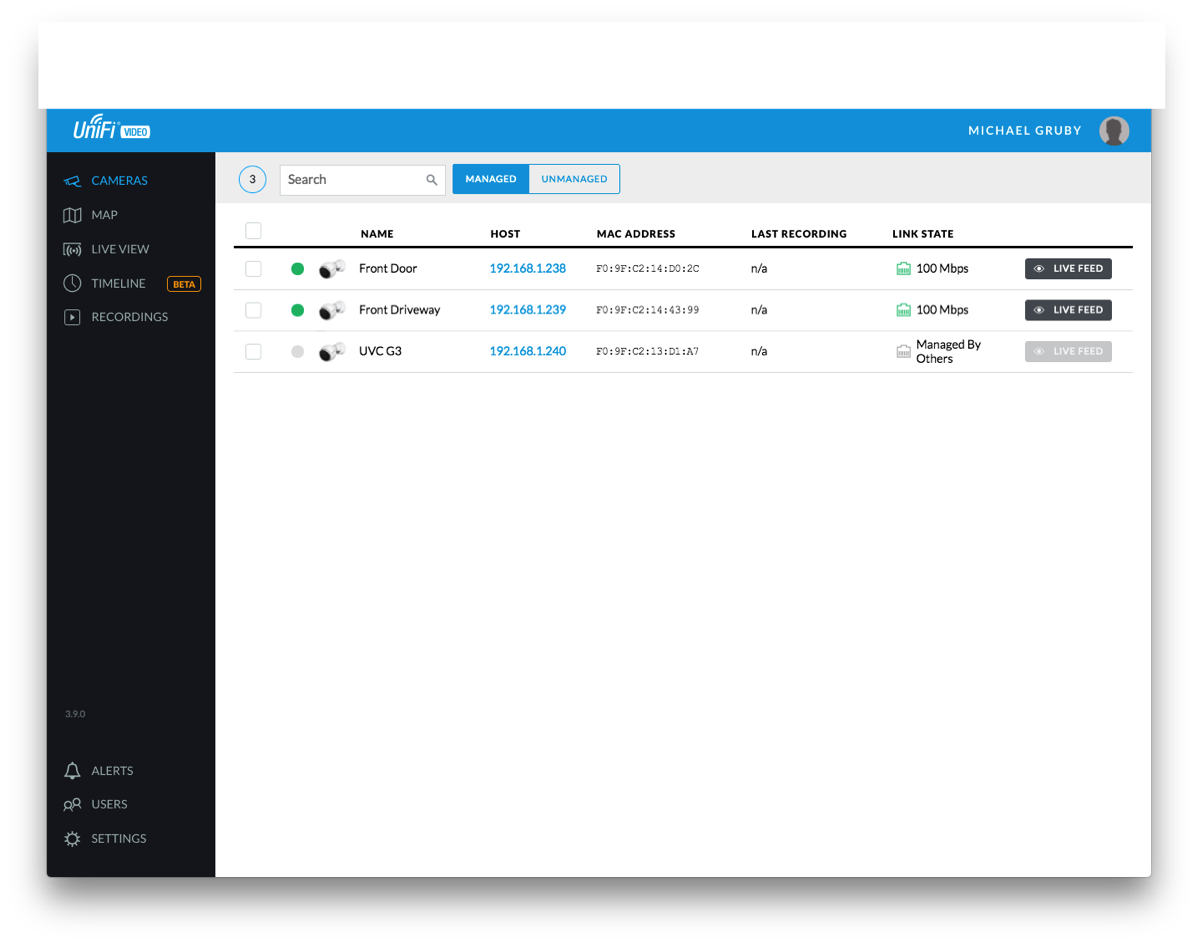
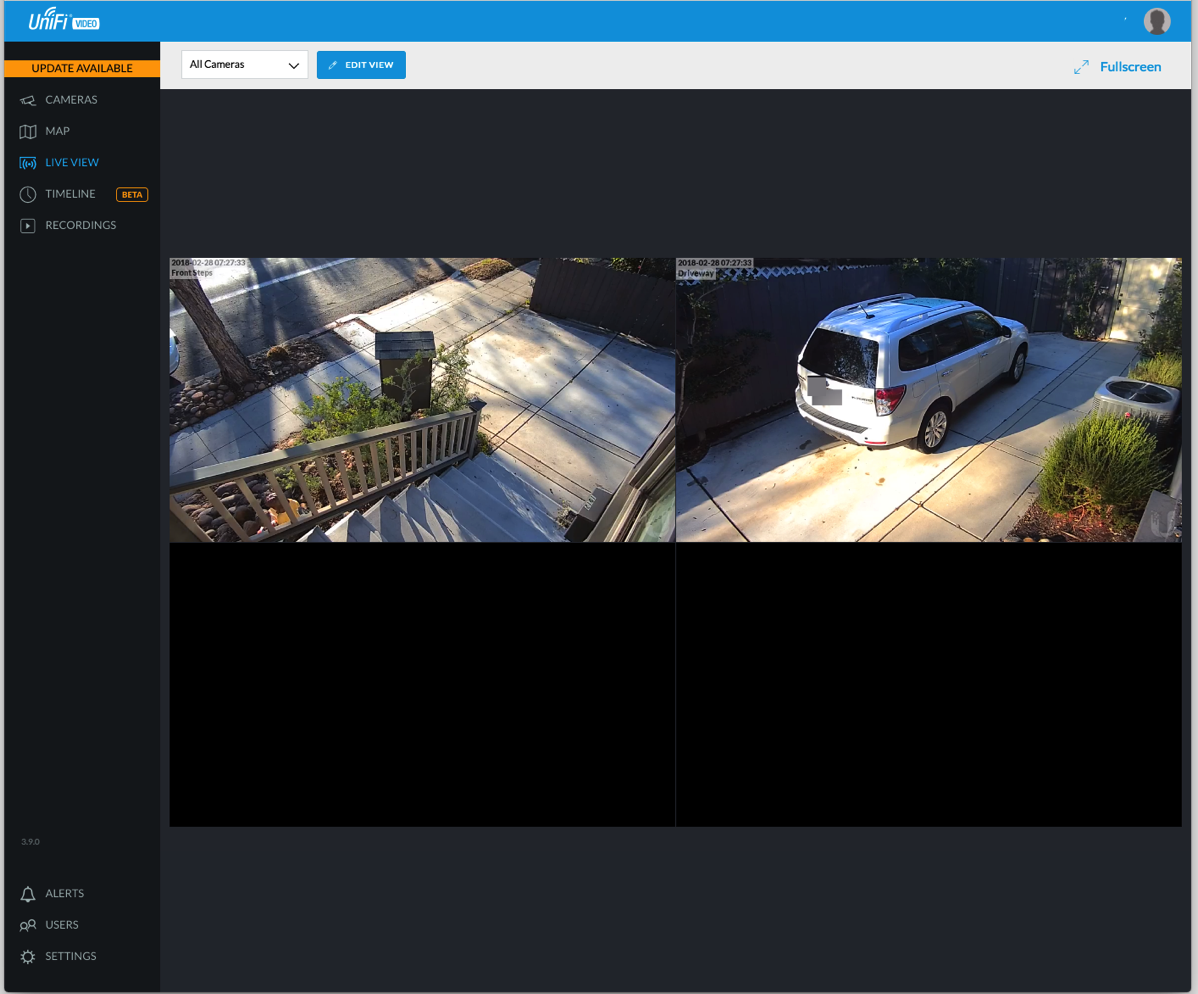

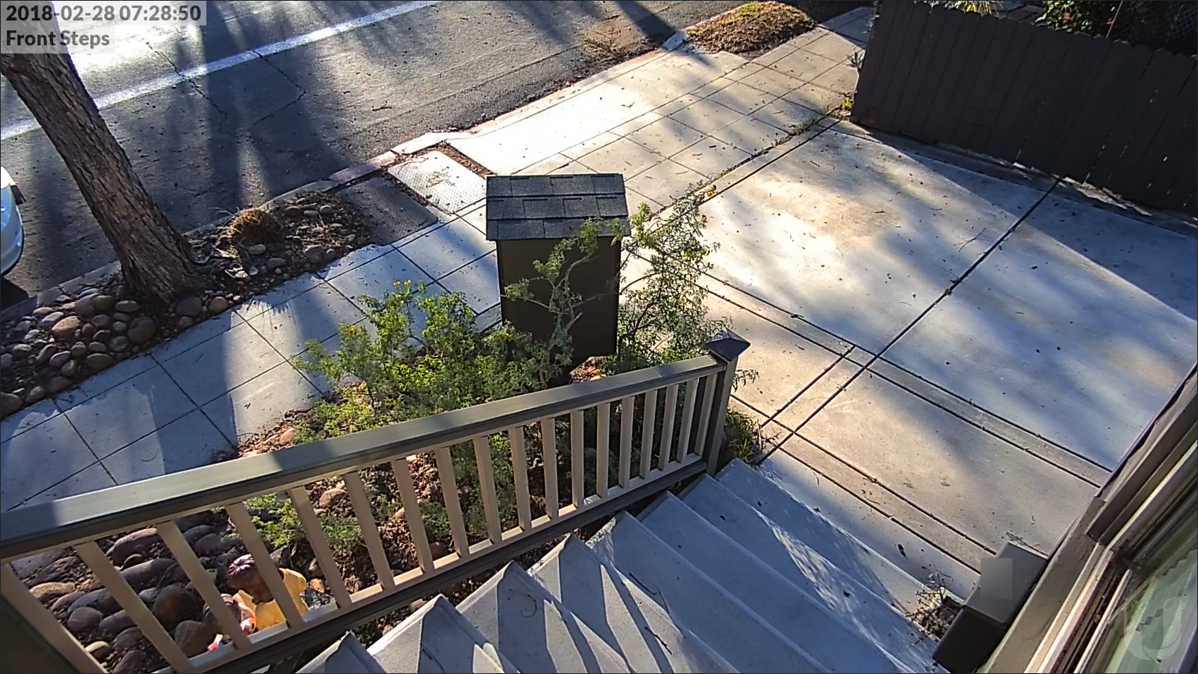
After the software setup, I installed the iOS app, connected my Ubiquiti account (for testing I added a user for me) and was able to use the app to help adjust the cameras. The app needs work, but it is usable. As WiFi coverage on the outside of the house was spotty, the image kept freezing until I realized that I should just turn off WiFi and let the image stream over cellular.
Once we completed the install, I turned over the "keys" to my dad and let him configure the recording, motion detection, etc. I only gave him a basic overview as the software is pretty self explanatory which is great.
With the install completed, I decided to use the last camera for my own system and setup the UniFi video software on an Ubuntu virtual machine. The install was pretty straightforward and I decided to store the recordings on a Shared Folder (VMWare). I had to add the following to
/etc/fstab:./host:/ /mnt/hgfs fuse.vmhgfs-fuse allow_other,defaults,uid=109,gid=117 0 0Where 109 and 117 are the uid and gid respectively of the unifi-video user. I also followed the instructions for installing a custom SSL certificate. I had some problems initially setting up the software as the UniFi Discovery Tool wouldn't locate it, but after I connected directly to it instead of using
https://video.ubnt.com, I was able to get it working. Will I keep it running? I still haven't decided.Pros
- Unified interface for camera management including being able to change white balance, contrast, etc. on each camera.
- Regular updates of the camera firmware and recording software.
- A company concerned about security.
- Free remote viewing system.
- iOS app.
- Decent video quality.
- NVR is compact.
Cons
- Remote browser viewing seems to require/prefer Chrome.
- If you don't already have a PoE switch, there is an extra cost involved. The 5 pack of cameras doesn't come with PoE injectors. The PoE injectors are unwieldy if you have more than one camera as each requires an outlet.
- Some discussion in the forums about quality of the iOS software.
- Timeline won't show multiple recordings at once.
- Timeline feature needs some work.
Now that I have my dad's whole system setup, I have to decide if it is worth replacing my 7 cameras with the UVC-G3 cameras. Since I already have a switch to power them and I'd run the software on a virtual machine, my cost is under $900. That's a lot of money to spend when I have something that already works. I would get a better interface, easier remote viewing (right now I VPN into my home network to view the cameras), better video quality (my cameras are 720p), less concern over security issues in the cameras as Ubiquiti regularly updates the firmware and the recording software, and unified management of all the cameras (if I want to change the brightness or contrast on a camera, I have to connect directly to that camera and change the setting). However, the software I use now has a better timeline feature.
I'll probably wait until something breaks before doing something; my system has been running (different hardware and software versions, but same cameras) for almost 5 years without a hiccup.
If you're shopping for an NVR/camera setup, the Ubiquiti offering is interesting, but I think it needs a little work around the timeline feature and the iOS app before I can completely recommend it. While I don't have much experience with other systems, this system takes a little technical know how as the switch has to be configured and the cameras adopted. For an installer to install this, I think it would be fine; for the average consumer I'd look elsewhere at least for now.
-
Cobbling Together a Home Automation System
I was introduced to home automation at a young age when my father installed an X10 system hooked to our alarm system. The basic gist of the automation was to turn on lights when we were away and to have all the lights in the house turn on if the alarm system activated. This was more than 30 years ago and was pretty simple in what he wanted to accomplish. Since then I've dabbled with the X10 Firecacker hooked to a Linux box, but really didn't get serious about home automation until about four and a half years ago when we purchased our current house. We were remodeling the house we purchased, so I used the opportunity to design an automation system and briefly wrote about it.
Many lights, several outlets, and the thermostat in our house are using the ZWave protocol. This only covers part of the automation. All of the sensors (motion, window, and door) are on a standard DSC security system hooked up with an Envisalink module. The brains of the system is a VeraEdge with several third party plugins. Out of the box, the VeraEdge won't talk to the sensors and has very basic decision making capability, so the Program Logic Event Generator plugin is needed. In addition, I put together a plugin for controlling my Russound audio distribution units that works by sending commands to a PortServer TS 4 MEI and then to the Russound's RS-232 serial ports.
This whole system worked well for several years, but I wasn't happy with the iOS app, so I created my own app a few years ago.
If this sounds like a lot of pieces and a lot of work, it has been a labor of love and an interesting hobby. Of course having a system working well isn't a lot of fun if you like tinkering! When I received my first Amazon Echo
two years ago, I was intrigued by the ability to control things by voice. My Vera (at the time) had no integration with the Echo, so I turned to a third party solution called HA Bridge by BWS Systems. It required more setup, but exposed scenes and devices so that they could be controlled by the Echo. (Vera now has native Echo support, but the way it is setup creates a delay in the response so I continue to use HA Bridge.) The new Routines in the Amazon Echo like adding one for "Good night" are an excellent addition, but has me scratching my head on if I should set that kind of thing up on the Echo, use the Vera natively, or use HA Bridge.
As an Apple fan, you'll probably notice that I haven't mentioned HomeKit, yet. HomeKit has been interesting, but due to the lack of interoperable components and hackability, I've pretty much ignored it. Some enterprising developers have created Homebridge which I've also setup. Why HomeKit and Echo support? Simple, with the HomeKit app on iOS 11 and the widget, I can easily turn lights on or off right from my iPad without switching to my app and without having to yell at the Echo. In addition, this allows me to control lights with my Apple Watch. I run HA Bridge and Homebridge on a Raspberry Pi
so that it can easily sit on my IoT VLAN (I separate out IoT traffic from my main network).
This automation setup has been about 5 years in the making and I'm sure I'm not completely done with it. I keep looking at ways to simplify it with different components like maybe a new hub or new switches. However, every time I start looking into it I realize that I'd lose functionality. My wife tolerates my hobby and kind of likes some of the aspects of it as she warms up to them. Changing anything would be a change for the worse.
The more time and effort I put into my automation system, the more I realize that turnkey home automation is still a pipe dream. If someone has very simple needs then maybe he or she can get away with one system. The moment you want a choice in your components or want to do something that the major companies that do automation don't want you to do, you have to either give up or cobble together a system.
Products used in my system:
Hardware
- VeraEdge - main automation hub
- DSC alarm system
- Envisalink - alarm system to network
- PortServer TS 4 MEI
- Russound audio distribution units (no longer made) with RS-232 ports
- Squeezebox audio units (no longer made)
- Raspberry Pi
for running Homebridge and HA Bridge
- Amazon Echo
- iPad/iPhone/Apple Watch
Software
- Program Logic Event Generator plugin for Vera
- HA Bridge - Echo to Vera
- Homebridge - HomeKit to Vera
- VeraAutomation - iOS app for controlling Vera
- Custom Lua plugin for Vera to control audio
Feel free to ask questions about my system. I'm always open to ideas and will keep actively exploring ways to improve my life through automation!
-
Setting up a UniFi Security Gateway for an On Demand iOS VPN
[UPDATE - 18 May 2020] In some recent iOS update (not sure which), certificates are no longer required to have an on demand VPN work. So I switched to using the built in L2TP VPN in the USG which requires very little configuration. My VPN profile has also changed and can be found here. This profile does on demand like before, but also automatically connects if something on my phone tries to access certain internal resources (I have AdGuard setup to handle DNS on my network). I use this for connecting to Home Assistant without port forwarding or anything like that.
[UPDATE - 06 Feb 2019] With the latest release of the OpenVPN app, the identifier has changed from
net.openvpn.OpenVPN-Connect.vpnplugintonet.openvpn.connect.app. Without this change, the VPN profile will NOT work.Following up on my widely popular post about Setting up an EdgeRouter Lite for an On Demand iOS VPN, I've decided to write about the same procedure, but on a Ubiquiti UniFi Security Gateway
. Much of the procedure is the same, but for completeness I'll include all the steps here.
An on demand VPN will automatically fire up when you're on certain WiFi networks and under certain circumstances. This is quite useful if you use unknown WiFi networks and are concerned about security (you should be!).
This is a really long setup, but it is straightforward. If you're intimidated by command lines and editing text files, this process is not for you!
Certificate Setup
- SSH into the USG. You'll use the same username and password for connecting to the UniFi Controller.
- Setup a new certificate authority that will be used to create new client certificates for the VPN. Issue the following commands, one per line. Follow the prompts when you run the commands.
configure sudo su cd /usr/lib/ssl/misc/ ./CA.sh -newca - Create a new server certificate and sign it. Follow the prompts when you run the commands; you'll need to enter a password for the new request. We'll remove it in another step.
./CA.sh -newreq ./CA.sh -sign - Copy the certificate authority key and certificate to an area of the router that will survive a firmware upgrade.
cp demoCA/cacert.pem demoCA/private/cakey.pem /config/auth/ - Also copy the server certificate to the same place.
mv newcert.pem /config/auth/server.pem - Display the certificate authority certificate using
cat /config/auth/cacert.pemand then copy it into BBEdit or another text editor on your local computer; save it to your hard drive. -
Remove the password on the private key for the server so that the VPN server can start automatically.
openssl pkcs8 -in newkey.pem -out /config/auth/server-pem.key - Generate the Diffie-Hellman Paramters; this takes a long time.
openssl dhparam -out /config/auth/dhp.pem -2 1024 - The next part is generating the client certificates. The recommendation is to have 1 client certificate per client. However, this would require me to have 1 for my iPad and 1 for my iPhone complicating setup. While having 1 certificate for both may not be recommended, it is the route I chose. When prompted, enter a password for the new key and then the last line will remove it. Don't enter a challenge password.
./CA.sh -newreq ./CA.sh -sign mv newcert.pem client-cert.pem openssl pkcs8 -in newkey.pem -out client-key.pem - Display the certificate using
cat client-cert.pemand past it into BBEdit and then saved it. - Do the same thing with the key using
cat client-key.pemand saved it to my Mac. -
On my Mac, do the following in Terminal (make sure you're in the same directory as where you saved the certificate and key). When exporting, set a password that you'll use later.
openssl pkcs12 -export -out client1.p12 -inkey client-key.pem -in client-cert.pem
Note that the /config directory survives firmware upgrades. If you need to add client certificates later and the certificate authority you created is gone, you may have to start the setup over.
OpenVPN Server Setup
- Create a file called
config.gateway.jsonand place it in the data directory for your UniFi Controller. I run my controller on a Mac and the path is ~/Library/Application Support/UniFi/data/sites/default. It should basically be as shown below. You'll want to configure the OpenVPN network (10.0.5.0/24) if you use a different numbering scheme; this cannot be a network defined in the UniFi Controller. You should also change the DNS to servers you use. I don't know if the push-route commands are absolutely necessary, but I put them in anyway as they appear to work.{ "firewall": { "group": { "network-group": { "open_vpn_network": { "description": "OpenVPN Network", "network": [ "10.0.5.0/24" ] } } } }, "interfaces": { "openvpn": { "vtun0": { "local-port": "1194", "mode": "server", "openvpn-option": [ "--comp-lzo", "--push redirect-gateway", "--push dhcp-option DNS 10.0.1.2", "--push dhcp-option DNS 10.0.1.1", "--duplicate-cn" ], "server": { "push-route": [ "10.0.1.0/24", "10.0.5.0/24", "10.0.0.0/16" ], "subnet": "10.0.5.0/24" }, "tls": { "ca-cert-file": "/config/auth/cacert.pem", "cert-file": "/config/auth/server.pem", "dh-file": "/config/auth/dhp.pem", "key-file": "/config/auth/server-pem.key" } } } }, "service": { "nat": { "rule": { "7000": { "description": "OpenVPN to WAN", "log": "disable", "outbound-interface": "eth0", "protocol": "all", "source": { "group": { "network-group": "open_vpn_network" } }, "type": "masquerade" } } } } } - Force a reprovision of the USG by selecting the USG, then clicking on the Config tab.
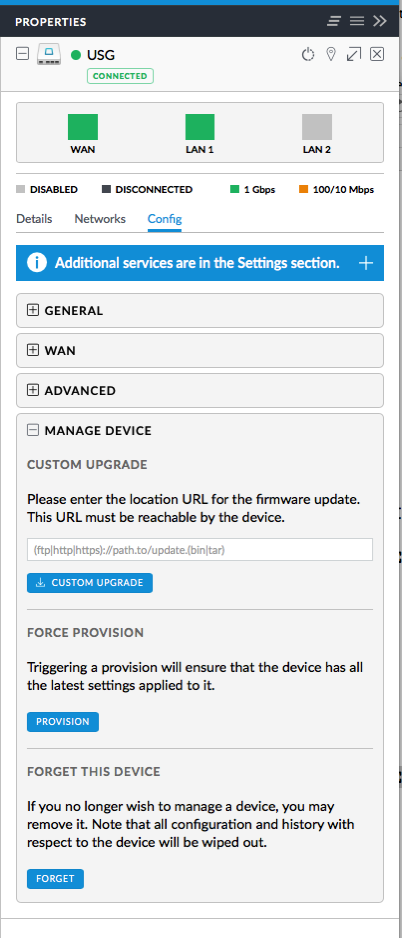
- On the UniFi Controller, click on Settings and then Routing & Firewall.
- Click on Firewall at the top.
- Click Groups and add an OpenVPN port group.
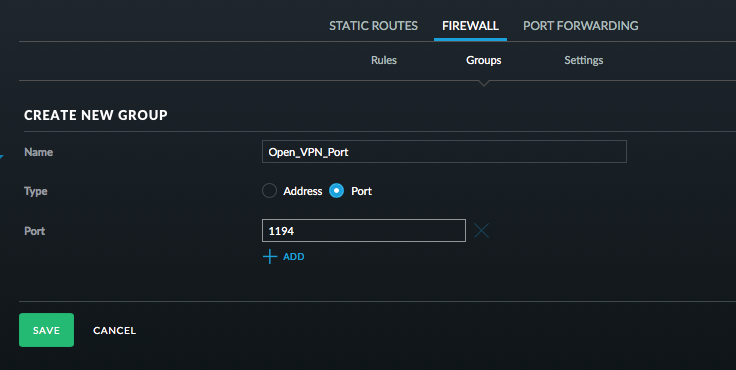
- Switch over to Rules and setup an OpenVPN rule.
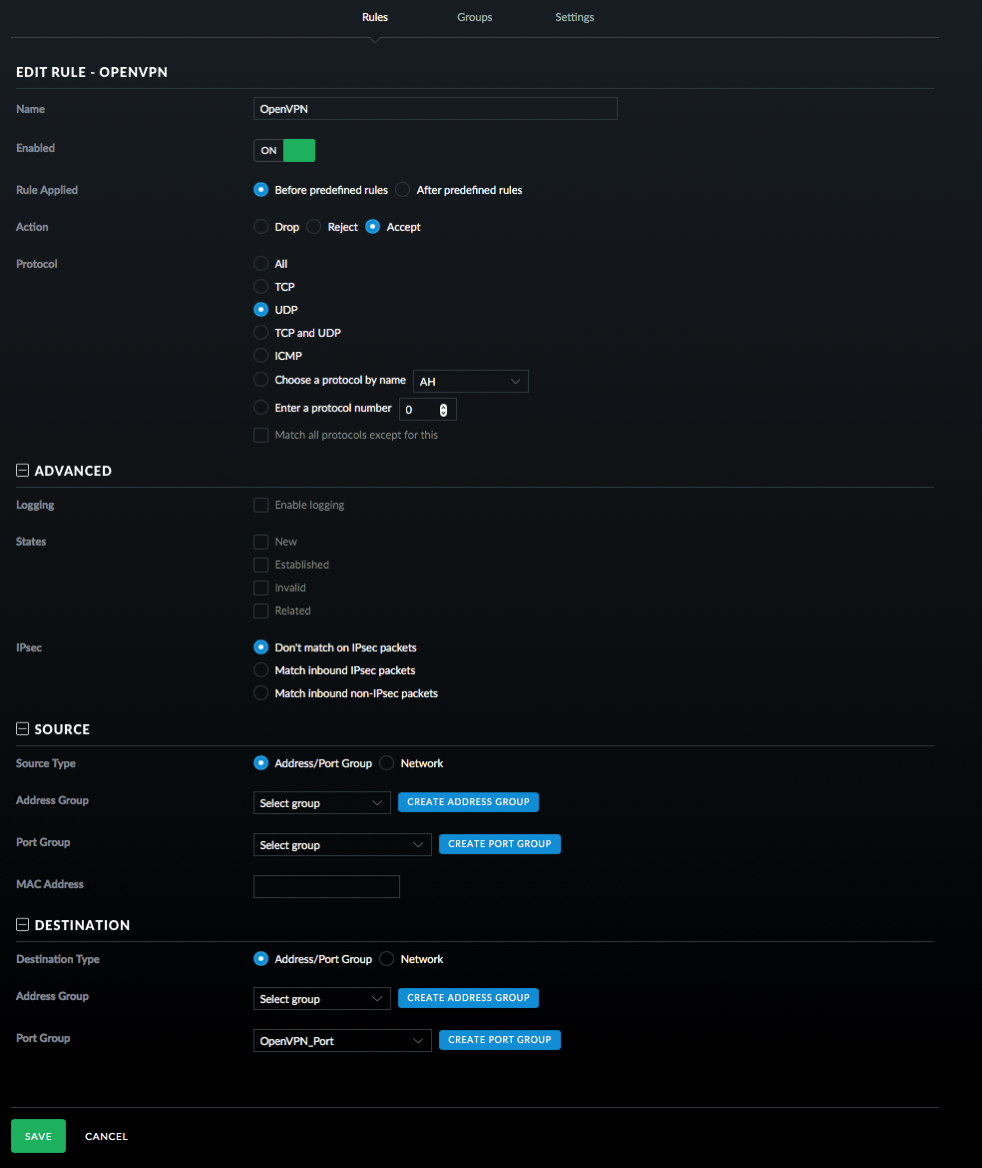
Good work if you've followed along this far! Next up is the client setup which has a bunch of steps as well.
iOS Client Setup
- Locate the p12 file that you created on your Mac.
- Download Apple Configurator from the Mac App Store.
-
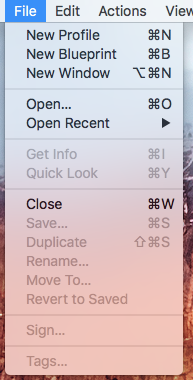
Select New Profile from the File menu.
-
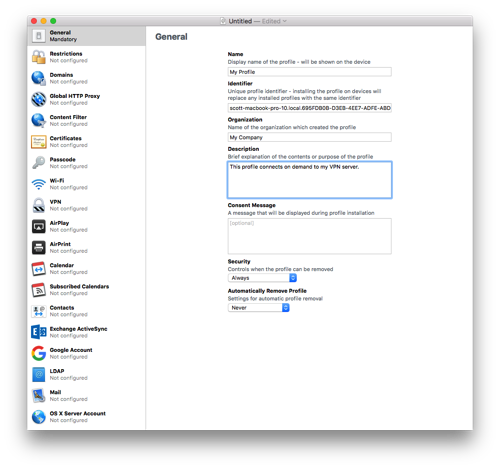
Fill out the General information for the profile. You can leave the Identifier as is.
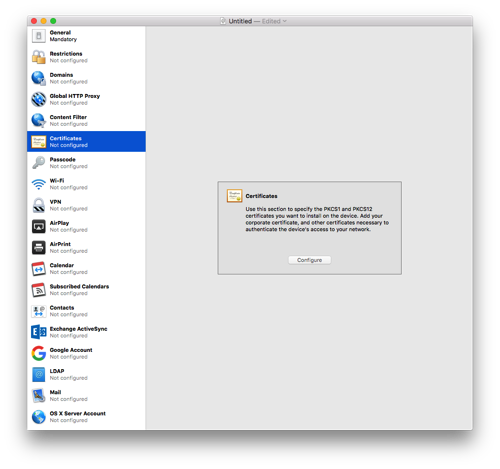
- Click on Certificates and then press Configure. Select the .p12 file you created way back in the first part of the instructions.
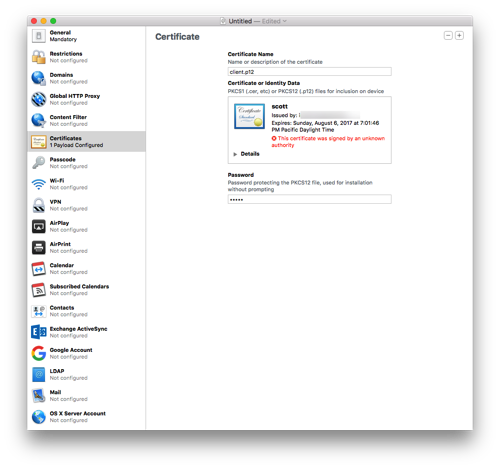
- Give the certificate a name and enter the password you used when exporting the p12 file.
-
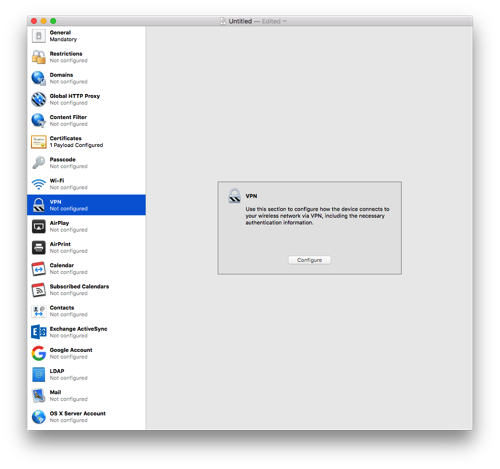
Select the VPN section and click Configure.
-
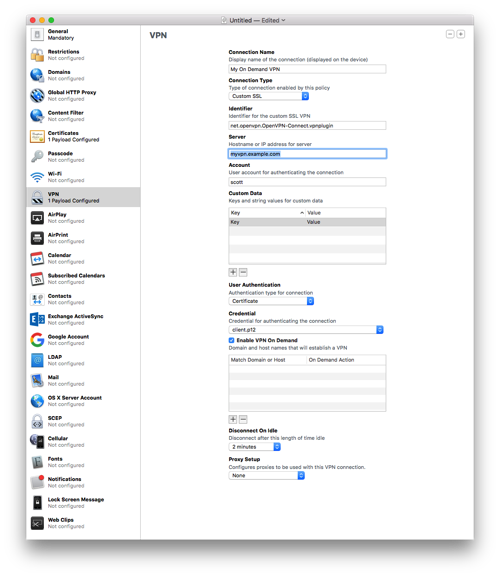
Enter a name for the connection.
- Select Custom SSL for the Connection Type.
- Enter
net.openvpn.connect.appfor Identifier. - Enter the hostname for the Server. I recommend your Dynamic DNS hostname here.
- Enter some username for the account; it won't be used.
- Enter a placeholder key/value pair. You'll edit this by hand later.
- Select Certificate for User Authentication and then pick the certificate you added earlier.
- Enable VPN On Demand. You'll hand edit this later as well.
- Select a Disconnect on Idle value; I selected Never.
- Save the profile to your Desktop (or somewhere else). Don't sign it as signing it will prevent you from editing it by hand which is needed to properly setup the VPN On Demand. Configurator doesn't handle all the options present in current iOS versions.
- Open the .mobileconfig file in BBEdit. BTW, if you haven't bought BBEdit, you should definitely buy it. While the current version offers basic functionality for free, this is a tool that should always remain in your tool belt.
-
Look at the section called VPN. Mine is basically below. You'll need to change a few entries.
VPN AuthName scott AuthenticationMethod Certificate DisconnectOnIdle 0 OnDemandEnabled 1 OnDemandRules Action Disconnect SSIDMatch My Network 5 GHz My Network Action Disconnect InterfaceTypeMatch Cellular Action Connect InterfaceTypeMatch WiFi Action Ignore PayloadCertificateUUID SOME_IDENTIFER RemoteAddress vpn.example.com VPNSubType net.openvpn.OpenVPN-Connect.vpnplugin VPNType VPN VendorConfig dev tun proto udp remote vpn.example.com 1194 cipher BF-CBC resolv-retry infinite nobind NOARGS persist-key NOARGS persist-tun NOARGS comp-lzo NOARGS link-mtu 1542 ca -----BEGIN CERTIFICATE-----\nMIID...bAqZZCQYgHwAh9bW\n-----END CERTIFICATE-----\n - Change the vpn.example.com references to your VPN address.
- For the section that starts with
BEGIN CERTIFICATEfor theca, find the cacert.pem that you saved to your hard drive. Open that in BBEdit and remove all the returns in the file. After the first line replace the return with \n. Before the last line put a \n and then another one after the line. You should end up with a big long line! - The OnDemandRules are described in Apple's documentation. My setup basically says that if I'm on a trusted network, disconnect the VPN. When on cellular, also disconnect the VPN (I trust the cellular network for now). If I'm on any other network, connect the VPN. The last item just falls through, but I suspect it will never get there. In my example, change the names of the trusted SSIDs.
- The VendorConfig section are the OpenVPN options that should match the server.
- Save the file.
- Transfer the .mobileconfig file to your iOS device. I drop the file on AirDrop to my devices. If the formatting of the file is correct, the iOS device will ask you to install the file.
- In the VPN section in iOS Settings, Connect and cross your fingers. That's it! Now when you wonder onto an unknown WiFi network, the VPN should automatically connect. It may take a few seconds for the connection to come up.
If you've made it this far, congratulations! I spent a few days working on this and hopefully I captured all the steps. Please send me corrections or feedback.
Notes
- I've noticed that sometimes iOS connects to my VPN even when it is on my network. The On Demand connection is evaluated when the network changes and I suspect iOS gets confused and starts evaluating the On Demand rules prior to getting an SSID.
- The default certificates are good for 1 year. So you'll need to renew then after a year. I'll cross that bridge when I come to it.
- If the certificate is compromised, I don't know how to do certificate revocations.
- Treat the certificate and keys just as if they were passwords. This goes for the .mobileconfig file as well. The mobileconfig file has the password to the p12 file in clear text and anyone with that file can connect to your VPN and access your network.
- The OnDemand rules are evaluated when the device changes networks and may take a few seconds to bring up the VPN. I always wait for the VPN icon to come up before doing anything on my device.
- OpenVPN runs on UDP port 1194 by default. You can configure it for TCP 443, but I won't go into that because it seems like a pain and requires more changes.
- In the latest iOS version (11.2.x), if your VPN is on demand, you cannot manually connect with it. You have to go into iOS Settings->General->VPN, tap the Info button next to the VPN and turn off "Connect On Demand".
- Savvy readers will notice that I put the client certificate as a p12 file in the mobileconfig file and put it in the OpenVPN specific settings. There appears to have been a change to the OpenVPN client on iOS where the p12 certificate no longer works. You may be able to remove the certificate from the configuration, but I left it.
-
Preserving Metadata in Photos
During my recent task of scanning the rest of the photos that I had lying around, I found a CD that my parents had made with some photos on it. They burned it using iPhoto 6 (burning a CD was a feature of iPhoto years ago). I thought that I'd just be able to put the CD in and open the library in Photos with all the metadata preserved. Unfortunately Photos couldn't read the library, so I was stuck with a bunch of JPEGs that had no metadata on them and the file dates aren't the actual dates of the pictures. While I was able to drag all the pictures into Photos, I really would have preferred that the metadata be attached to the photos.
Apple has taken the approach that the original photos should not be modified and that any changes like the date or metadata should be stored in a database. This is great as long as the database doesn't become corrupted and the application remains supported. I encountered the same type of issue when I was developing Paperless where I was allowing users to add a bunch of metadata to PDFs and I stored it in a database. Unlike Apple, I realized pretty quickly that if something happened to the database, I stopped supporting the application, or a user wanted to switch to another application, I wanted users to still have all the metadata associated with the PDFs. I discovered that PDFs can have keywords attached to them and I used this mechanism to write the data directly into the PDFs.
With Photos, if you drag a photo out of it and into the Finder, you get a copy of the original photo with none of the metadata that you enter in Photos attached to it. However, if you choose to export the photo there is an option to include the metadata which writes it as EXIF to the photo.
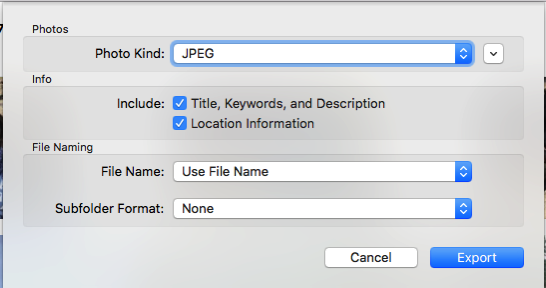
This was the key to my concern about having the metadata in the photos themselves. I created a smart album which contained all photos that didn't have a camera set on them (the assumption is that all photos that have the camera set in the EXIF have the correct photo date), exported all the photos, deleted the photos in Photos and re-imported them. Somewhat roundabout way to accomplish what I wanted, but my photos now have dates on them that will survive if Photos ever goes belly up.