The Road to Retirement

At the height of the pandemic, I started to think a lot about retirement. When I was 12, my father started me on the path to retirement by setting up an IRA for me. While this may seem young, experts say that time is the best way to build a nest egg (unfortunately due to tax law changes, I can’t establish an IRA for my son as it requires him to have income to offset his contributions). Throughout my life I’ve been thrifty (some may say frugal) with my finances. Combined with being hard working and frankly, quite lucky, financially I’ll be ready for retirement.

Being set for retirement only leaves me with a big hole; what is retirement? I’ve always told myself that retirement is doing what I wanted on my own time. That vision hasn’t changed. However with retirement on the horizon, I need to figure out how I’m going to fill my time. I know what I don’t want to do and that is still around all day in a recliner, read the paper and watch TV. Sure, maybe I’ll do that occasionally (well, what is a newspaper), but being stagnant isn’t in my nature and studies have shown that being active mentally and physically are keys to living a long life.

Friends and family have asked what I like to do. That’s a really good question; I’ve spent the last 17 years (almost) with my main goal being to help raise my son. So I’ve put what I want to do in the backseat. I’ve always wanted to help other people (yes, I know it is part of the Scout law) and have done that through volunteering. I’m definitely going to spend more time volunteering. I’ve been a regular volunteer at Feeding San Diego and I plan on increasing time there. Also in the last 1.5 years I’ve changed how I work with the Scouts; I’ve gone from being a troop leader to helping at the district level. This has brought me a lot of joy and I feel like I’m making a difference. It’s good that I’ve discovered happiness in that as they can always use more of my time. Is volunteering the only thing I want to do?

What will I do for myself? Yes, I could argue that volunteering fulfills me and it does. However, there must be more. That’s the part of retirement that I’m still working on figuring out. I really enjoy 3D printing and my son is dead set on teaching me how to use OnShape. I also enjoyed flying a drone (gave that up years ago as I didn’t find I had time) and am thinking of taking a drone class to get licensed; that may open up a business opportunity if I want to film this commercially which sounds cool. Not sure it will pan out, but another piece to occupy my time.

Any suggestions from the peanut gallery on what to do in retirement? I’m not quite there yet, but I’m not going to work until I drop (I hope).

USB-C cables under deliver

When I started learning about USB-C, I was excited to standardize on cables instead of having all kinds of cables and having to travel with a ton of cables. However, years ago, I read about a Google engineer who analyzed USB-C cables to find out which ones had charging problems or could damage devices. Fast forward, many years later there is still no way to tell what cables are good and which ones are bad.

Now that Apple has adopted USB-C, I’ve read about what adapters to use to charge without breaking the bank. The article concerned me as the author recommend some adapters that were not USB-IF certified. Without any type of certification, there is no way to know if you’re going to get a cable that could cause a problem with your device.

In my research to find cables that are quality cables, I watched a video where various cables were put under a CT scan and analyzed. It was fascinating to see the varying quality of cables. The cheap cables may not last and if they break, they could damage your device. In fact, some of the cables directly connect the power without any type of chip managing power. I have a flashlight and a bar code scanner that charge via a USB-C plug. However, neither one can charge with a USB-C to USB-C cable plugged into a power supply! They came with a USB-A to USB-C which probably just wired the power and maybe a few other lines. The only way I can charge them using a USB-C charger is to use a USB-C to USB-A adapter and then a USB-A to USB-C cable. So even if I carried a few USB-C to USB-C cables and chargers, I couldn’t charge these devices. That’s pretty disappointing that manufacturers implemented USB-C in non-standard ways so my hopes of having a single set of cables has been dashed.

I’ve started acquiring USB-C cables and am making sure that all the cables are USB-IF certified (note that this appears to be self certified). Will that keep my devices from having problems? I have no idea, but it is at least lets me sleep a little better at night.

A year without Paperless (ReceiptWallet)

Last year, I wrote about ditching Paperless and storing all my documents in the Finder. This was driven by 2 main things. The first was I didn’t know how long Paperless would be around as it was getting kind of dated. And second I wanted to be able to see my documents and receipts on any device.

Now that I’ve been using the Finder for a year, I can say that the transition has been pretty seamless. My initial plan was to only use the Finder for new things and keep using Paperless for older documents. However, when discussing this with my father, I went ahead and wrote an app that took all of my old Paperless libraries and extracted the PDFs into folders just the way I wanted. So after the extraction, I had all my receipts dating back to 2006 accessible on my Mac, iPad and iPhone.

This is great and has come in handy when I want to find things when I’m not at my Mac or when I’m out and about (my wife has asked me what we paid for something and I was able to look it up in the store). With the Finder being able to search contents of the documents, it is pretty easy to locate a receipt or document. One thing that I still do is when I scan receipts using my ScanSnap, I have it OCR the documents. Unfortunately sometimes receipts are so cryptic that even with perfect OCR, a search may not turn up what I need. However, by stored the documents by year and month with the file name being the merchant name and date, I have a good chance of finding what I need. Note that while your can scan from an iPhone or iPad using the ScanSnap, it won’t OCR the documents, so I still scan all receipts that I don’t get electronically on my Mac.

Now back to my first reason for transitioning to the Finder and that was the longevity of the app. As of the writing of this entry, the website for Paperless has been offline for at least a few weeks and all email bounces. I have no idea what happened to the company and I hope the owner is OK.

If you’re still using Paperless and would like to transition to using the Finder, I hope my Paperless Extractor can help and bring you some piece of mind that you won’t be stuck when/if Paperless eventually breaks (all apps break at some point).

It was a good run, ReceiptWallet/Paperless!

Review: UniFi UXG-Lite

Several years ago, I replaced the networking gear at my parents’ place with a UniFi Security Gateway, access points, etc. The setup has been working reasonably well and the only major issue was when the USG died and I had to replace it (turns out it was probably just the power supply, but I learned that too late). While the USG performed adequately (they only have a 100 Mbps down/10 Mbps up Internet connection), finding a replacement USG in case it failed was getting harder and harder (I had a spare on my shelf just waiting for it to die). Ubiquiti really didn’t have a decent replacement for the USG until recently when the UXG-Lite came out.

Prior to me seeing that the UXG-Lite had been released, a friend of mine sent me a UniFi Cloud Key Gen 2 Plus which I setup to replace the outdated UniFi NVR (no longer supported and no remote access was available) and CloudKey Gen 1. This allowed my dad to use UniFi Protect and view his cameras remotely.

Once I saw the UXG-Lite released, I immediately purchased one as it looked (for the most part) like a direct replacement for the USG. One of the requirements to running it was a newer UniFi controller which I had just installed so I was good to go. One of the immediate differences in the UXG-Lite was that it only had 1 WAN port and 1 LAN port while the USG had 1 WAN port, 1 LAN port and then 1 WAN/LAN port. I had originally setup my parents network with 2 separate LANs, but realized that all the traffic on 1 LAN was wireless so I could simply set a SSID to use a specific VLAN and still be able to isolate traffic.

Installing the UXG-Lite was a breeze. First I updated the controller to the latest version, then I forgot the USG in the controller and then adopted the UXG-Lite. All the settings were transferred and the whole process only took a few minutes. Since the USG was not powerful enough to handle IDS/IPS, I had that turned off. Once the UXG-Lite was setup, I turned that on just for some added piece of mind.

I also setup a WireGuard VPN into the box (not possible with the USG) and that seemed to work just as flawlessly as it does on my UDM-SE. I can’t imagine using it much, but it is there if I ever need it. The remote management of the network does all that I need to do without connecting directly to the network.

The UXG-Lite has been running for a week and I haven’t heard any complaints, so I’m going to call it a success. I was just looking for a modern replacement for the USG and that seems to be what it is. I’ve seen various reviews/complaints about the device, but in my limited testing I’m not seeing any issues.

Pros

  • Easy setup
  • Integrates with the rest of the UniFi line of equipment

Cons

  • Lacks second WAN/LAN port

Summary

If you’re looking for a replacement for the USG3, the UXG-Lite seems to foot the bill. While the UX (UniFi Express) has also been released, it wouldn’t meet my needs in the case due to using UniFi Protect to run cameras. If I hadn’t needed that, the UX may have worked. Remember that the UXG-Lite still needs the controller running on another piece of hardware so if you need an all-in-one box, this isn’t it.

I no longer have to worry about trying to replace an outdated equipment when the USG eventually broke. I’m still a huge fan of UniFi equipment and while it may not be commercial grade, it works for my home needs and being able to manage my parents’ network remotely is a lifesaver.

Amazon Returns and Bin Stores

This past summer I was reading 3D printing posts on Reddit and saw the mention of “bin stores” where people were purchasing filament and other 3D printing accessories for cheap. I started looking at what a “bin store” was and learned that they are stores that buy up Amazon (and other company) returns by the pallet load and sell the contents by spreading them out on tables that have lips (i.e. bins) to keep in the products. In addition to returns, the stores sometimes have items that didn’t sell so there may be multiple of the same item.

I was quite intrigued by the concept and mentioned it to my wife and she was also curious. I looked at a store about 20 minutes from our house and we went the next day. The stores that I’ve found use a similar strategy where they re-stock once or twice a week, have a higher price per item the first day, i.e. $10 the day after restocking and then reduce the price each day until re-stock day. Some stores will clean up the tables before re-stock day and sellable merchandise they take down to Mexico to sell.

Walking into the store, we were overwhelmed to see how much random stuff was for sale. We quickly realized that we had to be good shoppers by actually looking up the products that interested us to see if they were a deal or not. Some things for say $7 that sell new for $10 aren’t that much of a deal; however, something that sells for $25 we can get for $7 may be worth it.

After our first excursion, we decided to go back on the day after re-stock to see if there was better stuff. We got there early and had to wait in line before they opened. While waiting, we talked to a man that says he looks for just tools so that he can resell them and he mentioned another store to also check out. We went to the other store which was huge and spent several hours there looking around. We developed a system where my wife was on one side of the table and I was on the other and we’d go down each row so that we could see if there were any treasures in there.

As each trip is an adventure, my wife and I have been going every few weeks to kill some time. We also stop by the Grocery Outlet next door and do a little grocery shopping. Some of our trips are more productive than others; my son came with us once and picked out a Sony professional microphone that retails for about $250 that he picked up for $7. He sold it on eBay for $95! We’re not always that lucky, but have found some interesting products that at $5 an item (I like $5 day is it is a good balance between impulse buy and decent mix of available products.) are worth the trip.

Here’s a small sampling of what we’ve picked up for $7 or less:

  • Non-contact thermometer (human and surface)
  • Strainer that clips on pot
  • Bluetooth barcode scanner (I wrote an app for this that lets me easily scan items and look them up on Amazon for use on future trips)
  • Shoe orthotics
  • Foot stretcher (for my plantar fasciitis)
  • Fidgets for my wife to use at her school
  • Grabber tool (for picking up trash and hard to reach items)
  • Brita water bottles (built in filter)
  • Webcams (can be adjusted whereas the one on my monitor always cuts off the top of my head)
  • Name brand kitchen scissors
  • Bluetooth hygrometer/thermometers
  • HDMI capture device

So while we’re enjoying this new “hobby” and have picked up some useful items (we usually put stuff in our cart and at the end go back through and ask each other if we really need/want it and if it is worth it; we tend to put back a bunch of items), I’ve started to think more about the return problem.

These bin stores don’t seem to have a shortage of merchandise and the stores we’ve been to are only a small sampling of stores across the country that are doing the same thing. I’ve pieced together what happens from some articles as well as what I’ve seen at the stores. When an item is returned to Amazon (or Kohl’s or Target), a number of things could happen to it depending on the seller. If things are sold by a third party, I’ve read that the seller can either pay to have the return sent back to them or basically just eat the cost and have Amazon “dispose” of it. In addition, if things don’t sell, they may be in the same situation. Shipping costs money and it may cost more than the item resulting in items being “disposed” of by selling by the pallet load.

In some cases, items may be resold if they are new and unopened. However, this has a cost associated with inspecting and restocking the item. I don’t believe that this problem is going to go away any time soon. While it is great for my wife and me to have a treasure hunt adventure, the environmental costs in both shipping the products and disposing of what doesn’t sell even after the bin stores is huge. If companies move towards charging for returns and discouraging returns, that could reduce this slightly.

However, there is still the issue of producing things that don’t sell. For instance, we routinely see metal signs with various slogans on them and it is obvious that they didn’t sell. If a company makes them, ships them from China to Amazon to sell, it may take a few months to arrive. Then they try to sell them for a few months; in the meantime they are producing more. If they don’t sell, they may have part of the initial inventory to get rid of as well as the additional items produced before they were told to stop. Local manufacturing could cut down on the lag time and cut off production sooner, but using the theory “if we make it, we can sell it”, creates more products that people may not need.

Is there an easy answer for reducing the waste caused by returns or over manufacturing products that aren’t purchased? Unfortunately no. I try to do my part my thoroughly researching items before purchasing and rarely return items. This is especially true having seen where the returns end up and thinking about the impacts of my decisions.

Review: Consumer Cellular

As I’ve written, I switched to Consumer Cellular in July in an effort to save a little money. While I’ve been an AT&T customer for many years, I periodically have looked to save money by switching carriers. When I turned 50 this year, I received an offer to join AARP and in the offer was a discount for Consumer Cellular. This was another wake-up call to check for a new carrier. Unfortunately Consumer Cellular didn’t support the Apple Watch. This changed over the summer and I switched all my lines.

Despite a few hiccups in the transfer process, I’ve been quite pleased with the service. Consumer Cellular uses AT&T’s network so there was no change in coverage or my experience using my phone. Prior to the switch, I had 2 phones, a hotspot and an Apple Watch on AT&T and then my son’s phone on US Mobile (5 GB plan).

AT&T allows a maximum of 3 GB of hotspot data on the phone, so having a hotspot with unlimited data was quite useful for traveling and other times I needed to use my laptop or iPad. With Consumer Cellular, you can use any of your data on your phones as a mobile hotspot; this meant I didn’t need a separate hotspot line and anyone in my family could use a hotspot without borrowing the actual device.

This summer, AT&T announced that if you paid by credit card you wouldn’t get a $5/line discount. I always pay by credit card as I get cash back (2.5%) meaning that my AT&T cost went up by 2.5%; that was kind of the last straw on switching.

Pros

  • Cheaper than AT&T
  • Easier to get a US based human on the phone for support
  • Support folks seem to actually care (I had a conversation with one about San Diego while we were waiting for something to complete).

Cons

  • Switching carriers is not always a straightforward process

Summary

Consumer Cellular is AT&T repackaged for a significantly lower cost. 5G+ is offered as well as mobile hotspot on the phones. The unlimited data plan is really 50GB of data, but that’s plenty for my family (I think we hit 20GB when we went on vacation this summer).

I’m saving almost $60 per month by switching to Consumer Cellular! This is a huge savings with no change in service. In addition, my son no longer has to worry about his 5 GB of data (I put him on a separate plan as it was cheaper) and we don’t need a separate hotspot device.

Consumer Cellular – 3 lines and an AppleWatch (unlimited data)
Total bill (including taxes & fees):96.53
Credit card cash back (2.5%)-2.41
Net94.12
AT&T 2 lines + hotspot (unlimited data)
Total bill (including taxes & fees)132.45
US Mobile 1 line – 5 GB data
Total bill (including taxes & fees)19.91
Credit card cash back (2.5%)-0.50
Net152.36

Attempting to Save Money By Switching Cellular Carriers

As someone who tries to be thrifty, I routinely look at recurring charges and see how I can save some money. I’ve been using AT&T for cellular service for many years on various plans with various discounts. Last year I added a teacher appreciation discount (my wife is a teacher) and brought the rate down a little. I’ve been eyeing other carriers and MVNOs for awhile and gave Visible a try as they supported the Apple Watch and there were only a handful of MVNOs that supported the watch. That test didn’t go so well at the time as my phone was unusable when I went to Costco. They have since changed offerings and I would be tempted to try again.

This week, AT&T sent email saying that if I didn’t switch my AutoPay to use a debit card or bank account, they would charge me $5/line ($20 total) which got me thinking about switching again. My credit card rewards pays me 2.5% so on a $132 bill gives me about $3 per month which effectively increases what I pay. I decided to revisit carriers and discovered today that Consumer Cellular started supported the Apple Watch. I saw it on Apple’s website and then called them to verify. What I didn’t realize until later that they only support the latest versions of the Apple Watch (Series 8, SE 2, and Ultra) and not my 3 year old Apple Watch Series 6.

I was so excited about potentially saving $50 per month ($600 per year) that I ported my number over, added the eSIM and went through the process to get setup. There were a few hiccups as I entered the wrong PIN for the port (you have to request a time limited one from your carrier) and I had to call Consumer Cellular. Each time I called, I was connected to a rep quickly and was able to easily communicate with the US based support. Each person seemed empowered to actually handle my issues. After a little bit, I was up and running on my phone. I tested out mobile hotspot and discovered that I had been assigned an AT&T eSIM giving me basically the same coverage as I already had. Unfortunately things started going down hill when I tried to activate my watch. I called again and finally realized that they didn’t support my watch; I immediately asked for a port out PIN as I don’t want to give up my Watch for running (I don’t like being tethered to my phone).

I went to AT&T’s site and started the process to add my phone back to the account (my wife’s phone is the primary one on AT&T and I hadn’t ported it out as I wanted to make sure everything worked well before subjected her to a switch). After I put in the order (it says I’ll have to pay a $35 activation fee which I hope isn’t correct), I received an email that I had to call to finish the port. So I called and explained the situation and spoke with an outsourced rep. The rep wasn’t able to help; I went through this a number of times as well as the online chat.

After I think 4 hours of getting hung up on, transferred, having to explain the situation over and over, going through phone tree hell, and receiving strange error messages on the website, I finally called again and was connected to a very nice US based woman who was sympathetic and understanding. She asked why I went with Consumer Cellular and I told her; she asked about coverage and I said it was identical to AT&T which kind of surprised her, I think. She was very patient and did everything she could do and unfortunately had to transfer me to another department and I ended up “outsourced” again. None of the outsourced reps seemed sincere about helping me and read from their scripts. I have trouble understanding accents and that made the experience even worse.

Throughout this ordeal, I was about ready to just forget the phone number that I’ve had for over 25 years as I was so frustrated with AT&T. While I created my own mess, dealing with AT&T makes my blood boil. Eventually I was able to get my phone reactivated, but am still stuck with no cellular on my watch. That’s a problem for another day.

I wasn’t planning on getting a new Apple Watch this year as my Series 6 works fine. However, after this experience with AT&T, I am definitely getting the next watch so that I can jump ship and goto Consumer Cellular. Not only will it save me money (about enough in one year to pay for the watch), I won’t have to deal with AT&T’s archaic website, outsourced support, and high rates.

I can’t wait to say “good riddance” to AT&T.

Paperless Extractor

When I was designing ReceiptWallet, I was concerned about the database being corrupted and losing all my data. I decided that as a backup to the database, I’d store all the files as PDFs (later in life it would store other types of files, but for the most part people only stored PDFs) and would embed all the metadata as PDF keywords that could be recovered. The keywords in the PDFs also served as a transport mechanism where you could send a PDF from ReceiptWallet to someone else with ReceiptWallet and when imported, all the metadata would be filled out. In addition to being used as a backup of the data, I envisioned the day when I no longer used ReceiptWallet as I didn’t want to keep supporting it.

While this original idea seemed pretty solid, writing the keywords for the PDFs proved to be somewhat problematic. At the time, Apple’s PDFKit wasn’t completely reliable and could corrupt files when writing them out or crash. Reluctantly I added a switch to ReceiptWallet to turn off this feature (default was to have this on). So depending on the PDF, some PDFs may not have keyword data in them so metadata would basically be lost.

As I wrote earlier this year, that day has come. In my transition away from Paperless (formerly ReceiptWallet), I manually dragged out all files from one of my libraries into the file system and organized them into folders by categories. I placed the folder (named Document Library) in iCloud Drive allowing me to access all the files from anywhere including on my phone. At one point in the past, I started looking at an iPhone version of ReceiptWallet that would sync files; it didn’t go anywhere. Now I finally have that feature!

While I moved a document library over to the file system, I left all my libraries for receipts (one for each year) in Paperless and left them to deal with another day. A few weeks ago I was talking to my father about his transition away from Paperless (he likes to follow my lead sometimes) and I asked him if he had a tool to extract all his files, if he’d use it.

I spent a few hours that day working on a small Mac application that did just that. I had a chance to do a little SwiftUI and Swift concurrency. You drop a Paperless library onto the app’s main window, it walks the library (the library is a bundle which is just a folder which a file extension) looking for every PDF and then opens each file to find the date and merchant. It then creates folders by year and month for the files.

I’ve made the source to this app freely available. It comes with no warranty and I will not make a binary of it available; the tool has worked fairly well for my father and me, but may have some quirks (at one point, extra PDFs without metadata were added to the Paperless libraries).

This app was made without using any source to ReceiptWallet or Paperless; the directory structure of a library can be viewed in the Finder by control clicking the library and choosing Show Package Contents.

I have no information on the future of Paperless and I’m switching away from it as the file system handles my needs better than it did when I wrote ReceiptWallet over 16 years ago.

Goodbye old friend, ReceiptWallet

About 16 years ago, I was searching for a receipt and couldn’t find it. I thought there could be a better solution and searched for an application for the Mac that would allow me to store receipts. Unfortunately, at the time I couldn’t find anything so I decided to write ReceiptWallet.

I made many decisions writing ReceiptWallet that turned out to be very forward thinking that would allow me to switch how I tracked receipts in the future. I decided on using PDFs for storing everything (later I allowed for storing zip files and some graphics formats) and storing the files in the file system in a file bundle instead of embedding them in a proprietary database. In addition to storing metadata in a database, I added it to the PDFs that could be extracted without running my software. This was problematic as sometimes the PDFs that were imported either didn’t accept being modified with the metadata or the PDFKit APIs would crash.

ReceiptWallet was quite successful for me, but other things (like being a father) made it hard for me to keep up with it as a side project. So I decided to sell it and it became Paperless. Over the years I’ve done some work to help them with the product.

At the end of last year I was looking at Paperless as I used it daily and started thinking how long it would be around. It hasn’t made it to native Apple Silicon, yet and the user interface is becoming very dated. After chatting with a friend that said he just uses Spotlight to find things, I started looking to see if I could recreate the main features that I used in Paperless in the Finder. I also looked at some other apps that were/are competitors to Paperless and didn’t quite find what I wanted. I used the software for two distinct types of filing; the first was for manuals and documents. The second was for receipts and taxes.

For the first type of filing, I had already started copying certain documents to iCloud Drive such as manuals, certifications, vaccine records, etc. so that I could access them when not at my computer (I had started work on an iPhone version of ReceiptWallet that synced, but didn’t make much progress on it as storing all those documents on the iPhone would quickly eat up the limited storage at the time). I went ahead and made a directory called “Document Library” and then put folders in it. I then transferred all the documents out of my Paperless document library into folders and sub folders in the filing system. It took a few hours, but I managed to classify all my documents. By placing the new “Document Library” on iCloud Drive, I immediately gained mobile access without a special application. I could have used Finder tags, but decided that the directories and searching would be more than adequate. One concern is backing up iCloud Drive as it doesn’t directly appear in the file system. Luckily it is there under ~/Library/Mobile Documents/com~apple~CloudDocs and can be backed up with Carbon Copy Cloner or other tools. Note, however, that if you use tags and backup files to network volumes, CCC by default won’t copy the tags.

Documents Folder

For the second type of filing, receipts, I looked at what I was doing in Paperless. I organized receipts by year and then added categories to them in the interface. In reality, the only reason to add the categories was in case I needed to find a receipt for tax purposes. So I setup a folder called Receipts, created a 2023 folder and then a folder for each month under it. Not strictly necessary, but it is easier for me to open a folder with maybe 25-30 receipts than one with 500. Now all I do is scan or save receipts to the right month and I’m done. I don’t worry about filling in all the fields that I did with Paperless such as category, payment method, or amount. Since the folder is in iCloud Drive, I could just snap a picture of the receipt from my phone, save it and be done. I don’t do that, however, as I like the better quality of a scan, my scanner software does OCR, and I still enter every transaction in Banktivity. I do apply tags to certain transactions that are business or tax related which is kind of handy and the tags are visible on my iPad.

Receipts Folder

Am I going to miss Paperless? It does seem like an end of an era for me, but by simplifying how I handle receipts and documents will hopefully lead to time savings in the future.

Money Donation Machine – My son’s Eagle Scout Service Project

[As this article relates to my son’s Eagle Scout service project, I wrote most of it, but he had editorial discretion and added some content in various places. In the article, "I" refers to Scott, and "he" refers to Aiden, my son.]

About 9 years ago, my wife and I decided that we wanted to impart a sense of giving back to our son, so we decided to start volunteering with Feeding San Diego. We’ve been regular volunteers since, and when the opportunity arose to become trained as Team Leaders, we did so and our son, Aiden, at age 10 became the youngest team leader.

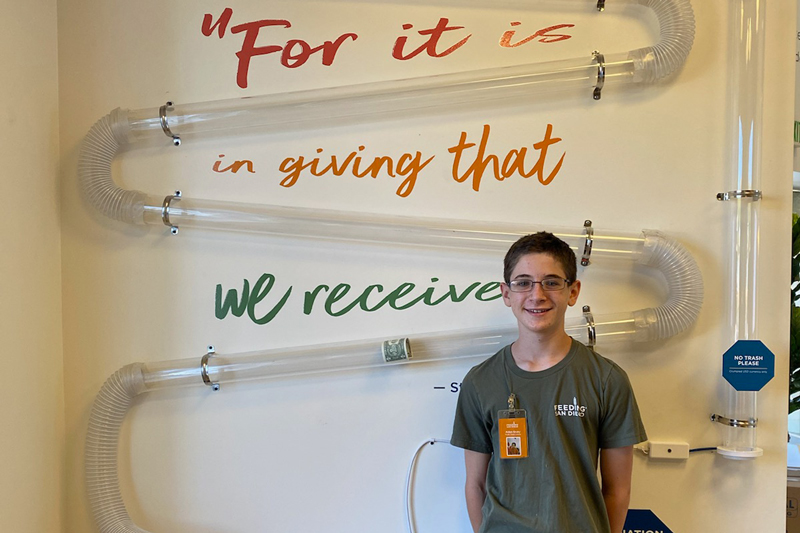
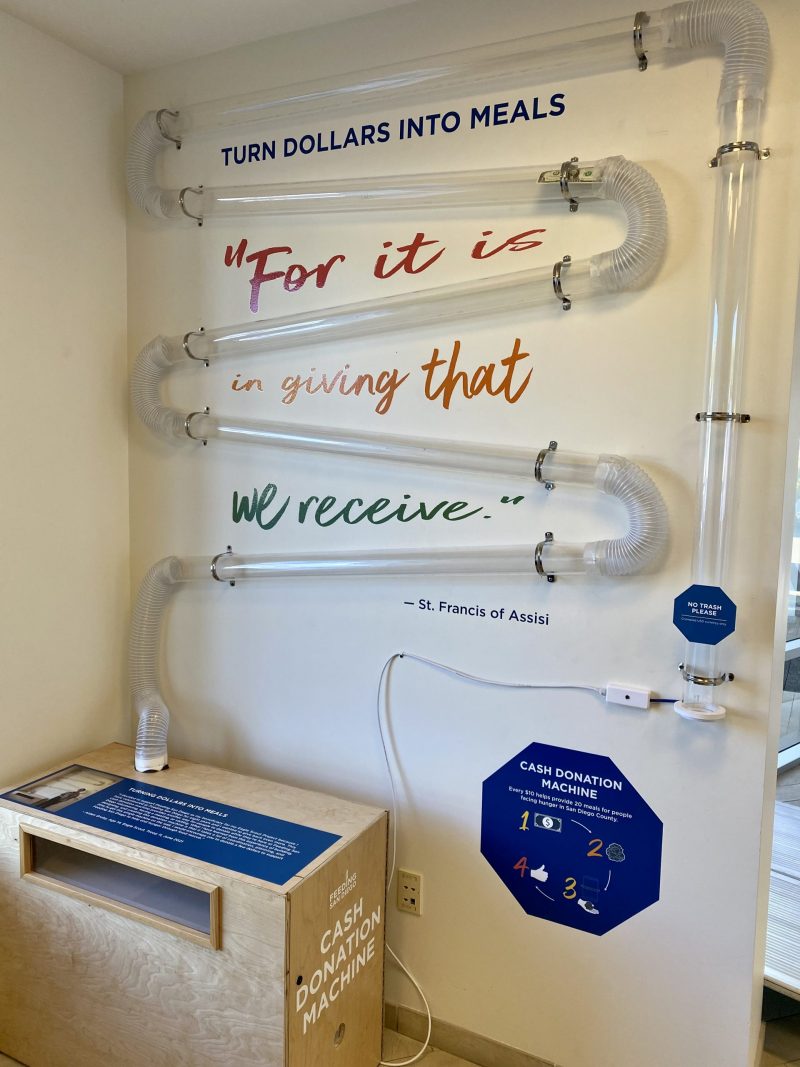
When it came time in August 2020 for Aiden to start planning his Eagle Scout service project, he wanted to do something for Feeding San Diego. He brainstormed with their marketing department, and they decided on a cash donation machine similar to ones at science museums and children’s museums, which suck the money up through a series of clear tubes. Aiden went back and forth with them over the course of many months to come up with a design and get it approved. While ironing out the design, he started figuring out the actual mechanics of how it would work. I was as hands off on the project as possible, but gave some suggestions here and there. While this donation machine won’t be handling million dollar donations, it will hopefully encourage people to donate, and be used as a talking piece in their lobby.

Finished project with graphics

He started his concept using an open source project he found, but it didn’t quite meet his needs. The first part was to be able to turn on a vacuum when some type of trigger (more on that later) was activated. I prototyped using a WiFi outlet and a WEMOS D1 Mini, but didn’t tell him how I did it just to give myself confidence that it could be done. It was a pretty simple concept where I setup the WEMOS as a WiFi access point and had the outlet connect to it; when a button was pressed, the WEMOS (basically an Arduino) sent an HTTP command to the outlet running Tasmota firmware. This concept was great, but in the end there was too much wireless interference when Aiden installed the project for it to actually work. Luckily Aiden found a UL listed wired switch called the Dataprobe iBoot-IO. This product was quite expensive, but turned out to be reliable and met our requirement of being UL listed.

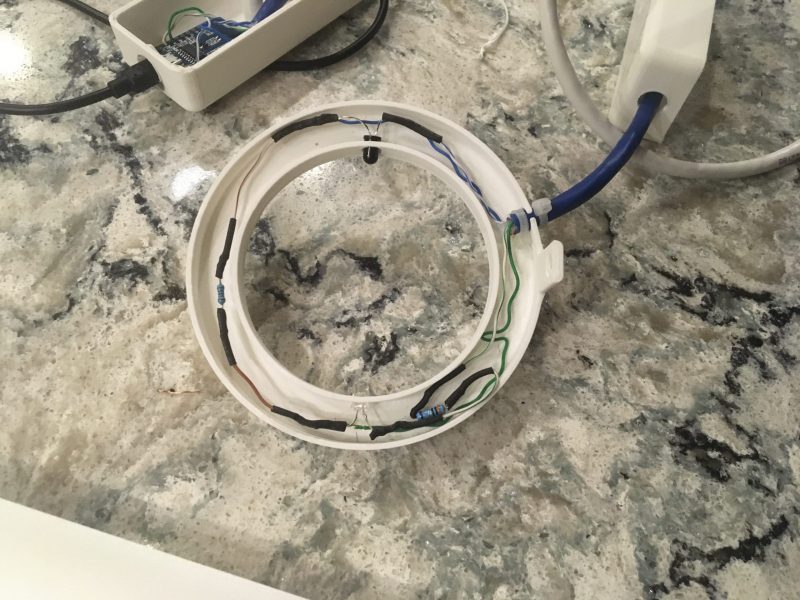
After getting the outlet to trigger, the next piece was how should it trigger? Basically, when money is put in the tube, it breaks an infrared beam and sends a signal to the outlet. This was completely out of my scope of knowledge, so Aiden did some research, figured out how to wire an IR sensor and receiver. The schematic is below. With that out of the way, how was it going to be mounted? Aiden has become a pro at using Fusion 360 and designed a ring to house the electronics and fit around the tubing. As part of programming the sensors, Aiden wrote the Arduino code to turn off the outlet after a certain number of seconds to allow the money to go through the series of tubes.

IR sensor

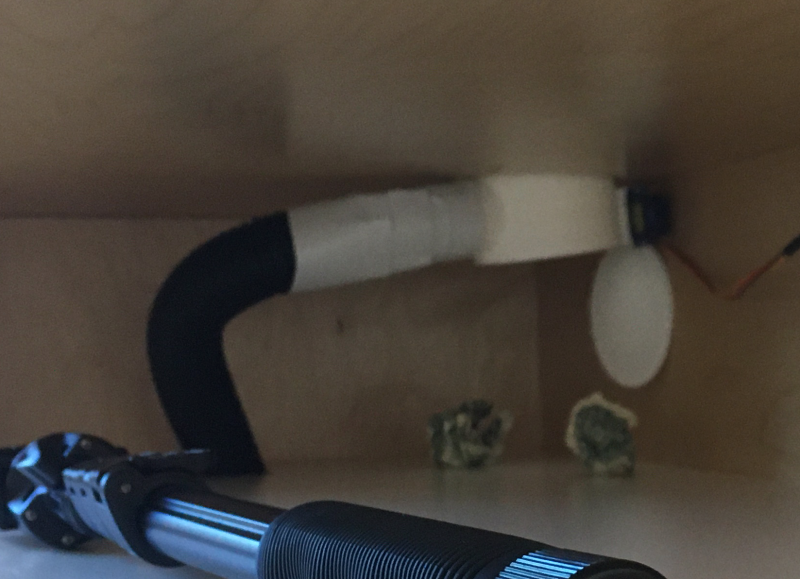
Is the project done, yet? I kept asking myself that numerous times over the 10 months of the project! Feeding San Diego wanted to make the cabinet to house the vacuum, electronics and collect the money, so Aiden designed and provided the dimensions for the box (again using Fusion 360). Unfortunately, the box wasn’t made to those dimensions, but that turned out to be a good thing. The box had a compartment for the vacuum and then a top compartment where the money would go that had a window for people to see. Aiden’s assumption on the box is that the top part would be completely sealed such that the vacuum could be attached to the bottom and there would be enough suction to draw the money through the tubes. I wasn’t, however, convinced of this and suggested that Aiden have a backup plan. I gave him an idea of a flap on the end of the tube that would close when the vacuum was turned on (the vacuum would provide enough suction to close the flap). Unfortunately the vacuum didn’t do that, so Aiden expanded on the idea and designed a flap with a servo such that his program sent a command to the servo to close the flap when the vacuum was turned on and then opened the flap when the vacuum was turned off so that the money would just drop.

Suction flap

With that finished, Aiden was confident that everything would work when installed. A few days before he installed the project, we were able to pick up the box so that Aiden could prepare it by installing thick foam to deaden the sound of the vacuum. When install day came around, Aiden led a number of Scouts and adults from his troop on attaching it to the wall. At the end when it came time to turn on the machine, the wireless interference I mentioned before caused problems with it not being reliable. After trying to troubleshoot it, Aiden finally found the iBoot IO box and ordered it as that would be more reliable and he wouldn’t have to worry about it. Waiting for the part, however, was torturous for him.

iBoot IO Box

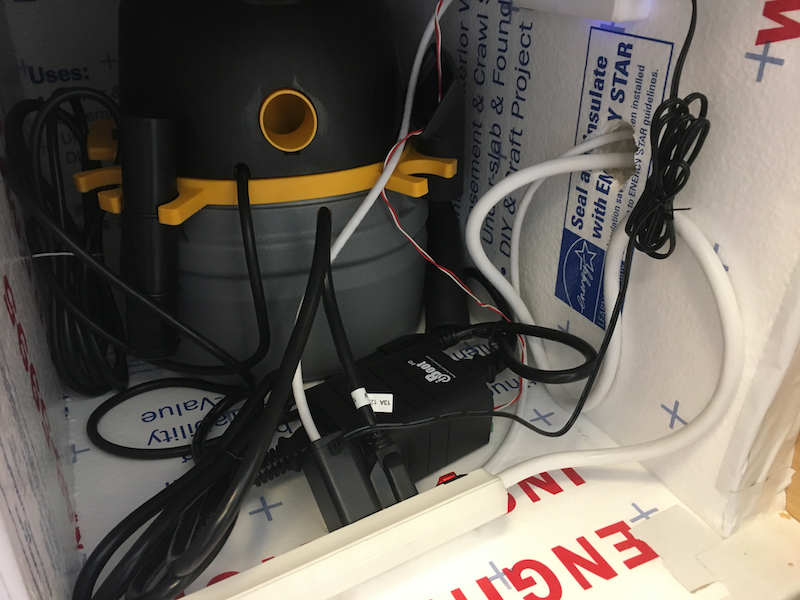
Once the part arrived, we went back to Feeding San Diego and he installed it. The electronics worked well and did what it was supposed to do. Unfortunately, there was another hiccup and that was that if the money wasn’t crumpled, it wouldn’t make it through the tubes. Back to Fusion 360 to design a "cap" to make the hole smaller and require people to crumple the money (signage has been added). Was that the final piece in making everything work? No. Turns out the vacuum was a bit underpowered, and the money wouldn’t always make it through even if it was crumpled. More research and a trip to Home Depot for a larger vacuum got him one step closer. Remember I mentioned the larger box before? The new vacuum was larger and some of the insulation he put in had to be cut out to accommodate it.

Was he done after the new vacuum? Well, almost. Aiden didn’t follow the KISS principle in his code which caused some false activations on the vacuum. I encouraged him to remove extra code and just turn on and off the outlet when the sensor was tripped; he had code in there that attempted to detect if someone kept triggering the vacuum and was playing around. That code, unfortunately, was a bit too complex for this application.

Does it work? Yes!

Aiden wanted me to write up his project and I’ve done my best to capture the big pieces.

If you have any questions about this, please don’t hesitate to contact me.

Complete Project Picture