Protecting my dishwasher from theft

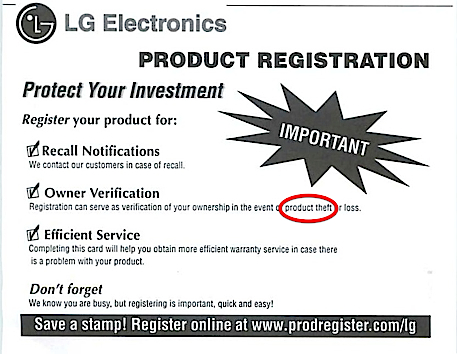
Included in my new dishwasher is the standard product registration card from LG Electronics. I usually don’t fill out the registration cards as they don’t affect warranty service. I did briefly look at the card and laughed when I saw it. It said:
Registration can serve as verification of your ownership in the event of product theft or loss.

I know that this is a standard registration card for all products, but it was funny.

registrationsmall.jpg

I’ve decided to provide step by step instructions for stealing my dishwasher because the product registration will help me prove that I own it.

  1. Break into house.
  2. Get past attack dog.
  3. Find kitchen.
  4. Take off cabinet toe kick. Hint there is one nail hidden in it.
  5. Unscrew dishwasher toe kick.
  6. Shut off water to dishwasher (the connection is under the sink; however, the cabinet under the sink has a child lock so you have to find the magnet).
  7. Disconnect drain hose while you’re under the sink.
  8. Unscrew electrical cover.
  9. Put on leather gloves and unscrew connections (or go out back and turn off the circuit breaker). Be careful!
  10. Find a tool to lower the leveling feet.
  11. Lower dishwasher.
  12. Pull dishwasher out (you have to feed the drain and supply hoses while you’re doing this).
  13. If you didn’t shut off the circuit breaker (it’s labeled in the box), be very, very careful with the water that comes out of the hoses so that it doesn’t come in contact with the live wires.
  14. Drag dishwasher out front door (it easily fits out the front).
  15. Shove it in your truck without my neighbors calling the police.

That’s all there is to stealing my dishwasher, so if you’re up for the challenge, be my guest as I have LG to back me up when I need to prove to the police that it’s mine.

Something Microsoft does right

I’ve never been a Microsoft fan and really haven’t had positive things to say about their software. There are lots of people that are as against Macs as I am against Windows. Today, I attended a Microsoft event where Microsoft was showcasing Windows 7, Windows Server 2008 and Exchange 2010. I decided to go as most of the companies I interact with are Microsoft shops and it was about time for me to learn about the “dark side”.

I went to the track on Exchange 2010. As the presenter started talking about Exchange, my view on Microsoft (at least Exchange) really changed. Microsoft has implemented so many things that companies need and made it easy to use (at least it looks that way).

The presenter was touting how well Outlook Web App worked in Safari and Firefox which is pretty cool. In addition, administration roles are sorely missing from other products I’ve used so that you can give a junior administrator certain privileges. Also, archiving and discovery is completely integrated. All of this, of course, comes at a price, but it knocks the socks off anything that Apple has put out. If Apple has any chance of competing in the enterprise space, it really needs to examine Exchange. I like the open source underpinnings of OS X server, but slapping together open source apps doesn’t make a server solution.

If I had people to run my servers and a vast budget, I’d definitely consider Exchange :-). Hmmm, maybe my head cold is clouding my judgment.

Sad (tech) day at the Gruby house

We’ve been using a Mac Mini as a media center for a little while now and haven’t used the TiVo in weeks. So, today, I decided to unplug the TiVo. The TiVo has been our friend for over 5 years and has undergone a few surgeries to swap out the hard drive.

When I unplugged the TiVo, I said to my wife, “notice how quiet it is?”. She hadn’t noticed the noise as it has been background noise for so long. The hard drive in it and the fan were quite noisy. The difference is absolutely amazing in terms how quiet it is now in our TV room.

While the TiVo has served us well, it is looking like my Mac Mini with EyeTV is going to fit the bill for our TV watching needs. The solution is not perfect, but it is working well.

RIP, TiVO.

Open Directory and DNS

As I’ve written before, Open Directory on Mac OS X doesn’t like it when DNS is messed up. It requires forward and reverse DNS to point to the same place. Our Open Directory server was running fine, but today we moved DNS to a different machine.

I was unable to authenticate using LDAP and saw an error in the LDAP log:

Miscellaneous failure No principal in keytab matches desired name.

After a little searching, I can across a blog entry mentioning this and talking about DNS. While it wasn’t exactly what I had, it made me do a little poking at my system. Turns out that I created 3 A records for the LDAP server which created a reverse DNS entry for the server. The problem is that the forward DNS entry didn’t match the reverse DNS entry. I changed 2 of the A records to CNAME records, restarted the LDAP server and the problem went away.

I wonder if there is another cause for this problem or just the authors of the software didn’t bother to put in a useful error message. It’s easy to ignore putting in useful error messages when writing code, but when Apple decides to use open source software and slap a GUI on it, they should try to make the error messages more useful. Again, I’m complaining about slapping a GUI on command line applications. If I wasn’t persistent and didn’t know how to troubleshoot UNIX, I’d never be able to run a Mac OS X server.

How (not) to install a dishwasher

The below steps are what I did to replace our ailing dishwasher. They should NOT be followed by anyone and your dishwasher should be installed by a professional. However, please note that the $100 install charge that Home Depot and Lowes charges may not cover your install if something is not simple.

  1. Shut off water supply to dishwasher.
  2. Shut off circuit breaker to dishwasher.
  3. Figure out how to remove cabinet kick plate. This proved to be challenging because tile was put in after the cabinetry and dishwasher was installed>.
  4. Disconnect water supply from dishwasher.
  5. Carefully open box with power supply.
  6. Unscrew wirenuts and use test meter to verify that power is off.
  7. Attempt to pull dishwasher out.
  8. Realize that dishwasher is too tall because tile was put in after dishwasher was put in.
  9. Try to lower feet by hand, but it doesn’t work.
  10. Grab pliers and screw in feet.
  11. Pull out dishwasher.
  12. Disconnect drain line.
  13. Put dishwasher aside.
  14. Notice extra wires in the back with a wirenut only on the hot.
  15. Put wirenut on the neutral (just because).
  16. Push wires back into hole in wall.
  17. Notice that wires seem like they’re going to break.
  18. Take off wirenuts and test wires.
  19. See that no current is flowing.
  20. Cut wires below where it looked like it was going to break.
  21. Thank goodness that I was using rubber handled cutters.
  22. Wait for heart to stop racing.
  23. Think about how on this green earth was I going to cap this live wire without shutting off power to the whole house.
  24. Put on leather gloves.
  25. Put test meter on newly exposed wires and see that they are live.
  26. Realize that the reason that the meter initially said there was no current was because the wires were broken.
  27. Shut off circuit breakers and retest wires.
  28. Carefully finish cutting the wires.
  29. Carefully strip the wires and apply wirenuts.
  30. Push wires back in wall.
  31. Turn breaker for that circuit back on.
  32. Call it a day.
  33. Wait for dishwasher to arrive.
  34. See that hole for drain line and supply line wasn’t big enough.
  35. Use recipricating saw to make hole bigger.
  36. When saw doesn’t finish the job, grab Dremel and work on the hole.
  37. Attach supply line to water line and feed it through the hole.
  38. Feed drain hose through hole (it’s attached to the dishwasher).
  39. Put supply line in channel under dishwasher.
  40. Screw right angle connector onto dishwasher for water supply line after putting Teflon tape on it.
  41. Think that the direction the right angle connector ended up could be a problem later.
  42. Push dishwasher into hole.
  43. See that power doesn’t come through the channel like it should have.
  44. Attempt to pull dishwasher back out and see it get stuck.
  45. Spend awhile trying to yank the dishwasher out and figuring out what to do.
  46. Grab plastic drywall knife and jam it into the side to try to get dishwasher out.
  47. Pull dishwasher out.
  48. Grab Dremel and make modifications to cabinet.
  49. Attach lead wire to power cable with electrical tape to help feed it.
  50. Push dishwasher back in cabinet.
  51. Yank on wire for power.
  52. See feed wire come off.
  53. Pull dishwasher out.
  54. Tie feed wire to power and re-tape it.
  55. Push dishwasher back in.
  56. Connect water supply line.
  57. Turn on water supply line.
  58. See water leak at supply line side of right angle connector.
  59. Turn off water supply.
  60. Redo Teflon tape and re-attach water supply line.
  61. Turn water back on.
  62. Wait a few minutes.
  63. See water leak on other side of right angle connector.
  64. Shut off water supply.
  65. Unscrew water supply line.
  66. Unscrew right angle connector.
  67. Reapply Teflon tape on right angle connector.
  68. Reattach right angle connector.
  69. Reapply Teflin tape on right angle connector on supply line side.
  70. Reattach water supply line.
  71. Turn on water.
  72. See that water didn’t leak.
  73. Connect power supply with wirenuts.
  74. Attach drain hose to airgap.
  75. Attempt to level front feet.
  76. Directions say to use 1/4″ ratchet to screw down feet.
  77. See that my socket fits, but the wrench doesn’t physically fit no matter what I did.
  78. Look all around for something to lower the feet.
  79. Find Gerber multitool in garage.
  80. As a last ditch effort, use tool to lower feet. The big issue was the tile made it difficult to get access to the feet.
  81. Finish leveling dishwasher.
  82. Secure top brackets of dishwasher.
  83. Attempt to put cabinet kick plate back.
  84. Struggle with it.
  85. Make cutout for dishwasher bigger.
  86. Try to put it back; still didn’t work.
  87. Excess grout was causing it not to fit.
  88. Chip out some grout with a screwdriver.
  89. Use Dremel to grind down some grout.
  90. Push kick plate back in and put in a nail (one seems to hold it).
  91. Turn on circuit breaker, cross fingers.
  92. Test dishwasher.
  93. Cleanup. (This took awhile as I made a complete mess out of the kitchen.)
  94. Relax and pat yourself on the back.

As you can see, this experience was not easy and if I had to do it again, I probably would have just spent the money to have someone else do it (I think I always say that, but come back to thinking that I can do anything around the house).

Another fight with OS X Server

It seems that every few weeks, I have another fight with OS X server. I still run Leopard Server as most of our Xserves are PPC and won’t run Snow Leopard, so these issues may have been addressed. I was moving our wiki and our sites from one server to another and that’s where the fun started. It appeared that the setting for where the wiki would be located wouldn’t stick. There appeared to be an issue with LDAP.

When I was touching the Web settings, I saw error messages in the log like was reported here

May 27 20:17:22 server servermgrd52: servermgr_web: htcleancache disabled
May 27 20:17:22 server servermgrd52: *** -WPWebServices updateWebServices:withVirtualHosts:withSession:: Couldn't update the WebServices record in /LDAPv3/127.0.0.1. Reason: Unable to set value(s) for dsAttrTypeNative:apple-serviceinfo in record $.
May 27 20:17:22 server servermgrd52: servermgr_web: Failure saving group services update: (null)
May 27 20:17:22 server servermgrd52: servermgr_web: Multi instance key 'SSLLog' has a single value=''!
May 27 20:17:22: --- last message repeated 2 times ---

(I was so frustrated, I didn’t copy the error messages, so what you see above is from the link referenced above.)

I gave up on this the other day and hacked on LDAP to get things working, but today I had to revisit it. I was starting to wind down my work day today when I had a stroke of genius; the error message referenced a host that I thought I had changed (I thought that when the LDAP server was setup, forward and reverse DNS were setup as those are critical to Open Directory working). I remembered one reference to the old hostname in Workgroup Manager. I went in Workgroup Manager, clicked on the computer tab, selected the old hostname, and changed the name to the real name, saved the entry, restarted servermgrd and presto, the error went away! Yeah!

I might give Snow Leopard server a test drive, but as long as Apple wraps command line tools up with a GUI, there are going to be problems. There is no way that they can handle all possible issues

If this solution helps you and saves you time (I think I spent a full day fighting with this), please purchase something through the Amazon link.

Review: Squeezebox Duet

I’ve been a big fan of the Squeezebox music systems for a number of years since I installed a music system in our house. I had 2 of the Squeezebox Classic boxes (before the cool redesign). Last year I saw a special on a Squeezebox Duet, so I splurged and bought it.

We didn’t need the box and had controlled all our music using the web interface to the Squeezebox software, so this box was quite gimicky. One of the things that this gave us was a 3rd source to our music system so that we could easily switch between our son’s music and our music. We didn’t use the controller much and it sat on my desk for most of the last year.

In the last few months, our son has wanted to listen to more music and changes what he wants to hear quickly. This has made the controller not just ideal, but almost necessary. The frequent upgrades to the software have really refined the interface and it lets us control all 3 music sources running off the Squeezebox software.

If you don’t already have a music server or aren’t willing to leave a computer on all the time to run the Squeezebox software, the Squeezebox Duet is pretty useless. In addition, if you don’t have a distributed music system, it may also have limited utility. The system is a bit hard to grasp for non-techies, but once I showed my mother-in-law how it worked (and how our music system works in general), she basically wanted a system like it.

Pros

  • Easy to use.
  • Bright screen.
  • Controls other Squeezebox units.

Cons

  • Pricey. List price of about $350 is not for the faint of heart.
  • Squeezebox software requires a computer to be on most, if not all, of the time.
  • Not all that useful without a distributed audio system which makes it even pricier.
  • Battery life is not great, so we leave it in the charger most of the time.

Summary

You’re probably saying that I usually give high marks to things that I review. Well, you’re kind of right. I usually do a lot of research before my purchases, so I’m not disappointed. The Squeezebox Duet falls into the same category (initially it didn’t). If you have a music setup like mine, this device is almost a must have. It’s price is a bit of a stumbling block, but if you factor it into the cost of a full house music system, it is much easier to justify.

Note

While not directly related to the Duet, each time I upgrade the Squeezebox software, I have to wait for some nice person to update the XMRadio Plugin. While Logitech (they bought Slim Devices) directly supports Sirius, use XMRadio subscribers rely on third parties. I wish that Logitech would work with XM to directly support the plugin. XM and Sirius are now the same company, so it seems that there is precedent for online streaming.

Review: Big Skinny Wallet

In a break from my normal tech reviews, he’s a review for the average Joe.

Before we left for New York, I emptied many items from my wallet and saw that cards became much looser, so I had to rearrange things a bit. While we were in New York (as seems to happen in most cities we visit), there was a street market with people selling all kinds of junk. We passed a few places selling wallets, but I couldn’t justify spending $10 on a cheap wallet when I had only paid $15 for my wallet at Mervyn’s (RIP).

On our way back, we saw another vendor selling Big Skinny Wallets, so we stopped. These wallets were different from the others we saw and my wife asked if the cards would fall out when there were fewer cards in it. The vendor said no and turned a sample wallet upside down. That was only the icing on the cake. He also had a comparison with a normal, leather wallet and the thickness difference was stunning. I asked the cost and he said $20. I was sold. My wife reminded me that I balked at $10, but jumped at $20. Oh well, the salesman was pretty good.

I’ve now had the wallet for about a week and a half now and I keep thinking I’m going to lose it because all my back pockets are stretched to fit my old leather wallet! While the salesman was good, I was a bit cautious in my enthusiasm when I bought it. Well, so far, I’d buy one of these wallets again without hesitation (provided it holds up).

Pros

  • Very thin
  • Cards stay in when the wallet is turned upside down

Cons

  • A little more expensive than the average wallet I’ve gotten
  • Unknown lifetime

Summary

I have absolutely no complaints with this wallet. Every time I pick it up, I’m amazed at how thin it is. I’m hoping that it lasts; all other reviews I’ve read have also given it high marks.

Post paid gas stations still exist?

On Saturday, we were doing errands and stopped to get gas. The gas station was busy, so we had to wait. The person in front of us pulled up and started trying to pump gas. He pulled the handle and nothing happened; he thing went over to the automated kiosk and looked quite confused. By this time, I saw a space open up, so I zipped around and got to a pump. I went inside, pre-paid for my gas (I decided against using the kiosk that took cash; many of the kiosks around don’t take cash).

When I was done pumping gas and got back into my car, the guy still hadn’t started pumping gas. At first when we saw him, we couldn’t understand how anyone couldn’t know how to pump gas (he appeared older than me). While I was pumping gas, my wife was analyzing the situation and saw that he had a Boise State shirt on and surmised that he might have been on vacation.

OK, I’ll give him the benefit of the doubt. So, the question is, where do you pay for gas after you pump it? I’ve lived in California for the last 18 years (with a small stint in Portland where you can’t pump your own gas) and all I can remember is paying for gas first; my memory could be foggy.

I read some forums and people complain about pre-paid gas when you’re using cash as you have to go into the cashier and then afterwards to get change (if needed). I frankly never considered this a problem; maybe I’m just used to this process. Hmmm.

Acura car service clarification

I heard back from the W Hotel today regarding my post about it’s complimentary Acura car service. Apparently someone forgot to tell the concierge how it works. It is available on a first come, first served basis, so when I asked for it the following day, the concierge was happy to arrange a limo for us for the $78 fee. I specifically said Acura and pointed at the sign on the desk. A simple, “it is available on a first come, first served basis; just goto the front door to see if it is there” would have stopped this nonsense and made complete sense to me.

If the W wants to stop nasty email messages from ticked off guests, it would make sense to put a sign at the entrance as normally people going to just hail a cab instead of go to the concierge to arrange transportation that is needed right at that moment.

While I guess the W is off my “bad” list, that concierge ranked a zero in my book.

I do contend, however, that the Web site is misleading as there is no asterisk next to this feature indicating that there are conditions for its use.