Home Assistant and Node-RED, automation perfected?
Earlier this year I started experimenting with Home Assistant and wrote some thoughts about it. It brought together enough pieces that I keep tinkering with it. A friend of mine had mentioned a project called Node-RED which is supposed to more easily link together IoT components and perform actions based on different inputs. At the time, I brushed it off as I didn't want to bother figuring out how to install it.
Fast forward to last week when I noticed that Home Assistant had a Node-RED add-on. Installing the add-on was quite easy and I was presented with a blank canvas. After a few minutes, I figured out how to make a simple sequence that took the state of a door sensor (at the time connected via my Vera) and turned on a light. Nothing too fancy, but I was able to hook it up, hit Deploy and test. It worked! This was light years ahead of the YAML based automations in Home Assistant and much faster to setup than Vera. I was hooked almost immediately. Could I convert all my automation logic to this? I spent the next few days trying.
Wiring some basic automations was quite easy as in this example that turns off lights in my bathroom if there is no motion. Node-RED resets the timer if there is more motion, making the sequence very straightforward.

Unfortunately not all my automations are this simple.
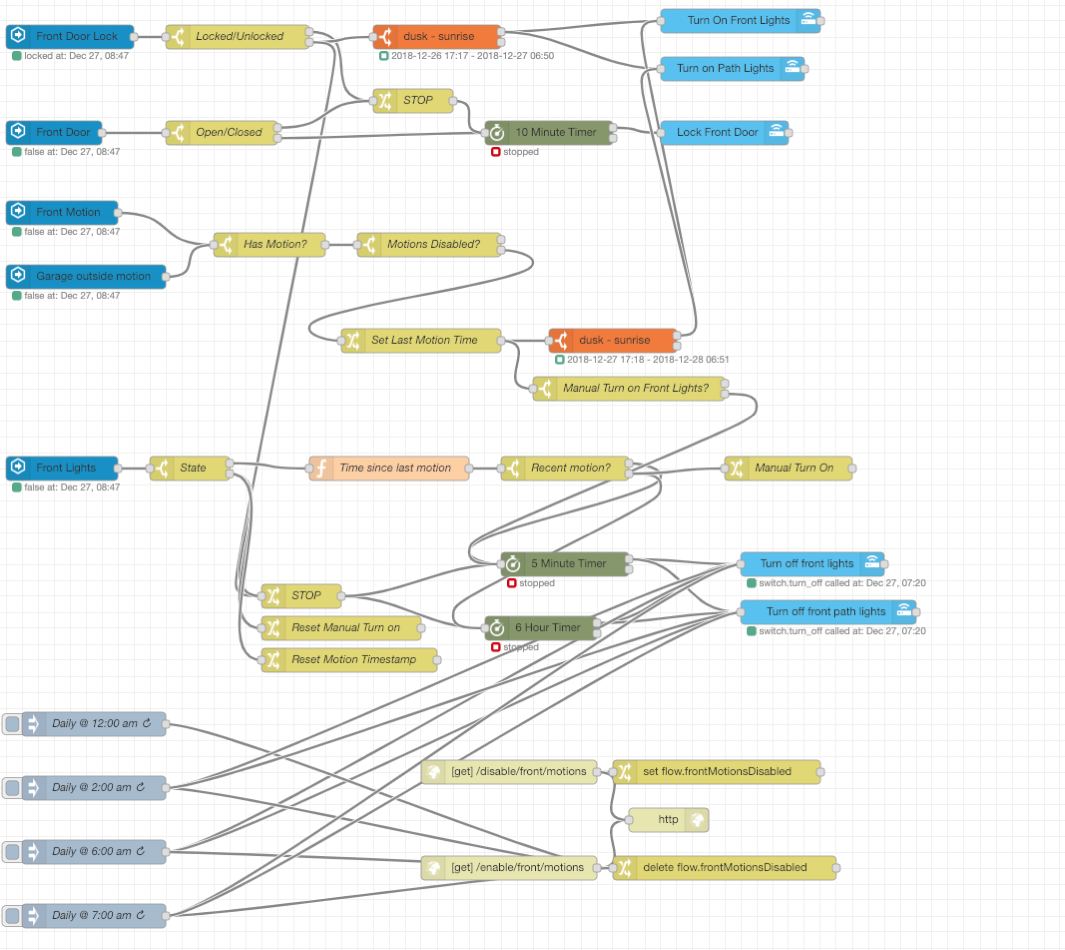
The most important sequences deal with my front and back motion sensors. I could just use something like the above sequence, but I only want the lights on at night, I want to be able to disable the motion sensors (for example on Halloween if we're not home, I don't want lights coming on), and if I turn on the lights manually I don't want them turning off a few minutes after there is motion. The tricky part here was to determine if the lights were manually turned on or triggered by a motion sensor. After a bit of experimenting, I decided to record the last time there was motion into a variable. Then when the lights turn on I check the variable to see how long ago it occurred. If it was less than 30 seconds ago, call it triggered my motion. With that, I was able to set on off timer based on how the lights came on. The one bit of "code" I had to write was to determine how long ago the motion was tripped.
    var motionTimestamp = flow.get('lastFrontMotion') || -1;
    var difference = (Date.now() - motionTimestamp) / 1000;
    if (motionTimestamp === -1)
    {
        difference = -1
    }
    msg.payload = difference;
    return msg;
The flow may look complicated, but to me it is quite readable.

The visual aspect of Node-RED makes it easier to setup automations, but calling automation simple is far from the truth as I've shown above. As a professional software developer, writing code doesn't scare me but for a hobby, this visual approach (with a little code as necessary) is much nicer. When I come back to this in 6 months, I have no doubt that I can read what is going on and troubleshoot as necessary.
For the last 5 years, I've been using my Vera to control everything using a plugin called PLEG which stands for Program Logic Event Generator. It has worked quite well, but it has been so long since I setup most of the automations, I have no idea what I did. PLEG, while functional, was a bit difficult for me to wrap my head around and it pained me every time I had to touch it. Also, when I touched it, I seem to recall having to restart Vera and wait only to find out that I needed to change something.
I'm so impressed with Node-RED that I've decided to see if I can move all my Z-Wave devices to Home Assistant using an Aeotec Z-Stick Gen5 plugged into the Home Assistant. The goal with this move is to speed up messaging; right now the Home Assistant polls (I think) Vera all the time looking for changes. This isn't very efficient and pressing a button can take a second or two to have the message reach Home Assistant. Will this work? I hope so!
I know that I'm just scratching the surface with this, but I am very excited over the prospects!