Non Standard iOS Navigation

In my years of being an iOS developer and user, I’ve seen a lot of apps that try to come up with their own ways of doing navigation that don’t follow Apple’s Human Interface Guidelines. Over this time, Apple has changed their guidelines, but usually don’t adopt some of the concepts that apps have inflicted on us.

I do most of my news reading on my iPad (and sometimes on my iPhone), so I’ve taken a look at the different news apps. Some people pan Apple’s News, however it is one of the easiest to use, has consistent navigation, and has a number of hidden features that make it convenient to use. For example, you can scroll up and down using the arrow keys on an iPad Pro keyboard, scroll page by page using option and the arrow keys and navigate back from an article using command and the left arrow key.

Using News, I’m able to take care of my tech, national and world news craving. So that leaves local news. The local news apps seem to shun standard navigation. One app uses an X in the upper which seems more cutesy than useful. If you’re browsing away with an iPad on a stand, you get used to swiping to the right to go back or at worst, tapping the back arrow.

X for close

This is pretty annoying; using the same app on the iPhone is worse because it prevents one handed news browsing. You have to reach up and hit the X button. The X for close is very much a desktop metaphor.

If we take a look at another news app, they at least kept the back button in the upper left, but because they want to show other articles, you can’t swipe right to go back.

Left Hand Navigation

I keep asking myself if the designers and developers use these apps or have done user studies (it’s hard for me to use a lot of apps I’ve worked on because they don’t apply to me, especially enterprise apps). Just watching a user use the app gives huge insight into what can be improved. One of the best experiences I had in the last year was watching someone use one of my apps; this was an enterprise app and thing that I thought were obvious weren’t obvious to the user.

By sticking to standard design paradigms as well as the Apple Human Interface Guidelines reduces user frustration, decreases training time (especially in enterprise apps) and increase the time that people use the apps.

Guest Network with EdgeRouter Lite and UniFi Access Points

Last year, I wrote about setting up a guest network with the EdgeRouter Lite. The post was focused on using an Apple Time Capsule as the wireless access point. Since then I’ve switched away from the Time Capsule and am now using Ubiquiti UniFi APs, so parts of the post are no longer relevant to me and a few people have asked me how to do this with the EdgeRouter Lite and the UniFi APs.

While the UniFi controller software has the option to do a guest network, as far as I can tell, it isn’t exactly what I want. With my setup, you can’t just use the checkbox to turn on the guest network as the current firmware apparently slows things down. So if you don’t check the box, my instructions appear to still be needed.

All of the EdgeRouter Lite steps are taken from my original post, so they may look familiar.

Here are the steps:

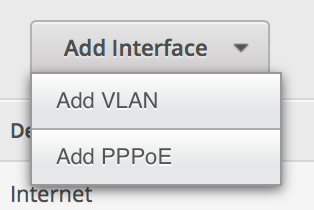
  1. On the EdgeRouter Lite’s Dashboard, click Add Interface and select VLAN.

    Add VLAN Image

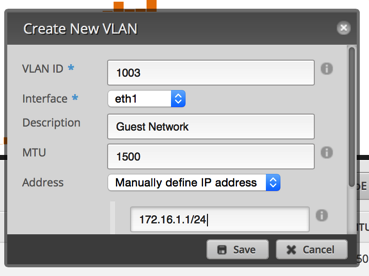
  2. Set up the VLAN as 1003 and attach it to the physical interface of your LAN. Give it an IP address in the range of a private IP block, but make sure you end it in a /24 to specify the proper subnet. (Make sure it is different than your normal private IP block.)

    Setup VLAN

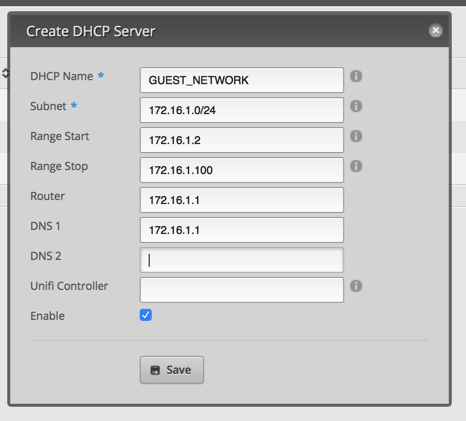
  3. Click on the Services tab. Click Add DHCP Server. Set it up similar to the image below.

    Add DHCP Server

  4. Click on the DNS tab under services. Click Add Listen interface and select the VLAN interface. Make sure you hit save.

    Setup DNS

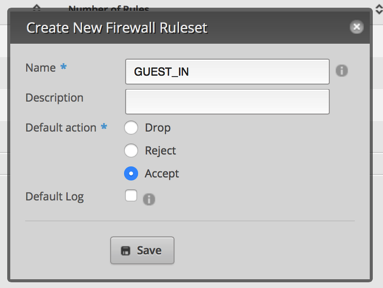
  5. Click on Firewall/NAT and then click on Add Ruleset. This is for packets coming into the router destined for somewhere else (not the router). Set up the default policy for Accept. Click Save.

    Add Firewall Rules

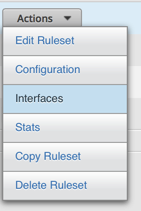
  6. From the Actions menu next to the Ruleset, click Interfaces.

    Select Interfaces

  7. Select your VLAN interface and the in direction.

    VLAN In Direction

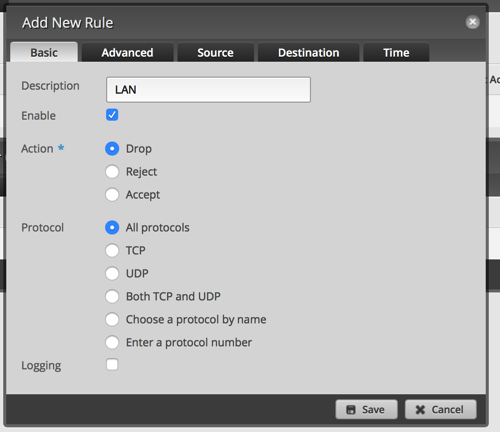
  8. Click Rules and then Add New Rule. Click on Basic and name it LAN. Select Drop as the Action.

    Add Rule

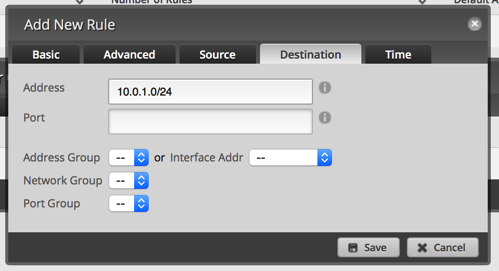
  9. Click Destination and enter 10.0.1.0/24 or whatever your LAN IP range is. Then click Save. This will drop all packets from the VLAN destined for your LAN. Save.

    Destination Selection

  10. Repeat 1 and 2 above (name it GUEST_LOCAL). From the Interface, select the VLAN interface and the local direction.

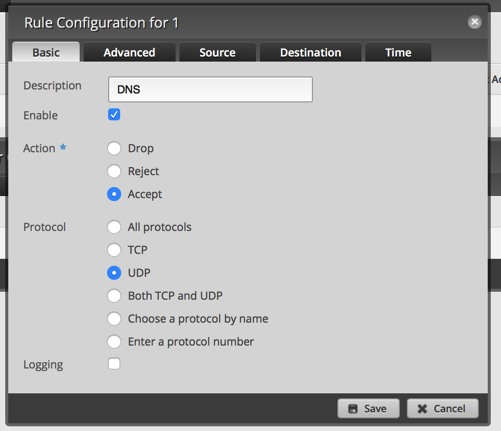
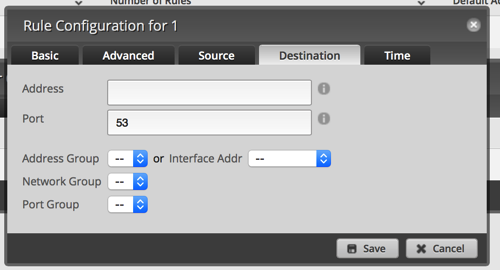
  11. Add a new rule. Set it to Accept on UDP port 53 (DNS).

    Rule Configuration

    Rule Destination

  12. Save.

Now it’s time to move over to the UniFi Controller.

  1. After you login to the controller, click the Settings in the lower left.

    Settings

  2. If you’re using your UniFi AP connected to a UniFi Switch, you have to setup the switch to pass traffic for your guest network. If you aren’t, you can skip to step 5.

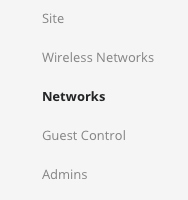
    Networks

  3. Click Create New Network

    Create New Network

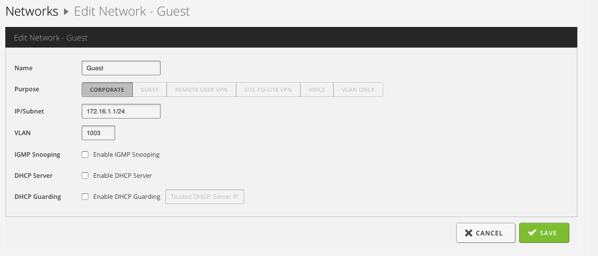
  4. Setup the network as indicated in the next image and then click Save.

    New Network

  5. Select Wireless Networks on the left side.

    Wireless Networks

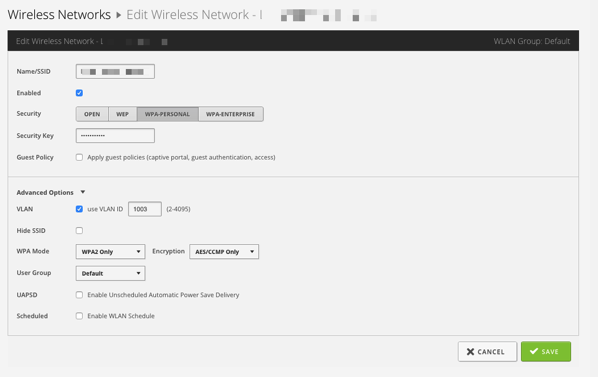
  6. Configure the network similar to the next picture. Note that I didn’t turn on guest policy.

    Wireless Configuration

Now you can test this by connecting to the guest network and accessing the Internet. Then try connecting to a device on your LAN or connecting to the EdgeRouter Lite. Both actions should fail.

I know that there are a lot of steps to configure this, but they’re not that difficult and you only have to do it once!

I’ve tested this and it is working well on my network; if I’ve missed anything, please let me know!

Conveniently Charging Devices

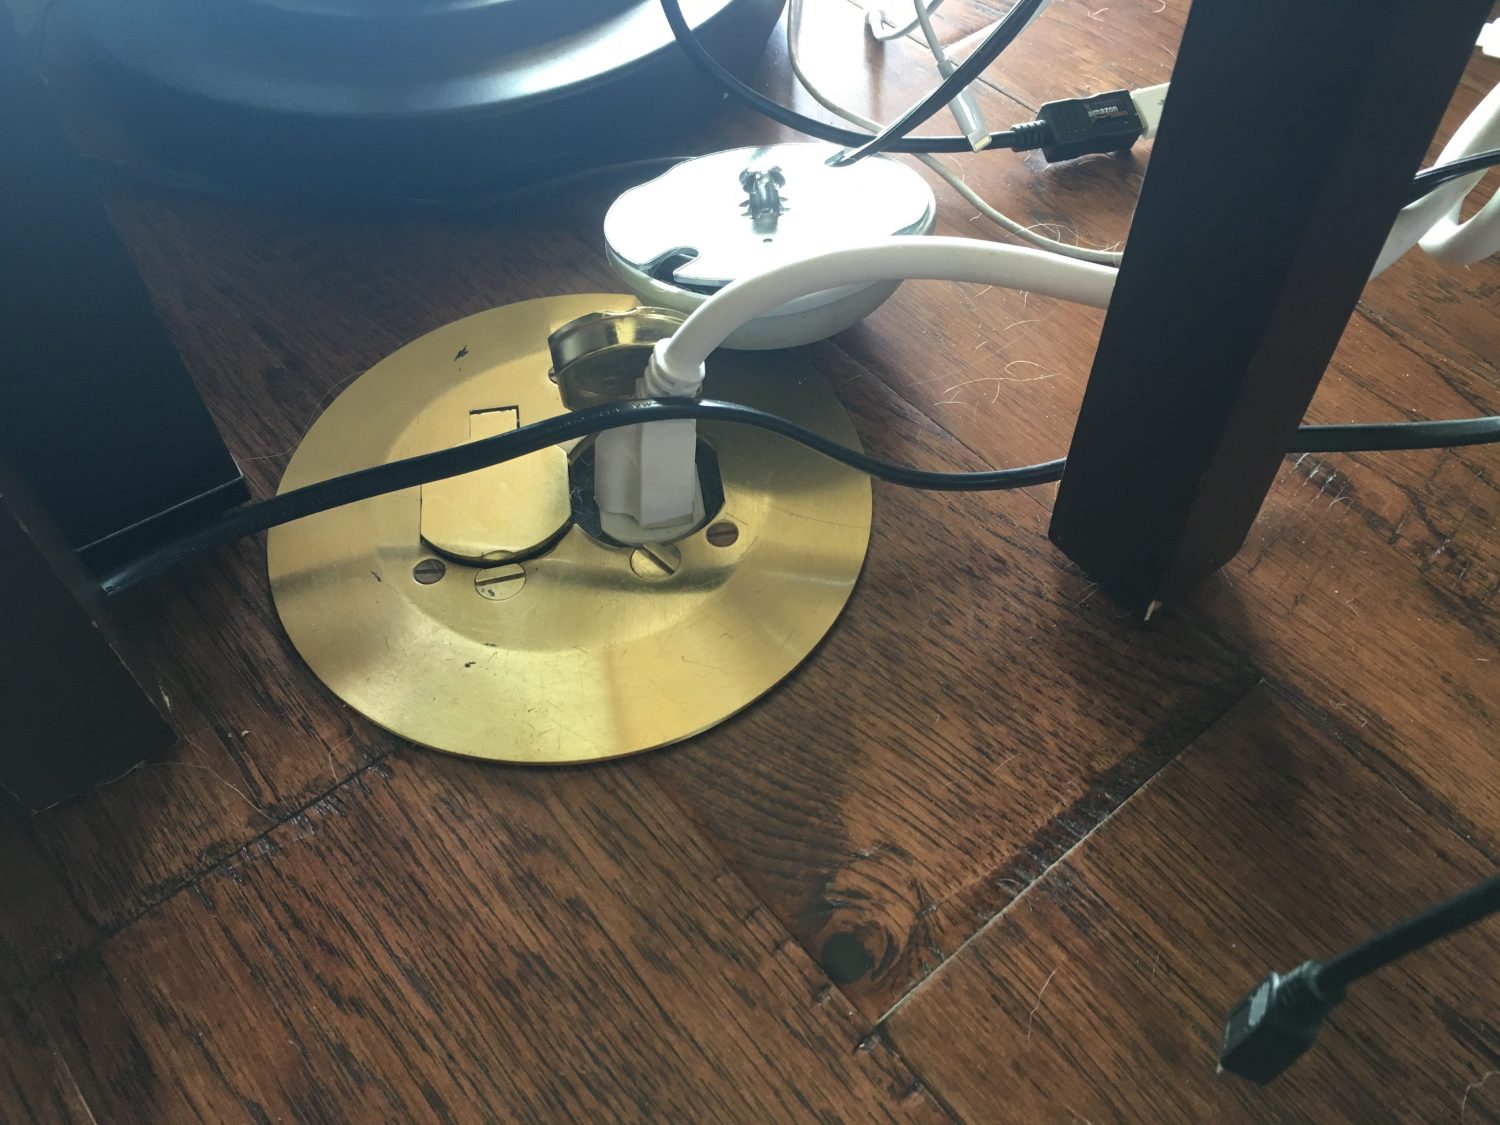
When we remodeled our house 3 years ago, we created a very open floor plan on our main living level by removing a wall. So now we have our kitchen, dining area (it isn’t a formal dining room as we never used one), and living room all together. This has worked out well, but during the planning stages, we realized that there would be a slight issue and that is based on how we wanted our couches, there would be no walls around them to plug in a lamp, charge devices, etc. We decided to put an outlet in the floor (the concrete had to be cut to put in the outlet which was being done anyway for our kitchen island). This outlet turned out to be a great decision.Floor Outlet

We started by plugging in a lamp into the outlet (the lamp is less harsh than the overhead lights) and then when I added a 5.1 surround system, I plugged the wireless subwoofer/rear speakers into the outlet. Of course, we only put a duplex outlet into the floor so when my wife wanted to charge her iPad there (she tends to use it most while sitting on the couch), I dug out a Y outlet and used that.

One device turned into 2 and then turned into more where we had to keep swapping out the cable. After purchasing a few of the Anker 5-Port USB Charger PowerPorts, I thought that using one of these on a table near the couch would solve my problem.

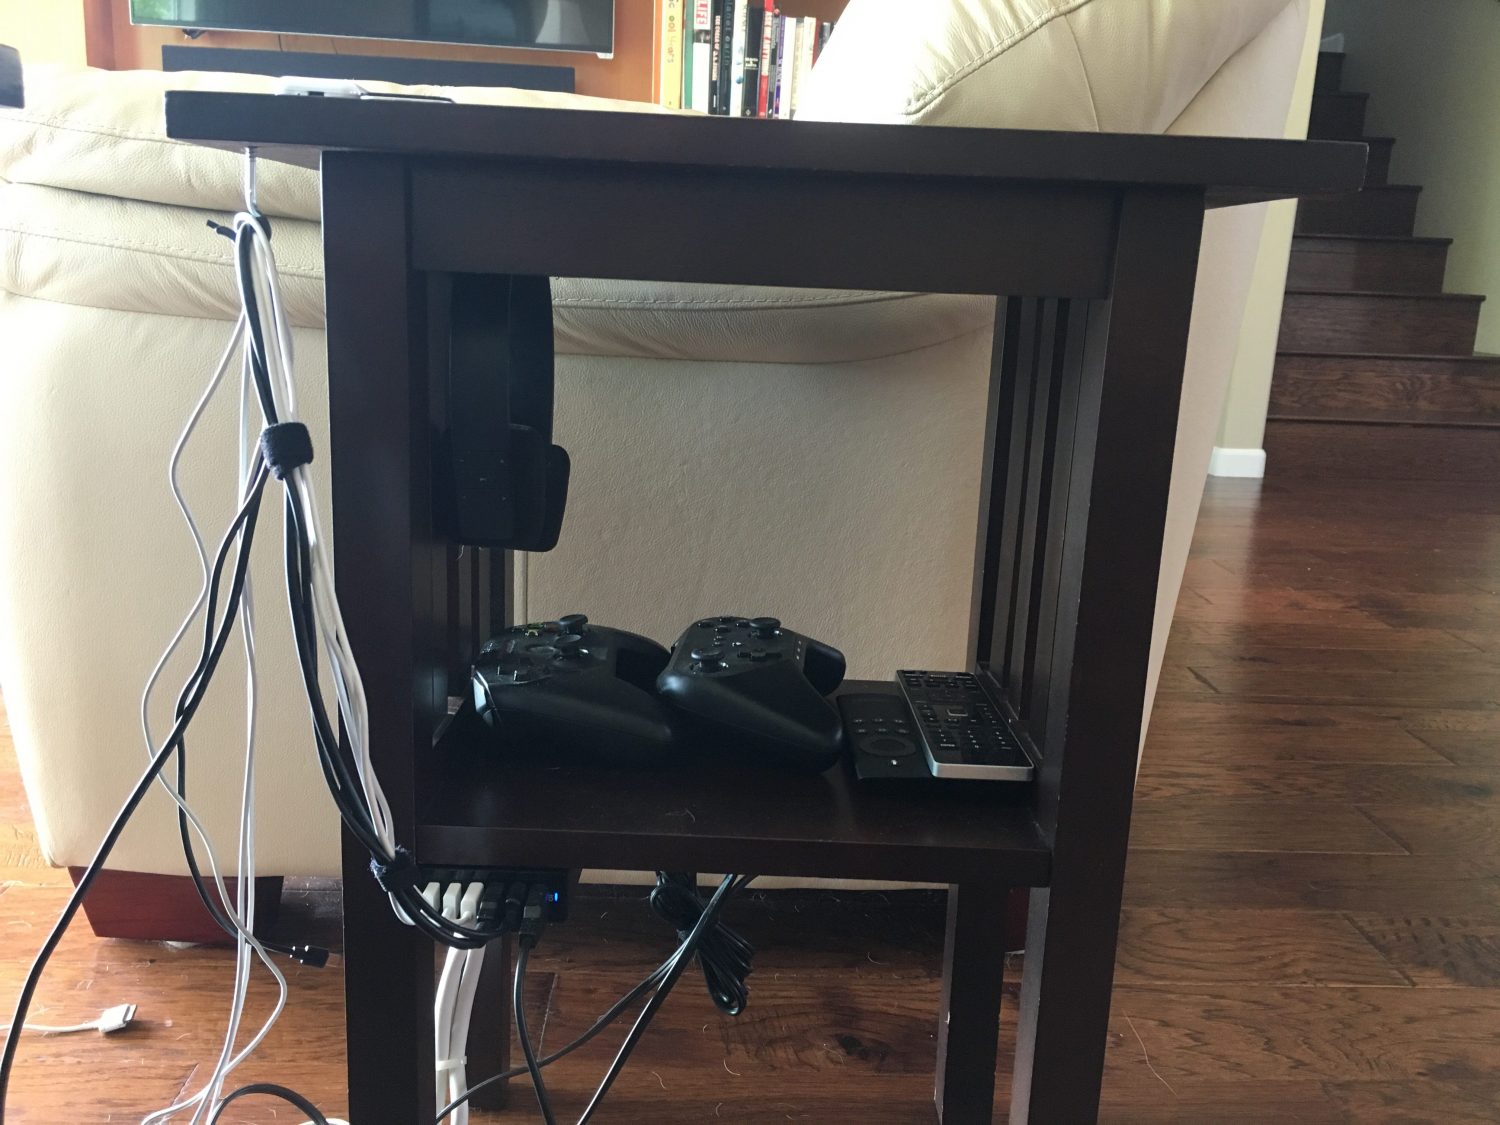
So I bought a small power strip, used industrial strength Velcro to mount it under an end table, and then mounted an Anker 6-Port USB Charger PowerPort under the table as well. Now I had 6 USB ports easily accessible near the couches.

I quickly realized that this solution was ingenious, if I do say so myself! It turns out we have a bunch of devices that occasionally need charging including an Apple TV Remote, a SteelSeries gaming controller, an Aeon Labs Z-Wave remote, an iPhone used as an automation remote, a pair of Bluetooth headphones that I sometimes use with the TV, and a few iPads. I’ve plugged in 2 30-pin cables, 2 lightning cables, a micro USB cable, and a mini USB cable into the Anker. This lets me easily grab a cable and be able to charge anything.

Device Power
Device Power

I’m still not quite sure what to do with the cables, but for now they’re all hanging together.

Review: UniFi Switch 8

Three years ago when we bought our house, I decided I wanted to put in surveillance cameras. When selecting the cameras, I decided that the cameras had to be powered by PoE (Power over Ethernet) so that I could change out the cameras later on if I wanted to and didn’t have to worry about dragging a separate wire for power which could be different for different cameras. At the time I was looking, the number of small, fanless switches that did PoE was quite small. I decided on a Cisco SG300-10P which is a 10 port managed switch with 8 of the ports being PoE.

The managed switch was definitely overkill for what I wanted, but an unmanaged gigabit PoE switch without a fan was nowhere to be found. The switch has worked fine for my needs. Since then, I’ve experimented with other unmanaged PoE switches (a 16 port one with 8 PoE ports) as I needed more ports. The Cisco switch works fine, but I really didn’t do much with it.

Last year after I tried out Ubiquiti’s UniFi AC Access Points, they asked if I wanted to test their new UniFi Switch 8 port switch that was coming out. Of course, I said yes! The switch, like other products in the UniFi line is controlled by the UniFi controller software. As I’ve mentioned before, the software is quite utilitarian, but works well. The switch easily integrates with my access points and is simple to setup.

One of the things I dinged the UniFi access points for (not the Pro) was the lack of 802.3af PoE requiring the use of a power injector. Well, like other switches in Ubiquiti’s line of switches, the 8 port switch provides passive PoE to individual ports if configured which will power the UniFi access points. So now that I had a UniFi switch, that negative point of having to use a power injector no longer applied.

My needs of a switch are pretty minor; I just need PoE provided to cameras and I need it to pass VLAN traffic for my guest WiFi network. The UniFi Switch 8 easily does that and a whole lot more. The controller interface works and I love being able to see statistics and have control over much of my network from one screen.

I really would like 10 ports and the switch has 2 SFP ports. Normally SFP ports are used for fiber connections, but they also support copper modules. I’m in the process of trying to get working copper modules from Fiberstore which is proving to be difficult; of the 6 I ordered, only 1 worked. Their support is good, but being in China, it takes a long time to get replacements. I would rather have had a combo RJ-45/SFP port like the Cisco switch has, but the SFP modules will eventually work.

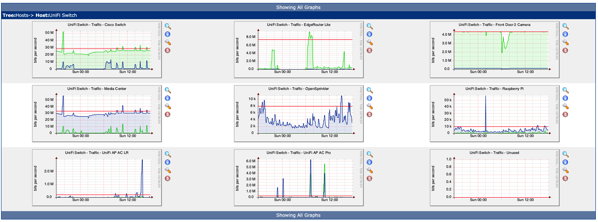
One of the things I’ve overlooked until recently in a managed switch is the ability to use SNMP and monitor traffic. There is no real use for watching the traffic, but I find it interesting. I have monitoring for my access points and my Cisco switch as well.

Cacti

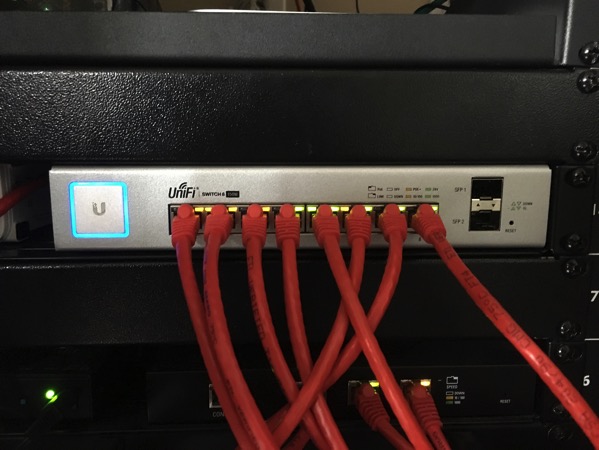
With a retail price of $199, who should buy this switch? For most home users, there is no reason to purchase this switch. However, if you’ve bought into the UniFi line of products (which I’m quickly doing as unified management is excellent and gives me lots of control), then getting a UniFi switch should be a no brainer. To me, multiple 8 port switches beat out the 24 port switch due to the lack of fans. Yes, it would cost more, but in my setup, I try to keep noise at a minimum.

IMG 5572

Pros

  • Integrates well into the UniFi line
  • Silent operation
  • Powers all the UniFi access points (802.3af or passive PoE)
  • Controller software is easy to use (but utilitarian)

Cons

  • Not rack mountable; the Cisco switch I have has really long ears to mount it which Ubiquiti could have done. In my case, I put it on a Raxxess RAX Rack Tray
  • No combo RJ-45/SFP Ports
  • A little pricey

Summary

While the UniFi Switch 8 isn’t for everyone, I’ve been quite happy with the Ubiquiti products and plan to purchase one of the 8 port switches to replace my Cisco switch (I’m waiting until the SFP modules work properly as I actually need 19 ports between my 2 main switches). The unified controller makes things very easy to manage. The Cisco switch has lots more options exposed, the UniFi switch can do a bunch with the command line; however, I haven’t had to touch it.

Standardizing on UniFi switches will also allow me to possibly use their UniFi Video cameras including their new 1080p as those are powered by 24V passive PoE which the switch will provide (if you’re listening, Ubiquiti, I have 7 cameras and would need an NVR to go with it :-)).

If you’re going all in on Ubiquiti products, getting one of their switches should be a no-brainer.

Note:The UniFi Switch 8 was provided to me by Ubiquiti at no cost for testing and review. It should be clear that my review is not biased by this as I plan on purchasing another switch with my own money.

Plateau for Mac processors?

Recently my dad asked me what he could do to make his 2007 iMac faster. The machine is running a 2.4 GHz Intel Core 2 Duo processor which by today’s standards is woefully outdated. We had already maxed out the RAM at 6 GB (specs say it can handle 4 GB, but 6 GB are recognized) and it had a 500 GB 3.5″ spinning hard drive (7200 RPM, I believe).

As we were looking for the most cost effective solution, I said that we should try an SSD drive in it. I told him to purchase the Samsung 850 EVO and a Newer Technology AdaptaDrive Bracket. The items arrived and then I was tasked with installing it (I actually had my dad get a different bracket which was wrong, so it was extra work, but let’s just pretend he got the right bracket). Since the iMac didn’t recognize my USB 3 docks to copy the data from his iMac to the new drive, I had to put the iMac in target disk mode, hook it to my Thunderbolt display via FireWire 800 and then copy the data to the new SSD hanging off my MacBook Pro. This process was long, but required no effort.

Opening up an iMac of this vintage was relatively straight forward, and I installed the new drive. After putting the machine back together, I booted it up to test it and was surprised at how well the machine performed. Before the drive replacement, the machine was far too slow for me to use. Boot time was long and opening up applications took too long. Now, the machine booted up a lot faster and applications opened quickly which seemed similar to my 2012 Retina MacBook Pro with a Quad Core Intel i7 processor.

So now I was comparing a nine year old computer to my 3.5 year old computer. My computer has a significantly faster processor and lots more RAM (16 GB), but the performance in opening apps (startup is still faster) and day to day operations seems reasonably close. Of course, I didn’t do any benchmarks on the 2 machines, but here you have about 6 years separating 2 computers and in everyday tasks, the performance seemed acceptable on both.

My dad runs VMWare Fusion on his iMac (for his accounting) and that is a pig; for that (Windows 10 running on 1 core of a 9 year old iMac is a recipe for pain). Other than that, my dad has been quite happy with his upgrade.

So the question I have to ask is if the processor speed in Macs matters much anymore for everyday tasks. It seems that the limiting factor may be drive speed. I’m not talking about compiling, running virtual machines, or transcoding video, but for web browsing, email, etc., how much speed do we really need? I’m not giving up my machine any time soon and if I can get my hands on a faster machine, I’ll definitely do that.

Review: UniFi AP AC Lite and AP AC LR

I’ve been using my EdgeRouter Lite for more than 6 months now and couldn’t be happier with it. After posting my review, Ubiquiti contacted me and asked if I was interested in testing out some new hardware. As I love playing with new hardware, I couldn’t say no. I was actually eyeing the 802.11 ac access points, but the price tag put me off as I didn’t need a new wireless access point; my Time Capsule has been working fine in bridge mode providing coverage throughout my house pretty well.

Ubiquiti sent me a UniFi AP AC Lite and UniFi AP AC LR for testing. Both units are basically identical with the LR providing better range and potentially better throughout on the 2.4 GHz range. I’m going to focus on the LR device as the price difference ($89 vs $109) is so low, that for the home and small business use, the LR is a no brainer when compared to the Lite (the Lite is also a bit smaller which could make it fit in better on the ceiling in a home).

Most home users purchase an off the shelf router such as the Apple Time Capsule which includes a router as well as a WiFi access point. This serves most people’s needs, however some people find that they need additional access points to fill in the dead spots in their homes. In order to do this, they either use repeaters or additional routers in bridge mode. This is basically wasting a large portion of the router. While this isn’t what I’m doing because I didn’t need to fill in gaps in coverage, I was quite intrigued about a WiFi access point that simply did WiFi. In addition, the UniFi access points are Enterprise grade access points which means (to me) that they’re highly reliable and highly configurable.

When I first opened the AC Lite (I tested it first), it had the access point, a mounting bracket, and a PoE injector in it. A PoE injector allows power to be supplied over Ethernet; this means that only 1 Cat6 cable goes to the access point and the injector is placed close to the switch and plugged into a power strip. The first thing that disappointed me about this access point is that it didn’t use the 802.3af PoE standard which would have allowed me to connect it directly to my Linksys PoE+ Switch. When I asked Ubiquiti about this, I was told that a lot of their customers are price conscious and when deploying a lot of devices, the cost difference can be significant. In these cases, their customers use the UniFiSwitch which provides passive PoE (like the injector). For my testing setup, I simply turned the access point upside down (nose pointing down) on a high shelf. For permanent installation they should be mounted on a ceiling (the docs indicate they can also be wall mounted, but based on the antenna design, ceiling mounting will be better). If I had known about access points that were this cost effective and could be PoE powered, I would definitely have run extra Cat 6 to central places in the ceilings. Anyone that is remodeling and putting in Ethernet cable should throw in a few extra runs in the ceilings to mount access points; even if they aren’t UniFi access points, some type of PoE access point could easily be installed.

The second step was to install the UniFi Controller software on my server. The software is used for initial setup (they also have an Android app and an iOS app that onfigures the access point), monitoring and ongoing maintenance of one or more access points as well as some of the other products in the UniFi line. The controller is a Java app and installed without too many problems. If installing on OS X Server, I recommend modifying the ports that it uses by going to ~/Library/Application Support/UniFi/data/system.properties and change the ports; OS X Server likes to run the web server on the standard port even if you turn off websites. Note that you have to run UniFi Controller once to create this file. In addition, when modifying the file make sure that there is nothing on the line following the port such as a comment as that will prevent the file from being read. (After spending 30 minutes trying to figure this out, I found a forum post with this information in it.)

I don’t like Java apps for daily use, but for server use, I have no objections to them (I also run Jenkins and it runs well without bogging down the machine). After installing the controller, I wanted to use my own SSL certificate (I’m not a huge fan of accepting self-signed SSL certificates). I setup an internal hostname for the machine and then using my SSL certificate in a pem file:

openssl pkcs12 -export -in server.pem -out ~/Desktop/mykeystore.p12 -name "unifi"
cd /Users/mediacenter/Library/Application Support/UniFi/data
keytool -importkeystore -srckeystore ~/Desktop/mykeystore.p12 -srcstoretype PKCS12 -srcstorepass aircontrolenterprise -destkeystore keystore -storepass aircontrolenterprise

(This requires restarting the controller software.)

Once I had the controller software installed, I went to a browser and connected to port 8443 on my server. The controller software walks you through the simple setup and the access point is up and running. I don’t recommend stopping here as there are a number of options to setup to take full advantage of the access point.
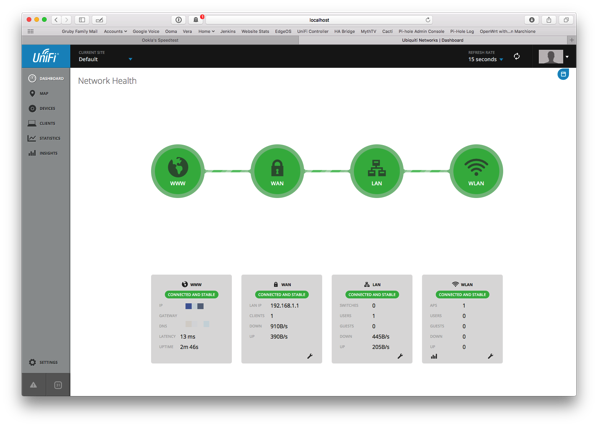
Unificontroller

The controller interface is very utilitarian, but in my opinion is not easy to use. For the basic access point, it shows a lot of stuff that is irrelevant and can’t be turned off. The good news is that the controller software isn’t used all that often. I spent a bit of time experimenting with the interface to get what I wanted. First off, I wanted separate 2.4 and 5 GHz networks. If you have one SSID for both 2.4 GHz and 5 GHz, Apple devices pick the frequency with the better signal and this tends to be the 2.4 GHz and won’t jump over to 5 GHz automatically. I found a reference to an Apple technote describing the behavior. By separating out the 2.4 GHz and 5 GHz networks, you can explicitly select the frequency. (Apparently the band steering option in the UniFi access points is supposed to help with that.) Next up was a guest network. While the controller can setup a guest network and portal mode, this turns on QoS (Quality of Service) and actually degrades performance even if no one is connected to the guest network. This was not acceptable to me, so I just created a separate SSID and told it to use VLAN 1003 and used what I wrote about before to separate out the traffic. While I would have liked to use the built in guest network and play with the portal, I rarely have people using the guest network so the tradeoff wasn’t worth it for me.

There are also settings for controlling power and bands for the router, but the default settings work for me.

So now that everything was setup, the next question was “do they work?” Well, it’s pretty hard for access points not to work! I setup the networks separate from my Time Capsule so that I didn’t subject my household to my testing and put my devices on it. Would my devices stay connected? Did the access point have hiccups and require rebooting? How was the performance of it?

I’ve been testing with my 2012 MacBook Pro, iPhone 6 and iPhone 6s, and iPad Mini 2. The iPhone 6 and 6s do 802.11ac, the iPad Mini 2 does 802.11n, and the MacBook Pro does 802.11n. I’ve found that the MacBook Pro consistently stays connected on the 5 GHz network (preferred network) and usually negotiates at 300 Mbps. Using iperf connecting to a local server, I get 150-200 Mbps. That’s not too shabby. The connection is rock solid and I don’t see the MacBook Pro switching to the 2.4 GHz network. Using the iPad Mini 2, I can stay connected to the 2.4 GHz network, but the Mini seems to require me to toggle WiFi periodically to see all the networks including the 5 GHz network. I have no idea why, but not an access point issue. When I use the 2.4 GHz network, I can get 50-60 Mbps and on the 5 GHz network, I can get 110-140 Mbps. My iPhone has no problem with the 5 GHz network and gets 100-110 Mbps. (I used iPerf3 on iOS to do the measurements. iPerf3 has an awful user interface, but it does work.) I saw similar, if not better performance with my Apple Time Capsule. Indications from reading the forum is that these access points have trade offs for supporting more users vs higher performance on a small number of users like in my situation. However, the performance is more than acceptable given that I currently have a 100 Mbps Internet connection and the only time I could exceed that is hitting my internal network.

While I don’t live in a condo or a multi-unit dwelling with units stacked on top of other, I do live in an area with crowded airwaves. The 2.4 GHz frequency as you can see below has a few peaks (my networks) and a lot of access points. Performance on the 2.4 GHz is acceptable and since I don’t normally run speed tests is more than adequate for my 50 Mbps downstream cable modem connection (for now until I get 200 Mbps hopefully next month).

2 4GHz

The 5 GHz frequency is a lot less crowded which is why I try to get my devices on it at all costs (I’m tempted to have the devices forget the 2.4 GHz network, but I suspect that will cause more problems).

5Ghz

Since I love statistics, I turned on SNMP in the UniFi controller (it actually tells the access point to turn on SNMP and monitoring is done by connecting to the AP and not the controller), and setup Cacti to monitor traffic. There, of course, is very little use in me monitoring traffic on my network, but I’m always curious about network performance and utilization. However, the graphs do tell me that very, very rarely do I ever see bandwidth spikes above 50 Mbps.
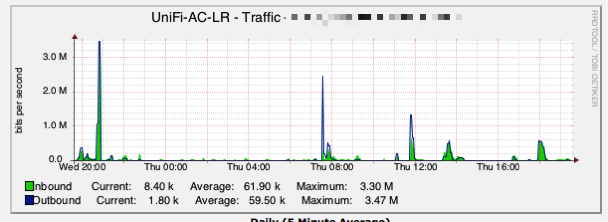
Catci

This access point is definitely a step up from consumer grade router/access point combos. It is extremely flexible, cost effective, and unobtrusive (I forgot to mention that it looks like a smoke detector). I’ve been so happy with my EdgeRouter Lite and this access point, that I have already purchased a UniFi AP AC Pro to see how that will perform.

Pros

  • Highly configurable
  • Easy to install
  • PoE for placement with just an Ethernet cable
  • Unobtrusive
  • SNMP capable
  • Decent performance in the single user environment
  • Low cost

Cons

  • Lite and LR units use passive PoE instead of 802.3af
  • Controller software is a bit cumbersome to use
  • Not all advertised features are currently available such as band steering and airtime fairness
  • Guest portal and rate limiting options drastically affect performance

Summary

While the UniFi access points are designed for enterprises, they are a great addition to the EdgeRouter Lite. If anyone has a little time to setup an access point and can deal with the not so consumer friendly controller software, I would definitely recommend this line of access points. If you’re OK with the 3×3 MIMO on 2.4 GHz and 2×2 MIMO on 5 GHz vs 3×3 on 5 GHz, than the LR access point is probably the better bang for your buck. The Lite for the home network where $20 isn’t going to break the bank may not a great choice, unless the smaller size is attractive due to mounting. In my case, I’ll be mounting 1 access point behind my TV and 1 in my office, so no one will see them. If you’re like me and the lack of the 802.3af PoE bothers you, than the Pro access point is the way to go. Since I already have a PoE switch (actually 2 of them and neither is a Ubiquiti switch that provides passive PoE), having to use an unsightly injector (which uses an extra power outlet) doesn’t excite me.

The Ubiquiti forums provide a wealth of information for the tinkerer. Ubiquiti staff is very helpful and provide lots of answers (as do community members). The controller software and AP firmware is being updated all the time which is very exciting; I don’t need new features, but a fresh UI and more options (such as being able to turn off the LED not just using a command line) would be nice.

For better coverage, getting at least 2 access points would go a long way to having full coverage in a house. While 1 will get me coverage bars all over my house, a second one will give me better performance and not just bars of coverage. Once I get the Pro unit, I’ll be able to space out my access points.

Most home users just accept mediocre WiFi coverage and buy into the marketing of many router/access points that say that they’re access points perform better than others. The problem really is that the access point can have higher transmit power (based on the maximum allowed), but really if your device can’t connect or have good WiFi performance, it doesn’t help. More access points are going to provide better, more consistent coverage. The UniFi access points do that quite well at a reasonable price.

NOTE: Test units were provided to me at no cost from Ubiquiti Networks. However, that didn’t influence the results of this review and no conditions were placed on what I wrote about the units.
Enhancing my TV Viewing Experience

In my last post about TV viewing, I wrote that I’ve switched to MythTV with a few custom scripts to export to Plex. This setup has been working well and I’m quite pleased with Plex on the AppleTV. One of the features of the AppleTV 4 is the ability to ask Siri things including “What did he say?” where the video rewinds a few seconds and turns on subtitles. This is an extremely useful feature that we’ve used a number of times watching shows on Netflix. However, since I have my own system for recording/watching shows, I didn’t have the ability to do this.

So, I decided to see what it would take to enable this. From what I read, Plex will show subtitles and if the subtitles are in the video container itself (i.e. in the mp4), it wouldn’t require extra processing power on the Plex Media Server to show the subtitles. That got me thinking that if I could turn the closed captioning into subtitles and put them in the mp4, maybe I could get this feature working.

Using the ever so powerful ffmpeg, I figured out that to extract the closed captioning (closed captioning isn’t the same as subtitles as far as I can tell as they are transmitted differently) using this:

/usr/local/bin/ffmpeg -f lavfi -i "movie=${TEMPDIR}/${FILENAME}[out0+subcc]" -map s ${TEMPDIR}/${FILENAME}.srt

Where ${FILENAME} is the MPEG2 file with the commercials stripped out (otherwise the titles wouldn’t match up).

Then I could use this:

    /usr/local/bin/ffmpeg -i ${TEMPDIR}/${FILENAME}.mp4 -f srt -i ${TEMPDIR}/${FILENAME}.srt -metadata:s:s:0 language=eng -c:v copy -c:a copy -c:s mov_text "${PLEXDIR}/${TITLE}/${OUTPUT_FILENAME}"

Which merges the newly created subtitle file (.srt) into the mp4 file.

After doing all that (it takes awhile to do the processing), I had an mp4 file with subtitles in it! I tried it out in QuickTime Player, turned on subtitles and show words. Next I put the video into Plex and played it through the Plex interface; good there as well. Now the last test was to play it through the AppleTV and use the Siri command to find out the last words. Amazingly that worked as well! There was a slight hiccup with Plex where the video stutters after the subtitles are turned off, but that’s pretty minor.

Putting that all together, I updated my plexexport script that I call from MythTV. While this whole setup has taken a little bit to get running, I just smile every time we watch shows as it really works seamlessly and requires no babysitting (I do check on the recorded shows each morning just to make sure that nothing went wrong, but that’s just because I can’t believe it really works!).

The TiVo works wonderfully for the average user; I’m not the average user and I consider all this work a hobby. Will I get tired of putting together my own systems like this? I have no idea, but for now, I’ll keep working on it until it is perfect (this system is almost perfect, but I’m sure there can be more).

OS X Server and the runaway process

Yesterday I heard the fan running like mad on my Mac Mini. My mini is my workhorse machine that is my media center, surveillance system, and build server. This is not uncommon as it processes video at times and when it builds certain projects (Swift seems to cause it more), the processor has to work harder. Normally the load is about 30% (Quad Core i7), but when the fan comes on loud enough for me to notice, it is hitting the 50-90% range. I did a little poking at the machine and saw a process called sdmd hogging the CPU. I had never heard of this process, but a quick search found some references on Apple’s support discussion threads.

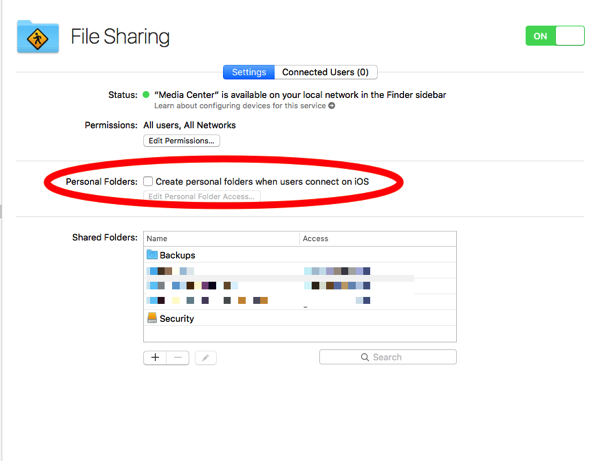
I read through all the responses and turned off “Create personal folders when users connect on iOS”.

FileSharing

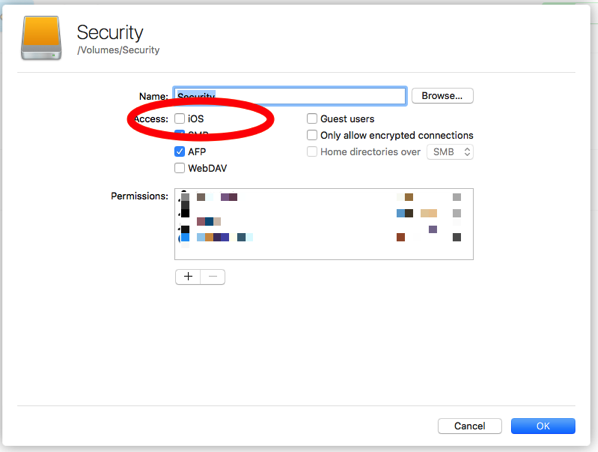
Unfortunately that was only half the solution. The other half of the answer that I ignored on the first pass was a setting in each Shared Folder that enables iOS sharing. I had recently added a shared item and didn’t notice the iOS setting.

Sharing

Once I unchecked iOS, the load started going down and little files stopped being created. By this time, I had over 150,000 little files! These were thumbnails from my cameras collected over the last week. Using the Finder to delete the files was an exercise in waiting, so I searched for a UNIXy way to do this and found the answer. Switch to the /Library/Server/ServerDocs/Data directory and issue:

sudo find . -type f -print -delete

This quickly nukes all files in the current directory.

I still have mixed feelings about OS X Server; it is working pretty well for me right now to perform basic functions including Time Machine backups, but sometimes it does magic where it takes time for me to figure out how to undo its magic.

Review: Amazon Echo

[19 Jan 2015, 7:38 AM – Minor Edits]

When Apple first announced HomeKit, I was excited for an easy to use system for home automation. Unfortunately or fortunately, they left the actual implementation to the manufacturers. The first HomeKit devices that came out were pretty simplistic and would allow you to turn lights on and off. To me, this was a bit useless. In order for automation to be truly valuable, there had to be rules for different things to happen based on inputs that worked even if my phone wasn’t around (what good is automation if it can’t turn on lights in the middle of the night when you’re not home to scare someone away?). Now that more manufacturers are getting into automation, we’re seeing hubs such as Insteon incorporate HomeKit; I’m not exactly sure what it does, but it is a start.

I glanced at the forums for the Vera hub that I use periodically and saw that someone had created a Vera HomeKit Bridge. I had some time one day and installed it and picked up one of the apps on the iOS app store that had an Apple Watch component and gave it a whirl. Telling Siri on my watch to turn a light on and off was interesting, but due to the speed of Siri, it was more of a gimmick than anything else.

I was now intrigued with voice control of my automation, but it had to be more seamless and work even when I didn’t have my watch on my wrist (raising my wrist to yell at Siri to turn on a light was pretty lame). I saw that someone created a Bridge Application for Amazon Echo and I started looking at the Amazon Echo. The Echo looked very gimmicky with a lot of promise. This bridge, if it worked better than the HomeKit bridge, could be the next step in my home automation. The cost of the Echo was a bit more than I was willing to spend on an experiment, so I put it on my wishlist.

Much to my surprise, one Saturday evening, the Echo arrived (someone bought it for me off my wishlist) and I quickly set it up, told it to discover devices (the Echo Bridge emulates a Hue Bridge), and I was ready to start experimenting. I was turning lights on and off in no time. My son got a bit too excited about the Echo and basically annoyed my wife to no end; the Echo was banished to my office. After a few days, my wife let me put the Echo back in our kitchen (we have a split/tri level house with the kitchen/living area in the middle). My son soon learned to not annoy my wife and I started routinely using the Echo to turn lights on and off. For instance, when I go out back to put compost in the bin, I tell the Echo to turn on the back lights (unfortunately due to some choices I made, the switch for the back lights is not near the door).

So now I had a “toy” to control my automation. In a few short weeks, the “toy” became a tool where I routinely told the Echo to turn off lights that my family had left on around the house. It wasn’t until one day my wife walked upstairs, sat on the couch and used the Echo to turn off the downstairs light, that I knew the Echo was a keeper. Since we have an open floor plan with our living room adjacent to our kitchen, the Echo can “hear” us anywhere in our main living quarters which is about 500 sq feet. (Our house isn’t all that big and the light switch was literally 5 feet from the couch.) While I initially thought that turning lights on and off was too simplistic, it is really something that is done all the time in a house that can’t be automated.

Other than the Echo controlling my automation, I use it occasionally to hear news and weather and we sometimes ask it questions.

The Amazon Echo has tons of potential and if it wasn’t for the Echo Bridge, it would be an expensive, seldom used gadget. The bridge makes the Echo an excellent addition to my home; however, the price is a bit much for what it does. Developers are adding more “skills” to it all the time and maybe it will make sense for it to be used by more than just early adopters.

Some people have privacy concerns over an always on microphone. As far as I understand it, the trigger word processing “Alexa” is all done locally and doesn’t transmit until the trigger word is heard. To me, this is fine to have the processing done remotely after the trigger word is said; nothing I say to the Echo is all that interesting.

Pros

  • Voice recognition works well.
  • Microphone picks up voice from across the room.
  • Easy setup.
  • Developers are extending built in functionality.

Cons

  • Limited utility for most people.
  • High cost for a gadget.
  • May have privacy concerns.
  • Doesn’t integrate well into iOS ecosystem (tasks and reminders need IFTTT to get to the device).
  • Current skills are pretty mundane.

Summary

For me, the Amazon Echo has been an excellent addition to my home automation system. I don’t think a day goes by that we don’t use it. However, without the bridge to my Vera automation system, the Echo would not be used. The current price is a bit much without a particular use. I wouldn’t recommend purchasing the Echo unless you have a particular use in mind and are willing to get used to using your voice to control things. The Echo Bridge is a great piece of software that completes the Echo; while it was designed around the Vera, anything you can control via a URL can be controlled via the Bridge.

At this point, I think I’d feel like one hand was tied behind my back if I didn’t have the Echo!

Attempting to perfect TV viewing system

As I’ve written about in the past, I’ve gone to great lengths to record and play TV shows (I don’t torrent and I get my shows over the air). My system up until now has relied on El Gato’s EyeTV 3 software running on my Mac Mini combined with a few scripts and now a command line program I wrote called EyeTVExporter to drive ffmpeg. The whole system has worked well, but one problem with EyeTV is that I have to screen share to the Mac Mini to add or modify schedules. Also, this process is far too complex to maintain in the long run. Also, I don’t currently have faith that EyeTV will continue to be updated; for instance the latest issue I have with it is that the Export routines (either in the app or via AppleScript) convert all the audio to stereo instead of preserving the AC3 5.1 audio that is recorded on many shows and exists in the MPEG2 file that EyeTV internally stores. When I’ve tried to just export to MPEG2 with the cut marks which mark the commercials, it has garbled some of the video.

Never content with the status quo, I decided to give MythTV a try this weekend. I had tried to install it before, but the pre-canned installers failed. So this time, I decided to build MythTV using MacPorts using the instructions on the MythTV wiki. Other than a few minor hiccups due to old cruft lying around, the install succeeded after awhile of building. I also installed mythweb to manage the whole thing (I changed the port on the version of Apache installed so I didn’t have to futz with the standard OS X Server apache install.)

After the initial configuration and purchasing a 2 month trial of Schedules Direct for the guide data, I was off and running. First step was to record. That went smoothly and the built in commercial skipping seemed adequate for my needs; having it built in instead of using an external component was a big win for me. The next part became trickier and required me to work on a script. I created a user job in the mythbackend that has the following calling parameters:

plexexport %DIR% %FILE% %CHANID% %STARTTIMEUTC% "%TITLE%" %SEASON% %EPISODE%

I then created a script that I placed in /usr/local/bin/plexexport (chmod +x the file after placing it there). Basically the script uses the commercial flags that MythTV inserted, converts those to a cut list and then exports to the appropriate location for Plex to pick up. My ffmpeg settings seem to work well for 1080i and 720p video and preserves the 5.1 audio. I did find that ffmpeg didn’t stop when it was done and duplicating my test video for 9 hours of video; using a little script magic and ffprobe, I cleared up that problem by explicitly telling ffmpeg the duration.

With MythTV you can have it run the user job right after the show records, but I want everything to happen at night when I don’t have to hear the box if I’m in my office, so I had to create a simple script based on a sample I found that I invoke every night (I use Lingon to set it up). This script tells MythTV to locate all shows that are less than 24 hours old and to queue a commercial flagging job and a Plex Export job. I have MythTV setup to do 1 job at a time so I don’t have to worry about the processor getting overloaded.

The last piece in this puzzle is deleting old recordings automatically and yes, I have another script to accomplish that task.

This may sound like it was more complicated than in the past, but I had 4 scripts before and 1 custom program to do the same work. If this all works, my time will have been worth it.

This allows me to use a web browser to schedule shows and easily view upcoming recordings. While the web interface isn’t great, it is usable. One caveat is that mucking with some things can have cause lots of problems as the web interface does very little error checking.

Does this save me money? No, Schedules Direct is $25/year while the EyeTV guide data is $20/year, so it is $5 more. However, by undertaking this now, I’ve proven to myself that when/if EyeTV stops functioning, I have a viable alternative. Hopefully this experiment pans out.