Keeping Network Devices Updated

Some time ago, IPv6 disappeared from my home network. After a bit of research, I found out that Time Warner Cable had a problem with my cable modem (Motorola SB 6183) and IPv6 so they pushed out a firmware that disabled IPv6. Recently I read in the Time Warner forums that a firmware update would be out soon that has this fixed.

This got me thinking about IPv6 on my home network. While I’m not sure exactly why I need it, I’m curious about it. Do all my devices support IPv6? Should I move everything to IPv6? Both of these questions are not my focus right now as my IPv4 network is fine, and I don’t want to put my head around it. What this did bring up, however, is the availability of updates for devices on my network; not just IPv6 support, but security and stability fixes.

My network has a large number of devices from a number of manufacturers. I have 7 video cameras, 7 Squeezebox devices, 3 Macs, 3 iPhones, 5 iPads, a sprinkler controller, Apple TV, Fire TV, Amazon Echo, serial to Ethernet adapter, 3 WiFi access points, 2 managed switches, printer, a Vera, and a partridge in a pear tree. These devices range from being a few months old to some being many years old. How do they get updates? Are they still made? As a tech person, I try to keep on top of all the updates and keep my network secure.

One of the problems with keeping all these devices updated is that some of the manufacturers are no longer around or the devices are no longer supported. Does this pose a security risk? Devices that update their firmware automatically like the Amazon Echo make this whole upgrade issue moot (until the company goes out of business or moves on). What does the average person do with all these devices? The simplest solution for devices that don’t update their own firmware, unfortunately, is to replace them every few years. This is a complete waste, but potentially the only solution. The problem is going to get worse as more and more devices are put on the network.

What do other people do to keep devices updated? Maybe I need a quarterly update day to check all my devices.
Review: Plantronics BackBeat Fit Headphones

It seems that every year I look for better headphones for running. The last 4 or 5 years, all the headphones that I’ved used have been wireless, but something either happens to the headphones or there is something that I don’t like about them. This summer was no different than past summers in that I wasn’t satisfied with the headphones I had. My previous pair were the Plantronics BackBeat Go. They performed adequately, but I was never able to keep them in my ears and spent time on my runs adjusting them. Sometimes they stayed in and required little adjustment, but most of the time, they just kept falling out. I initially liked them and was able to have them properly positioned, but that might have just been a fluke. I had bought them at Costco so that I could try them out and if I didn’t like them, they’d go back. However, they worked OK and I ended up keeping them for about a year.

Flipping through the Costco magazine recently, I saw that they were selling the Plantronics BackBeat Fit with a $20 discount. Like last year, I decided to give them a try. With Costco’s generous return policy, I had nothing to lose. (I used to hate going to Costco, but now I go on an almost weekly basis.)

Like most Bluetooth headphones these days, pairing was pretty easy; granted not as easy to pair as Apple’s AirPods, but easy enough. I paired the headphones and the sound is decent. I’m not an audiophile and when I’m running, it almost doesn’t matter as long as they play. The controls on the side are fairly easy to work, but the volume up/down button (it is 1 button) is a little small. Skipping tracks requires a double tap of the button on the left ear. I would have rather that button just require a push and hold as I skip tracks fairly often when there is music I don’t want to hear.

One of the things I’ve noticed on the headphones is that there has been a firmware update for them; this is a first for me on running headphones. The one feature I noticed with the update is that when I goto the next track by double tapping the button is that a voice says “next track”. Also, when I power them on, a voice gives estimated play time which is great instead of just high, medium, or low battery charge.

The headphones fit well over my ears and don’t move when I run. They left small marks on my ears where they rested, but I barely noticed them. They were comfortable and I didn’t feel like I spent time futzing with them while running.

Pros

  • Comfortable.
  • Don’t move when running.
  • Voice prompt for battery usage is useful.
  • Decent play time.
  • Can be paired to multiple devices.

Cons

  • Volume button is a little small.
  • Advancing tracks requires 2 taps which is sometimes hard to do while running.

Summary

Many times when I get something new like this, I write the review during the “honeymoon phase” and have very little critical to say about it. While that is true here as well, the design of these headphones is what will keep me using them. They are similar to a pair of Motorola headphones that I had a few years ago, but those had a stiff piece of plastic connecting the sides which dug into my head. I liked the design on those as they stayed in my ears. I’m quite hopeful that these live up to the hype.

At the discounted price I got at Costco (they were on sale), buying them was a no-brainer. At regular price, I can say without a doubt that they are better than the JayBirds I had before that I couldn’t get to stay in my ears. I wouldn’t hesitate to recommend these for anyone that wants wireless headphones for use when running or working out.

Setting up an EdgeRouter Lite for an On Demand iOS VPN

Ever since I started my career, I’ve used Virtual Private Networks (VPN) to connect to a company network. My first experience is with AppleTalk Remote Access and I thought it was neat to be able to have my home computer on the work network. Over my career, I’ve used VPNs mostly as a user as I had no use for one as a home user.

When I setup cameras at my house over 3 years ago, I wanted to remotely connect to the cameras. Since I put together my own system, there wasn’t an out of the box way to view the cameras (it does have a web interface, but I didn’t want to directly expose that to the world). This gave me the first experience in setting up a VPN. I turned on Mac OS X Server’s VPN, configured my iOS devices for the VPN and I was easily able to connect.

Recently I’ve been working with mobile device management (MDM) and one of the features that I’ve been reading about is on-demand VPN. I became curious about it and wanted to see if I could set it up more of an exercise than anything else, but also it would be useful to hop on any WiFi network and automatically connect to my home network. The iOS on-demand VPN requires that the VPN use certificate authentication instead of just a username and password. Unfortunately, the OS X Server’s L2TP IPSec VPN doesn’t support certificates, so I had to look to other options. Luckily, my EdgeRouter Lite can be configured as an OpenVPN server with certificate authentication. Given that, the only obstacle to setting this up was time and some futzing to get things right. I’ve scoured the web and managed to find the pieces to get things working.

The rest of this entry will document how to setup the server as well as the iOS client side. For the server setup, I followed this article, but had to make a few changes to get things to work the way I wanted. I then used another article to setup the iOS side.

This is a really long setup, but it is straightforward. If you’re intimidated by command lines and editing text files, this process is not for you!

Certificate Setup

  1. SSH into the EdgeRouter Lite
  2. Setup a new certificate authority that will be used to create new client certificates for the VPN. Issue the following commands, one per line. Follow the prompts when you run the commands.
    configure
    sudo su
    cd /usr/lib/ssl/misc/
    ./CA.sh -newca
    
  3. Create a new server certificate and sign it. Follow the prompts when you run the commands; you’ll need to enter a password for the new request. We’ll remove it in another step.
    ./CA.sh -newreq
    ./CA.sh -sign
    
  4. Copy the certificate authority key and certificate to an area of the router that will survive a firmware upgrade.
    cp demoCA/cacert.pem demoCA/private/cakey.pem /config/auth/
    
  5. Also copy the server certificate to the same place.
    mv newcert.pem /config/auth/server.pem
    
  6. Display the certificate authority certificate using cat /config/auth/cacert.pem and then copy it into BBEdit or another text editor on your local computer; save it to your hard drive.

  7. Remove the password on the private key for the server so that the VPN server can start automatically.

    openssl pkcs8 -in newkey.pem -out /config/auth/server-pem.key
    
  8. Generate the Diffie-Hellman Paramters; this takes a long time.
    openssl dhparam -out /config/auth/dhp.pem -2 1024
    cp dhp.pem /config/auth
    
  9. The next part is generating the client certificates. The recommendation is to have 1 client certificate per client. However, this would require me to have 1 for my iPad and 1 for my iPhone complicating setup. While having 1 certificate for both may not be recommended, it is the route I chose. When prompted, enter a password for the new key and then the last line will remove it. Don’t enter a challenge password.
    ./CA.sh -newreq
    ./CA.sh -sign
    mv newcert.pem client-cert.pem
    openssl pkcs8 -in newkey.pem -out client-key.pem
    
  10. Display the certificate using cat client-cert.pem and past it into BBEdit and then saved it.

  11. Do the same thing with the key using cat client-key.pem and saved it to my Mac.
  12. On my Mac, do the following in Terminal (make sure you’re in the same directory as where you saved the certificate and key). When exporting, set a password that you’ll use later.

    openssl pkcs12 -export -out client1.p12 -inkey client-key.pem  -in client-cert.pem
    

OpenVPN Server Setup

  1. SSH into the EdgeRouter Lite if you haven’t already.
  2. Exit out of sudo mode using exit if you’re still using the same session as before.
  3. Enter configuration mode:
    configure
    
  4. Start editing the VPN tunnel (I didn’t know that by entering a full path to an object, you didn’t have to enter a full command for subsequent items):
    edit interfaces openvpn vtun0
    
  5. Setup the server.
    set mode server
    set local-port 1194
    
  6. Select a subnet. Choose a subnet that doesn’t overlap with other subnets on your LAN. Notes have also indicated that you should pick an IP range that isn’t used on other networks as you could have routing problems, but I’m not completely positive that is true. If you’re routing everything over the VPN, the device should use that route first.
    set server subnet 10.0.20.0/24
    
  7. Configure the TLS parameters
    set tls ca-cert-file /config/auth/cacert.pem
    set tls cert-file /config/auth/server.pem
    set tls key-file /config/auth/server-pem.key
    set tls dh-file /config/auth/dhp.pem
    
  8. The notes indicate for EdgeMax 1.8 firmware and higher, you can turn on IPv6 support. I’m not running that, yet, so I didn’t do this.
    set protocol udp6
    
  9. For my purposes, I want all the traffic to go over the VPN. I’m not sure if the second line is strictly needed.
    set openvpn-option "--push redirect-gateway"
    set server push-route 10.0.1.0/24
    
  10. Since I run Pi-hole for blacklisting advertising, I want to continue to do that even when connected to my VPN. (Yes, I know websites make money off the ads, but the ads really need to get better and more relevant before I’ll turn this off.) I set my DNS to the same entries that I set on the EdgeRouter’s DHCP server.
    set openvpn-option "--push dhcp-option DNS 10.0.1.2"
    set openvpn-option "--push dhcp-option DNS 10.0.1.1"
    
  11. Now a few extra OpenVPN options. I allow the same certificate to be used by multiple clients, so I have that option as well as one to enable compression.
    set openvpn-option --comp-lzo
    set openvpn-option --duplicate-cn
    
  12. Next up are the firewall rules to allow clients to connect from the outside to the EdgeRouter Lite.
    top
    edit firewall name WAN_LOCAL 
    set rule 4 action accept
    set rule 4 description “OpenVPN”
    set rule 4 destination port 1194
    set rule 4 protocol tcp_udp
    set rule 4 log disable
    
  13. If you have an IPv6 firewall, you might add something like this.
    top
    edit firewall name WANv6_LOCAL 
    set rule 4 action accept
    set rule 4 description “OpenVPN”
    set rule 4 destination port 1194
    set rule 4 protocol tcp_udp
    set rule 4 log disable
    
  14. That’s it for the server setup! Finally do:
    commit
    save
    exit
    
  15. Check that the OpenVPN server is running using:
    ps -ef | grep openvpn
    show openvpn server status
    

The last line can be used when clients are connected to monitor it.

Good work if you’ve followed along this far! Next up is the client setup which has a bunch of steps as well.

iOS Client Setup

  1. Locate the p12 file that you created on your Mac.
  2. Download Apple Configurator from the Mac App Store.
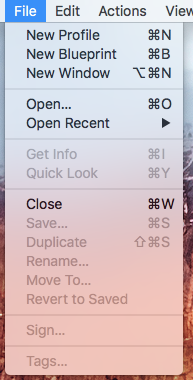
  3. Select New Profile from the File menu.

    New Profile

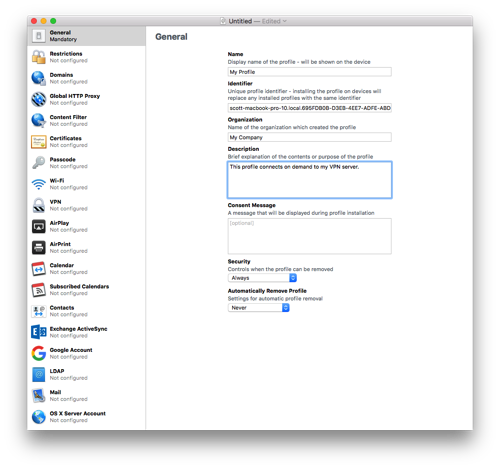
  4. Fill out the General information for the profile. You can leave the Identifier as is.
    General

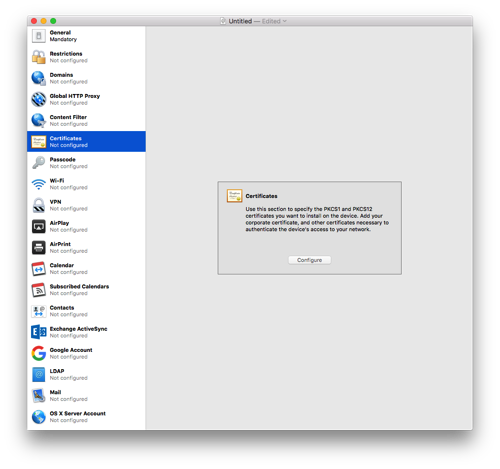
  5. Click on Certificates and then press Configure. Select the .p12 file you created way back in the first part of the instructions.
    Select Certificate
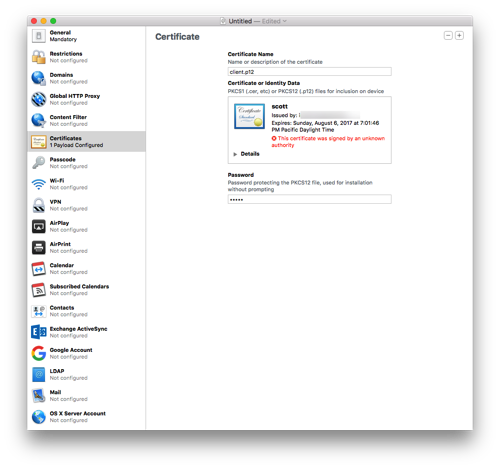
  6. Give the certificate a name and enter the password you used when exporting the p12 file.
    Certificate Selected
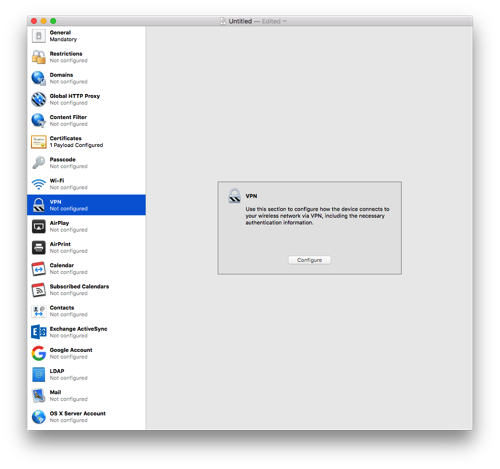
  7. Select the VPN section and click Configure.
    Configure VPN

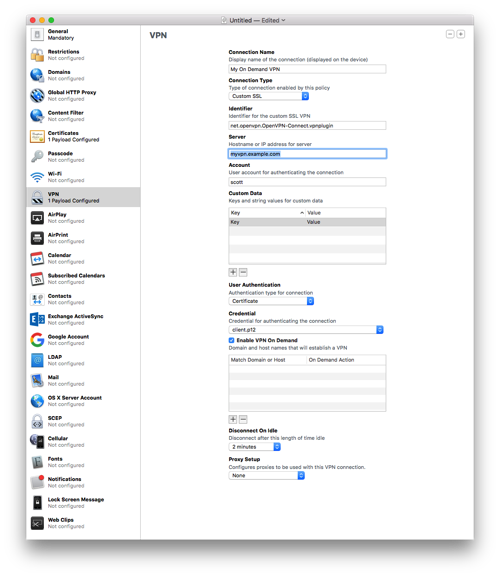
  8. Enter a name for the connection.

  9. Select Custom SSL for the Connection Type.
  10. Enter net.openvpn.OpenVPN-Connect.vpnplugin for Identifier.
  11. Enter the hostname for the Server. I recommend your Dynamic DNS hostname here. I wouldn’t recommend a CNAME as I’ll explain later.
  12. Enter some username for the account; it won’t be used.
  13. Enter a placeholder key/value pair. You’ll edit this by hand later.
  14. Select Certificate for User Authentication and then pick the certificate you added earlier.
  15. Enable VPN On Demand. You’ll hand edit this later as well.
  16. Select a Disconnect on Idle value; I selected Never.
  17. Save the profile to your Desktop (or somewhere else). Don’t sign it as signing it will prevent you from editing it by hand which is needed to properly setup the VPN On Demand. Configurator doesn’t handle all the options present in current iOS versions.
    VPN Setup
  18. Open the .mobileconfig file in BBEdit. BTW, if you haven’t bought BBEdit, you should definitely buy it. While the current version offers basic functionality for free, this is a tool that should always remain in your tool belt.
  19. Look at the section called VPN. Mine is basically below. You’ll need to change a few entries.

        <key>VPN</key>
        <dict>
            <key>AuthName</key>
            <string>scott</string>
            <key>AuthenticationMethod</key>
            <string>Certificate</string>
            <key>DisconnectOnIdle</key>
            <integer>0</integer>
            <key>OnDemandEnabled</key>
            <integer>1</integer>
            <key>OnDemandRules</key>
            <array>
                <dict>
                    <key>Action</key>
                    <string>Disconnect</string>
                    <key>SSIDMatch</key>
                    <array>
                        <string>My Network 5 GHz</string>
                        <string>My Network</string>
                    </array>
                </dict>
                <dict>
                    <key>Action</key>
                    <string>Disconnect</string>
                    <key>InterfaceTypeMatch</key>
                    <string>Cellular</string>
                </dict>
                <dict>
                    <key>Action</key>
                    <string>Connect</string>
                    <key>InterfaceTypeMatch</key>
                    <string>WiFi</string>
                </dict>
                <dict>
                    <key>Action</key>
                    <string>Ignore</string>
                </dict>
            </array>
            <key>PayloadCertificateUUID</key>
            <string>SOME_IDENTIFER_REPLACE_WITH_WHAT_YOU_HAVE</string>
            <key>RemoteAddress</key>
            <string>vpn.example.com</string>
        </dict>
        <key>VPNSubType</key>
        <string>net.openvpn.OpenVPN-Connect.vpnplugin</string>
        <key>VPNType</key>
        <string>VPN</string>
        <key>VendorConfig</key>
        <dict>
            <key>dev</key>
            <string>tun</string>
            <key>proto</key>
            <string>udp</string>
            <key>remote</key>
            <string>vpn.example.com 1194</string>
            <key>cipher</key>
            <string>BF-CBC</string>
            <key>resolv-retry</key>
            <string>infinite</string>
            <key>nobind</key>
            <string>NOARGS</string>
            <key>persist-key</key>
            <string>NOARGS</string>
            <key>persist-tun</key>
            <string>NOARGS</string>
            <key>comp-lzo</key>
            <string>NOARGS</string>
            <key>link-mtu</key>
            <string>1542</string>
            <key>ca</key>
            <string>-----BEGIN CERTIFICATE-----\nMIID...bAqZZCQYgHwAh9bW\n-----END CERTIFICATE-----\n</string>
            <key>cert</key>
            <string>-----BEGIN CERTIFICATE-----\nMIID...1jCCAr6gAwIBAgIBC\n-----END CERTIFICATE-----\n</string>
            <key>key</key>
            <string>-----BEGIN RSA PRIVATE KEY——\nMIIG4wIBAAKCAYEA...psUtuM+qAfu\n-----END RSA PRIVATE KEY-----\n</string>
        </dict>
    </dict>
    
  20. Change the PayloadCertificateUUID to whatever is already in your config file.

  21. Change the vpn.example.com references to your VPN address.
  22. For the section that starts with BEGIN CERTIFICATE for the ca, find the cacert.pem that you saved to your hard drive. Open that in BBEdit and remove all the returns in the file. After the first line replace the return with \n. Before the last line put a \n and then another one after the line. You should end up with a big long line!
  23. For the cert, repeat the above using the client-cert.pem from earlier.
  24. For the key, repeat the above using the client-key.pem from earlier.
  25. The OnDemandRules are described in Apple’s documentation. My setup basically says that if I’m on a trusted network, disconnect the VPN. When on cellular, also disconnect the VPN (I trust the cellular network for now). If I’m on any other network, connect the VPN. The last item just falls through, but I suspect it will never get there. In my example, change the names of the trusted SSIDs.
  26. The VendorConfig section are the OpenVPN options that should match the server.
  27. Save the file.
  28. Transfer the .mobileconfig file to your iOS device. I drop the file on AirDrop to my devices. If the formatting of the file is correct, the iOS device will ask you to install the file.
  29. In the VPN section in iOS Settings, Connect and cross your fingers. That’s it! Now when you wonder onto an unknown WiFi network, the VPN should automatically connect. It may take a few seconds for the connection to come up.

If you’ve made it this far, congratulations! I spent a few days working on this and hopefully I captured all the steps. Please send me corrections or feedback.

Notes

  1. I mentioned earlier that a CNAME entry for my VPN server caused a problem and that is because if I’m connecting from inside my firewall (yes, I know it isn’t needed), the client tries to go to the external IP address. By using an A DNS entry and doing the following on the EdgeRouter Lite:
    configure
    set system static-host-mapping host-name vpn.example.com inet 10.0.1.1
    commit
    save    
    

    You can have your client connect to the VPN from inside the firewall. This is useful if iOS gets confused and wants to connect to the VPN when it shouldn’t.

  2. I’ve noticed that sometimes iOS connects to my VPN even when it is on my network. The On Demand connection is evaluated when the network changes and I suspect iOS gets confused and starts evaluating the On Demand rules prior to getting an SSID. This isn’t a big deal as my clients can connect to the VPN even on my own network.

  3. The default certificates are good for 1 year. So you’ll need to renew then after a year. I’ll cross that bridge when I come to it.
  4. If the certificate is compromised, I don’t know how to do certificate revocations.
  5. Treat the certificate and keys just as if they were passwords. This goes for the .mobileconfig file as well. The mobileconfig file has the password to the p12 file in clear text and anyone with that file can connect to your VPN and access your network.
  6. The OnDemand rules are evaluated when the device changes networks and may take a few seconds to bring up the VPN. I always wait for the VPN icon to come up before doing anything on my device.
  7. OpenVPN runs on UDP port 1194 by default. You can configure it for TCP 443, but I won’t go into that because it seems like a pain and requires more changes.

10 Years of Storing Receipts Electronically

Just about 10 years ago, I got frustrated trying to find a receipt and embarked on storing all my receipts electronically. At the time, I couldn’t find a Mac application to do this, so I wrote my own called ReceiptWallet, now called Paperless. I started scanning in just about every receipt and stored the receipts by year. This may seem quite excessive to many, but I’ve found that having easy access to receipts is invaluable.

Yesterday I found a crack in my toilet tank and after finding the warranty information, I contacted support (lifetime warranty on the toilet) and they wanted a copy of the receipt. It took me about 30 seconds to find the receipt and was able to easily email the PDF (along with pictures of the problem) to support. If I didn’t scan in receipts, the chances of me finding it would have been very slim.

While scanning in every receipt may not be completely necessary, I don’t have to worry later about missing a receipt. Yes, the $2 parking receipt isn’t all that helpful, but when trying to categorize business expenses for taxes, it gives me another chance to easily see if I missed any expenses. Anyone that has a small business knows that it is quite important to track all business related expenses.

One of the keys to preserving receipts is to start with a high quality scanner. My scanner of choice (and has been for years) is the Fujitsu iX500 ScanSnap. The scanner isn’t cheap, but it is fast and works well. The other is a good program to manage the receipts. I still use Paperless all the time; I try to scan in receipts a few times a week. A few minutes at a time is all it takes for me to keep up with the receipts.

It takes a certain kind of person to keep up with this process. I’ve found it easy to do and is proven to be helpful time and time again. It isn’t for everyone as it requires some planning and up keep.

EdgeRouter Lite and Namecheap Dynamic DNS

For years, I’be connected back to my home network when I was away for various reasons. As my home network is on a residential cable modem, the IP address of the network is not guaranteed to remain the same. While it remains the same for long periods of time, I don’t really want to take the risk of the IP address changing while I’m not home and not being able to access the network. The solution, of course, is Dynamic DNS (DDNS) where you run a small client on a machine that is running all the time that monitors the external IP address and then updates a DNS provider when it changes; the DNS provider uses a short TTL (time to live) to guarantee that the cached DNS entry doesn’t last too long. For years, I’ve run SecuritySpy which has a built in DDNS client that connects to a service that the company runs. This has run flawlessly for me; I setup a CNAME DNS entry to point to the DDNS entry so that I can use a name that I remember. The CNAME lookup usually works fine, but I ran into a problem this weekend where it was causing problems for a VPN client. So, a quick search turned up that the registrar I use, Namecheap has a DDNS service that is already built into their DNS dashboard. Since I already use their DNS, setting up a DDNS entry took a few seconds.

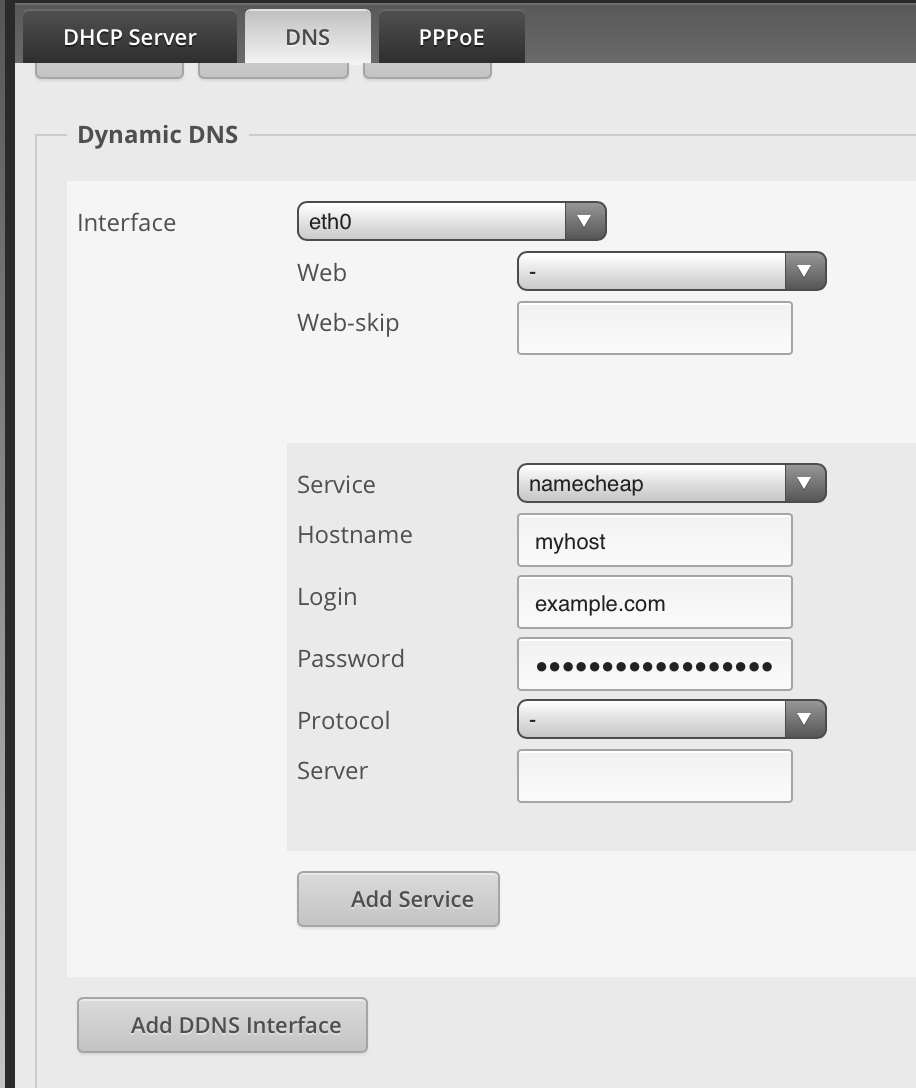
Now that I had the entry setup, I needed something to update the entry when my IP address changed. Turns out that my EdgeRouter Lite has a built in DDNS client with Namecheap as one of the options. Unfortunately, it wasn’t obvious what to put in all the fields. After a little searching, I found a post which had the magic formula. Basically Namecheap generates a password that is used to update the entry.

Here are the instructions for configuring it:

  1. Login to the EdgeRouter Lite.
  2. Click the Services tab.
  3. Click the DNS tab.
  4. Select the appropriate interface (in my case, it is eth0 that is my WAN).
  5. Select namecheap as the service.
  6. Enter the name of the host you setup in your DDNS entry on Namecheap; don’t include the domain.
  7. For the username, enter your domain.
  8. For the password, enter the Dynamic DNS password from Namecheap.
  9. Apply the changes and force an update.

DDNS Screenshot

It’s pretty straightforward, but I wanted to document this so that I wouldn’t have to search in the future.

Review: UniFi Switch 16

As my loyal readers have probably been able to tell, I’ve become a huge fan of Ubiquiti Network’s UniFi line of access points and switches. I’ve previously written about the UniFi Switch 8 which Ubiquiti sent to me for testing. Over the last few months, the switch has continued to perform well and I decided to see about simplifying my network and get a UniFi US-16-150W to replace a Cisco PoE switch and a common place Ethernet switch. While the 16 port switch and the 8 port switch would mean a loss of total ports (with SFP modules, I could get 4 more ports yielding a total of 26 ports; 1 port on each for connecting switches), all my devices would just barely fit.

I didn’t need the switch, but moving to more UniFi gear would make management easier on my network. The main features I use on the switch are PoE for my cameras and bandwidth monitoring on each port. They don’t justify replacing working equipment, but simplification can’t be overstated.

My one hesitation on getting this switch was that it has 2 fans unlike the 8 port version. The ambient temperature in my server closet ranges from about 76° F to 86°F which is a bit warm for equipment. I have 6 PoE cameras attached to the switch (drawing very little power) and I expected the fans to come on repeatedly. To my delight, I’ve only heard the fans at startup. Granted I’m not home all day, but when I have been home, I haven’t heard them. Other than that, the switch performs as well as the 8 port switch.

Moving to the UniFi switch for the rest of my network caused 1 problem that didn’t occur in the previous configuration; 2 of my 3 Squeezebox devices weren’t connecting to the network. This had me quite concerned, but after some futzing, I set the ports for the devices to be 100 Mbit (instead of auto negotiation) and turned PoE off on those ports. These changes fixed the issue.

There isn’t a whole lot to say about the switch except that it is easy to manage, but for most home networks it is overkill.

Pros

  • Integrates well into the UniFi line
  • Powers all the UniFi access points (802.3af or passive PoE)
  • Controller software is easy to use (but utilitarian)
  • Rack mountable

Cons

  • No combo RJ-45/SFP Ports
  • A little pricey
  • Fans could make it noisy

Summary

Just like the UniFi 8 port switch, I’m quite happy with this switch. It isn’t for everyone or even most home users. However, if you’re standardizing on UniFi gear, this switch will fit well into your network. The price is decent for a managed PoE switch, but if you don’t have a bunch of PoE devices and don’t have a use for a managed switch, I’d keep looking for network gear.

I purchased this switch from Ubiquiti’s store and judging by my other UniFi gear, this is going to serve me well.

Review: Plantronics Voyager Focus UC

When I started my new job, I was issued a MacBook Pro, an Acer monitor, an Apple wired keyboard, a cheapo mouse, and a few other things including a USB headset for use with Lync, i.e. Skype for Business. There was also a desk phone next to my computer that I haven’t figured out the purpose as Lync lets me make phone calls. I brought in my own trackpad to replace the mouse and I was pretty much set. However, after a few conference calls with the USB headset, I asked my manager for something better; he and others had the Plantronics Voyager Focus UC. He ordered me one and it arrived this week. The headset isn’t cheap (list price is $299), but I soon began to understand the high cost.

I quickly setup the headset, plugged in the Bluetooth adapter, installed the Mac software (it’s kind of mediocre), reconfigured Lync to use the headset and I was off and running. I also paired it with my phone to play music. After a few hours with the headset (including a conference call), I was hooked. When you take the headset off, the music pauses; when you’re on a Lync call, the LED on the Bluetooth adapter turns red; if you try to talk when the headset is on mute, you get an alert on the computer telling you that you are trying to talk and the most important feature is the active noise cancelling (ANC). When I put on the headset and turned on the ANC, all the noise of the office were drowned out and I had some peace and quiet.

For the first few weeks of work, I didn’t listen to music and suffered through the noise. Since I got the headset, I’ve been listening to music almost all the time and have been able to get in the “groove” of my work even forgetting how long I’ve been sitting (good thing my Apple Watch reminds me to stand up!). In addition to listening to music, the conference calls have been crystal clear. I’m not quite sure what I would need in a headset.

Pros

  • Active voice cancellation works well.
  • Integrates well with Lync/Skype on the Mac. (Look for the -M version)
  • Pairs easily with my iPhone and switches between Mac voice and iPhone music.
  • Sound quality is very good for voice calls and music quality isn’t bad.
  • Controls are easy to access on the sides.
  • When you remove the headset, music pauses; when you put them back on, the music continues.

Cons

  • The cost is much higher than any headset I’ve ever used.
  • The Mac software is subpar; there is a menubar item, but you have to hide the main window otherwise the menubar item goes away.
  • If you set the output from the Mac to be the headset and are playing music, the music stops and plays alerts and then plays the music again. I expected the music to “duck” and then come back, but it is abrupt.
  • Extended wearing of the headset causes slight discomfort.
  • Sometimes a little static that seems to go away despite being less than a foot from the Bluetooth adapter.

Summary

After only a few days of using the headset, I’ve been contemplating buying a pair for my home office (at some point I’ll be able to work from home sometimes). Even though I could move the headset home, the convenience of having one would be worth the money. Without having used the headset for a few days, there is absolutely no way that I’d plunk down this kind of money on something unseen. However, now that I’ve had time to use the headset, I should have bought this headset even if I just wanted to use them with my phone. I was on so many calls at my last job, that having these would have been a huge win for me. When I was told to buy a good headset for calls, I bought a cheap Bluetooth headset that crackles; I should have spent company money on something like this!

If you spend a lot of time on calls in an office, I’d definitely recommend this headset. If you’re using Lync (Skype for Business), even better.

Guest Network with EdgeRouter Lite and UniFi Access Points, Take 3!

I’ve written about guest networks with UniFi Access Points twice before and since I’ve written those articles, the UniFi software has just gotten better and better. My instructions are close to no longer being needed, but not quite. In the latest versions of the UniFi controller (5.x), Ubiquiti has fixed issues with network slowdowns when turning on the guest network. This has excellent news and really simplifies the configuration.

For this post, I’m going to reuse some of my pictures and steps as I don’t like to duplicate my work!

Start on the EdgeRouter Lite and do the following:

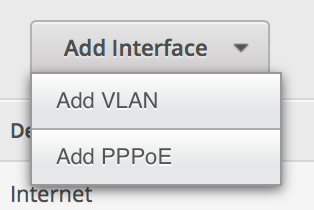
  1. On the EdgeRouter Lite’s Dashboard, click Add Interface and select VLAN.

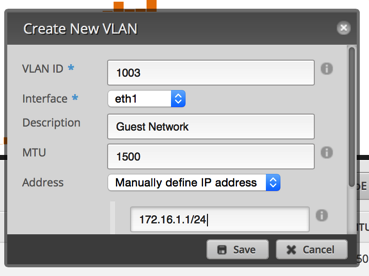
  2. Set up the VLAN as 1003 and attach it to the physical interface of your LAN. Give it an IP address in the range of a private IP block, but make sure you end it in a /24 to specify the proper subnet. (Make sure it is different than your normal private IP block.)

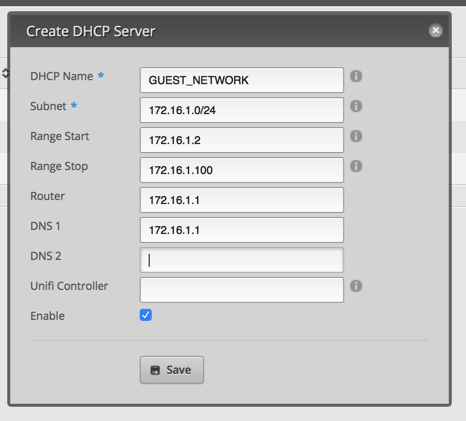
  3. Click on the Services tab. Click Add DHCP Server. Set it up similar to the image below.

  4. Click on the DNS tab under services. Click Add Listen interface and select the VLAN interface. Make sure you hit save.

Now it’s time to move over to the UniFi Controller.

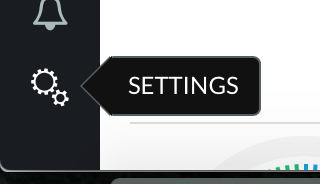
  1. After you login to the controller, click the Settings in the lower left.
    Screen Shot 2016 07 13 at 8 17 52 PM

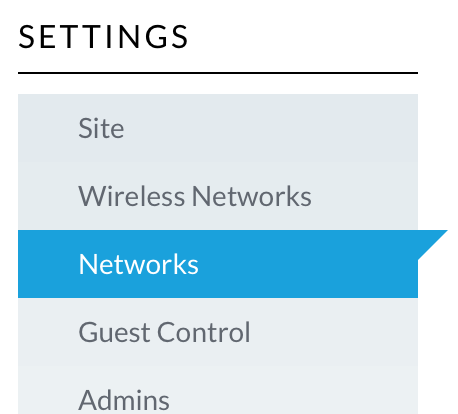
  2. Click Networks.
    Screen Shot 2016 07 13 at 8 19 41 PM

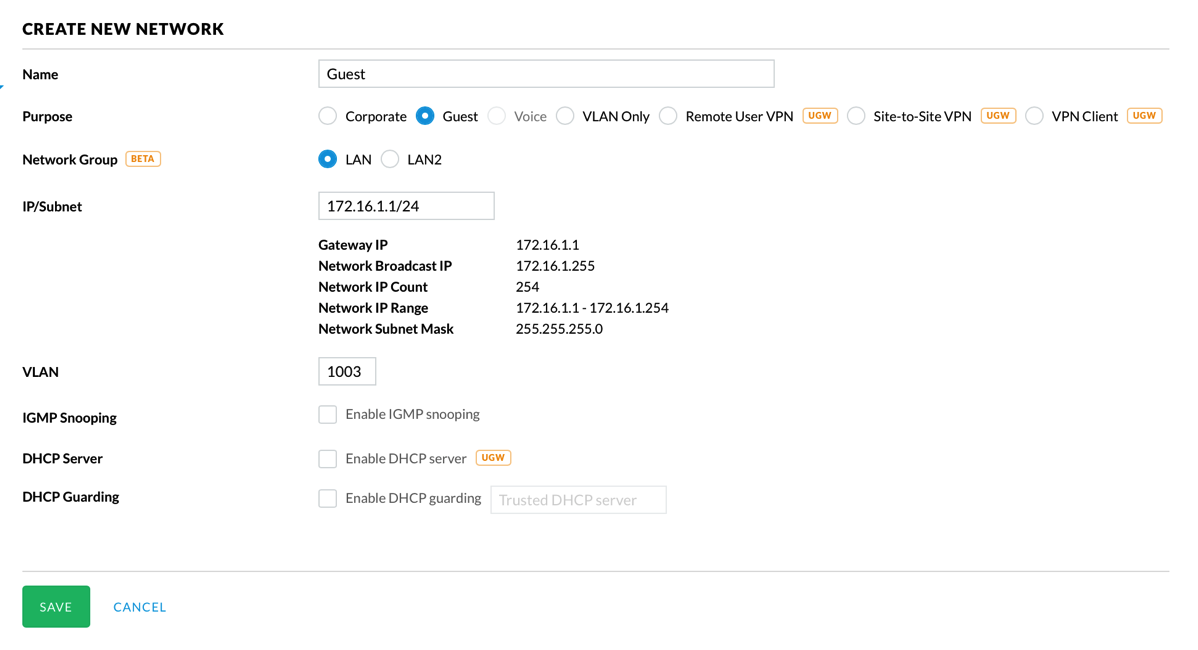
  3. Click Create New Network
    Screen Shot 2016 07 13 at 8 20 23 PM

  4. Setup the network as indicated in the next image and then click Save.
    Screen Shot 2016 07 13 at 8 22 35 PM

  5. Select User Groups on the left side.
    Screen Shot 2016 07 13 at 8 30 17 PM

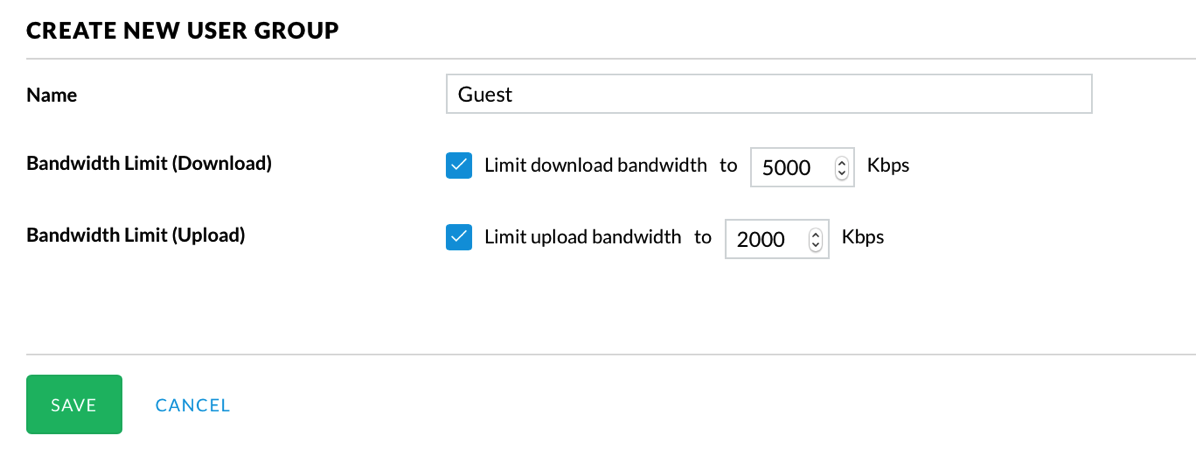
  6. Click Create New User Group.
    Screen Shot 2016 07 13 at 8 31 01 PM

  7. Enter appropriate values to limit upload and download.
    Screen Shot 2016 07 13 at 8 31 57 PM

  8. Select Wireless Networks on the left side.
    Screen Shot 2016 07 13 at 8 24 32 PM

  9. Click Create New Wireless Network.
    Screen Shot 2016 07 13 at 8 26 10 PM

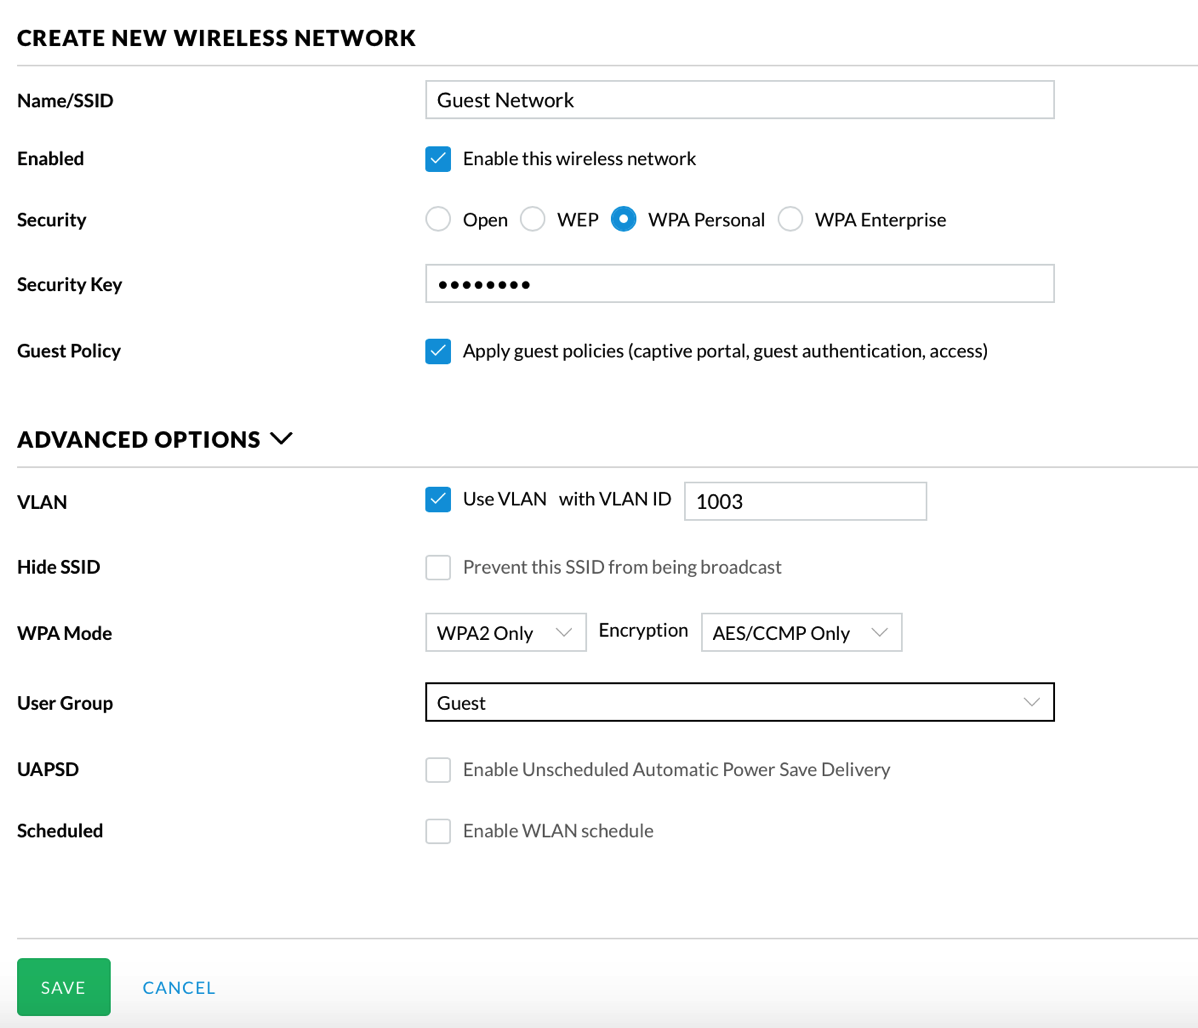
  10. Configure the network similar to the next picture. Of course, set a password that isn’t bullets!
    Screen Shot 2016 07 13 at 8 28 42 PM

  11. Select Guest Control on the left side.
    Screen Shot 2016 07 13 at 8 34 03 PM

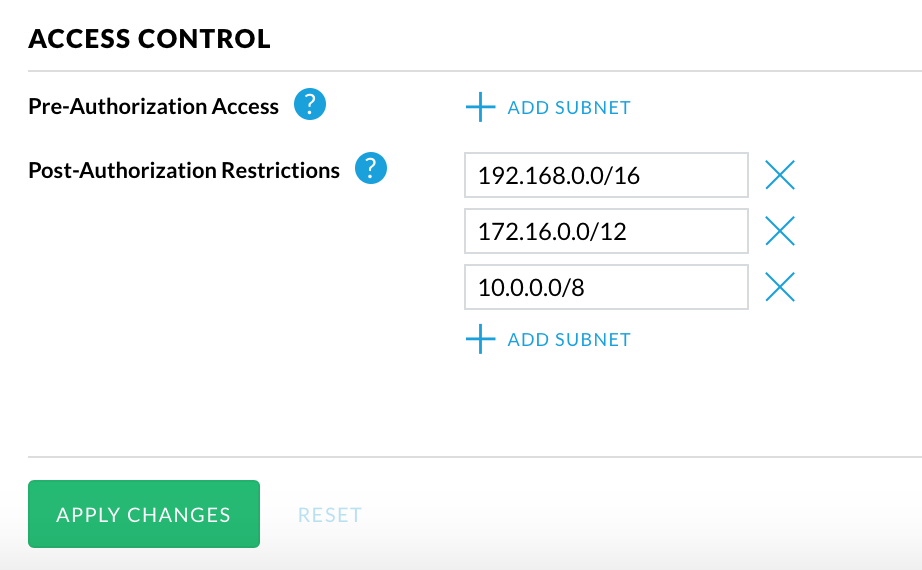
  12. Configure the guest access how you find appropriate. Since I already have a WPA2 password, I just put in no authentication and some basic text. The important part of this screen is access control at the bottom. This area basically isolates guest clients from connecting to your LAN. In my prior configurations, I had to do this at the router level. This is much simpler and cleaner to setup.
    Screen Shot 2016 07 13 at 8 35 54 PM

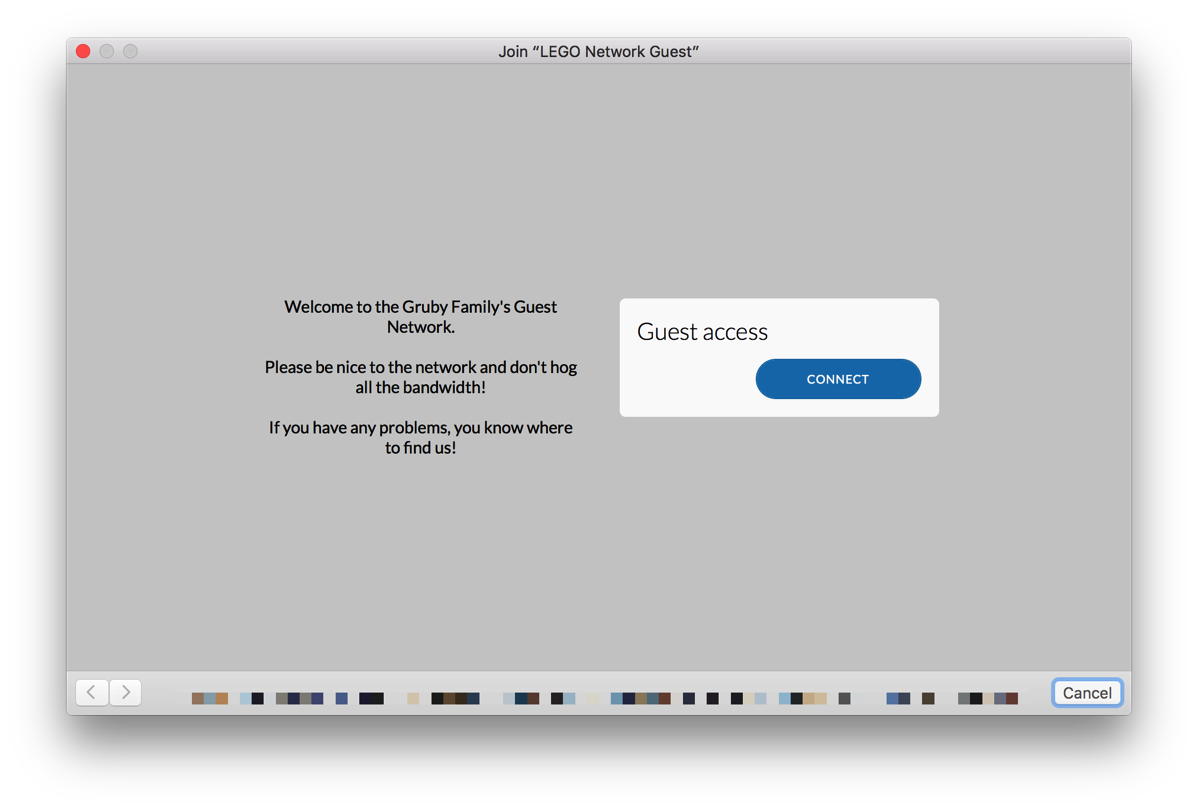
Now you can test this by connecting to the guest network and accessing the Internet. On my network, I now get a captive portal; nothing fancy, but it’s kind of cool.

Screen Shot 2016 07 13 at 8 38 06 PM

Then try connecting to a device on your LAN or connecting to the EdgeRouter Lite. Both actions should fail.

I know that there are a lot of steps to configure this, but they’re not that difficult and you only have to do it once!

I’ve tested this and it is working well on my network; if I’ve missed anything, please let me know!

This configuration is much cleaner than my previous 2 attempts as most of the configuration is in the UniFi Controller. I’ll be writing one last follow up on this topic when I swap out my EdgeRouter Lite for a UniFi Security Gateway (USG). While the EdgeRouter Lite is a great box, the USG is basically the same hardware, but all configuration is done through the UniFi Controller. I’m not quite ready to do the swap (I have one sitting on my shelf that Ubiquiti sent to me) as I’m waiting for the UniFi Controller to add a few more features like static DHCP assignments, static DNS entries, and IPv6 support (all via the GUI; this can already be done on the command line).

Did I find my next new car?

In January, I wrote that I’ve delayed my decision to buy a new car. Last weekend I had some car trouble where my car wouldn’t start and had to deal with it. My son asked me if I was going to get a new car and I said no; I’d just get it repaired. However, I decided to look at Apple’s CarPlay site and pursued the list of cars that support it. None of the typical American cars like Ford or Chevy interested me and I am not getting a Ferrari! I saw that the 2017 Subaru Impreza will support it. At the auto show, I saw the Impreza and it was a decent looking car. It didn’t have CarPlay and wasn’t a plugin hybrid. Now that it will have CarPlay, I’ve decided to take another look. Plugin hybrids are kind of the neglected step child of car manufacturers; it’s either hybrid or electric which kind of concerns me in terms of reliability and support. I’m going to forego the plugin hybrid for now and that should open up my search.

I found a few sites offering first looks as well as Subaru’s own “sneak peak”. It appears that the loaded package will have some interesting tech besides CarPlay. EyeSight® is a system that helps prevent collisions, notifies the driver if he (or she) drifts, as well as can work with the cruise control. Also, it has blind spot detection, cross traffic backup alerts, and high beam assist. In addition, it finally has a power adjustable driver’s seat. So it would appear that the car (on the surface) has many of the features that I’d want in my next car.

On top of all the features, if the pricing remains similar to the 2016, the car would actually be affordable. EPA estimates for the 2016 are about 50% higher than my current vehicle which would be immediately noticeable as I am now driving a lot more for my commute. Subaru says that the car will be available in the later half of this year. Now I just wait so that I can give the car a test drive and see if it is the vehicle for me.

I’m crossing my fingers!

User Experience vs User Interface Design

Once upon a time, I claimed that I could do UI design of applications. This was back in the Newton and Palm OS days where the apps didn’t do a whole lot and the developer guides had pretty clear guidelines that everyone followed. For Palm OS, it even had the number of pixels from the edges for buttons which made it quite easy to know exactly where to place objects.

Moving forward 20 years, it is clear to me that I can follow guidelines, but I need help designing an interface. This is where I’ve learned a ton working with professionals that do design. So far I’m being vague about what I mean by design, because I think that there is a clear misunderstanding of what is mobile design (or application design in general).

There are 2 main areas that I see referenced in mobile design. They are User Interface (UI) and User Experience (UX). While they sound very similar and some people treat them the same, they are very, very different. I’ve had the opportunity to work with a very talented individual that makes both look easy and has taught me the differences.

In general terms (at least to me), user experience is how the user navigates through an app, uses the features, and generally interacts with it. User interface is about drawing the pretty pictures, identifying the typefaces for styling, and picking the colors. In working with a designer on our team, I saw how he meticulously mapped out how everything would work in the application by putting together flowcharts of what every button would do, how you got back somewhere, what was the recovery for every error, how it interacted with hardware, what to do while the user was waiting for a network operation to finish, etc. The actual user interface was secondary to the user experience; for the most part we used standard controls, a standard color palette, etc. This type of design really impressed me as our designer identified so many things that are easy to ignore when simply writing an app. (How many apps just display “Error” with a number with no way to recover from it?)

On the flip side, I worked on a project where the designers were user interface designers trying to do both UX and UI design. Their UX design made the app hard to use, didn’t consider different screen sizes, didn’t consider navigation, didn’t consider how to display data that wasn’t in their sample, and was really about how pretty they could make it look. This frustrated me to no end as they wanted all kinds of custom interactions that would require end user training and were hard to use. In addition, they didn’t consider dynamic typefaces which I feel are important in consumer apps as people like me increase the type sizes to make the text easier to read. I pushed back on some of it and made the app work the best I could. I’m definitely not any type of designer, but having been in this business long enough, I know what doesn’t work!

As a user of apps, I find that a good user experience is paramount for me wanting to keep using an app. However, without an appealing visual appearance, I probably won’t enjoy looking at an app. Keeping these ideas in mind makes killer apps. I feel quite lucky to have worked with a designer that has taught me so much about design; I think that seeing how he did the design and how he considered all the interactions will be a huge benefit to me in the future when I work on new apps.