A year with my Impreza

It’s hard to believe that I bought my Subaru Impreza a year ago! My initial impressions of the car were pretty good. Now that I’ve put about 10,000 miles on it, I am convinced that I made the right choice with the car. We’ve taken it on a few road trips pushing, but mostly I’ve driven it around town.

I’ve never owned a “sports car” and this may be the closest I come to one. This car is truly fun to drive. I’ve been playing a lot with the paddle shifters especially going down mountains. Also, being closer to the ground, I definitely feel the acceleration.

Tech wise, CarPlay is now a requirement for every car I get. The interface is clean and Apple updates it periodically with new features, something car manufacturers are not known to do with the infotainment systems. Up-to-date maps and navigation alerts such as alternate routes and accidents are handy. My only problem with CarPlay is that I have to wait for the infotainment system to fully power up before I plug in my phone, otherwise CarPlay fails to start. However, I’m testing a theory that the Subaru STARLINK app crashes when I connect my phone to the car. The app is useless and I’m not sure why I left it on my phone until this week.

I was concerned about the smaller cargo capacity especially going on trips and camping, but those concerns have so far been unfounded. I’ve managed to cram everything in the car without having to use the roof box I bought. The gas mileage has been pretty good with some trips giving me close to 38 mpg. Unfortunately most of my driving is city driving and a hybrid would have done much better in those circumstances. If Subaru had a hybrid Impreza, I’d definitely be interested in that.

The car has had a few recalls which is expected on a new platform and I hope I get years of continued service out of it.

Overall this car was a very good purchase. It may not be for everyone; it is the right car for me!

Digitally Preparing for an Emergency

The recent fires in Southern California have me thinking about what would I do if I had to evacuate. I’d grab the family and the dog, but what else? While I have a collection of personal mementos such as product boxes from my career, I’d probably just take my Eagle Scout award which is sitting on a shelf in my office. What about all the documents in my file cabinet? They could be important in the future.

Eleven years ago, I started on a journey to scan everything and go “paperless”. I’ve been pretty good at scanning in things that come into the house, but missed a number of documents over the years and never went back prior to eleven years ago. This week, I’ve gone through my entire file cabinet and used my Fujitsu ScanSnap iX500 to finish the task. I put all the documents into Paperless for easy organization. In addition to all the paper, I used the scanner to scan over 1000 photos! The scanner is a workhorse and scans in everything I throw at it. Some would have used a professional service for the photos to save time, but I just plugged away and used the ScanSnap at 600 dpi to scan in the photos.

Now that I have all my photos and documents in a digital form, the question about what I’d take in case of fire gets a little easier. I’d grab my MacBook Pro and my Akitio Thunder2 Quad with 24 TB of storage. This drive has all my media as well as backups from all the computers in the house. Of course, I need to bring a Thunderbolt 2 to Thunderbolt 3 dongle and a cable!

Would I be devastated if something happened to my house and belongings? No doubt I would, but as long as my family is safe everything else is just “stuff” and by going digital with my documents, I have peace of mind that I at least have copies of important documents.

Setting up WAN Failover on a USG

For many years, I’ve been intrigued about routers that have cellular backup to maintain connectivity when the primary Internet does down. I’ve never pursued setting this up as my Internet connection has been quite reliable with downtime measured in hours over the last few years. The cost to set this up could never be justified for my home setup.

One of the features of the latest UniFi Controller is the ability to turn an unused Ethernet port on the USG to be a WAN failover. This is a great addition for a enterprise class router, but overkill for my needs.

About a year ago I purchased a HooToo Travel Router to experiment with setting up a VPN when I travel. I had some success with it, but ultimately gave up and have just been using it as a battery for other devices. I’ve been reading forums about the Mobley and saw that the Mobley could be tethered to a router and not just used as a hotspot. Now I had a mobile hotspot and a router that maybe I could put together to be a WAN failover.

The forums talking about the Mobley mentioned router firmware called ROOter that supports various routers and modems. There happened to be firmware for a router similar to my portable router, so I decided to give it a try. Worst case is that I’d brick the router and this exercise would be over.

After a bit of fiddling, I got everything working. The below steps detail what I did. There are a large number of steps, but they’re pretty simple. There should be very few, if any, changes for different LTE modems.

  1. I grabbed firmware for the HooToo TripMate Nano router.
  2. I then flashed the firmware onto the router. This is going to vary based on the current firmware on the router.
    Screen Shot 2017 10 29 at 4 29 41 PM
  3. Select the ROOter SSID on your computer. Use the default WiFi password of rooter2017.
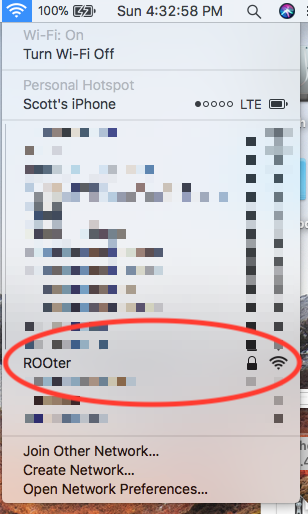
    Screen Shot 2017 10 29 at 4 32 54 PM
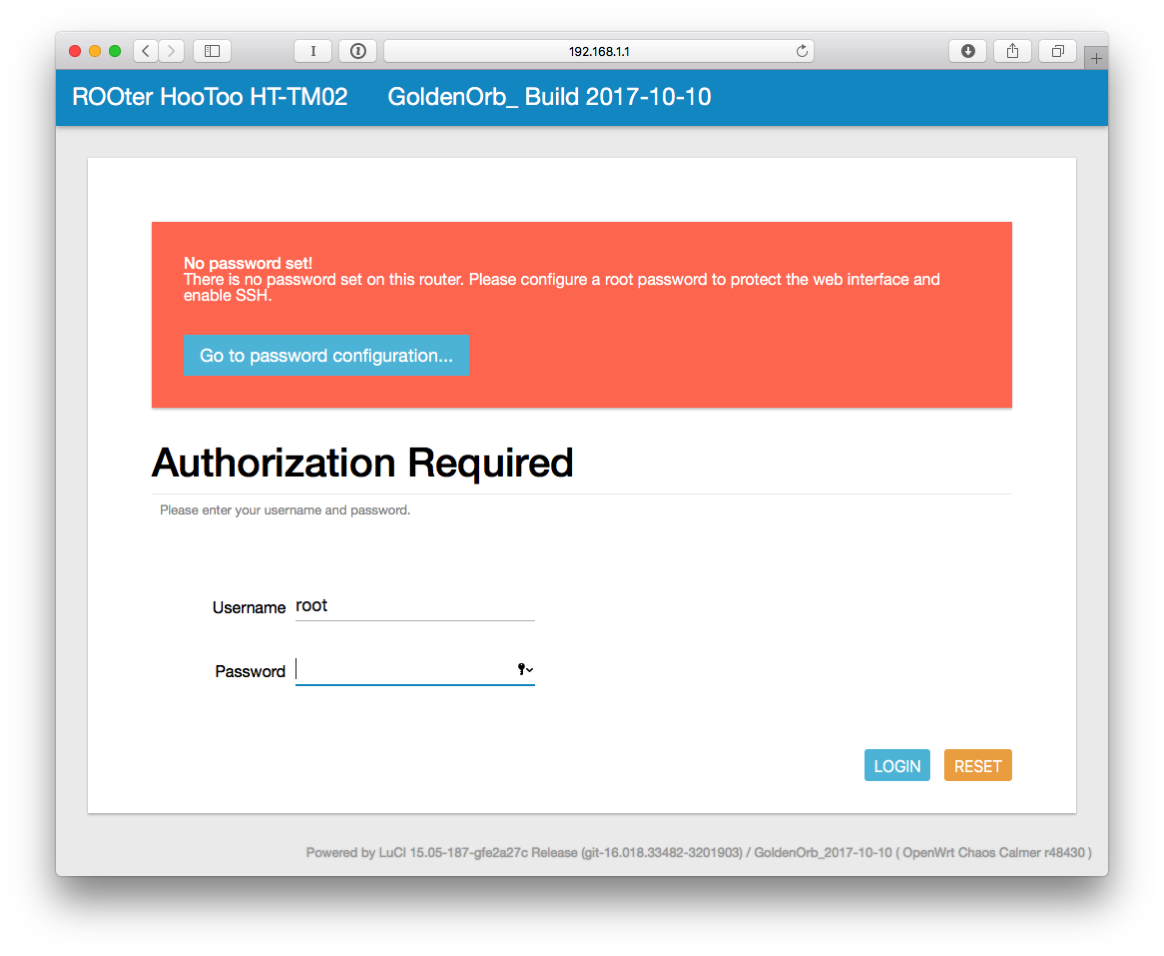
  4. Goto Safari and enter 192.168.1.1.
    Screen Shot 2017 10 29 at 4 35 16 PM
  5. Click Login.
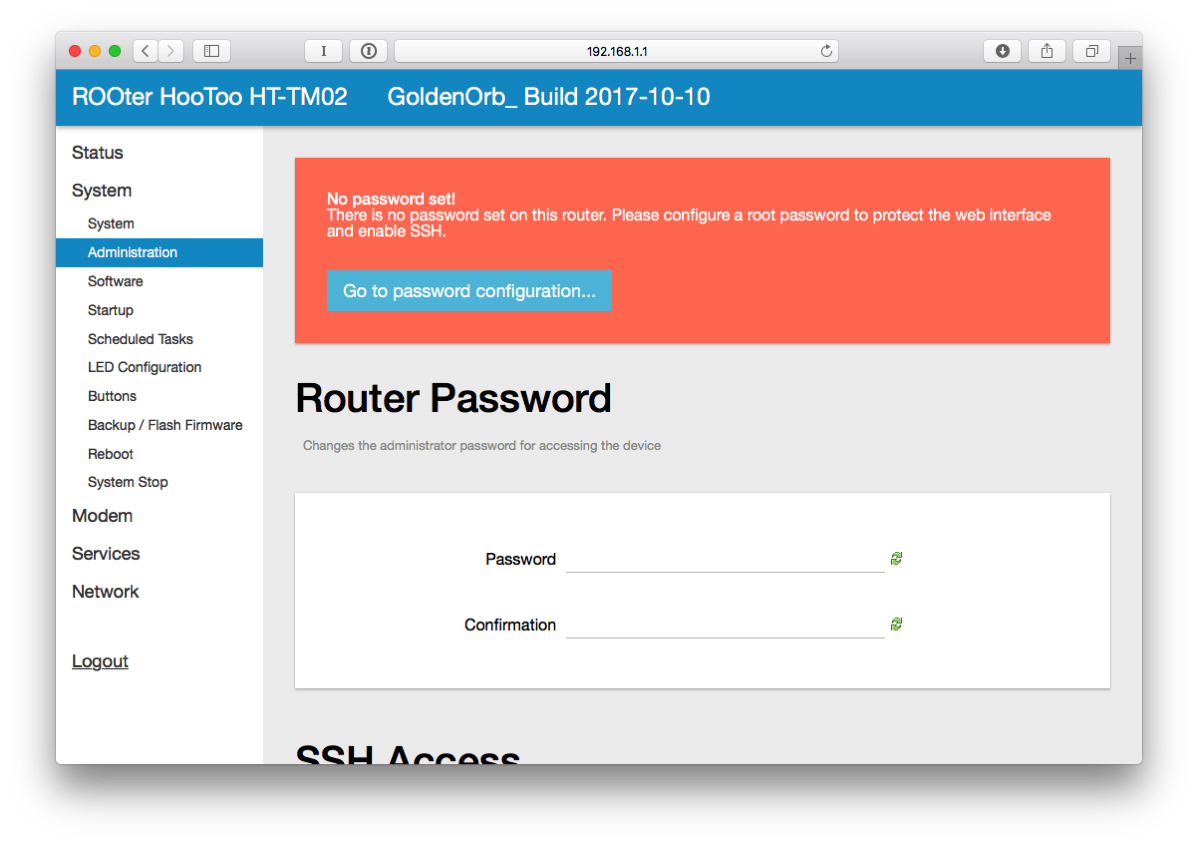
  6. Click on “Go to password configuration…”
  7. Enter a password and confirm it.
    Screen Shot 2017 10 29 at 4 36 25 PM
  8. Click SAVE & APPLY at the bottom of the page.
  9. On the left side, click on Network and then Interfaces.
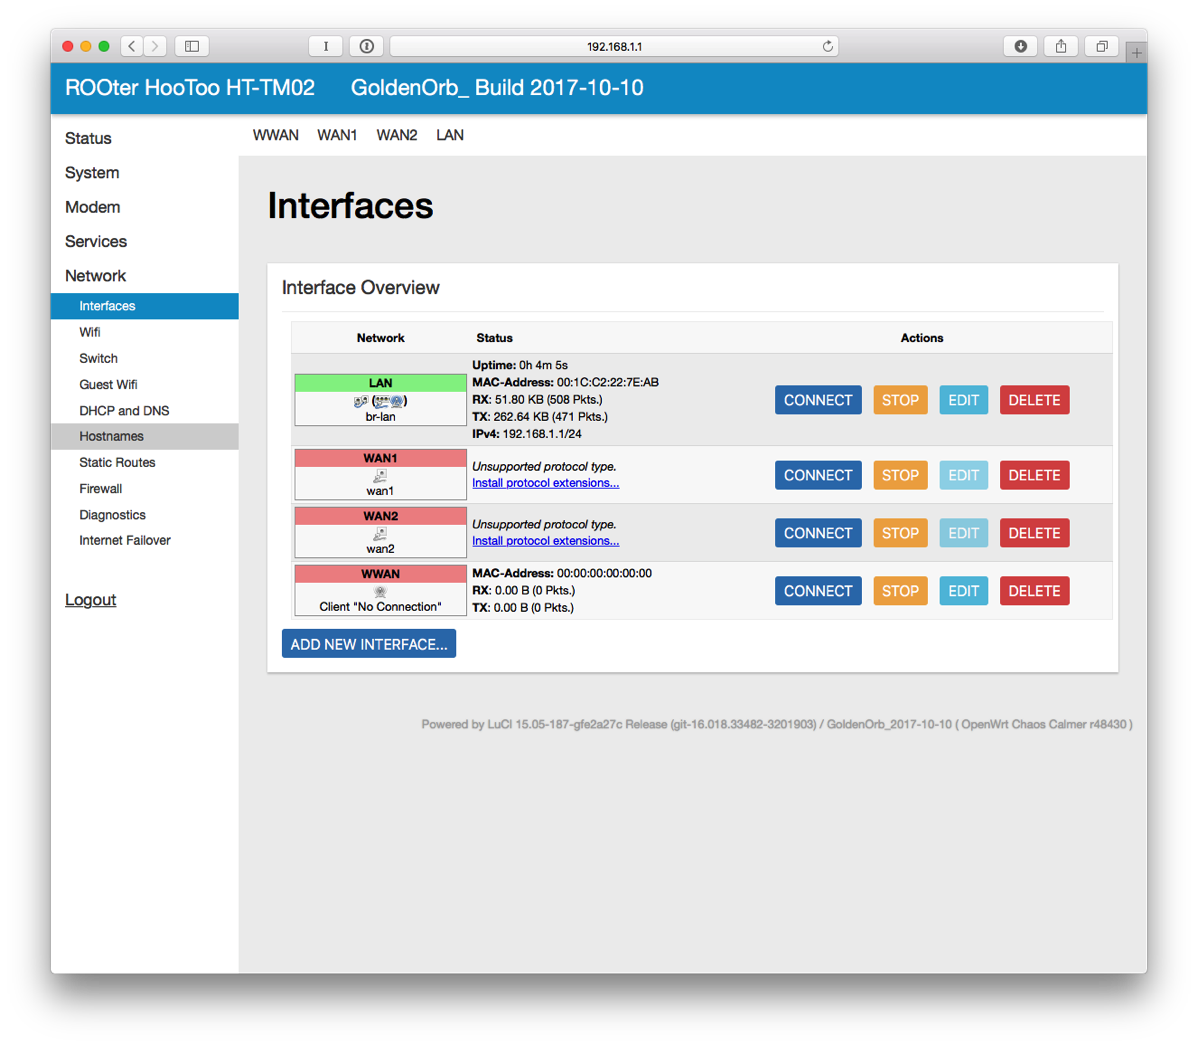
    Screen Shot 2017 10 29 at 4 37 35 PM
  10. Next to LAN, click on EDIT.
  11. For the IPv4 address, enter 10.10.10.1 (it has to be a different subnet than the hotspot and I like this numbering scheme). At the bottom of the page, click SAVE & APPLY.
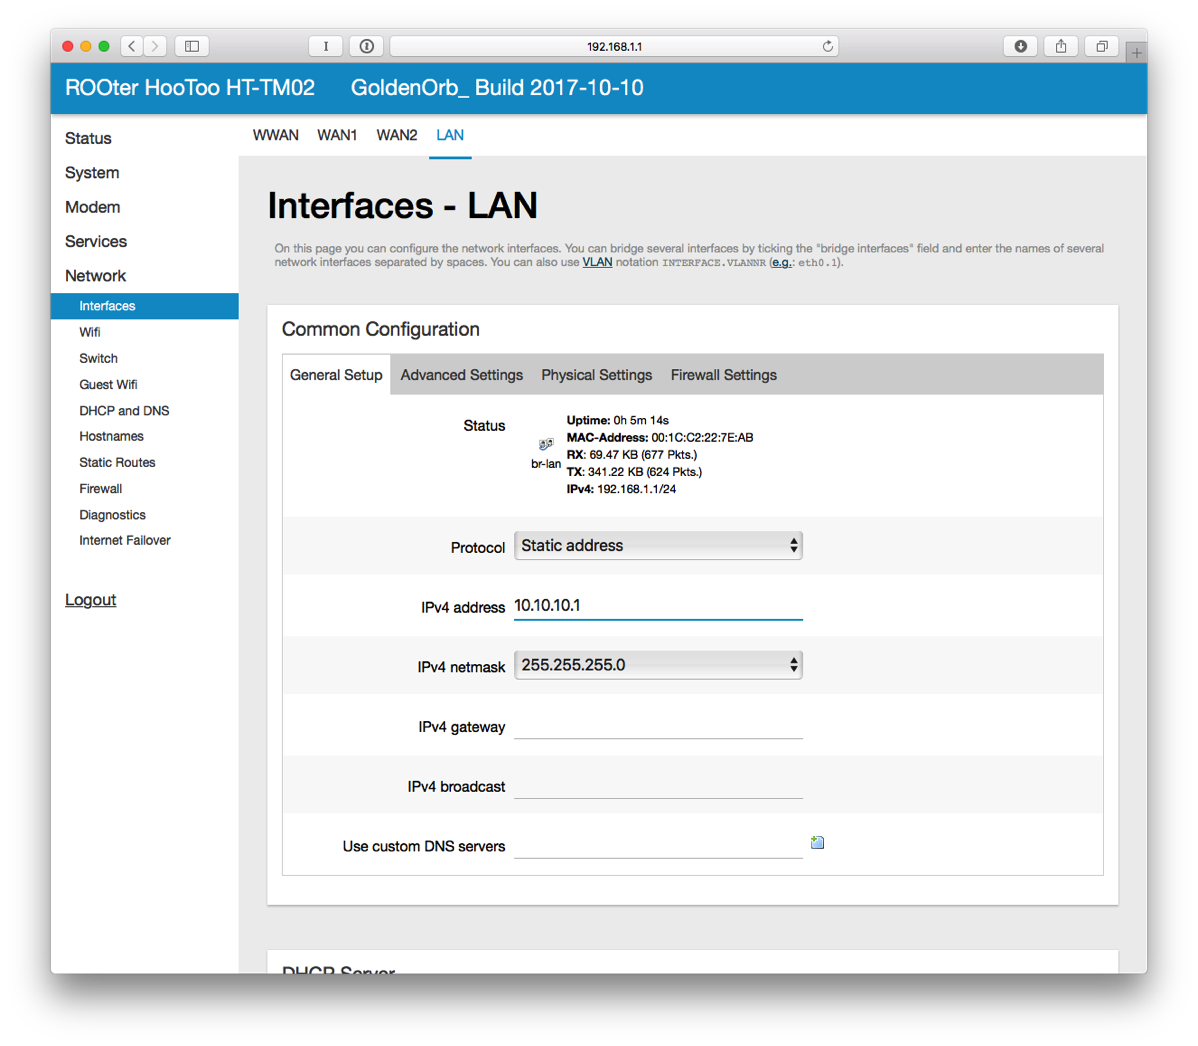
    Screen Shot 2017 10 29 at 4 38 43 PM
  12. The router will apply the settings and knock you off the network. I did have to disconnect from WiFi and reconnect to get assigned a new IP address.
  13. In Safari, connect to 10.10.10.1. Login.
  14. On the left side, select DHCP and DNS.
  15. Enter 8.8.8.8 and 8.8.4.4 for DNS Forwardings. Click SAVE & APPLY at the bottom.
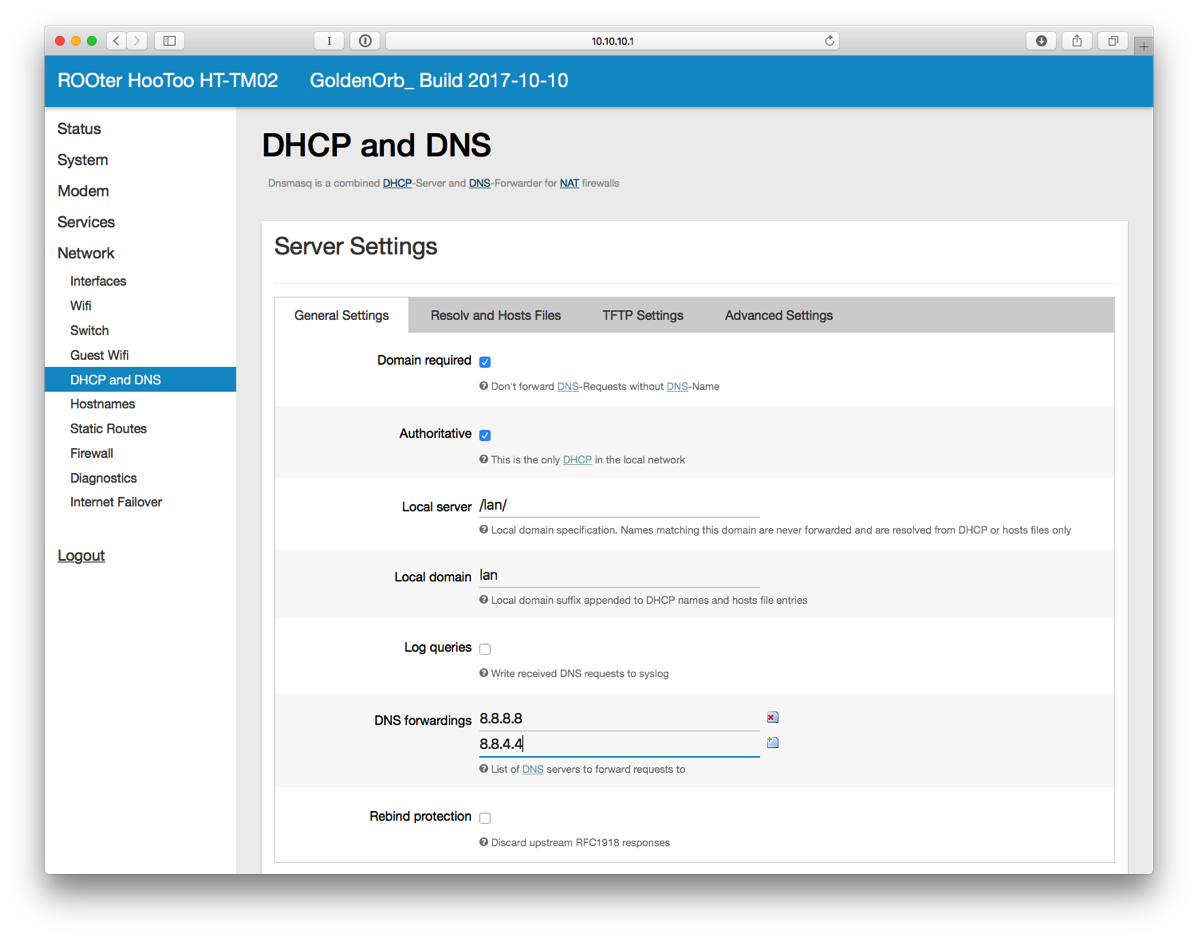
    Screen Shot 2017 10 29 at 4 43 11 PM
  16. On the left side, Select Wifi under Network and then click EDIT next to ROOter.
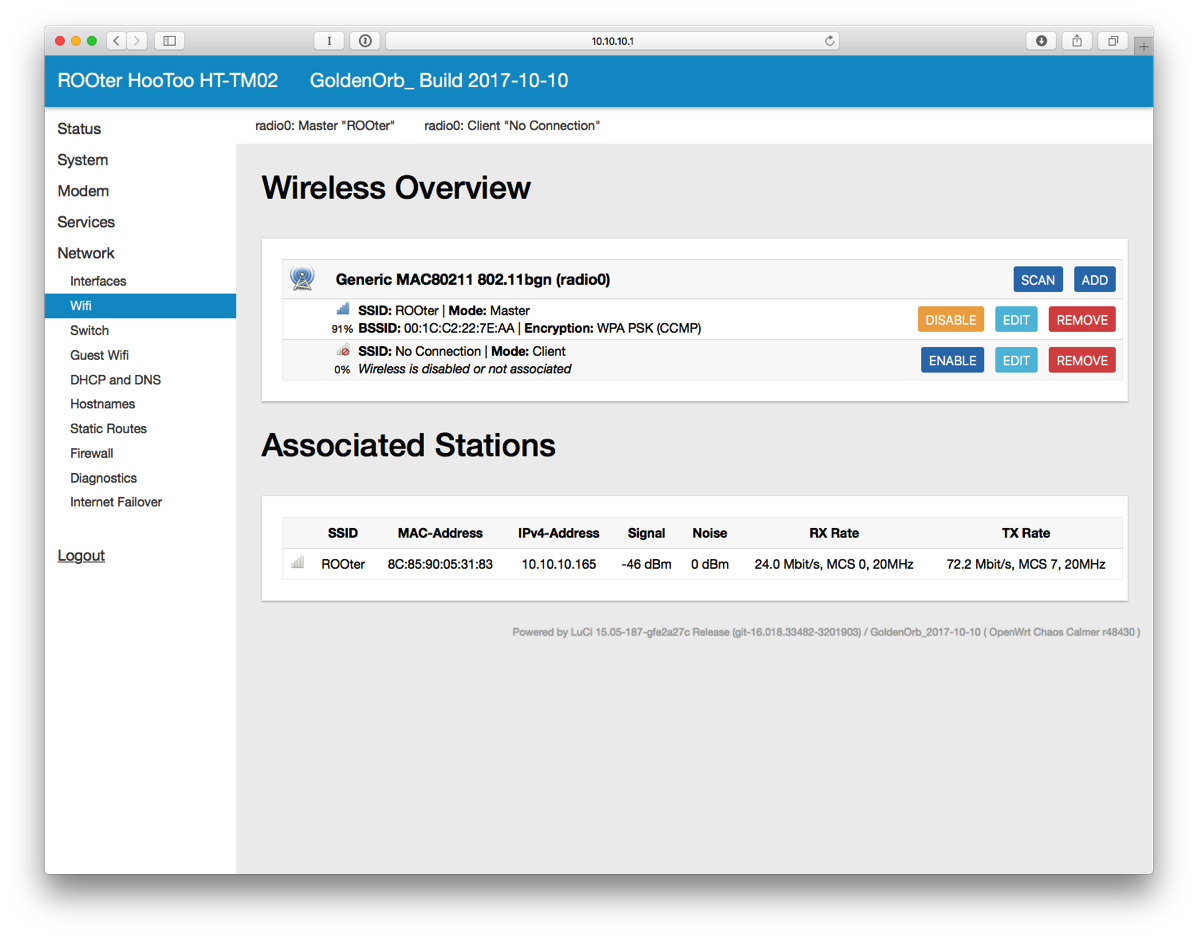
    Screen Shot 2017 10 29 at 4 44 54 PM
  17. Change the ESSID to whatever you want.
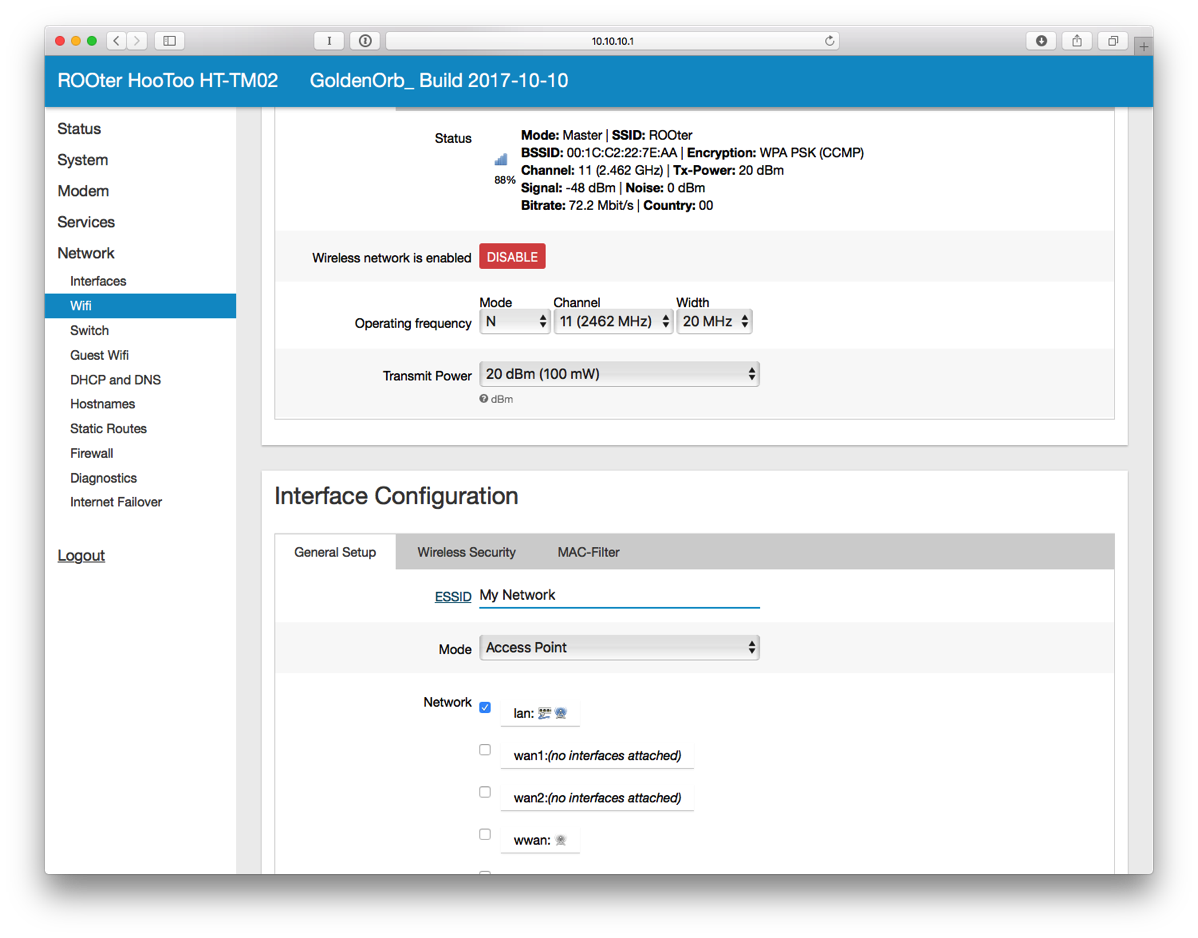
    Screen Shot 2017 10 29 at 4 46 26 PM
  18. Click on Wireless Security.
  19. Change Encryption to WPA2-PSK. Change the Key as well. Click SAVE & APPLY.
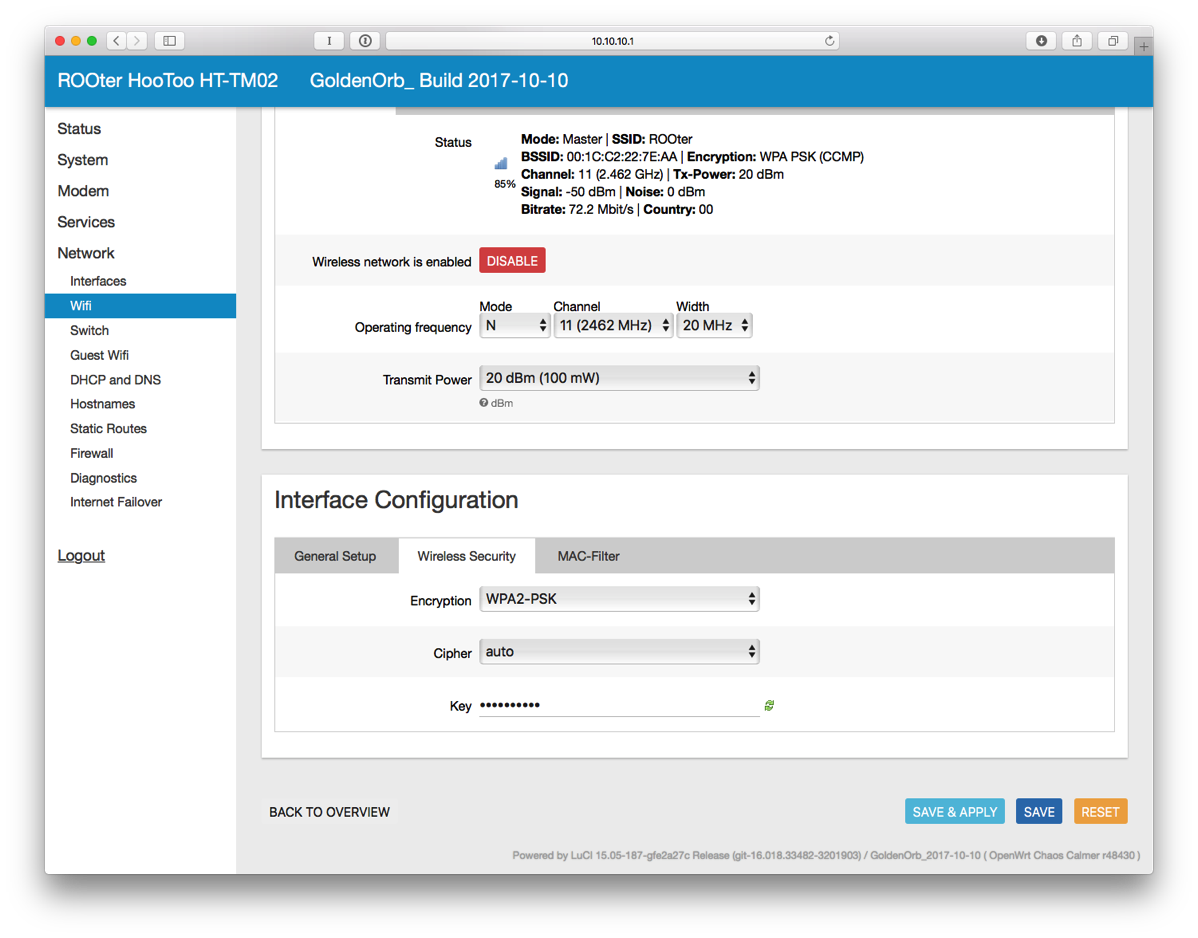
    Screen Shot 2017 10 29 at 4 47 40 PM
  20. You’ll have to reconnect to WiFi for the new SSID that you just set.
  21. Power on the Mobley. It can’t be plugged into the USB port of the TripMate as there is a separate USB port on the Mobley for tethering.
  22. On the Mobley, peel off the little cover on one side to reveal a micro USB port.
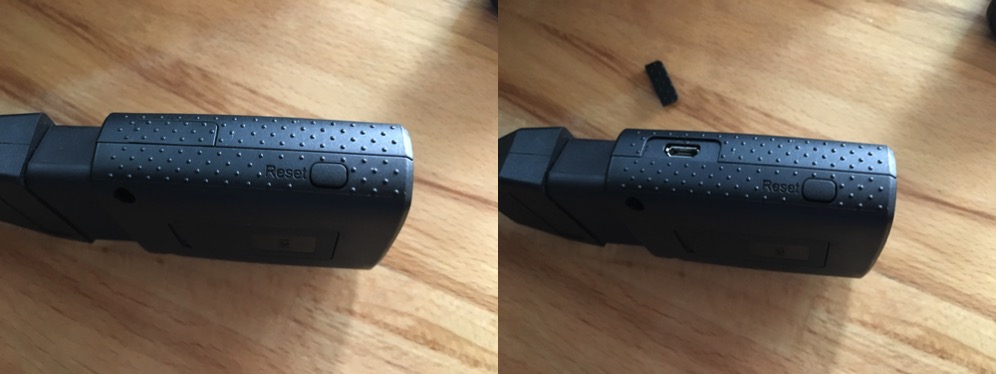
    Mobley
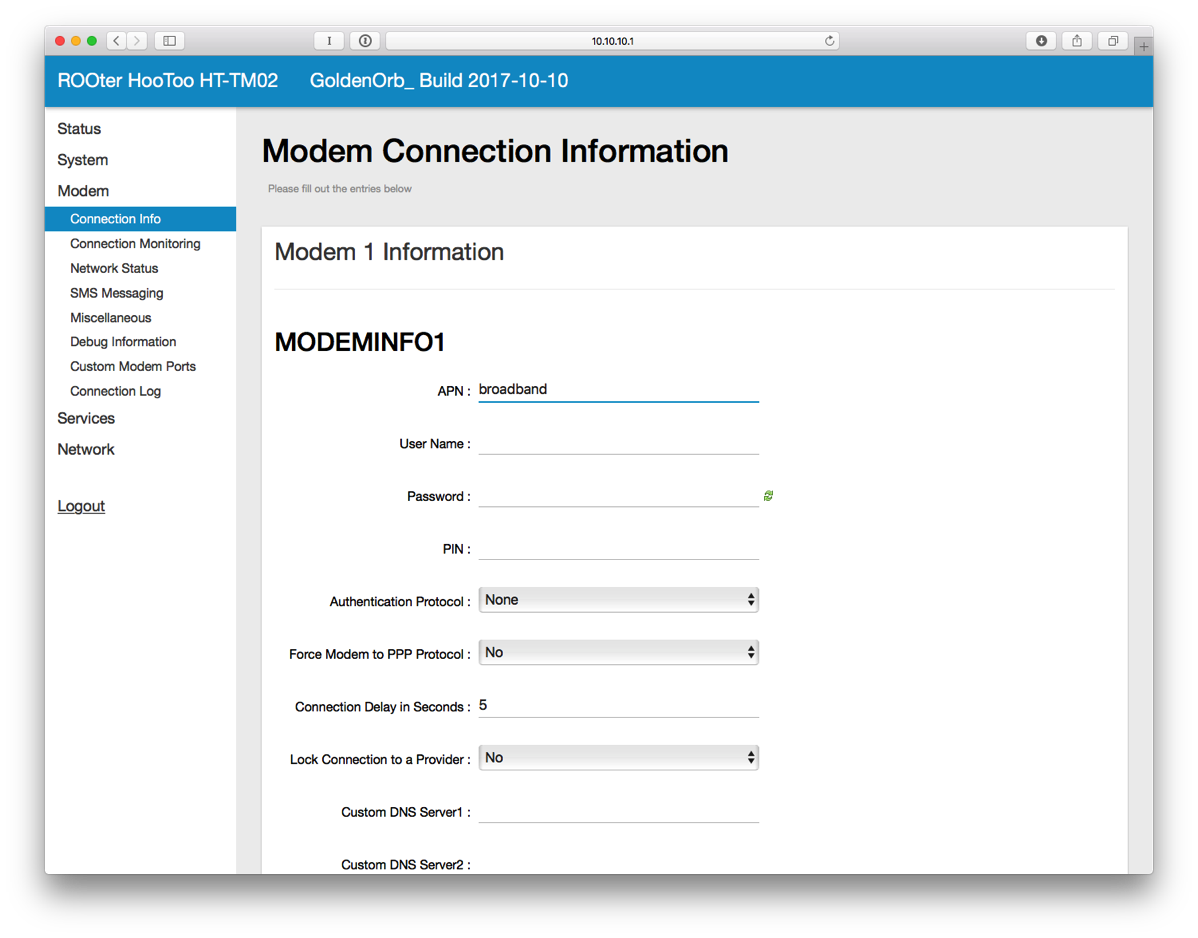
  23. On the left side of the interface, click on Modem and then Connection Info.
  24. Enter broadband next to APN and click SAVE.
    Screen Shot 2017 10 29 at 5 05 55 PM
  25. Plug in a micro USB cable from the router to the Mobley.
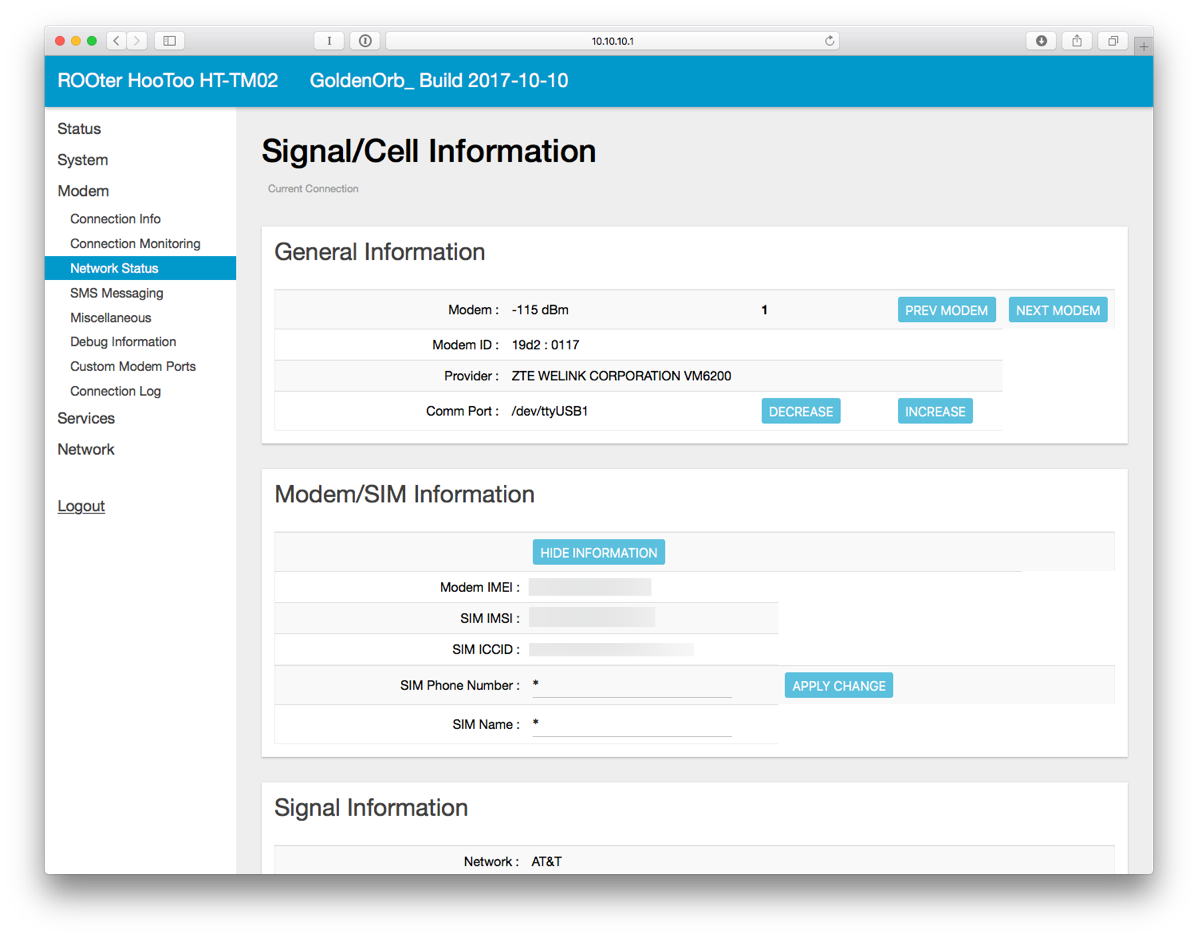
  26. On the left side, click on Network Status. Wait a little bit until the connection is established. Once connected, it will look like this.
    Screen Shot 2017 10 29 at 5 07 40 PM
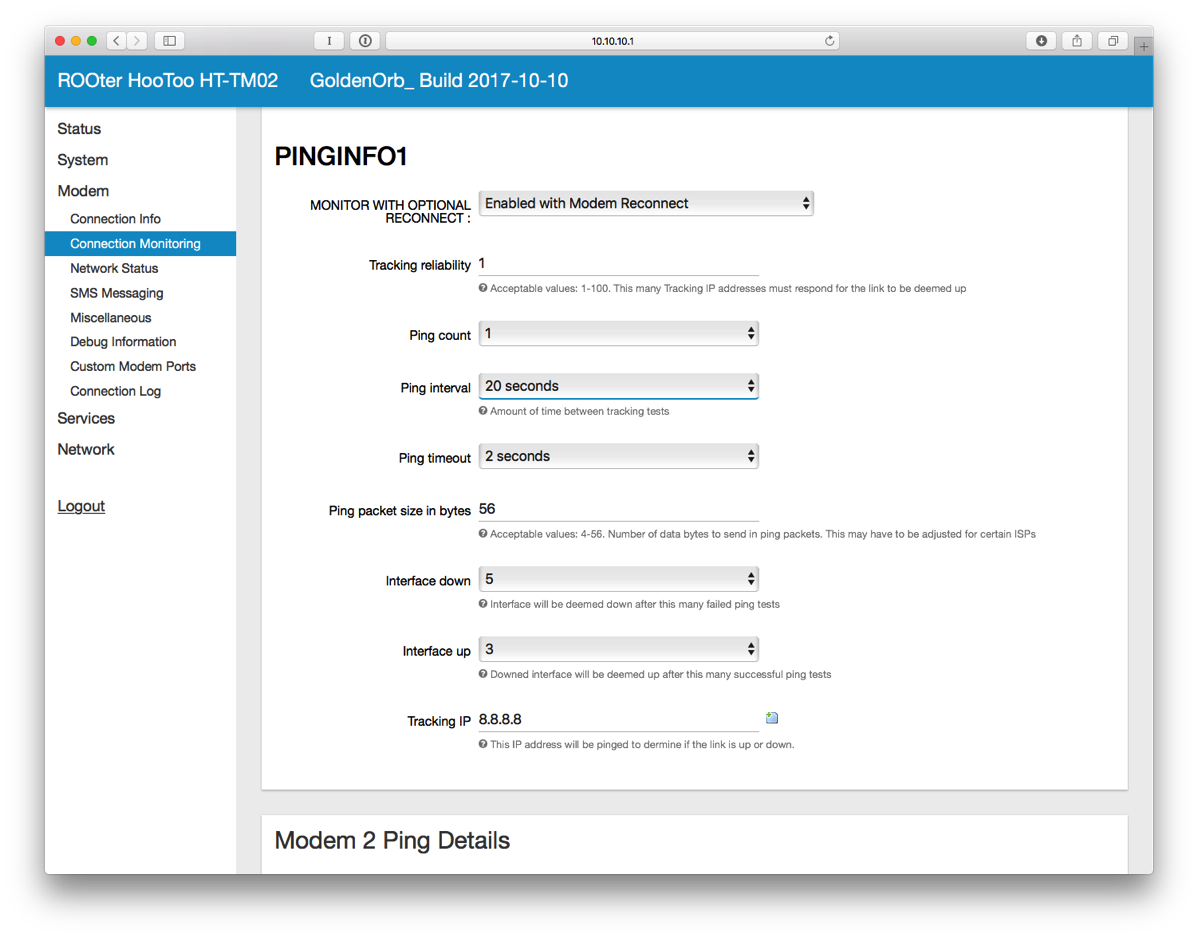
  27. You may also want to setup Connection Monitoring which will attempt to reconnect the modem in case of network failure.
    Screen Shot 2017 10 29 at 5 15 05 PM
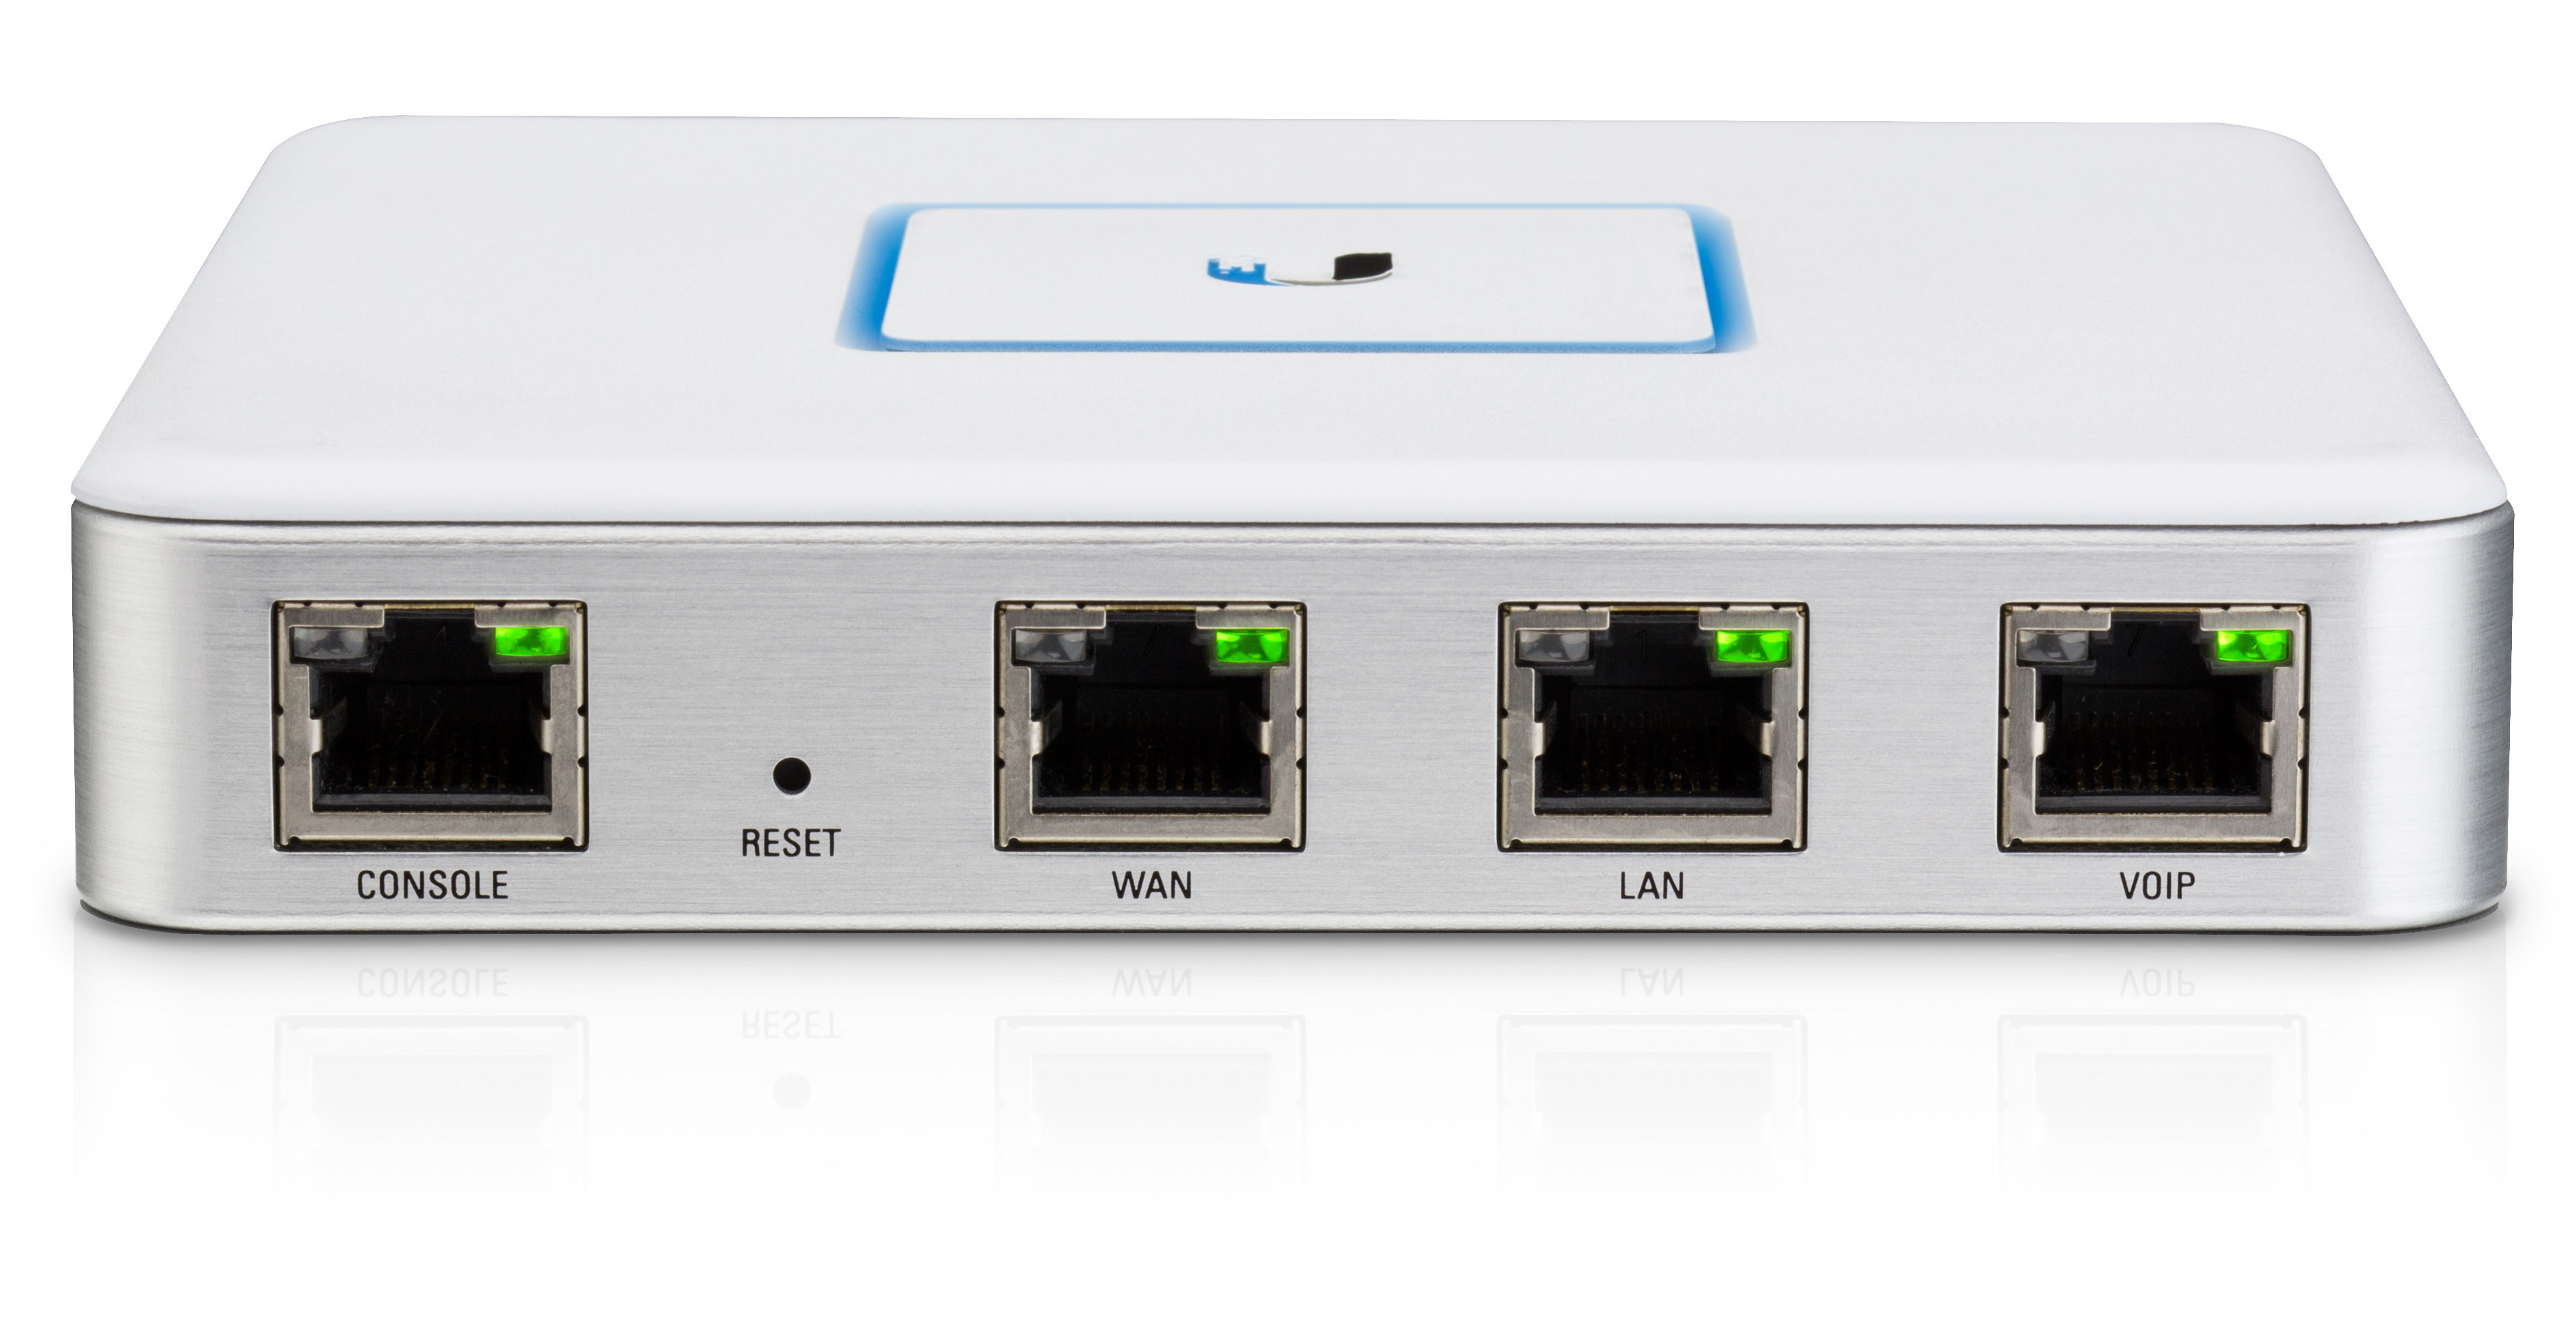
  28. Plug in an Ethernet cable from the router to the VOIP port (or LAN2 depending on the model) of the USG.
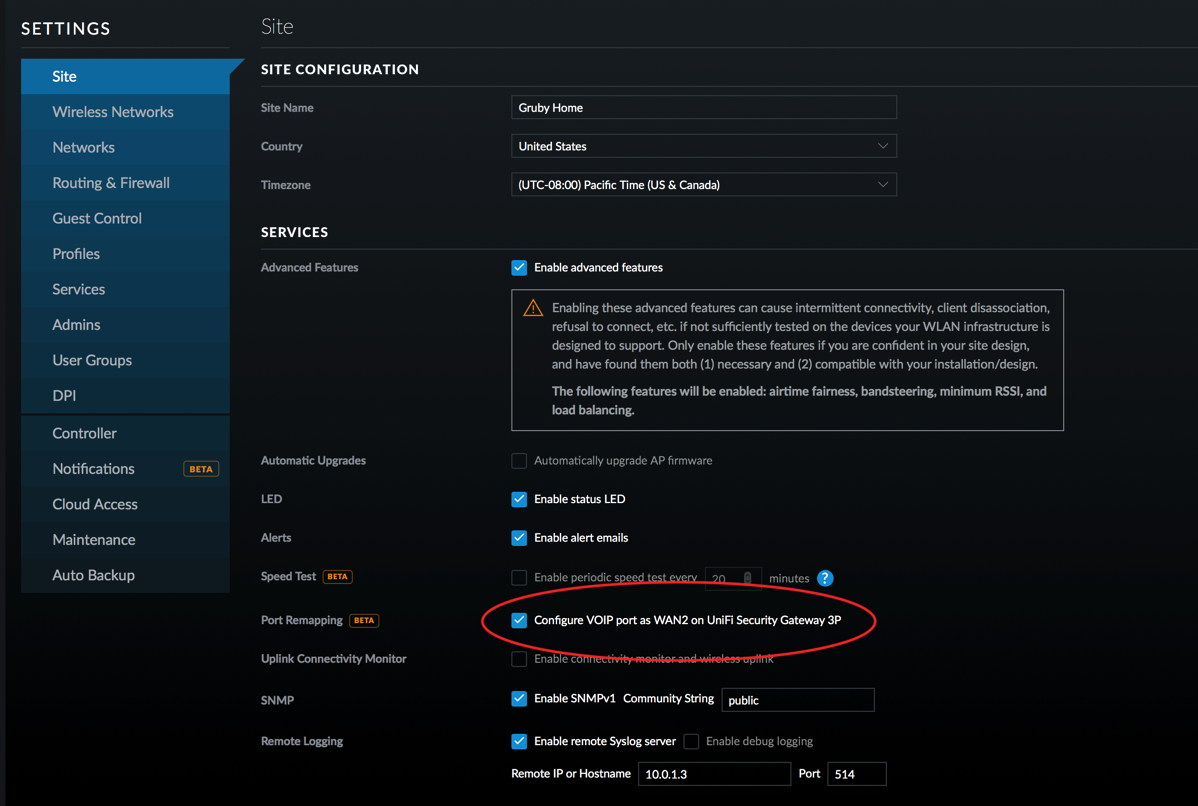
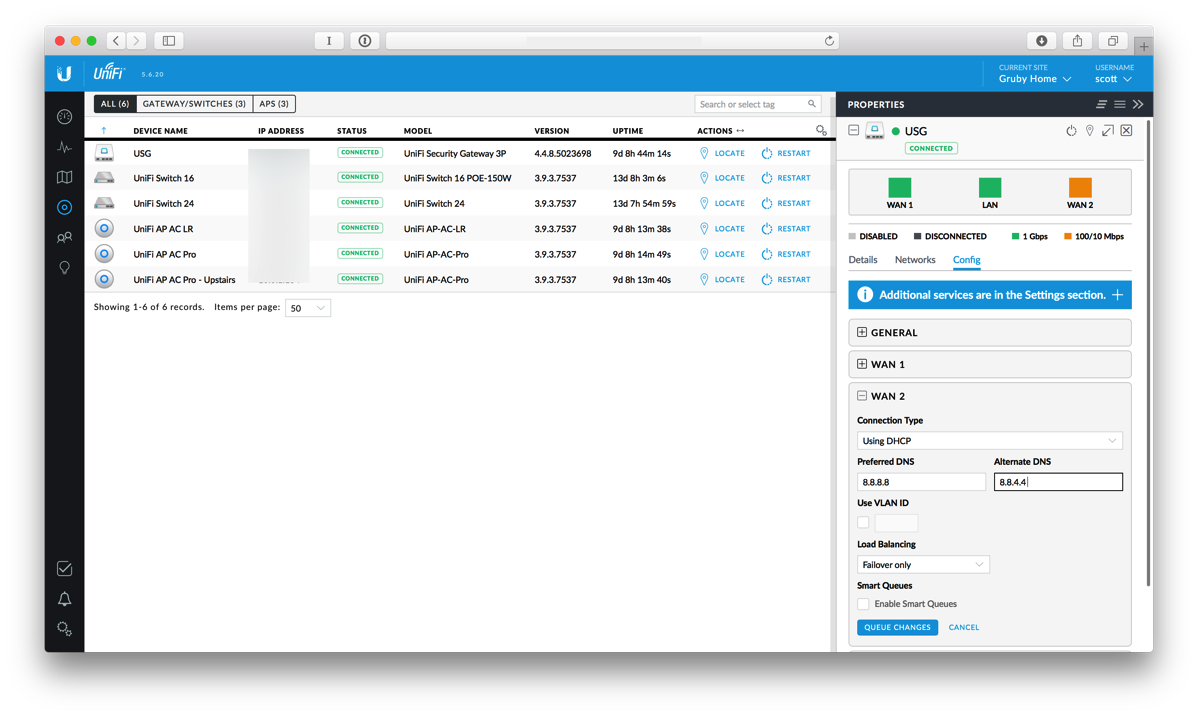
  29. On the UniFi Controller, setup the VOIP port to be WAN2. Wait for the USG to re-provision.
    USG Site Configuration
  30. Click on the devices icon and select the USG.
  31. Select WAN2 and enter DNS settings. I’ve used Google’s DNS, 8.8.8.8 and 8.8.4.4.
  32. Make sure Load Balancing is set to Failover Only and then click QUEUE CHANGES. Then click APPLY CHANGES.
    Screen Shot 2017 10 29 at 7 02 03 PM

In order to verify that things are working, SSH into the USG using your admin username and password.

Type show load-balance status and you’ll see something like this:

    Group wan_failover
      interface   : eth0
      carrier     : up
      status      : active
      gateway     : x.x.x.x
      route table : 201
      weight      : 100%
      flows
          WAN Out : 624
          WAN In  : 0
        Local Out : 2

      interface   : eth2
      carrier     : up
      status      : failover
      gateway     : 10.10.10.1
      route table : 202
      weight      : 0%
      flows
          WAN Out : 0
          WAN In  : 1
        Local Out : 0

This tells you that eth0 is the main connection and eth2 is the failover.

Next type show load-balance watchdog and you’ll see something like this.

Group wan_failover
  eth0
  status: Running 
  pings: 62
  fails: 0
  run fails: 0/3
  route drops: 0
  ping gateway: ping.ubnt.com - REACHABLE

  eth2
  status: Running 
  failover-only mode
  pings: 15
  fails: 0
  run fails: 0/3
  route drops: 1
  ping gateway: ping.ubnt.com - REACHABLE
  last route drop   : Sun Oct 29 19:05:59 2017
  last route recover: Sun Oct 29 19:06:36 2017

This shows that both eth0 and eth2 have working network connections.

In order to test, I unplugged the WAN connection and waited a few minutes. Much to my delight, the connection switched over to cellular and everything continued to work on my network.

When the primary WAN goes down, show load-balance watchdog will show something like this:

Group wan_failover
  eth0
  status: Waiting on recovery (0/3)
  pings: 84
  fails: 3
  run fails: 3/3
  route drops: 1
  ping gateway: ping.ubnt.com - DOWN
  last route drop   : Sun Oct 29 19:13:16 2017

  eth2
  status: Running 
  failover-only mode
  pings: 53
  fails: 0
  run fails: 0/3
  route drops: 1
  ping gateway: ping.ubnt.com - REACHABLE
  last route drop   : Sun Oct 29 19:05:59 2017
  last route recover: Sun Oct 29 19:06:36 2017

Doing a show load-balance status yields:

Group wan_failover
  interface   : eth0
  carrier     : down
  status      : failover
  gateway     : unknown
  route table : 201
  weight      : 0%
  flows
      WAN Out : 1140
      WAN In  : 0
    Local Out : 4

  interface   : eth2
  carrier     : up
  status      : active
  gateway     : 10.10.10.1
  route table : 202
  weight      : 100%
  flows
      WAN Out : 192
      WAN In  : 1
    Local Out : 1

While I have no plans to keep this connected all the time, it is good to know that if my Internet connection goes out, I have a backup mechanism. For enterprise applications, I’d recommend a beefier router and a dedicated LTE modem.

Feel free to send corrections or ask questions.

Things to note

  • The router does NAT, so you won’t be able to connect from the outside world to your USG or internal network. It will work for outgoing connections which may be more important.
  • This particular modem has to be powered separately from USB and the router has to be powered. You’ll need two USB cables to power this setup.
  • If you unplug the Ethernet cable on the second WAN port and leave it disconnected, the USG may failover when it can’t ping the Ubiquiti host that is used for failover checking. This may be intermittent and could cause your network to go down. I’d suggest disabling the failover if you’re not going to keep the second WAN connection.
  • The router I’m using has a 10/100 Mbit port, so the connection isn’t going to use the full bandwidth of the LTE. In addition, the router is pretty underpowered and will definitely impact performance.
  • A user on the Ubiquiti forums suggests a modification to the config.gateway.json to ping an IP address instead of ping.ubnt.com by adding and then forcing a re-provision on the USG:
      "load-balance": {
        "group": {
          "wan_failover": {
            "interface": {
              "eth0": {
                "route-test": {
                  "type": {
                    "ping": {
                      "target": "8.8.8.8"
                    }
                  }
                }
              }, 
              "eth2": {
                "route-test": {
                  "type": {
                    "ping": {
                      "target": "8.8.8.8"
                    }
                  }
                }
              }
            }
          }
        }
      },
    

Review: Running Buddy smartphone pouch

For many years, I’ve been using a Wahoo Fitness Sportband to hold my iPhone when I run. I’ve replaced it a few times and try my best to keep it in good shape. It appears that rinsing it after I run and adjusting the strap caused my last one to wear out prematurely. I can’t say that I’ve been disappointed with it, but when I heard a recommendation for the Running Buddy on MacBreak Weekly, I figured I’d give it a try.
The Running Buddy is a pouch that clips to my shorts using very powerful magnets. The pouch holds my iPhone 6s pretty snuggly the magnets ensure that it won’t move. When I first put my phone in the pouch and started running, I had my doubts about it as I thought my phone would fall. It was a weird feeling having the pouch on my waist. After a few miles of running, I forgot that I was still wearing it. One thing to note about the pouch is that if your shorts aren’t tight, then the pouch with your phone will pull down your shorts!

I’ve been running with the pouch for a few weeks and I can’t quite say if having the phone on my arm or on my waist is better. The pouch is slightly more comfortable as I don’t have pressure on my arm, but the pouch rubs against my stomach. The armband’s neoprene got quite disgusting because of the sweat. The different material of the pouch seems like it would repel sweat better.

I’m going to keep using the pouch as I’m starting to get used to how it feels.

Pros

  • Convenient way to hold iPhone while running.
  • No unsightly tan lines on my arm.
  • No pressure on my arm.
  • Material is easy to wipe off and doesn’t appear to retain sweat.

Cons

  • Feels kind of weird on my waist.
  • At first it feels like it is going to fall off.
  • Can’t glance at information on screen.
  • Unknown longevity as the part that comes in contact with my waist and shorts gets covered in sweat.
  • Material rubs against my abdomen and could cause irritation.

Summary

This case is an interesting solution to holding my phone. For people walking, I can definitely recommend it if you don’t have pockets or the pockets aren’t convenient. For runners, I think it takes getting used to and if you don’t like armbands, it is definitely worth a try.

Dealing with the IoOT

No, the title is not a typo. I’m coining the acronym Internet of Outdated Things! I’ve written in the past about keeping devices updated and the recent KRACK attack brings this issue back to the forefront. I’ve already updated by UniFi access points and am waiting for updates from Apple and Amazon for clients that I have connecting over WiFi. The only other devices that I have on my WiFi network are a few old SlimDevices Squeezeboxes.

These Squeezebox Radios are now over 5 years old, but still going strong. All our music in the house is streamed through 3 other Squeezebox devices that are hard wired, so I’m not concerned about those. Since Logitech stopped supporting these devices several years ago, I can’t realistically expect to get a firmware update to fix this WiFi issue. However, should I just toss the devices because I can’t get a firmware update? For some devices I’d take the opportunity to upgrade, but our music system has been running so well for so long that I’m not going to touch it. Where does that leave me? While the KRACK attack is mostly theoretical right now and the attacker must be in close proximity, I decided I had to figure out a way to mitigate this just for my own piece of mind.

I decided to start with the work I documented last year on blocking my IP cameras from talking to the Internet and modify it for this situation. This is a little different because I only want the Squeezebox devices talking to my Media Center running the Logitech Media Server and I want the devices to be able to talk to the Internet in order to stream music. Unlike last year, this exercise is all being done in the UniFi controller since I’m using a USG and UniFi access points.

So let’s begin:

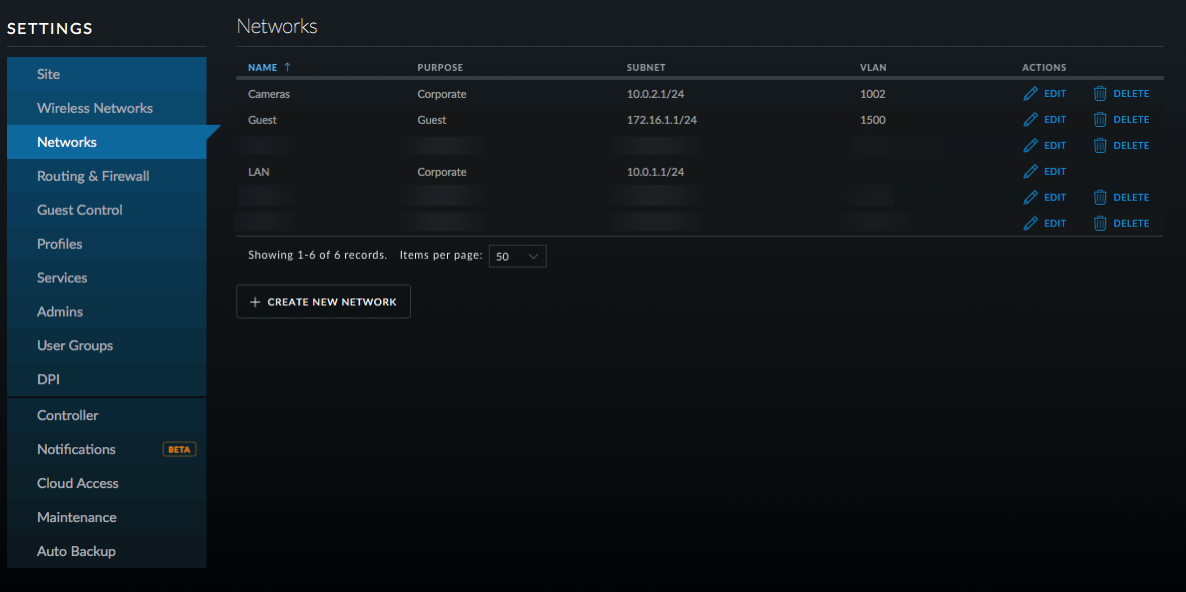
  1. In the UniFi controller, go into Settings and select Networks.
    Screen Shot 2017 10 23 at 5 17 31 PM
  2. Click on Create New Network.
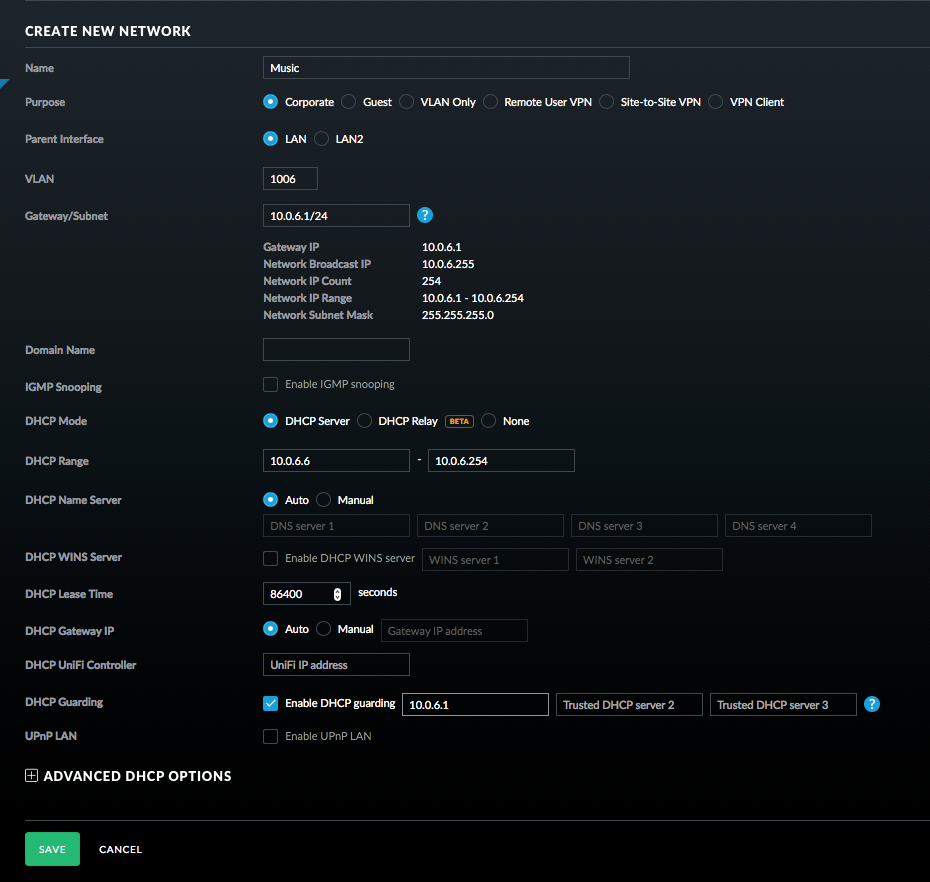
  3. Enter a name for the network; I chose Music.
  4. Leave it on Corporate and LAN1.
  5. Enter a VLAN number; I chose 1006 and then enter the gateway as 10.0.6.1/24 or something similar depending on your network. Click on Update DHCP Range.
  6. You can enable DHCP guarding if you like so that only the USG is recognized as a DHCP server.
    Screen Shot 2017 10 23 at 5 20 11 PM
  7. Click Save.
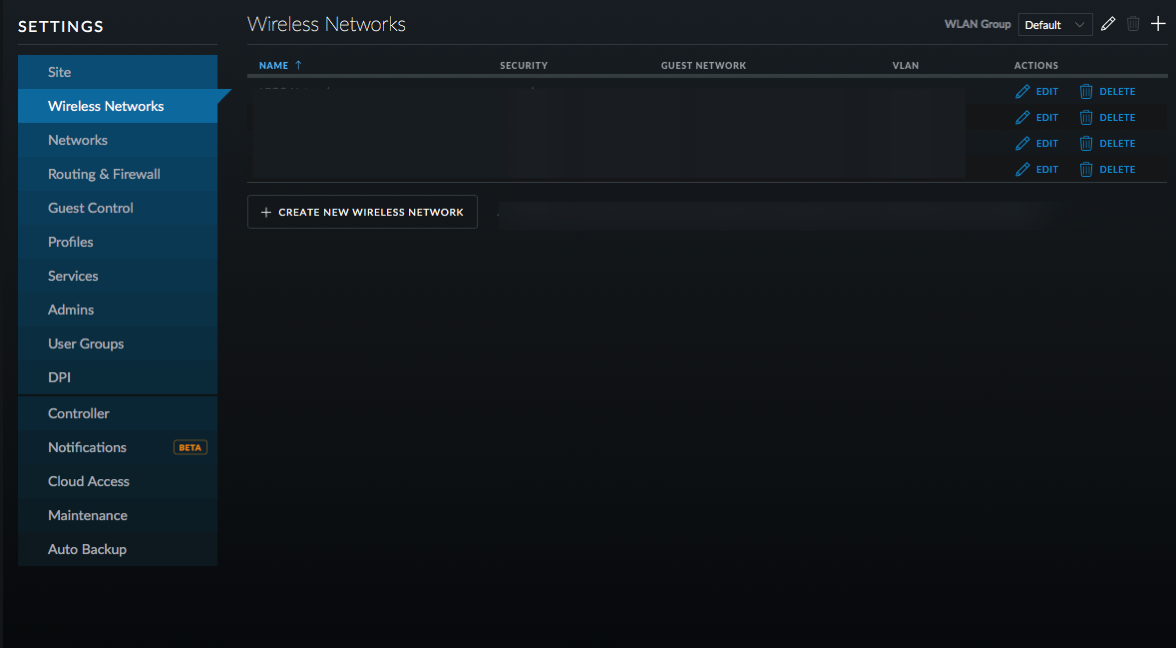
  8. Click on Wireless Networks and then Create New Wireless Network.
    Screen Shot 2017 10 23 at 5 22 42 PM
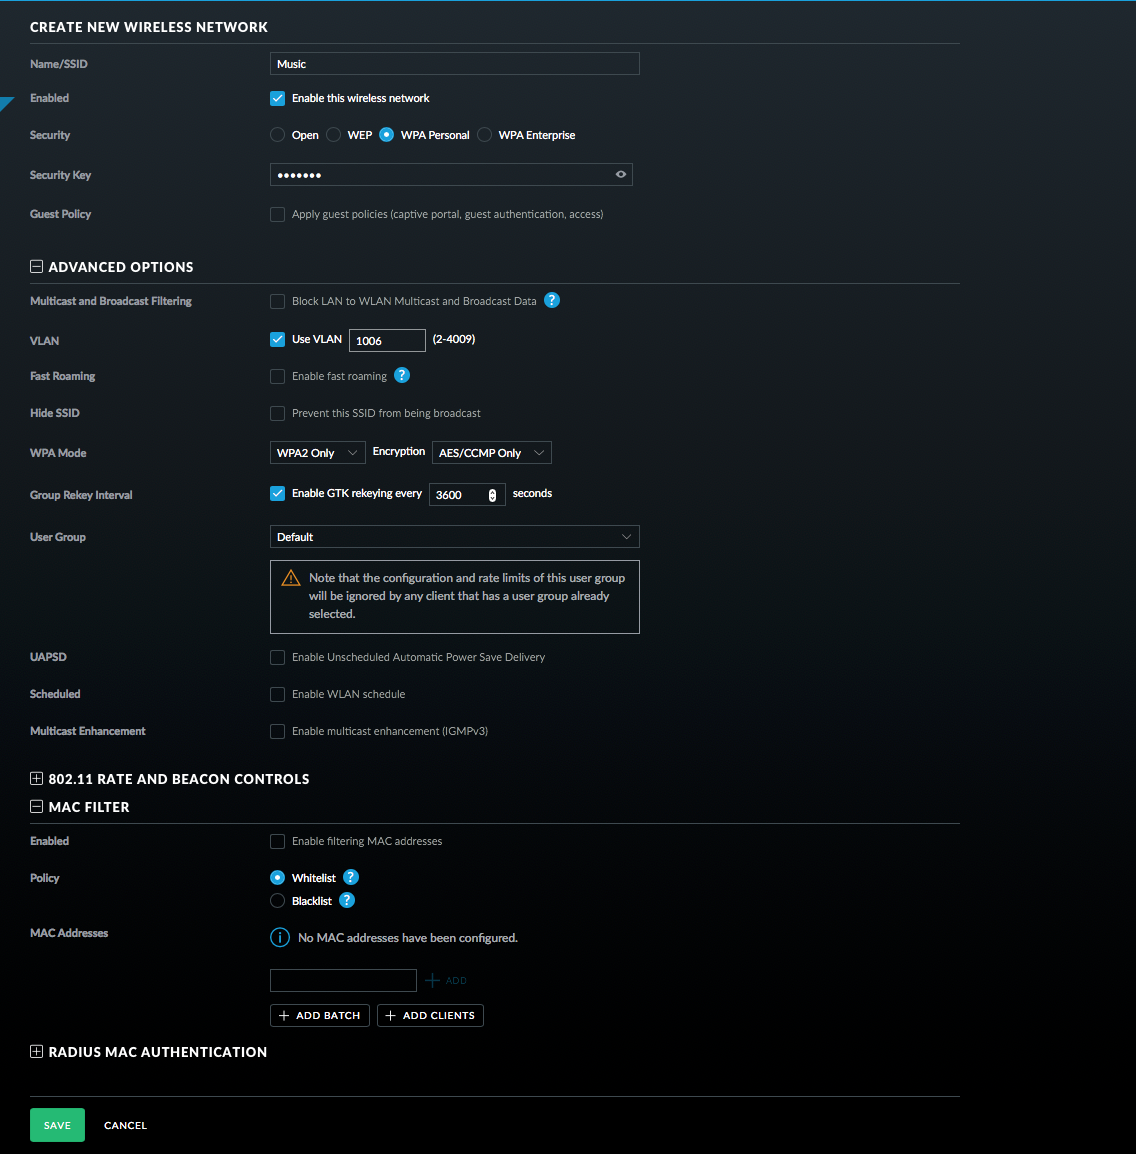
  9. Name the new network and turn on WPA Personal Security with a Security Key.
    Screen Shot 2017 10 23 at 5 26 18 PM
  10. Select Use VLAN and enter the VLAN you setup before.
  11. Click on Advanced Options and then on MAC Filter (note this may not be in all versions of the controller software).
  12. Whitelist your devices that you want to connect (this is not necessary and MAC addresses can be spoofed, but it can’t hurt).
  13. Click Save.
  14. Click on Routing & Firewall, Firewall, and then Select Groups. These groups will be used later in the firewall rules.
    Screen Shot 2017 10 23 at 5 28 57 PM
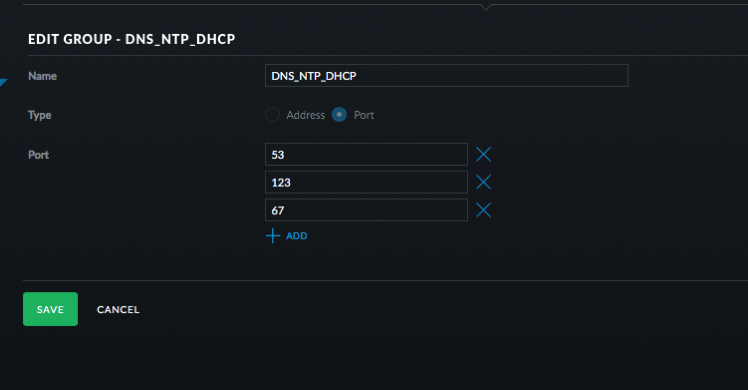
  15. Click Create New Group. Set it up as a Port group with 53, 123, and 67 as the ports. Name it DNS _ NTP _ DHCP.
    Screen Shot 2017 10 23 at 5 31 12 PM
  16. Click Save.
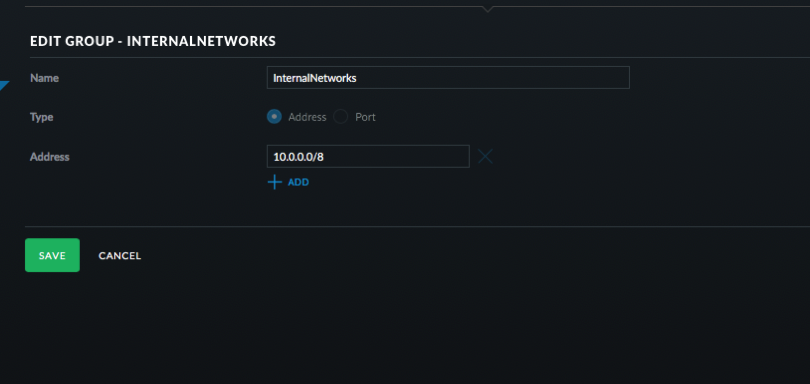
  17. Click Create New Group. Address group and use 10.0.0.0/8 and then click Save.
    Screen Shot 2017 10 23 at 5 32 23 PM
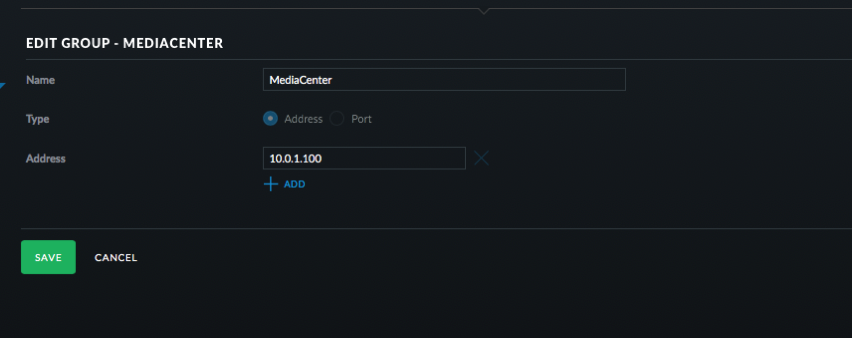
  18. Click Create New Group. Address group and use 10.0.1.100 or whatever is the address of your Logitech Music Server. Click Save.
    Screen Shot 2017 10 23 at 5 33 45 PM
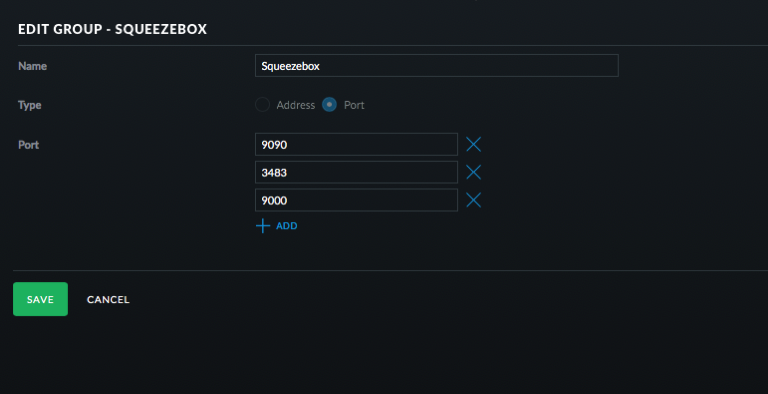
  19. Click Create New Group. Port group and use 9090, 3483, and 900. Click Save.
    Screen Shot 2017 10 23 at 5 34 05 PM
  20. Click on Rules and then LAN Local.
  21. Click Create New Rule.
    Screen Shot 2017 10 23 at 5 38 26 PM
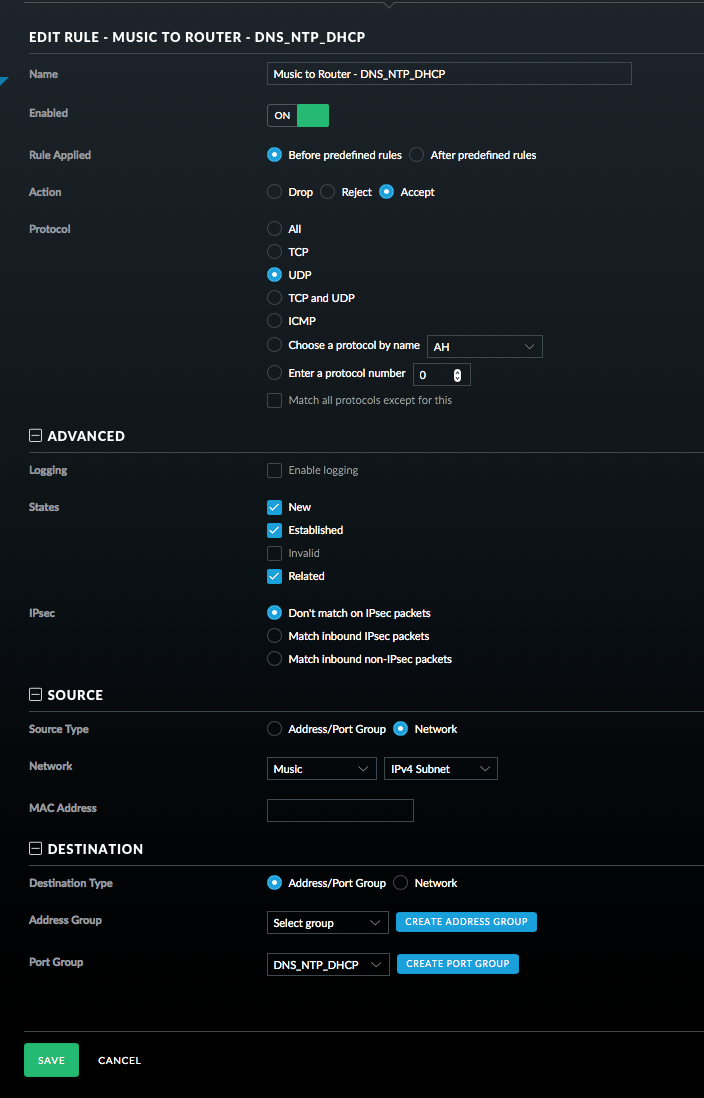
  22. Configure this rule to allow DNS, NTP, and DHCP requests from the Squeezebox devices to the router. Select UDP, New/Established/Related. Then select the Music Network and then the DNS _ NTP _DHCP port group as seen in the picture. Click Save.
    Screen Shot 2017 10 23 at 5 40 16 PM
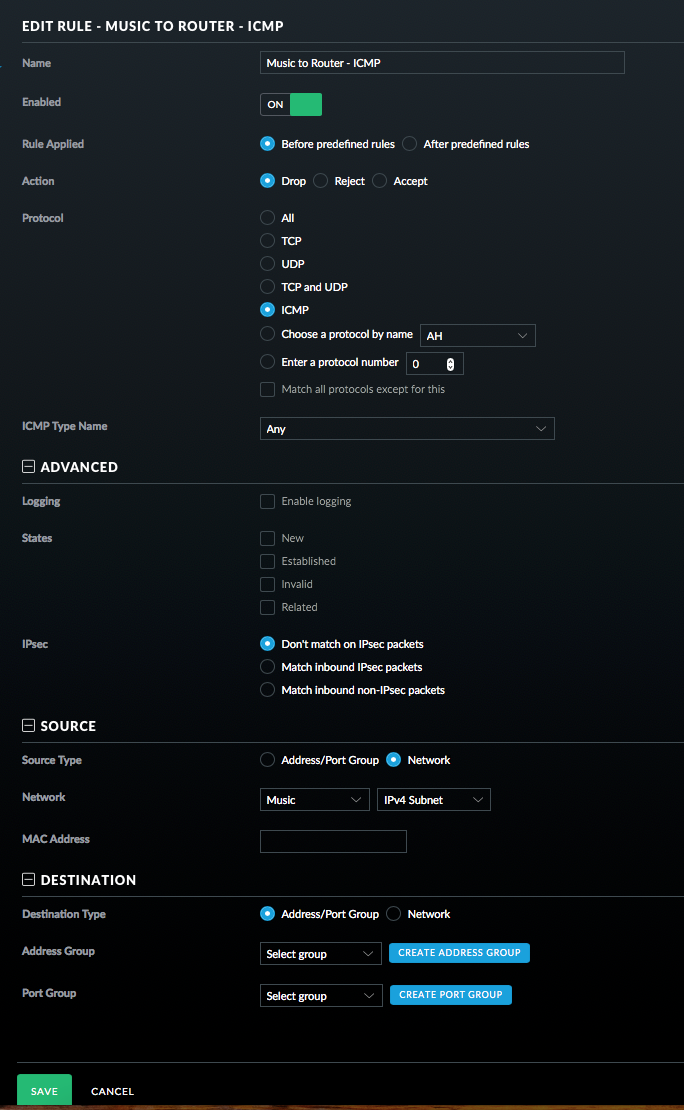
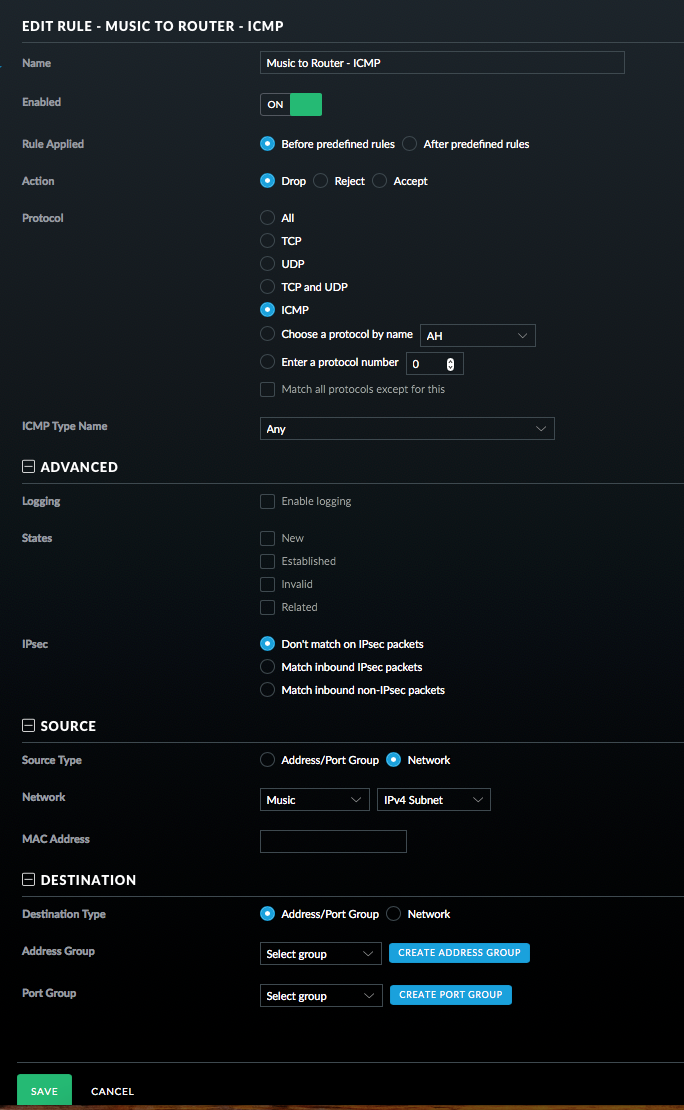
  23. Add a Rule for ICMP packets. See picture.
    Screen Shot 2017 10 23 at 5 43 41 PM
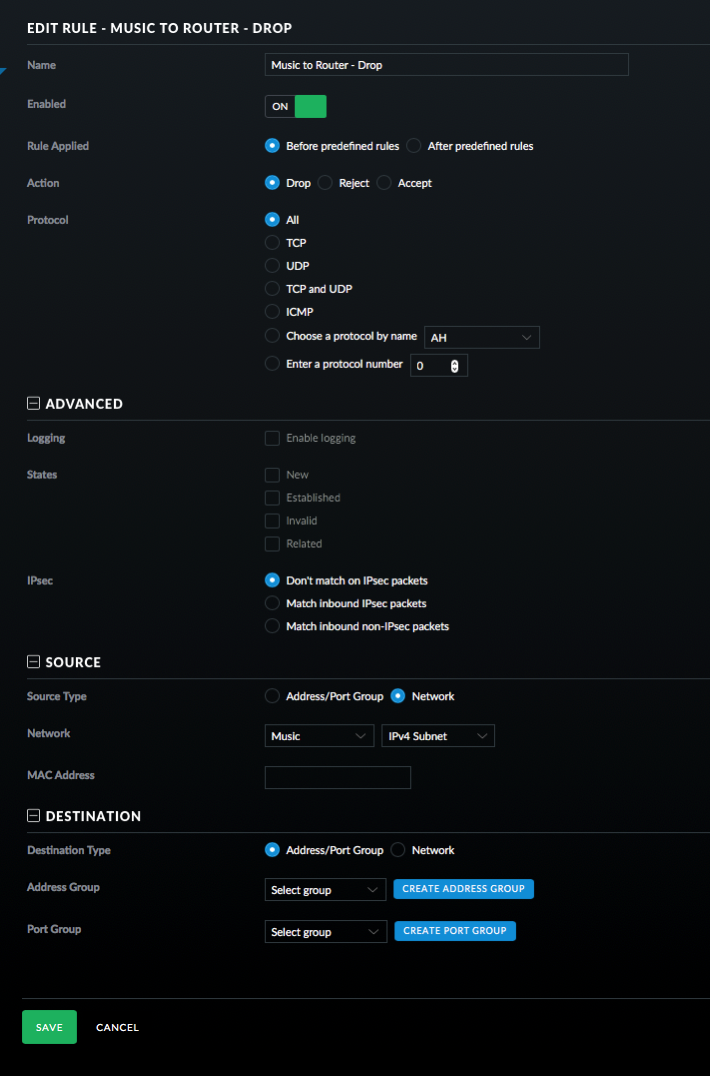
  24. Finally for this section, add a rule to drop all other traffic. This must be the last rule in this set.
    Screen Shot 2017 10 23 at 5 44 49 PM
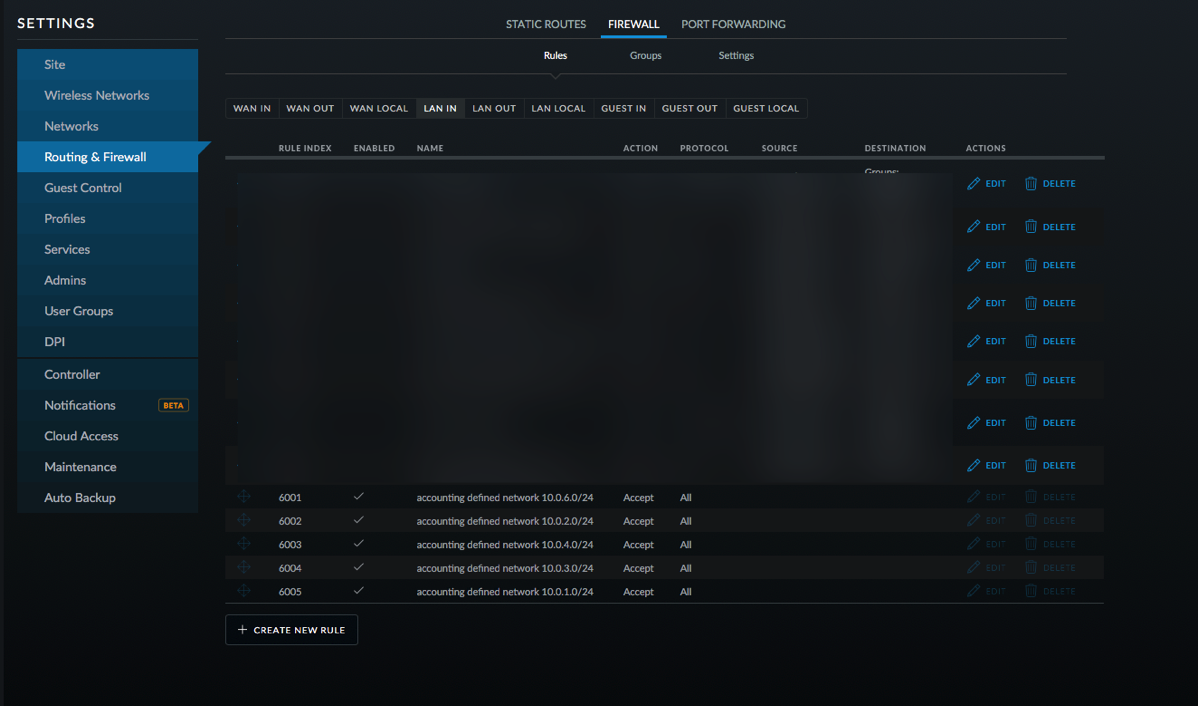
  25. Click on LAN IN and then Create New Rule.
  26. This rule allows traffic from the Squeezebox to the Media Center.
    Screen Shot 2017 10 23 at 5 43 41 PM
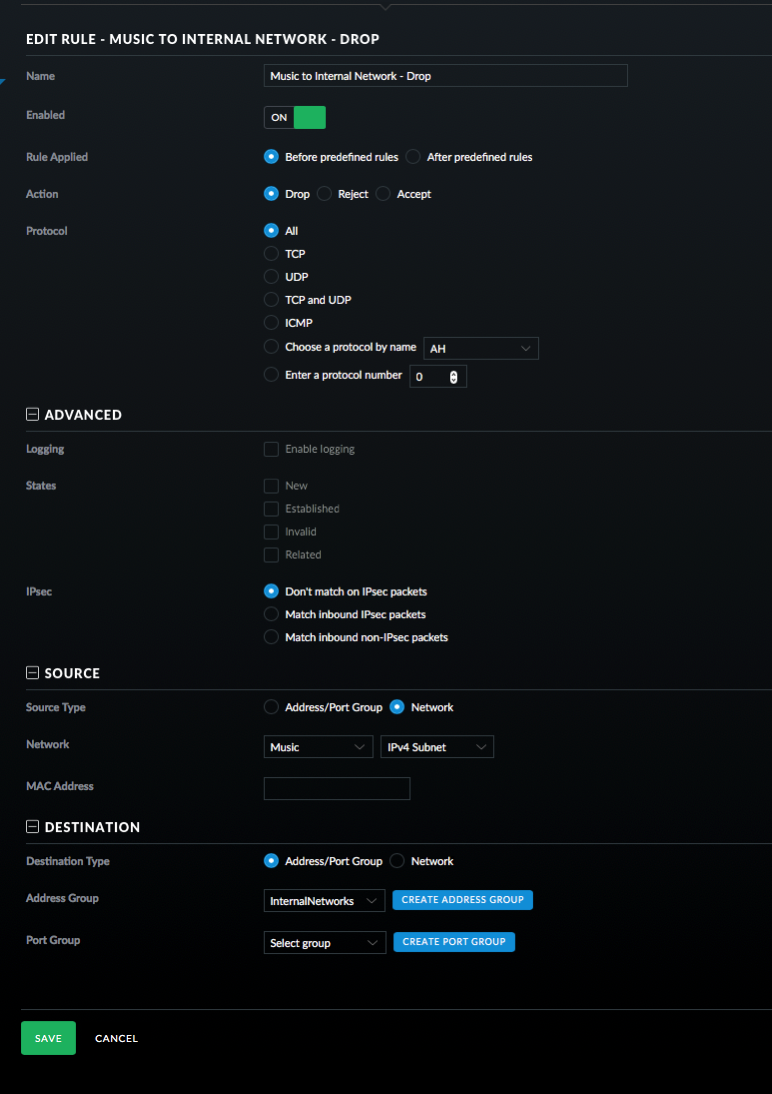
  27. And finally the last rule to drop all traffic from the Squeezebox to the internal network.
    Screen Shot 2017 10 23 at 5 47 36 PM
  28. On the Squeezeboxes, you have to enter the IP address of your Logitech Media Server as device discovery won’t work over subnets without some extra steps.

Still here? The process for creating rules is quite tedious, but once you get the hang of it things start moving faster. What I’ve done is restricted traffic from the Squeezebox devices so that they can only talk to the Logitech Music Server on certain ports and can only talk to the router on certain ports. I also didn’t setup rules for WAN traffic letting the Squeezeboxes talk to the Internet.

Will this fix KRACK? No. Will I be a target for KRACK? Probably not. Is isolating network traffic a good thing? Absolutely. If you have the know how to do this and a little time, I think it is worth it. I’ve gradually been moving pieces of my network to VLANs.

If there are any mistakes, please let me know! I’m not a network engineer, so it is quite possible I missed something.

Developing Consumer Apps (MyNumberBlocker)

I love writing software and routinely create programs to meet my needs. In many cases my applications are very focused and have a market of one, so I don’t bother polishing them or releasing them. There have been several exceptions to this including ReceiptWallet (now called Paperless and NotifyMail (NotifyMail was not quite consumer friendly, but did well in the enterprise). My latest application, MyNumberBlocker follows in the footsteps of my other apps in that it is very focused. This app is a one trick pony, but it solved my need to block the increasing number of phone calls that look like they come from the same prefix as my phone.

When I started MyNumberBlocker, I was able to get it running very quickly and decided that I could use it as an experiment to see how the current App Store operates. As an individual I’ve only put one app on the Apple App Store and that was many years ago. Making the app user friendly wasn’t difficult, but took me awhile because I like tackling different types of problems and presenting a user interface with instructions was not fun. Another challenge was setting up a website and putting together some instructions.

I know that MyNumberBlocker isn’t going to bring in enough money to change my life so I’ve set a very modest sales goal. The next step is figuring out how to market the app with little to no marketing budget!

Repairing a Time Machine backup

Apple’s Time Machine can be considered a revolution in creating backups for average users. Plug in a hard drive, set it for Time Machine and it just works. When Apple introduced the Time Capsule routers, they brought this ease of use to devices that didn’t have a dedicated external hard drive for backups. For the most part, this worked as well but there are sometimes issues.

When using Time Machine connecting to a Time Capsule, NAS, or other file server, a disc image in the form of a sparse bundle is created for each machine that is connected to the server. The sparse bundle is basically a wrapper that contains the hard drive. Inside of the wrapper are many files called bands that contain the data. This bundle grows as more data is added which is great. Unfortunately if something happens such as unplugging a computer from the network or closing the computer while the disc image is in use, the entire image can become corrupt.

Yesterday I disconnected my Mac from my Thunderbolt Display which was connected to Ethernet during a Time Machine backup. This caused the disc image to become corrupt. Up until now I had just accepted that I’d have to start over with the backup. I spent last week getting a new backup strategy in place and didn’t want to start over again. I did some searching and found a few articles on repairing corrupted sparse bundles. I started with this article but instead of trying to perform the repair on the network, I screen shared to my Mac Pro and attempted to do the recovery locally. Unfortunately the steps outlined failed to repair my disc image. Another article had similar commands but didn’t quite work either. Combining information from the two, I came up with my own steps to repair the image:

Attach to the disc image, but don’t verify it or attempt to mount it. Note the readwrite option as this was key for my repair.

sudo hdiutil attach -nomount -noverify -noautofsck -readwrite /Volumes/Backups/Shared\ Items/Backups/Scott’s\ MacBook\ Pro.sparsebundle

Look at the output that will be something like:

/dev/disk6 Apple_partition_scheme
/dev/disk6s1 Apple_partition_map
/dev/disk6s2 Apple_HFS

Make a note of the disk for the last entry that has HFS in it.

Perform the verification and repair using:

sudo fsck_hfs -drfy /dev/disk6s2

I had to do the above item twice to get a message that the volume was repaired successfully. This will take awhile depending on the damage and size of the disc image.

Once the volume has been repaired, issue the final command

sudo hdiutil detach /dev/disk6s2

After that I did a Time Machine backup and everything worked again! I tested out restoring a file and that worked as well. Now I have a way to fix the disc images when this happens in the future. Apple really needs to do something about this issue as the articles I referenced are 6 and 9 years old meaning this isn’t a new problem.

Review: Western Digital MyBook Duo

Last year I was looking at options for adding storage to my Mac Pro that I use as a media center, Jenkins server, DVR, and security camera monitoring. The Mac Pro has a 1 TB SSD but storage is eaten up very quickly with everything running on it. I wanted at least 8 TB of usable storage and while I could use a RAID, I was more interested in configuring drives as JBOD (just a bunch of disks).

I decided to get the WD 8TB My Book Duo as the price was reasonable at the time and I could configure it as JBOD. I would have preferred Thunderbolt 2 but for the price I went with USB 3. When I got the drives I configured it as JBOD and then partitioned the drives. I was curious to know if I could take the drives out of the case (Western Digital makes it easy to do) and just connect them individually to my computer without the Western Digital case. Turns out you can’t. The case does some magic to manage the drives. I was disappointed in this as it now became a potential point of failure where I couldn’t just take the drives out if the case failed.

The setup worked fine for about a year and then I started noticing that sometimes I’d see error messages on my Mac Pro about the volumes unmounting. I tried plugging the case into a different USB port, but still saw these issues at times. Things started getting worse and I decided to see if the actual drives or the case was failing. I took the drives out of the case and put them in a Thunderbolt dual bay drive dock. This, of course, caused me to lose all my data because I didn’t have the special WD magic sauce on the dock. It appeared that one drive was fine and the other drive was on its way out. I used the one drive and a second 2 TB drive in the dock for a few weeks and didn’t have any of the problems I saw before.

In order to get warranty service on the Duo, I had to send it all back. Since I didn’t know the state of the data on the drives I wanted to do a secure erase on the drives. I individually did a secure erase on the drives which worked fine negating my previous analysis that one of the drives was bad. I put the drives back in the case, reconfigured them then did a drive check using the WD utilities. The drive check failed which indicated to me that the case and not the drives were bad as I had just done a full secure erase which writes zeros to the drive.

The drives and case are now on their way back to Western Digital for warranty repair/replacement. While I don’t know if I had bad luck with this, I’ve moved on to a different case which doesn’t add magic sauce to the drives. Definitely a much more expensive solution than the MyBook Duo, but I trust it a lot more than I do the WD case.

Pros

  • Reasonable price.
  • Easy to setup.
  • 3 year warranty.

Cons

  • Crappy WD software to configure.
  • JBOD configuration doesn’t let you remove a drive and use it in another mechanism.
  • Failed after 1.5 years.

Summary

If you’re looking to add storage to a machine, I’d steer away from this case. In addition, Toshiba drives have been rated better for long term quality and in this case where the drives are running 24/7, spending some extra money on better drives will give me a little peace of mind. If the case simply allowed the drives to show up separately and not add the WD magic, I might have just chalked this up to a drive failure and given it a second chance. However, since all my data is locked into this case, I can’t recommend it. Once my case and drives come back from warranty service, I’m not sure what I should do with it. Any ideas?

Retiring my 5 GHz SSID

As many people know, the 5 GHz WiFi band is going to provide better performance and is less crowded than the 2.4 GHz band. I have always tried to get my devices on 5 GHz. Most WiFi access points/routers broadcast the same SSID for both 2.4 GHz and 5 GHz allowing devices that support both bands to pick which band it wants to use. Unfortunately the devices sometimes prefer the 2.4 GHz band. Apple seems to have acknowledged this shortcoming of devices by providing an option in the AirPort Extreme base station for the user to set a separate 5 GHz SSID.

I’ve used a separate 5 GHz SSID for many years and have had devices that could use 5 GHz use it. While this has worked, once I got to the edge of the range my devices dropped off and I’d have to manually switch to the 2.4 GHz network. This didn’t happen often but it was enough to be annoying and the devices wouldn’t switch back to the 5 GHz network.

One of the features of the UniFi line of access points is band steering which is supposed to push devices to go to 5 GHz if possible. Since I was working on my network anyway I decided to see if I could have one SSID for both bands and if the devices would prefer the 5 GHz network.

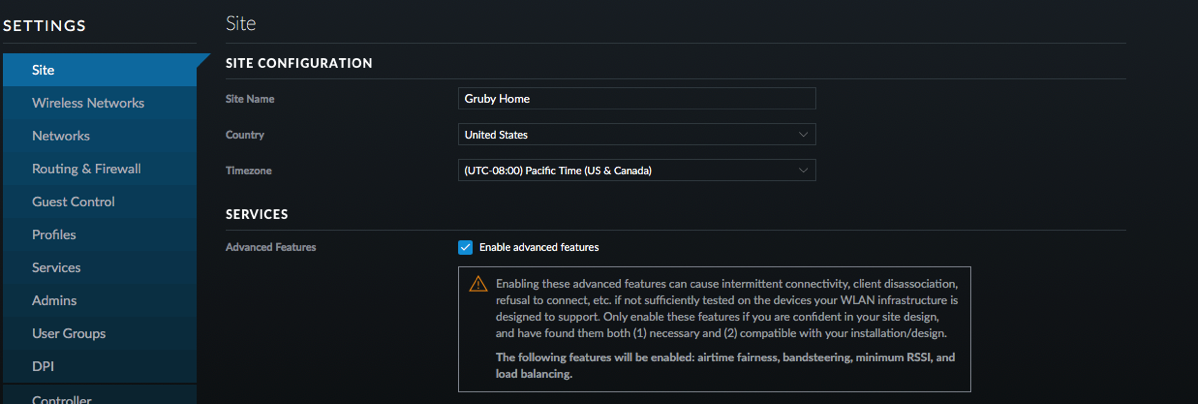
The first thing I did was enable the Advanced Features in the UniFi controller:

Screen Shot 2017 09 20 at 1 43 17 PM

Screen Shot 2017 09 20 at 1 43 28 PM

After enabling the Advanced Features, I went to the configuration for each of my access points and turned on band steering to prefer 5 G.

Screen Shot 2017 09 20 at 1 44 04 PM

To finish off the configuration I set the transmit power to high for 5 GHz and medium for 2.4 GHz just to help devices think that the signal is a bit stronger on 5 GHz.

Screen Shot 2017 09 20 at 1 44 04 PM

I tested this configuration for a few days by forgetting the 5 GHz SSID from my devices and watched in the UniFi controller which band the devices chose. Without fail, all the devices including an Apple TV, iPad Pro, iPhone, Amazon Echo, and MacBook Pro chose the 5 GHz network. That was enough to convince me to retire the separate 5 GHz SSID. Today I removed the 5 GHz SSID and if all goes well no one in the house will notice a difference and devices will continue to operate at peak performance.

Getting Better WiFi

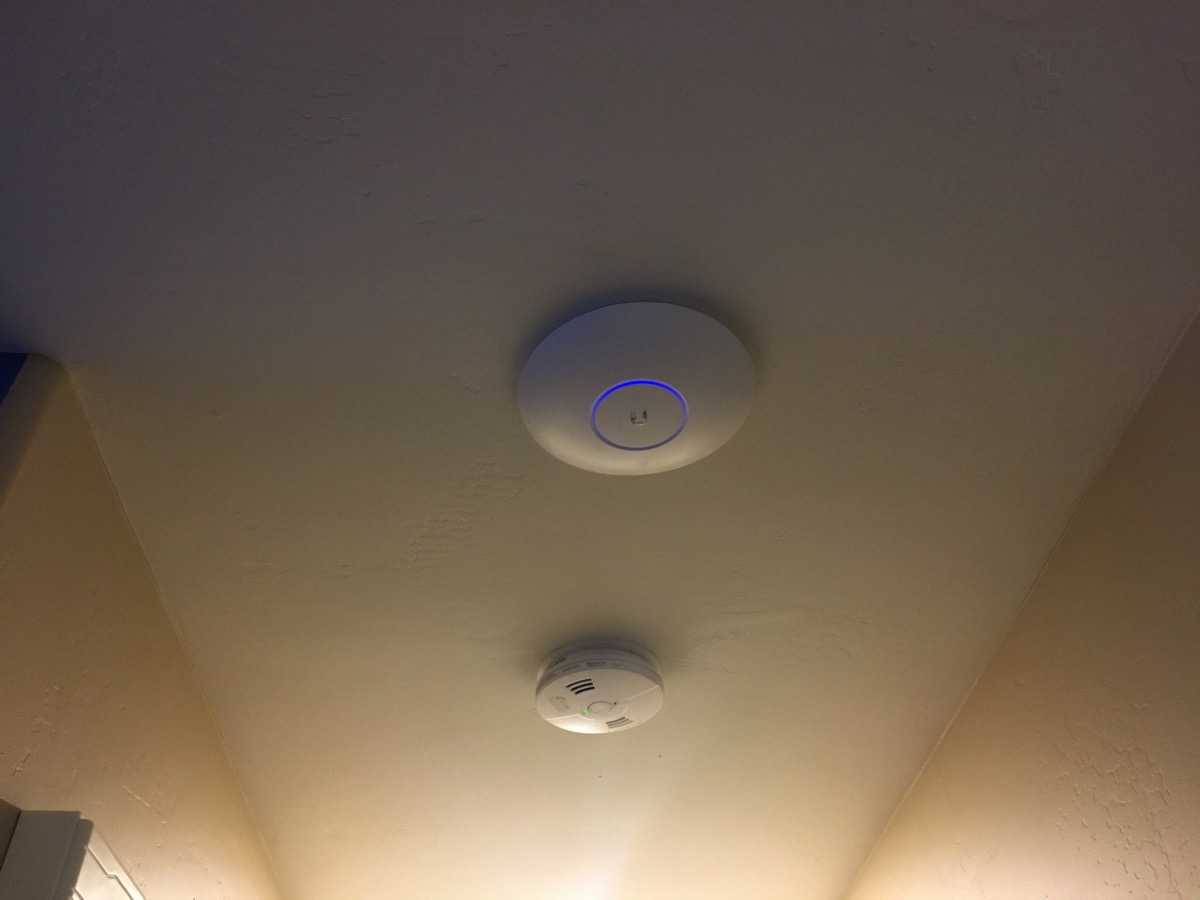
As I’ve written in the past, I replaced all my WiFi equipment with Ubiquiti’s UniFi gear. For my relatively small 1600 square foot house, I’ve gone overboard and have 3 access points. The house is a tri-level house so ideally I’d put once access point on each level. Unfortunately, due to convenience, I didn’t do that.

I set up one access point in my networking closet near my office on the ground floor, one in the garage in the hopes that it would cover up (yes, I know it points down) and one behind the TV on the mid level (wall mounting is not a great option). While WiFi coverage was adequate, I’m always looking at ways to improve my network. A few weeks ago, I decided to put the access points where they belonged. Since I have attic access above the mid level and second story, I just had to get a Cat6 cable up there. After several hours of trying to get 2 wires through a hole in the garage (I have about 6 other wires through that same hole and didn’t want to make a new one) I managed to pull the cable and wire things up.

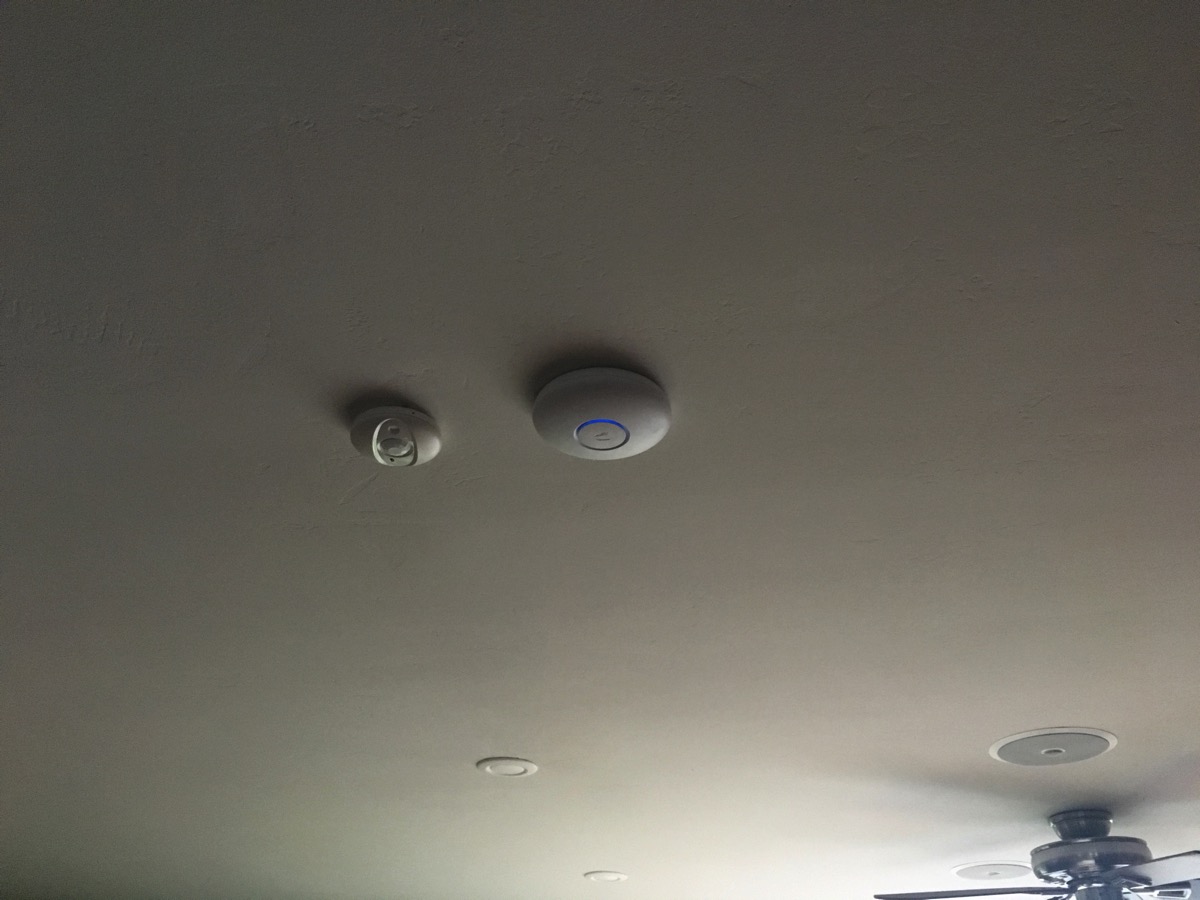
The result can be seen in these pictures; the access points pretty much blend in with motion detector and the smoke detector.

The coverage is now very consistent throughout the house and my wife hasn’t complained about the access points on the ceiling!

IMG 6403

IMG 6407