WordPress SSL Admin and Twitter Tools

For a long time, I’ve used WordPress for my blog hosted on my own server or virtual server. This has allowed me to experiment with plugins and play around with various settings. As I’ve been doing a lot of posting from my iPad using the WordPress for iOS app, I realized that the posting link was over a non-secure link, so my admin password was passing in the clear over the Internet. I set out to secure the admin portion of my blog. I read an article over on WordPress’s site.

The actual securing it wasn’t that difficult. I already had an SSL certificate from StartSSL which works well and the price of free is good. In addition their certificates use a subject alternative name which lets me secure blog.gruby.com as well as gruby.com if I choose to use that in the future.

After a few posts, I realized I had a problem. I use the Twitter Tools plugin to tweet each time I post. The URL in each tweet had https in it and I didn’t need to put excess load on my server encrypting public pages. So I went about figuring out how to create my own WordPress plugin to remove the https and replace it with http. I’m not a php expert nor a WordPress plugin expert, but I came up with a plugin that appears to work.

This plugin is free to use and maybe it will help someone.

<?php
/*
Plugin Name: Twitter URL changer - https to http
Plugin URI: 
Description: Changes https to http in URLs sent to twitter.
 This can be caused by using SSL to protect admin pages.
 No need to use SSL on the main site.
Author: Scott Gruby
Author URI: https://blog.gruby.com
Version: 1.0
Disclaimer: Use at your own risk. No warranty expressed or
implied is provided.
*/
if (!defined('PLUGINDIR')) {
	define('PLUGINDIR','wp-content/plugins');
}

function gruby_https_remover($url) {
	$new_url = str_replace("https://","http://", $url);
	return $new_url;
}

add_filter('tweet_blog_post_url', 'gruby_https_remover');

The rise of the casual gamer

I’ve always been intrigued with video games, but was never very good at them. I had a PlayStation that I bought at a clearance sale, then bought a refurbished PlayStation 2, and now have a Wii that a client bought for me. Video games hold my attention for a little bit, but I grow tired of them quickly, probably because I have to turn on the TV and go into another room to play. I believe (as do some tech experts) that console gaming is going to be relegated to the hard core gamer and that smartphones and tablets will be more than sufficient for the casual gamer.

In fact, I think that smartphones and tablets (e.g. iPad) is making people that really aren’t gamers into people that are playing more and more games. If you look at the types of games available for iPhone and iPad, there is a huge range with some of the more addictive ones such as Angry Birds requiring very little skill to play. I think that one of the problems with game consoles is that some games require far too much time to master and have too many controls (look at the number of buttons on a PlayStation controller).

I have a bunch of games on my iPad and really enjoy playing them; I think that Angry Birds informed me that I had already passed 5 hours of playing! Ouch, that’s a lot of wasted time! My manager told me that she has probably passed 80 hours playing it on airplanes (that seems a bit much to me, but what do I know). In addition to the simplicity of the games (in terms of mastering), the very low cost makes it a no brainer for people to pick up the games.

Is it bad for more people to play games on these devices? If it helps pass the time and relaxes people, I don’t think it can hurt. If it becomes so addictive that they play them while walking across a street then, yes, there is a problem.

Review: MacBook Pro 15″ (Early 2011)

As someone that deals with computers all day long, I need to upgrade my hardware periodically as the applications get more complicated and my productivity starts to decrease. I try to get a new machine about every 2.5 years. My previous machine was a 15″ MacBook Pro right after the unibody redesign. The machine performed quite well and my SSD upgrade last year kept it going. There was nothing really wrong with the machine, but the new version of Xcode and the increased complexity of my projects began to cause me some frustration waiting for builds to complete.

When I started my new job, I wasn’t issued a new machine and didn’t ask for one as I wanted to wait for the next revision of MacBook Pros. When the new machines got announced, I put in my request and it was approved (slightly different from what I wanted, but still an impressive machine). I ended up with a 15″ MacBook Pro, 2.2 GHz Quad Core i7 processor, 8 GB RAM, 256 GB SSD, high density, matte screen.

Since I had an SSD in my last machine, the big changes for me were the faster processor (2.8 GHz Core 2 Duo vs. 2.2 GHz Quad Core i7) and more memory (6 GB vs 8 GB). The first thing I did when I got the new machine and set it up was to compile one of my projects. The project was taking 45 seconds to 1 minute to compile. On this machine, the compile took about 15 seconds! Sweet!

What more can I really say? Compared to my old machine, this thing screams, but I’m sure I’ll say it is slow in no time at all!

I haven’t had a chance to give it the full laptop treatment (take it on a trip and see how the battery performs), but my first impressions are quite positive. I don’t really measure app launching as some people do as I don’t launch apps all day long; the compile time is the number one performance boost that makes me glad that I got a new machine.

Pros

  • It’s fast. There is no doubt about it, this machine can outperform a lot of desktop machines.
  • Thunderbolt/DisplayPort can do audio out to an HDMI adapter which means I have one less connector to connect when I “dock” my machine.
  • Built in SD card reader eliminates the need for me to dig out a reader when I need to configure my Eye-Fi card (I don’t transfer photos using the card, just over WiFi.

Cons

  • It’s expensive. The price tag on this thing is something around $3000 which is a lot of money. However, if it was my own money, I would have gotten a similar machine as it is a tool that helps me earn money.
  • The high density display is a bit hard to read.
  • I’m undecided on the matte display; I’ve had glossy displays before and they work fine.

Summary
My “review” isn’t like the detailed reviews that Macworld publishes, but sometimes people just need a yes/no on buying something. I’ve been a fan of the MacBook Pro line for a number of years and this machine definitely doesn’t disappoint. However, when I get new machines, I like to get them immediately after Apple announces something significant and this upgrade with the Quad Core i7 is definitely one of those times. Luckily the major upgrades seem to coincide with when I want to upgrade.

For professional users, you can’t go wrong with a 15″ MacBook Pro, The size is right for the infrequent traveling I do, but is more than adequate for use as a desktop machine. I won’t get another desktop machine as the portability is worth so much to me even if I don’t use it all that often.

EyeTV and AppleTV Integration

When the second generation AppleTV was released, I was intrigued by it, but even the low $99 price tag didn’t get me to bite as I couldn’t quite justify it. Now that we’re trying out Netflix (our viewing will increase this summer when most shows are in re-runs), the AppleTV became more interesting and then the enhanced AirPlay on the iPad pretty much sealed the deal for me getting one. I almost ordered one, but hesitated and then MacMall had an eBay special for $80 for one (+$6 California sales tax), so I bit.

So besides watching Netflix on it and streaming movies I create on my iPad with it, what else could I do with it? I already have a Mac Mini setup as a media center handling broadcast TV recordings on my EyeTV. Viewing shows with the EyeTV is fine, but I wanted to use the Remote app on the iPad as it looked cool (did I need a better reason?). I started hacking away at a system to export the videos and import them into iTunes on the fly. Since the export takes a long time, I needed to export the videos in the middle of the night after ETVComskip ran to strip out the commercials.

I came up with the following AppleScript to do the exports of the shows that were recorded in the last day.

set destFolder to "Macintosh HD:Users:mediacenter:Movies:EyeTV Encoded:"
set currentDate to (current date) - 1 * days
set currentSeconds to seconds of currentDate
tell application "EyeTV"
	set recordCount to count recordings
	if recordCount is greater than 0 then
		repeat with myCounter from 1 to count recordings
			set theRecording to item myCounter of recordings
			if busy of theRecording is false then
				set startDate to actual start of theRecording
				if (startDate > currentDate) then
					set thisTitle1 to title of theRecording
					set thisTitle2 to unique ID of theRecording
					set AppleScript's text item delimiters to ":"
					set theTextItems to text items of thisTitle1
					set AppleScript's text item delimiters to "-"
					set thisTitle1 to theTextItems as string
					set AppleScript's text item delimiters to {""}
					set thisTitle to thisTitle1 & " " & thisTitle2
					export from theRecording to file (destFolder & thisTitle & ".m4v") as AppleTV replacing no
				end if
			end if
		end repeat
	end if
end tell

Next I setup a cronjob like this:

15 0 * * *  /Library/Application\ Support/ETVComskip/\
MarkCommercials.app/Contents/MacOS/MarkCommercials\
 all > /dev/null 2>&1
15 2 * * * open /Users/mediacenter/Desktop/Export\
ToAppleTV.app
15 20 * * * rm -rf ~/Movies/EyeTV\ Encoded/*

The first line runs the commercial skipping, the second runs the AppleScript that I’ve saved as an app. The third line removes all the exported videos as they’re no longer needed.

I’ve been using this for about a week now and it’s working quite well. I can control the shows from my iPad, but my wife thinks I’m just doing it because I’m a geek (and I say, so?).

The only issues with this is that I can’t delete the shows with my AppleTV and as of now, I’m keeping the backup copies on the EyeTV. So I have to manually delete the watched shows from iTunes as well as EyeTV. Once I get more confident, I’ll modify the AppleScript to delete the shows from the EyeTV after exporting and then I can write another script that removes the shows from iTunes after they have been watched; this is a little risky as I’m not sure if I can tell if it has been completely watched or partly watched. I wouldn’t want to prematurely delete the shows.

While this isn’t for the novice, I think it’s pretty cool and if I can centralize all my media watching to the AppleTV, I’ll be pretty happy. The Remote app on the iPad is very slick and beats any standard remote.

Review: Ram Mount iPhone car mount

When I decided to ditch my GPS unit to use my iPhone, I needed a way to secure my iPhone in my car or a rental car so I started to look for options. On the MacBreak Weekly podcast, Andy Ihnatko raved about the mounting systems from Ram Mount. Since Andy reviews a lot of products and seems pretty critical of some poorly made ones, I figured he might know what he’s talking about. I decided to give the

The wrong way to use a Smart Cover

One of the coolest aspects of the iPad 2, believe it or not, is the Smart Cover. I like the idea of having a built in stand and have used it a number of times. However, it seemed a bit unstable to me and I thought it was very un-Apple to do that. So I watched the Smart Cover video on Apple’s site again and realized my mistake. I thought that when the cover was “rolled up” the micro fiber side was on the inside of the triangle so that the plastic side of the cover was towards the surface. Well, that isn’t the case; the proper way to fold up the Smart Cover is to have the micro fiber towards the surface where the iPad is resting.

I feel a bit dumb about not seeing this, but having the micro fiber “out” just seems wrong. Oh well, when opening the Smart Cover and making it into a stand, take a look at the video on Apple’s website if you have any questions about the stand working right.

Review: Navigon for iPhone

I’ve written in the past about my poor experience with phone based navigation systems that relied on a network for the maps as well as the routing information. Last summer with iOS 4 released, a new crop of useless navigation applications appeared for the iPhone. With a trip on the horizon where I’d be renting a car, I decided to try out Navigon for iOS as it received decent reviews from users and had all the maps self contained without relying on the network. The navigation apps are all in the range of $25-$50 (or so), so I did a bit of research before plunking down $40 on Navigon’s USA edition (it was on sale when I bought it).

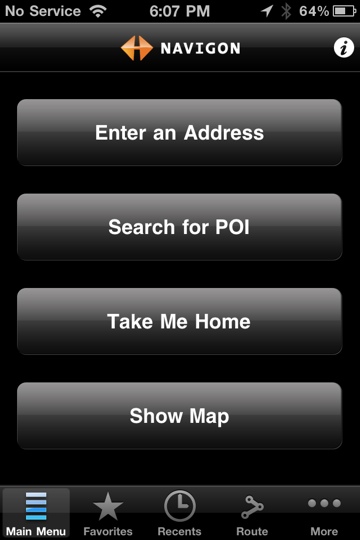
When I first started using the app around town, the biggest difference from my Garmin 765 was the screen size. However, I soon realized this didn’t matter as I just listened to the voice navigation. My Garmin became increasingly frustrating to use as the resistive touch screen wasn’t very accurate and entering information was cumbersome. Navigon’s interface is quite straight forward and data entry is easy. The voice prompts are clear and gave me enough notice before I had to make a turn.

Once you enter an address and start navigation, there is no need to touch the display again, except if alerts come up (which is kind of annoying, but Navigon can’t do anything about notifications and battery warnings). As with all GPS apps on the iPhone, Navigon sucks the life out of the battery. If you combine this with being in an area without cell coverage, you pretty much need to plug the iPhone into a car charger. Luckily I have a 2 USB port car charger and an extra USB to dock connector cable.

California law is very specific on where you can place a GPS unit and effectively it can only be mounted in the lower left corner of a windshield (you can put it in the lower right corner, but that’s pretty useless). So, you’ll need to get some type of mount so that the iPhone can maintain an adequate GPS signal and you can hear the voice. Also, if you want to glance at the screen for an upcoming turn, it needs to be at eye level. However, relying on the voice navigation seems pretty adequate (and safer) to me.

Coming from the Garmin, I really only needed the GPS application to navigate me to my destination without relying on the cellular network and be easy to enter information. Navigon easily met these conditions. In my testing, I took it on a trip to an area that had no AT&T coverage for the last about 1 hour of the trip, so any GPS app that didn’t have built in maps would have been a complete failure (i.e. Garmin’s offering for the iPhone).

While I’m not a huge fan of the colors that Navigon used and the non-standard looking buttons, I believe they made the choices to be easy to use with one hand and be as non-distracting as possible. Of course, the app says not to use while driving, but the developers probably knew that people would ignore this, so they made it easy for people to use while driving (I don’t condone this activity; rely on the voice navigation while driving).
20110327-060906.jpg
My torture test was to use the app in an area I’d never been before and have it navigate me to my destination that was about 3 hours away. I was either going to have huge problems if it got me lost (no cell coverage for part of the trip as I said before) or it was going to deliver me safely to my destination. (OK, I had actually put Google Maps directions on my iPad in case there was a problem as I’m not a complete idiot.) The Navigon software performed flawlessly.

There are a number of GPS apps out there that probably do a similar job, so I can’t say that it is any better or worse than others. I can say, however, that it is better than my Garmin and frankly better than a standalone GPS unit due to the fact that I don’t have to carry an extra device and it has all my addresses in it. I packed up my Garmin and am ready to pass it on as I no longer have a use for it; I really haven’t had the Garmin for that long (about 1.5 years) as I bought it after my last fiasco with phone based navigation software. My, oh my, how quickly things (and my thinking) change.

Pros

  • Built in maps.
  • Doesn’t rely on a network connection to operate.
  • Text to speech voice tells you where to turn and when.
  • Active Lane Assistant makes it easy to see which lane you need to be in on a freeway for exiting/merging.
  • Different options for routes based on your preferences.
  • Decent list of points of interest. I was able to enter “Budget” and an option came up for Budget car rental return which is what I wanted.

Cons

  • Address book integration is kind of poor. Tapping on a friend’s full address sets the destination to be about 30 miles away from where it really is.
  • Social networking integration is useless.
  • Inconsistent use of British spelling. In one case Favorites is spelling Favourites and Optimize is spelled Optimise. For the version with USA maps, it should use American spellings.
  • Black background and black buttons just don’t look right to me. It looks like someone wanted to get fancy and instead made it look ugly.

Summary
Navigon USA edition does what it is supposed to do and easily replaces a standalone GPS unit. If you are going to travel in a rental car or even your own car in an unfamiliar area, the Navigon app (or one of its competitors) would definitely be worth your money to have at your disposal. The cost may seem a bit steep at $50 or $60, but compared to a standalone GPS unit that does less, it’s a drop in the bucket.

The other side of daily deals

In the last few years, “daily deals” have started popping up everywhere from Groupon to my local paper’s deal. From a consumer point of view, some of these are pretty good where a consumer can get a product or service for maybe 50% off. This, of course, isn’t done out of altruism, but for marketing purposes in order to attract new customers.

My wife’s jewelry business, Designs by Janessa, has been doing well, but she’s been looking for ways to expand it and market to more people. She was approached by one of these deal sites and now has done a few of them. I’m sure many of my readers have read about coffee shops that did Groupons and lost tons of money because the deals didn’t do what they had expected them to do.

While I’m not going to get into the exact specifics of how these deals work, I’m going to present some made up numbers and give people an idea of the merchant side of a deal.

The companies that present the deals have 2 goals when doing a deal. The first is to make money. If you take kind of a conservative figure (similar to Apple’s App Store), the company may take 30% of what someone pays for a deal. On a $50 value for $25, the company makes $7.50. They cover the processing fee and run the website for the deal. What they bring to the table is their customer list and potential audience. The company’s other goal is to build their customer list so that they can solicit other merchants to do a deal and say “we have 50,000 people on our list”. So basically, the company is selling a customer list to merchants (merchants only get the list of people that buy it). Is the “list” worth say $7.50 (or more) per customer? Well, that depends.

For the merchant, they are trying to gain repeat customers and spread the word about their company or brand. They really aren’t looking for the person that uses the deal and doesn’t come back as the cost to acquire that customer is usually far too high. So how does a merchant do a deal and not get raked over the coals with people just looking for a bargain? That’s where things get tricky.

First off, the merchant must realize that the entire cost of the deal is a marketing expense. So in my hypothetical example above, the merchant effectively is paying $32.50 for each customer that is brought in as the merchant must provide $50 worth of a product or service, but only gets paid $17.50 for it.. Ouch, that sounds pretty steep and can easily make a merchant regret doing the deal. Depending on what the merchant is offering, if a customer buys the minimum and never comes back or tells his/her friends, this is a waste. In order to reduce the cost to the merchant, the merchant should make sure that shipping and sales tax are excluded and that the minimum purchase is greater than the deal, i.e. any single product that can be purchased is greater than the deal value; in this case, $50.. This, at least, reduces the cost per customer and most customers understand that discounts don’t apply to shipping and tax. If a customer purchases significantly more, then the cost to acquire the customer is a drop in the bucket and the deal was a success.

Second, the merchant needs to put words in the contract such that there is a limit to the number of offers that any one person or better yet, household (defined as the same address) can redeem. My wife had a person buy 11 of the offers which was basically 50% off. Some of the deal sites are smart enough to limit the number by credit card number and/or address.

Third, if the merchant thinks that customers are trying to game the system, the merchant should put the onus on the company putting on the promotion to either foot the bill for the dishonest people or deal with the customers. It’s probably in the best interest of the company putting on the promotion to eat the cost so that they don’t get a bad reputation; besides, they’re making a killing for minimal work.

Fourth, limit the total number of offers. If the merchant is a small business, the influx of customers could swamp them and annoy all customers when products are delayed.

Fifth, before even undertaking a daily deal, the merchant has to ask him or herself if the marketing dollars could better be spent elsewhere. If something comes up as a deal, does the merchant actually want the customer that is cheep and looking for a deal? Also, if someone doesn’t get in on a deal, he or she could be waiting for the next deal and not buy expecting a deal to come later.

Daily deals have been a boon to consumers (my wife and I have bought a few). Most people don’t realize the actual cost to the merchant and some merchants may think they’re losing money on a deal which is probably the wrong way to look at being part of a deal. However, before a merchant gets involved in a daily deal, he or she should carefully think of the cost, additional work involved, and the headaches of dealing with “cheap” customers (in my experience, customers that are looking for a bargain are sometimes quite troublesome and not worth keeping as customers).
Review: iMovie for iPad

For many reasons, I’ve been interested in video editing and making movies for years; nothing professional, I just thought it was kind of neat to be able to put together movies. Over 20 years ago, I put together footage that I had taken at the 1989 National Scout Jamboree and put together a little video that I edited using our camcorder and a VCR. I may have even put in some titling using a computer, but I can’t recall. That was quite rudimentary compared to what can be done today.

When Apple first introduced iMovie for the Mac, I thought it was quite neat and made a few videos, but the more video I took and stored, the more time consuming it became to edit the videos. Since then, I’ve made a few movies, but have mostly left that to my mother as she seems to like doing it and does a great job throwing together random clips and photos to make something interesting.

At the iPad 2 introduction, Apple showed iMovie for iPad. The ease of use looked amazing and getting it was one of my many reasons for buying an iPad 2. After I got my iPad 2 the other day, the first app I bought was iMovie. My intention was to make a movie from videos and photos that we shot in the last year of our son. While I was hopeful that I could accomplish that this weekend, I was also realistic that based on my past history, this might have been a pipe dream.

The first step in creating a movie was to make sure all my video was in the proper format for the iPad. I already wrote about transcoding all my video the other day, so that part was accomplished. I decided to see how far I could get this weekend. In about the 1 hour or so that I could use my iPad, I managed to apply all the video I wanted to the timeline and trimmed it. I then spent maybe another hour adding photos and dropping in some songs.

I was absolutely amazed that within about 2 hours, I was able to create a 9 minute movie ready to show. In the past, the movies I’ve made have taken me a long time on the order of 1 hour per 1 minute of final movie which really makes the process a drag. I’m now cautiously optimistic that I can keep up the movie making if it is this easy to make something half decent.

I did encounter a few issues with iMovie including crash or two. iMovie applies the Ken Burns effect to every photo added, something that I find pretty annoying. In order to remove this, you have to set the starting and ending zoom level and picture position to be the same. This is fine as long as you zoom out on every picture and align the picture to an edge; however, if you want to zoom in or center the photo, this process is extremely hard to do. I’ve submitted feedback to Apple to improve this.

iMovie on the iPad is intuitive in many ways, but I read through the in-app help which reduced some of my frustration (removing the Ken Burns effect is documented). I’d strongly recommend that people read the docs before starting a project as some actions are strange at first.

iMovie for iPad is almost a killer reason to buy an iPad 2 (it won’t run on a first generation iPad). However, if your video isn’t in a format that the iPad can show, you have to go through the long and tedious process of converting it; if you’re also shopping for a new digital camera, I’d suggest looking for one that encodes video in a format that the iPad can show natively (also useful to import video when you’re away from your computer). So far, my brief research shows that the Panasonic compact digital cameras use M-JPEG which the iPad should be able to read.

Pros

  • Intuitive interface for most editing needs.
  • Extremely fast method for creating movies.
  • Decent results with little effort.

Cons

  • Removing Ken Burns effect is a pain when adding photos.
  • No ability to lower volume of music in particular parts of a clip, i.e. no fine grained audio editing. iMovie will “duck” the audio in the background music if there is music in a clip.
  • It can be slow at times where the interface appears to be unresponsive.
  • Occasional crashes.

Summary
If you have an iPad 2, spend the $4.99 and buy iMovie. Even if you don’t make a lot of movies, just playing with it is worth it to see what the iPad 2 can do. This could be the way to edit movies at the end of a trip even before you get home as it is easy to put off the movie making and simply never get around to it.

iMovie is an impressive piece of software and I hope that Apple keeps making minor improvements to touch up the edges.

Video Transcoding for the iPad

When I first started syncing pictures to my iPad, I noticed that videos didn’t sync. After some research, it turns out that the video/audio format used by my Canon SD960 IS, I kind of put it on the back burner and ignored it. Now that I have an iPad 2, I bought iMovie and wanted to do a little video editing this weekend. Unfortunately the only clips that I had on my iPad were taken with my iPhone 4.

After a bit of futzing around with AppleScript, I slapped together 2 scripts to transcode my videos into 720 p and suitable for use on my iPad. The big issues I found is that QuickTime Player (the one with Snow Leopard) changed the AppleScript syntax and exports asynchronously. For non-techies, this means that the export basically happens in the background. This created a problem as I don’t know when each export ends; I need this information so that I can change the date on the exported file to match the original file as well only running around 10 exports going at once (too many running basically slows down the system).

So here’s what I did:

  1. Created a new folder on the Desktop called Movies and dragged all my movies from iPhoto.
  2. Created a second folder on the Desktop called NewMovies.
  3. Opened AppleScript Editor and used the following script and saved it as an application.
    property exportFolder : (path to desktop folder as Unicode text) & "NewMovies:"
    
    on run
    	choose folder with prompt "Change video files from these folders:" with multiple selections allowed
    	open (result)
    end run
    
    on open droppedItems
    	tell application "QuickTime Player"
    		activate
    		close every window
    	end tell
    	
    	set numExports to 0
    	
    	repeat with thisItem in droppedItems
    		if (folder of (info for thisItem without size)) is true then
    			list folder thisItem without invisibles
    			
    			repeat with thisFile in (result)
    				if (numExports < 10) then
    					tell application "QuickTime Player"
    						open ((thisItem as Unicode text) & thisFile)
    						try
    							export front document in (exportFolder & thisFile) using settings preset "HD 720p"
    						on error errorMsg number errorNum
    							display dialog "Error (" & errorNum & "):" & return & return & errorMsg buttons "OK" default button 1 with icon caution
    						end try
    						
    						set numExports to numExports + 1
    						close front document
    					end tell
    				end if
    			end repeat
    		end if
    	end repeat
    end open
    
  4. I then created a second script that changes the date on the exported files and then deletes the originals.
    property exportFolder : (path to desktop folder as Unicode text) & "NewMovies:"
    
    on run
    	choose folder with prompt "Change video files from these folders:" with multiple selections allowed
    	open (result)
    end run
    
    on open droppedItems
    	repeat with thisItem in droppedItems
    		if (folder of (info for thisItem without size)) is true then
    			list folder thisItem without invisibles
    			
    			repeat with thisFile in (result)
    				try
    					set fileExists to no
    					tell application "Finder"
    						if exists (exportFolder & thisFile) then
    							set fileExists to yes
    						end if
    					end tell
    					
    					if fileExists = yes then
    						set file_ to POSIX path of (exportFolder & thisFile)
    						set fileInfo to info for ((thisItem as Unicode text) & thisFile) as alias
    						set oldDate to creation date of fileInfo
    						set format_string to "<><><><><>"
    						set new_creation_date to format_date(oldDate, format_string)
    						do shell script "touch -t " & new_creation_date & " " & quoted form of file_
    						tell application "Finder"
    							delete ((thisItem as Unicode text) & thisFile)
    						end tell
    					end if
    				end try
    			end repeat
    			
    		end if
    	end repeat
    end open
    

    NOTE that you also need you to grab some AppleScript code for date formatting and put it in the above script.

  5. I ran the first script, let the transcoding finish, then ran the second script. Unfortunately I had to repeat this a large number of times to transcode all my videos.

So now I have all my videos in a format that works on the iPad. When I import new movies, I’m going to run them through these scripts before I put them in iPhoto. Another benefit of doing this now is that all my videos are in the same format and will buy me a few more years using H.264 and AAC for encoding; all my videos were in random formats some requiring special codecs to play that who knows how long they’ll be around.

While I wish this process was more straightforward and took less time, I’m glad that I undertook this so that I can start playing with iMovie on my iPad.