Troubleshooting OS X Server’s Websites

Today I was trying to install a program on my OS X Server and the software complained that something was listening on port 8080. I couldn’t figure it out, so after a bit of searching I found a command that could get me closer:

sudo lsof -iTCP -sTCP:LISTEN -P -n | grep 8080

The output had in it:

httpd     21950        _www    7u  IPv6 0xc086bca85e9b29f7      0t0  TCP *:8080 (LISTEN)
httpd     65328        _www    7u  IPv6 0xc086bca85e9b29f7      0t0  TCP *:8080 (LISTEN)

OK, so now I know that the _www user was running the process. Next up was to do:

ps awuwx | grep _www

Which gave me:

_www            23128   0.0  0.0  2518828   1132   ??  S     8:41PM   0:00.00 /usr/sbin/httpd -D FOREGROUND -f /Library/Server/Web/Config/apache2/httpd_server_app.conf

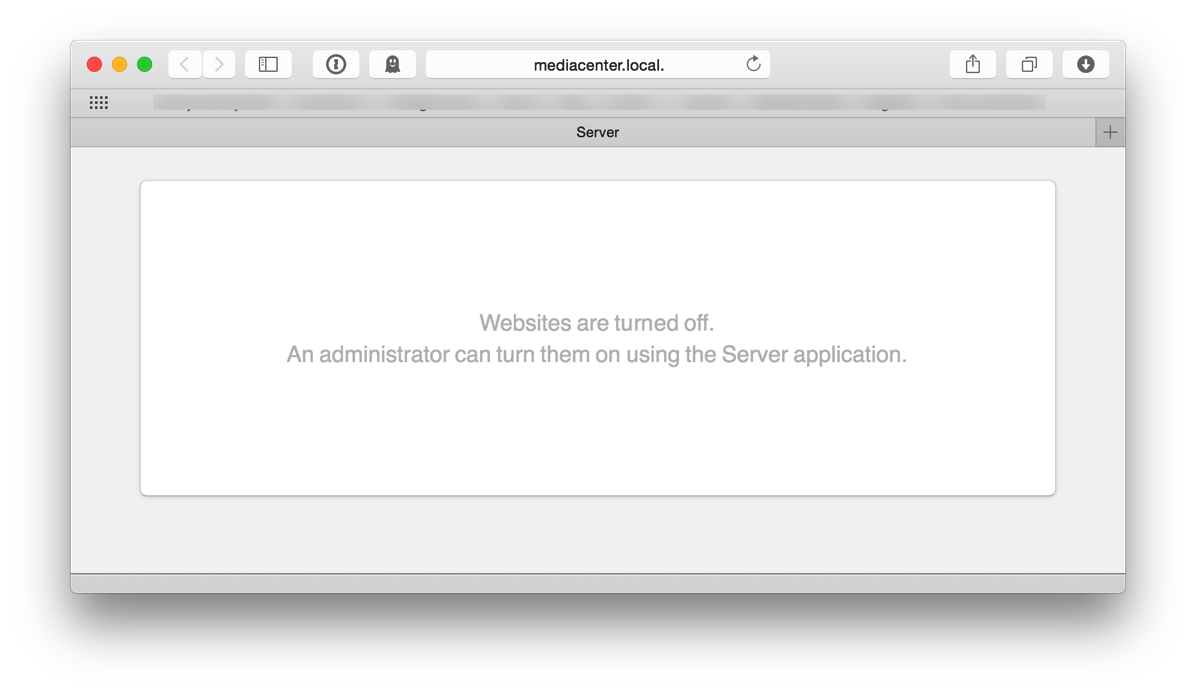
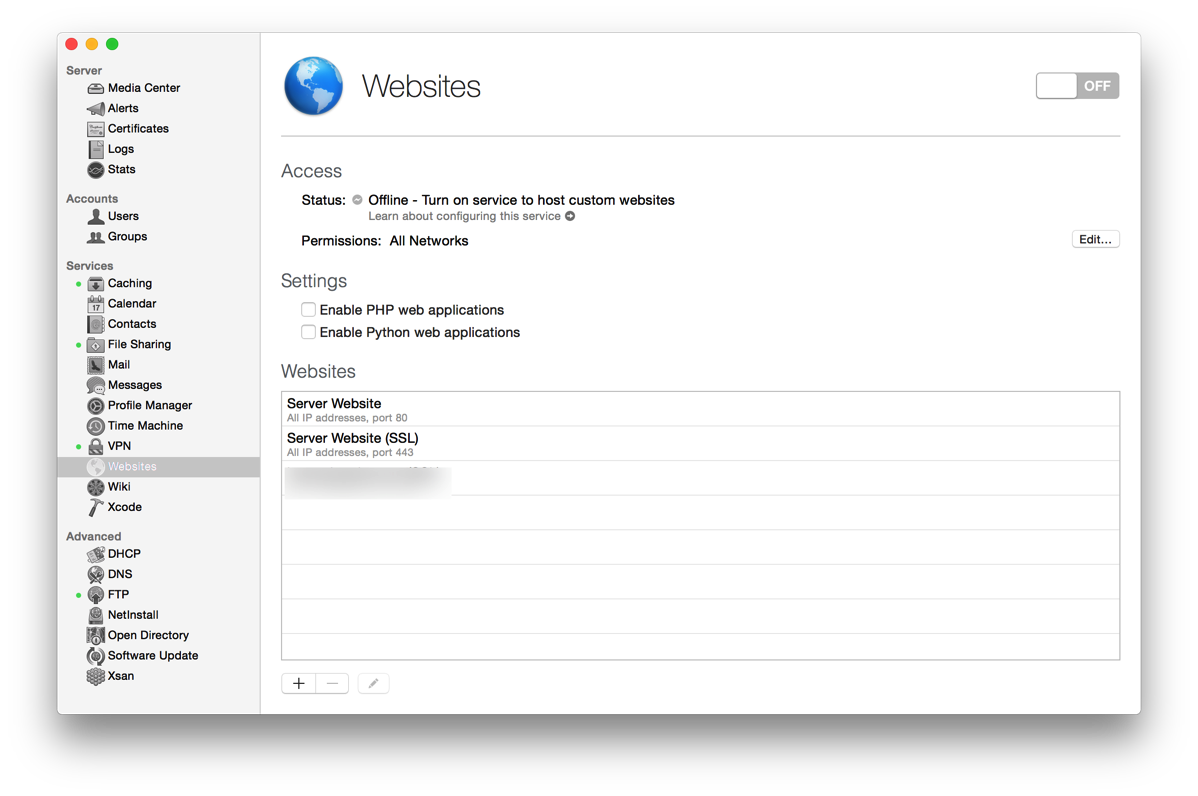
Ah, this tells me that OS X’s Server App is running Apache which is fine, but I had Websites turned off in OS X Server!

Screen Shot 2015 09 01 at 8 33 06 PM

Hmmm, how do I disable Apache without hacking away on the http files? Well, I noticed on the Websites section I had an entry listening on port 8080. I removed the entry and presto, my server stopped listening on port 8080. Very odd because Websites is off, but OS X Server decided that if Websites is off, it should still listen and serve up a page that says “Websites are turned off.”

Screen Shot 2015 09 01 at 8 46 55 PM

Besides Apple ending the text with a preposition, this is absolutely the wrong behavior in my opinion. I understand that certain services (CalDAV, WebDAV, etc.) run through Apache and OS X Server has to have it on to work, but Apple needs to have better messaging to indicate that it is listening on various ports and how to turn off the websites.

Maybe I’m not the average OS X Server user in that I run various other services including Jenkins, but OS X Server still is not up to snuff; I’m not sure why I keep running it. OK, I do know why I keep running it; the caching server is excellent, VPN service is good, and file sharing is pretty easy to setup. Good thing I’m not afraid of the command line and can figure this out.

Setting up QoS on the Edge Router Lite

When I started using the EdgeRouter Lite, I knew that it was quite powerful and could handle pretty much anything I threw at it. Last week I had to send a very large file to a co-worker, so I put it in Dropbox and soon saw Dropbox use pretty much 100% of my upstream bandwidth; I tried limiting the upstream bandwidth in Dropbox, but the setting failed to do anything. Someone tried to call us on our Ooma and I had trouble with the call, so I stopped the Dropbox upload and turned on the Network Link Conditioner on my Mac to limit the upload.

That evening I started playing with Quality of Service (QoS) on the EdgeRouter Lite to see what I could do to prioritize the voice traffic and limit bandwidth while making calls. After much research over about a week, I finally managed to come up with a configuration that seems to work. There are lots of guides out there, but I didn’t quite understand them, so I’ll do what I can to explain what I’ve done here. If there are any errors or tips, feel free to let me know.

First up, I setup a DOWNLOAD traffic-policy to handle downstream bandwidth. I’m not sure that this is truly necessary as I’ve been unable to continuously max out my downstream connection and when Time Warner Cable upgrade to MAXX this November, it will become less of an issue.

I SSH’d into the box and did the following:

configure

set traffic-policy shaper DOWNLOAD bandwidth 60mbit

DOWNLOAD is an arbitrary label. 60mbit is my total downstream bandwidth.

set traffic policy shaper DOWNLOAD class 10 bandwidth 25%
set traffic policy shaper DOWNLOAD class 10 burst 2.5k
set traffic policy shaper DOWNLOAD class 10 ceiling 50%
set traffic policy shaper DOWNLOAD class 10 description RTP
set traffic policy shaper DOWNLOAD class 10 match VOIP-RTP ip dscp 46
set traffic policy shaper DOWNLOAD class 10 match VOIP-RTP-ipv6 ipv6 dscp 46
set traffic policy shaper DOWNLOAD class 10 priority 7
set traffic policy shaper DOWNLOAD class 10 queue-type fair-queue

This sets up a “rule” given this particular traffic a minimum of 25% of the total bandwidth and caps it at 50% of the total bandwidth. It matches on the VOIP RTP packet header. The docs say that the priority is 0 to 7 where 7 is the highest priority. Note that the docs say that for default, 7 is the lowest priority.

set traffic policy shaper DOWNLOAD class 20 bandwidth 5%
set traffic policy shaper DOWNLOAD class 20 burst 2.5k
set traffic policy shaper DOWNLOAD class 20 ceiling 50%
set traffic policy shaper DOWNLOAD class 20 description RTP
set traffic policy shaper DOWNLOAD class 20 match VOIP-SIP ip dscp 24
set traffic policy shaper DOWNLOAD class 20 match VOIP-SIP-ipv6 ipv6 dscp 24
set traffic policy shaper DOWNLOAD class 20 priority 7
set traffic policy shaper DOWNLOAD class 20 queue-type fair-queue

The bandwidth values are pretty arbitrary as VOIP should never use that much bandwidth on my network.

set traffic policy shaper DOWNLOAD class 30 bandwidth 10%
set traffic policy shaper DOWNLOAD class 30 burst 2.5k
set traffic policy shaper DOWNLOAD class 30 ceiling 20%
set traffic policy shaper DOWNLOAD class 30 description OOMA
set traffic policy shaper DOWNLOAD class 30 match OOMA-ADDRESS ip destination 10.0.1.102/32
set traffic policy shaper DOWNLOAD class 30 match OOMA-MAC there destination 00:00:00:00:00:00
set traffic policy shaper DOWNLOAD class 30 priority 7
set traffic policy shaper DOWNLOAD class 30 queue-type fair-queue

This rules gives my Ooma box guaranteed bandwidth; the matching is an ANY so either match will work. I really don’t need both matches, but I put it here to try things out.

set traffic policy shaper DOWNLOAD default bandwidth 65%
set traffic policy shaper DOWNLOAD default burst 15k
set traffic policy shaper DOWNLOAD default ceiling 100%
set traffic policy shaper DOWNLOAD default priority 7
set traffic policy shaper DOWNLOAD default queue-type fair-queue

This is for any traffic that doesn’t match the other rules. Note that the total bandwidth (not ceiling) should add up to 100%.

Something similar for UPLOAD:

set traffic-policy shaper UPLOAD bandwidth 6mbit
set traffic policy shaper UPLOAD class 10 bandwidth 25%
set traffic policy shaper UPLOAD class 10 burst 2.5k
set traffic policy shaper UPLOAD class 10 ceiling 50%
set traffic policy shaper UPLOAD class 10 description RTP
set traffic policy shaper UPLOAD class 10 match VOIP-RTP ip dscp 46
set traffic policy shaper UPLOAD class 10 match VOIP-RTP-ipv6 ipv6 dscp 46
set traffic policy shaper UPLOAD class 10 priority 7
set traffic policy shaper UPLOAD class 10 queue-type fair-queue
set traffic policy shaper UPLOAD class 20 bandwidth 5%
set traffic policy shaper UPLOAD class 20 burst 2.5k
set traffic policy shaper UPLOAD class 20 ceiling 50%
set traffic policy shaper UPLOAD class 20 description RTP
set traffic policy shaper UPLOAD class 20 match VOIP-SIP ip dscp 24
set traffic policy shaper UPLOAD class 20 match VOIP-SIP-ipv6 ipv6 dscp 24
set traffic policy shaper UPLOAD class 20 priority 7
set traffic policy shaper UPLOAD class 20 queue-type fair-queue
set traffic policy shaper UPLOAD class 30 bandwidth 10%
set traffic policy shaper UPLOAD class 30 burst 2.5k
set traffic policy shaper UPLOAD class 30 ceiling 20%
set traffic policy shaper UPLOAD class 30 description OOMA
set traffic policy shaper UPLOAD class 30 match OOMA-ADDRESS ip source 10.0.1.102/32
set traffic policy shaper UPLOAD class 30 match OOMA-MAC there source 00:00:00:00:00:00
set traffic policy shaper UPLOAD class 30 priority 7
set traffic policy shaper UPLOAD class 30 queue-type fair-queue
set traffic policy shaper UPLOAD default bandwidth 60%
set traffic policy shaper UPLOAD default burst 15k
set traffic policy shaper UPLOAD default ceiling 100%
set traffic policy shaper UPLOAD default priority 7
set traffic policy shaper UPLOAD default queue-type fair-queue

set interfaces ethernet eth1 redirect ifb1
set interfaces ethernet eth1 traffic-policy out DOWNLOAD
set interfaces input ifb1 traffic-policy out UPLOAD

commit
save

The last bit above tells eth1 (my LAN interface) to use the download policy (out means leaving the box). In order to get the upload to work, I’ve told the interface to redirect the traffic to the “input” interface and then applied the QoS policy.

One drawback to QoS is that with the 1.7 firmware, traffic analysis doesn’t work. Ubiquiti has said that they may add traffic analysis to QoS packets. In addition, the release notes indicate that at higher bandwidths, QoS bogs down the box and limits the bandwidth. So, when my cable modem gets upgraded, I may turn off the DOWNLOAD policy, but can still keep the UPLOAD policy which is where most of the problem lies.

After setting all of this up, I was able to run a download test and still maintain a voice call, so I succeeded in my mission. I’m sure something isn’t quite right and I’ll be tweaking this again when iOS 9 brings WiFi calling as I’m not sure that my policies will match the correct traffic.

Putting this all together, I got the following configuration:

traffic-policy {
    shaper DOWNLOAD {
        bandwidth 60mbit
        class 10 {
            bandwidth 25%
            burst 2.5k
            ceiling 50%
            description RTP
            match VOIP-RTP {
                ip {
                    dscp 46
                }
            }
            match VOIP-RTP-IPv6 {
                ipv6 {
                    dscp 46
                }
            }
            priority 7
            queue-type fair-queue
        }
        class 20 {
            bandwidth 5%
            burst 2.5k
            ceiling 50%
            description SIP
            match VOIP-SIP {
                ip {
                    dscp 24
                }
            }
            match VOIP-SIP-IPv6 {
                ipv6 {
                    dscp 24
                }
            }
            priority 7
            queue-type fair-queue
        }
        class 30 {
            bandwidth 5%
            burst 2.5k
            ceiling 10%
            description OOMA
            match OOMA-ADDRESS {
                ip {
                    destination {
                        address 10.0.1.102/32
                    }
                }
            }
            match OOMA-MAC {
                ether {
                    destination 00:00:00:00:00:00
                }
            }
            priority 7
            queue-type fair-queue
        }
        default {
            bandwidth 65%
            burst 15k
            ceiling 100%
            priority 7
            queue-type fair-queue
        }
    }
    shaper UPLOAD {
        bandwidth 6mbit
        class 10 {
            bandwidth 25%
            burst 2.5k
            ceiling 50%
            description RTP
            match VOIP-RTP {
                ip {
                    dscp 46
                }
            }
            match VOIP-RTP-IPv6 {
                ipv6 {
                    dscp 46
                }
            }
            priority 7
            queue-type fair-queue
        }
        class 20 {
            bandwidth 5%
            burst 2.5k
            ceiling 50%
            description SIP
            match VOIP-SIP {
                ip {
                    dscp 24
                }
            }
            match VOIP-SIP-IPv6 {
                ipv6 {
                    dscp 24
                }
            }
            priority 7
            queue-type fair-queue
        }
        class 30 {
            bandwidth 10%
            burst 2.5k
            ceiling 20%
            description OOMA
            match OOMA-ADDRESS {
                ip {
                    source {
                        address 10.0.1.102/32
                    }
                }
            }
            match OOMA-MAC {
                ether {
                    source 00:00:00:00:00:00
                }
            }
            priority 7
            queue-type fair-queue
        }
        default {
            bandwidth 60%
            burst 15k
            ceiling 100%
            priority 7
            queue-type fair-queue
        }
    }
}
interfaces {
    ethernet eth1 {
        address 10.0.1.1/24
        description Local
        duplex auto
        redirect ifb1
        speed auto
        traffic-policy {
            out DOWNLOAD
        }
    }
    input ifb1 {
        traffic-policy {
            out UPLOAD
        }
    }
}
A simple solution to poorly working remotes

When we remodeled our house, I ran HDMI cable from the TV through the wall to my equipment rack which is on the other side of the wall. At the time, we were using an Apple TV, so we were just using an iPhone over WiFi controlling the Apple TV. This worked well until I added a Roku 3 and a Fire TV to the mix. The Roku 3 uses a WiFi Direct remote and the Fire TV uses a Bluetooth remote.

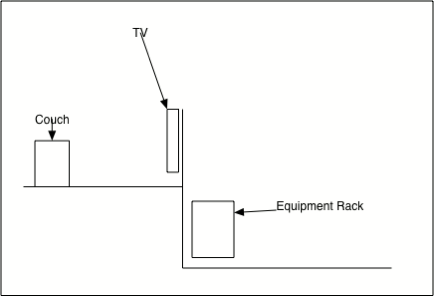
In theory, the remotes should have no problem reaching about 10 feet through one wall. In practice, the remotes have been flakey. For the longest time, I’ve been blaming batteries and the remotes. I got so fed up last week that I decided to take another look. My server rack is in the lower level of our house whereas the TV is in the middle level (it’s a split level house) and the Roku and Fire TV have both been in the rack; this puts them slightly below the floor level of the middle level. This isn’t the best picture, but it will suffice.

Rack

I put zip ties around the Fire TV and Roku TV and mounted them on the wall next to the equipment rack; I put them as high as possible given the Ethernet cable I had which situated them about a foot above the rack. Moving the boxes out of the rack and raising them up slightly seems to have done wonders to the remotes. They are now very responsive and I haven’t reset the Roku remote in a week and haven’t banged them against the couch to get them to work!

While the solution is now obvious, I was so concerned about making my equipment rack nice and neat that I chose to ignore simple troubleshooting steps dealing with RF. Some people may be asking why I don’t just stick the boxes next to the TV. For starters, I don’t want to see the boxes as they would add clutter to our TV area. Second, I have the wall warts plugged into a power strip that turns off at night to conserve energy (I plug as much as possible into this strip and it automatically shuts down at around 11 pm and turns on around 6 am).

Knock on wood that things keep working; if I have problems again, I’ll get some longer Ethernet cables and move the boxes so that they’re higher up and on the backside of the TV wall.

Following directions (or how to fix a clogged dishwasher)

Ever since I can remember, I’ve used liquid or gel dishwashing liquid in my dishwashers. For some reason I thought that the liquid would dissolve better and would wash better. When we got our new dishwasher (a Bosch) 2 years ago, I didn’t really read the instruction manual and kept using liquid detergent (I do most of the dishes in our house as my wife does the cooking). Since getting the dishwasher, we’ve periodically had it give us an error (E22) and fail to completely drain.

I read about the error online and people seemed to indicate there was a problem with how the drain hose was hooked up. Ours was hooked up to an air gap and I adjusted the hoses several times which fixed the problem temporarily. After the last time I got the error, I decided to read the manual. The manual recommended using Finish Powerball Tablets. I thought this was a bit wasteful, but it sure looked convenient. I went to Costco, bought a box of these and started using them.

Since I started using them (knock on wood), we haven’t had a problem with the dishwasher. My theory is that the gel we were using didn’t completely dissolve and clogged up part of the drain or hose enough that the dishwasher thought it was completely clogged and shut off the cycle (the error always occurred at the end of the wash).

So the lesson here is “read the instructions”!

My time with the Apple Watch

More than 3 years ago, I backed the Pebble watch on Kickstarter. My needs for the watch were quite simple; I wanted to be able to tell the time (the summer before that, the battery on my watch died twice and I got tired of replacing it), I wanted to get text message notifications on it and I wanted to be notified when the phone rang. The last 2 were important as I don’t always feel my phone vibrate when it is in my pocket. About 2.5 years ago, my Pebble arrived. Initially it didn’t do all that I wanted (from the list above), but with software updates and iOS updates, it completely met my needs.

Pebble added apps and I played with a few of them, but didn’t really use them. I’m likely an atypical user as I’m at my computer most of the day and when I’m away from my desk, I don’t spend a lot of time playing on my watch or phone (I don’t commute anywhere).

My only real complaint with the Pebble is that it got confused often and didn’t always give me notifications.

When Apple announced the Apple Watch, my main reason for wanting one was better integration with the iPhone. About a month and a half ago, mine arrived (black sport). Since then I’ve worn it everyday and have been pleased with it for my use. Like the Pebble, I use it for notifications and telling the time. In addition, the watch face I use shows upcoming appointments; that is very useful.

I’ve been quite pleased with Siri on it as I tell Siri to add things to my grocery list and set timers. I haven’t used it for Apple Pay, yet, but hope that more stores accept Apple Pay so I can use it. I don’t use it while running as I’m not sure I’d find it all that comfortable with all my sweat; also I don’t know how well I can get the sweat out of the watch.

In my use, the battery life is excellent (I charge it nightly and it usually has 60-70% battery remaining). I don’t really use the apps, but maybe with watchOS 2.0, that will change. For notifications, the watch performs well. As a watch, it is kind of mediocre; having to lift my wrist is strange and I’d like to just be able to glance at it and see the time. However, having to lift my wrist makes me check the time less often which may be a good thing.

Is the watch for everyone? Of course not. I love technology and the Apple Watch does everything I expected it to do and then some (like Siri), so I guess it was worth it. I knew what it was going to do before getting it and it performs those functions adequately. I know that there are people that hate the Apple Watch and those that love them. Will it be a mainstream product? I kind of doubt it, but that doesn’t matter to me as it does what I need.

Surge Protector on Coax – Bad idea?

It seems that most surge protectors that are a bit more expensive than the run of the mill ones have ports for coax, Ethernet and phone lines to provide surge protection for these items. I’ve always ignored the Ethernet and phone line ones as I use VOIP and it is unlikely that the VOIP box would generate a surge and same goes for Ethernet. However, when I setup my UPS almost 2 years ago, I figured that connecting the coax for the cable modem into the coax on the UPS would be a good idea in case a surge came in through the cable line, it wouldn’t blow up my cable modem.

As I’ve written about in the last few months, I’ve had some problems with my Internet cutting in and out sometimes and I basically came to the conclusion that it was the router. However, at the same time I replaced the router, I came across a post indicating that the coax surge suppressor will cause signal loss (any coax connection likely does this) and that depending on the suppressor, it might not pass all the frequencies needed for the cable modem. (From what I understand, the newer cable equipment can use higher frequencies. I don’t know enough about this to verify what I’ve read, unfortunately.)

I decided to just connect the coax directly to the cable modem (the coax into my cable modem has no splitters from the street; just a few connections would shouldn’t cause signal loss) and see what happened. Combined with my router change, my cable modem connection has been rock solid. Is all this a coincidence? Who knows, but the signal loss issue is quite possible (the cable tech said that the loss was acceptable, however) and what do I have to lose? If there is a surge through the cable line, I’ll lose the cable modem.

Food for thought if you’re having problems with your cable modem.

EdgeRouter Lite and VPN Connections

When I was going through a variety of routers before I ended up with the EdgeRouter Lite, I found that my connection to my work VPN would drop several times a day which became quite annoying. The connection was a standard Cisco IPSec VPN connection using the built in Mac VPN Client. I’ve setup VPNs before (site to site using Cisco boxes) as well as a VPN Server (OS X), so I do have some experience with VPNs. I tried to tweak settings (OS X’s VPN client is built on top of raccoon) to no avail.

After I setup the EdgeRouter Lite, I tried to connect to my VPN and found that the VPN (except for 1 day) remained connected for the entire day! This was great news and is likely due to how the router handles NAT. For people that work from home, maintaining a connection to a VPN is absolutely vital. Some router manufacturers might not care much about this as they figure that home users don’t use VPNs; this is an oversight that I’m glad the enterprise grade EdgeRouter Lite handles well.

Yet another reason that I’m pleased with the EdgeRouter Lite.

Setting up a guest network with the EdgeRouter Lite

I recently purchased a Ubiquiti Networks EdgeRouter Lite to act as the router to my home network. As this box is only a router and not a WiFi access point, I’m using my Apple Time Capsule as an access point. By doing this and not using the Time Capsule, I lost the ability to have a separate guest network that wouldn’t interact with my main network and wouldn’t have access to my internal resources. After a bit of searching, I found out that the Time Capsule (and Airport Extreme)’s guest network uses a VLAN tag of 1003. A VLAN is a virtual LAN designed to separate traffic without physically separating it. I knew that the EdgeRouter Lite was extremely powerful and could do all kinds of wacky things with a VLAN; the question was just how could I do it.

I’ve been dabbling with Linux networking for almost 20 years, so firewall, DNS, DHCP, etc. don’t scare me. It was just a matter of putting the right pieces in the right places without having to resort to the command line.

Here’s what I did:

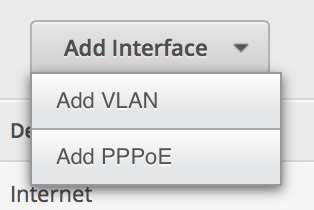
  1. From the Dashboard, click Add Interface and select VLAN.

    Screen Shot 2015 07 05 at 1 59 24 PM

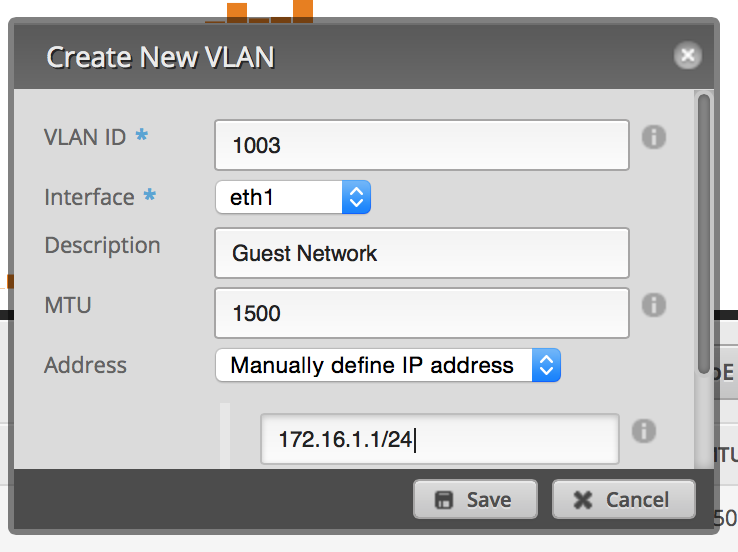
  2. Set up the VLAN as 1003 and attach it to the physical interface of your LAN. Give it an IP address in the range of a private IP block, but make sure you end it in a /24 to specify the proper subnet (I originally did /32 as I though it was supposed to be the exact IP address).

    Screen Shot 2015 07 05 at 1 59 56 PM

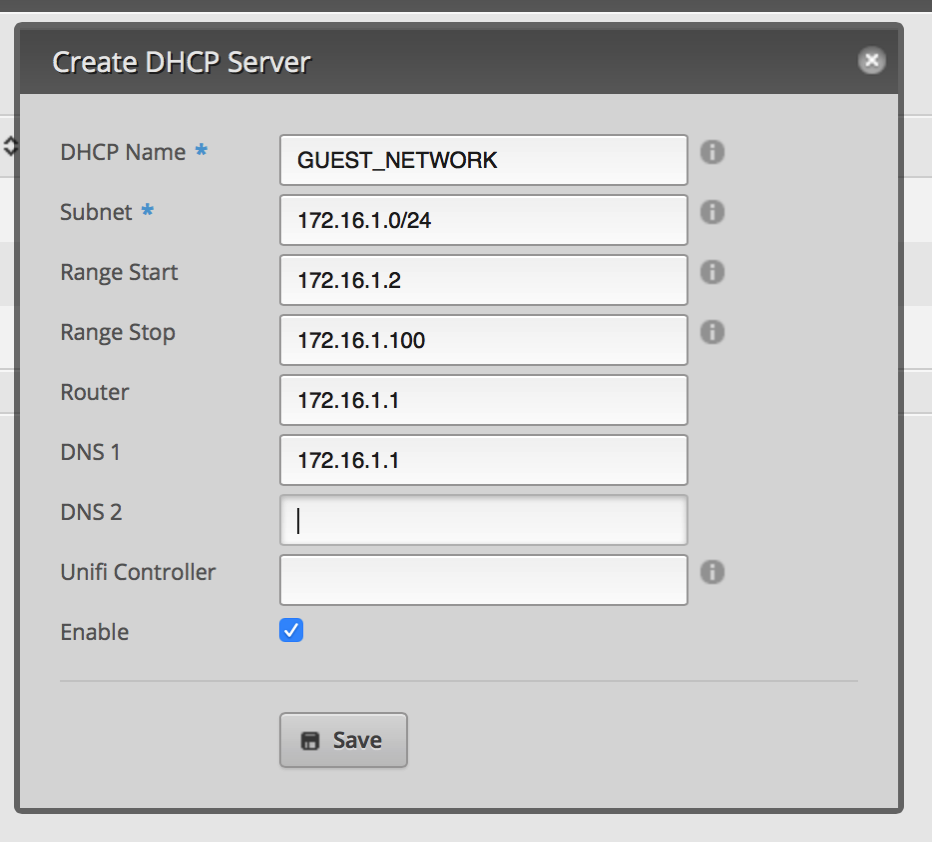
  3. Click on the Services tab. Click Add DHCP Server. Set it up similar to the image below.

    Screen Shot 2015 07 05 at 2 00 48 PM

  4. Click on the DNS tab under services. Click Add Listen interface and select the VLAN interface. Make sure you hit save.

    Screen Shot 2015 07 05 at 2 01 25 PM

At this point, you should be able to connect to your Guest Network and connect to the Internet. However, you’ll be able to access the EdgeRouter as well as other devices on your LAN. Next thing you have to do is secure the VLAN.

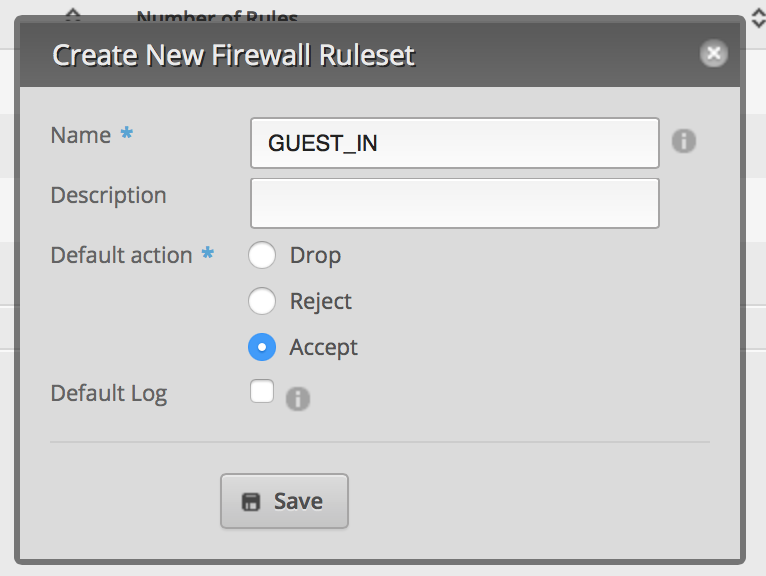
  1. Click on Firewall/NAT and then click on Add Ruleset. This is for packets coming into the router destined for somewhere else (not the router). Set up the default policy for Accept. Click Save.

    Screen Shot 2015 07 05 at 5 00 24 PM

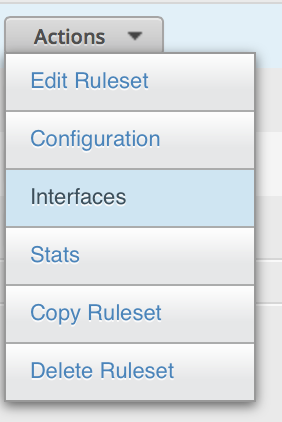
  2. From the Actions menu next to the Ruleset, click Interfaces.

    Screen Shot 2015 07 05 at 5 11 50 PM

  3. Select your VLAN interface and the in direction.

    Screen Shot 2015 07 05 at 5 12 44 PM

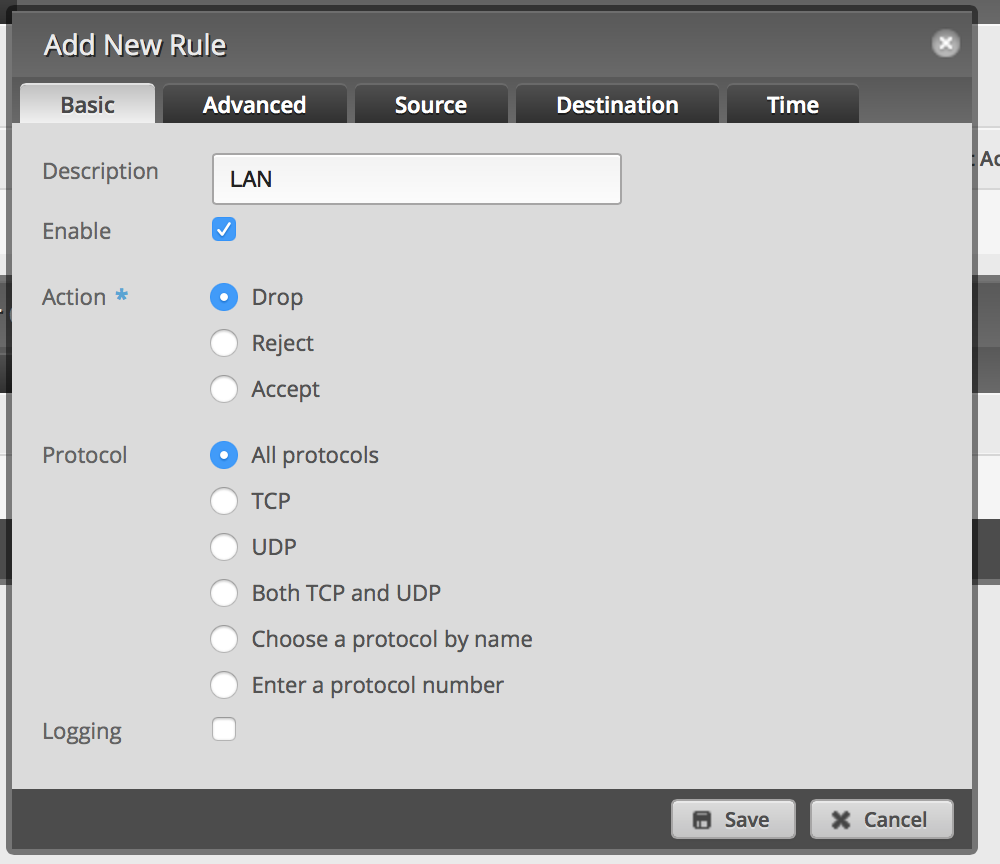
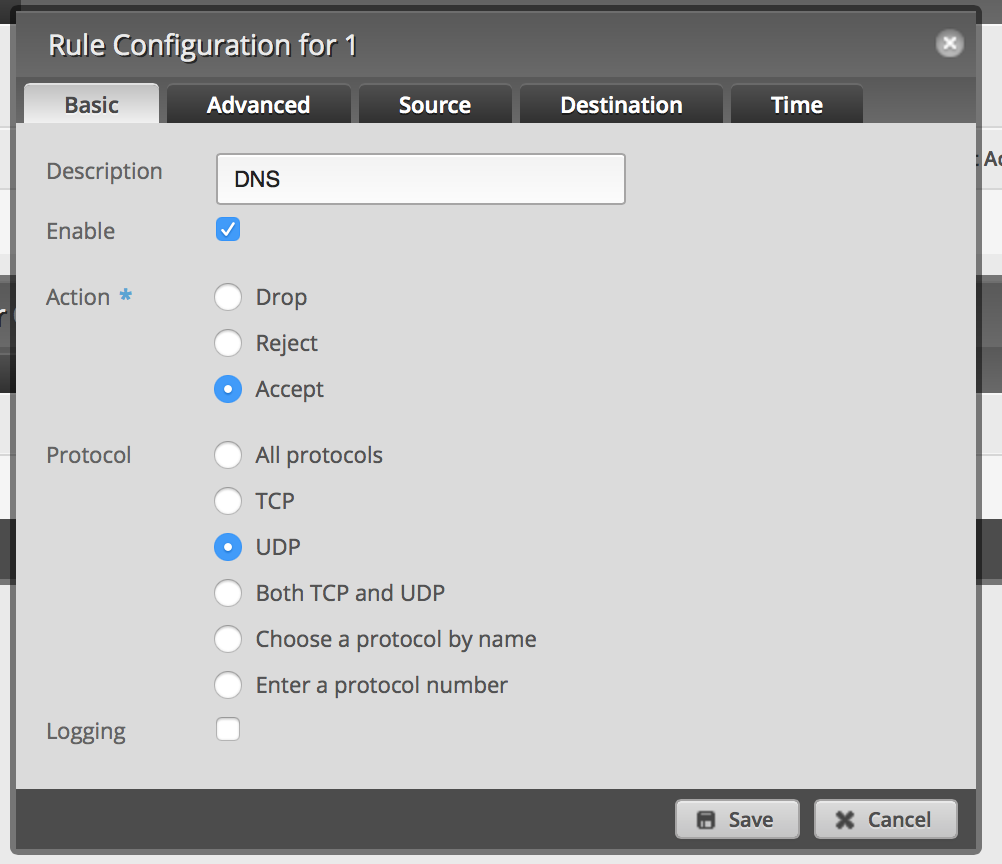
  4. Click Rules and then Add New Rule. Click on Basic and name it LAN. Select Drop as the Action.

    Screen Shot 2015 07 05 at 5 14 38 PM

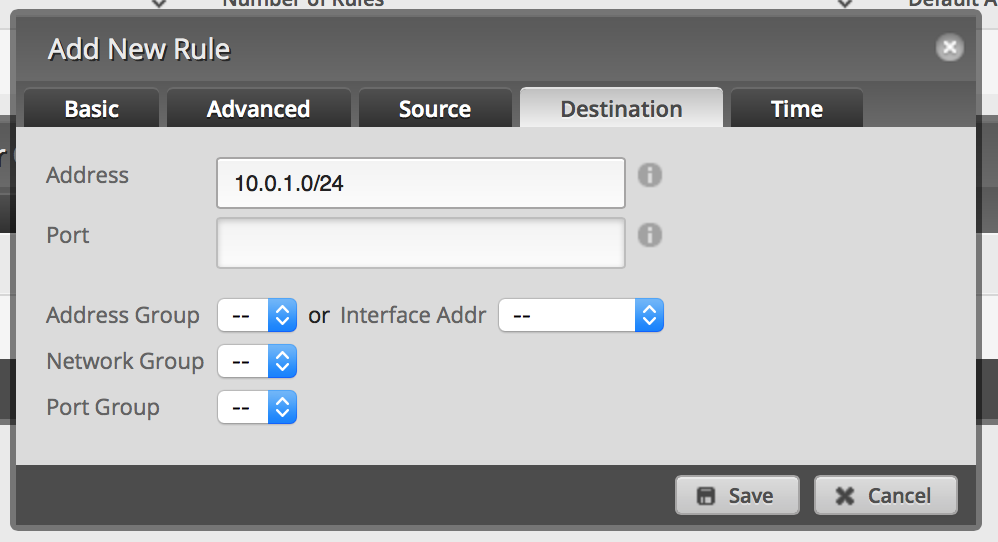
  5. Click Destination and enter 10.0.1.0/24 or whatever your LAN IP range is. Then click Save. This will drop all packets from the VLAN destined for your LAN. Save.

    Screen Shot 2015 07 05 at 5 14 52 PM

  6. Repeat 1 and 2 above (name it GUEST_LOCAL). From the Interface, select the VLAN interface and the local direction. However, set up the default policy as Drop.

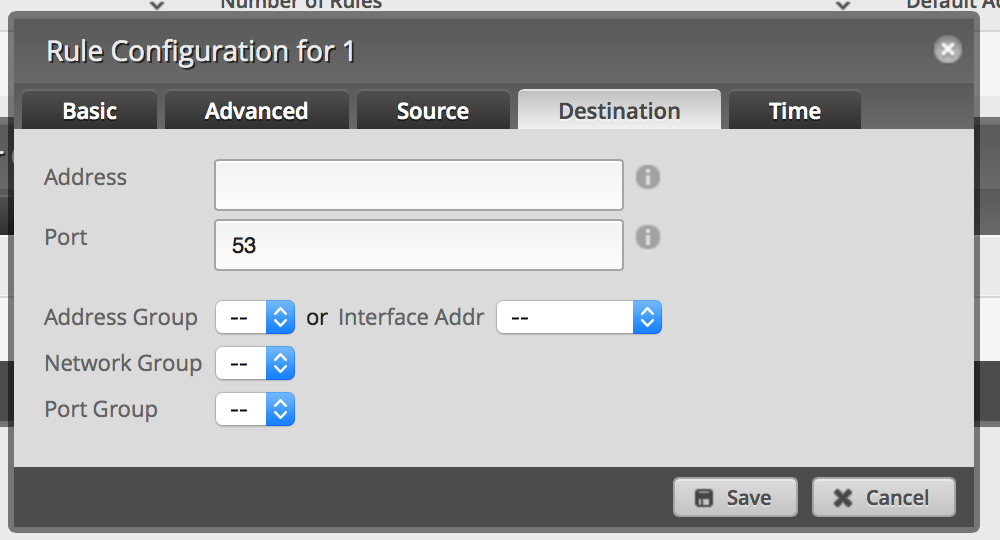
  7. Add a new rule. Set it to Accept on UDP port 53.

    Screen Shot 2015 07 05 at 5 18 22 PM
    Screen Shot 2015 07 05 at 5 18 28 PM

  8. Save.

Now you can test this by connecting to the guest network and accessing the Internet. Then try connecting to a device on your LAN or connecting to the EdgeRouter Lite. Both actions should fail.

I’ve tested this and it is working well on my network; if I’ve missed anything, please let me know!

Installing a Car Stereo

About 10 years ago, I bought a Parrot CK3100 to install in my 2003 Toyota Highlander as I wanted to be able to answer the phone while driving if my wife called me. I was unable to figure out how to install it, so I returned it. I think about a year later, I bought the car kit again and tried again.

This time, however, I was determined to install it. It turns out the tricky part of installing the car kit was the factory amplifier I had, so I decided to put in a marine speaker and put it under the center console. The install was still tricky, but I managed to get it working.

The car kit worked OK, but the audio quality was never great due to the location of the speaker as well as the type of speaker. It survived a number of phones from different manufacturers and worked decently with my iPhones. However, in the last year or so, I’ve found the connection less than stable and would fail to connect quite often. It was annoying, but I didn’t think much of it.

Last week, I had a business trip where I had to drive to Orange County (I haven’t driven for work in years). On the way up, I used Navigon for navigation; normally it routes the navigation audio through the car kit, but due to the connection issues, it didn’t work well. So I turned up the volume and it continued to navigate. However, Navigon crashed and I didn’t want to pull over to figure out where to exit. I used Siri to navigate to my destination and all was good (a bit hard to hear as the audio was coming out of the phone’s speaker, but doable). On my way home from the trip, my wife was texting me about road conditions and since my car kit wasn’t working, I had to put in a headset and used Siri to read the messages.

When I got back, I wanted to find a solution to this and started looking at new stereos (something I’ve never done in my life) and found an inexpensive Pioneer one. I’ve always heard good things about Crutchfield and their support. I ordered the unit along with all the install pieces. I spent the time waiting for the stereo to study the install instructions and they were as clear as mud. I am an engineer, so how hard could it be?

Since I had a factory amplifier, Crutchfield had a Scosche SLC-4 Line Output Converter as a recommended install accessory. Using the included wiring harness and line output converter, I wired everything up and thought it would be a piece of cake (I soldered all the connections, used shrink wrap tubing on the connections, and tightened the screws on the SLC-4.

The rest of the install was pretty easy and I was pleased with my work until I turned it on. There was static (not a hum) on the speakers and even a connection from my phone (to rule out the radio noise) didn’t help. I checked all the connections and nothing helped. I studied the diagrams again and took a chance hooking all the ground wires together; the diagrams had the ground for the amp separate from the chassis ground so I had connected the ground for the Line Output Converter to the amplifier ground. What I didn’t realize is that the amplifier needed to be grounded to the stereo. After this change, the stereo worked great!

There is a reason there are so many installers for car stereos; there are far too many combinations to have instructions for all of them. While the Crutchfield instructions were an OK start, they are definitely not for the novice. I was just lucky because I have a basic understanding of electronics as well as being determined.

I’ve learned a bit and am extremely pleased with my handy work. I’m also amazed at how inexpensive car stereos are and how much they do these days; my new stereo does everything my old one did (OK, it doesn’t have a CD changer that I never used nor a tape deck that I didn’t use either) and has all the pieces of a Bluetooth car kit.

Learning about Surround Sound

During our recent vacation, I happened to hear rear speakers on a 5.1 surround sound system and was intrigued by it. I’m not an audiophile nor do I have a home theater system. I do have a TV and a sound bar in our living room. So I decided to try out a Vizio 38 inch sound bar. Setting it up was quite easy and the wireless subwoofer/rear speakers fit perfectly in my living room. This post, however, isn’t a review on this sound bar.

After hooking everything up, I only heard stereo sound and was confused as to why I didn’t hear surround sound even though I read that Netflix (my test content) had 5.1 surround sound content. I read a bit about this and saw that there were settings in the Roku box to turn on Dolby Digital and DTS. The sound bar handles DTS and Dolby Digital, but not Dolby Digital+. I chose Dobly Digital+ and DTS only as it was close enough. Still no go; I started futzing with the TV as I had also read that my TV (a Vizio) did pass through of audio, so the Roku should pass the audio to the TV and then to the sound bar via the optical out.

My TV had PCM and Bitstream audio out. I had never heard of Bitstream, but the TV was set to PCM, so I chose Bitstream. I went back to Netflix on the Roku and magically I saw content have a 5.1 badge next to it! It was a miracle (OK, not quite). I played some content and it was pretty cool to hear the audio behind me as well as the sound through the subwoofer.

So, it appears that anyone that wants to have a home theater work properly or just have surround sound needs to learn a new language (audio encoding/encoding) as well as futz with all the settings. My guess is that there are only a small percentage of people with these systems that actually have them working properly.

(Another part of this puzzle was getting the TV shows we record to properly export them and preserve the audio encoding; EyeTV’s export mechanism to MP4 converts audio to stereo even if the over-the-air format is 5.1. I did manage to figure this out, it it isn’t for the faint of heart and required a lot of futzing.)