Review: UVC-G3-AF and UVC-NVR-2TB

[Updated 2/28: Added camera images]

As anyone that reads my blog can tell, I really like Ubiquiti networking gear. When I saw that they also had a video/NVR platform, I really wanted to try it. However, since I already had a working surveillance system, I couldn’t justify the cost to convert. Recently my father wanted a recommendation on a surveillance system and I started looking at options. There were a few complete systems at Costco, but they all received pretty mixed to poor reviews. I could point him to Nest cameras or a similar system, but each system was cloud based with a yearly fee. In addition, the cost of the cameras was a bit on the high side. With the Costco systems, I was concerned about ease of use and security of the cameras; many of the Chinese made/designed cameras have major security flaws that keep getting exposed. Securing these systems would take a lot of work and they would likely never receive firmware upgrades.

Once I added up the cost of 4 Ubiquiti UVC-G3 Cameras and a UVC-NVR, the Ubiquiti solution didn’t cost much more. The solution would have cost more, but I had a spare 8-Port UniF Switch (US-8-150W) sitting around that I gave my dad. My dad was onboard and he ordered all the components and some patch cords. We decided using 25 ft and 50 ft patch cords was easier than running structured wiring, so all we had to do was mount the cameras and string the patch cords in the attic.

I left most of the physical install to my dad and brother-in-law. Running the wires is never a straightforward task, but we got it done after a number of hours of work. We mounted the cameras so that they could be seen as I think it is a valuable deterrent.

IMG 0084

IMG 0089

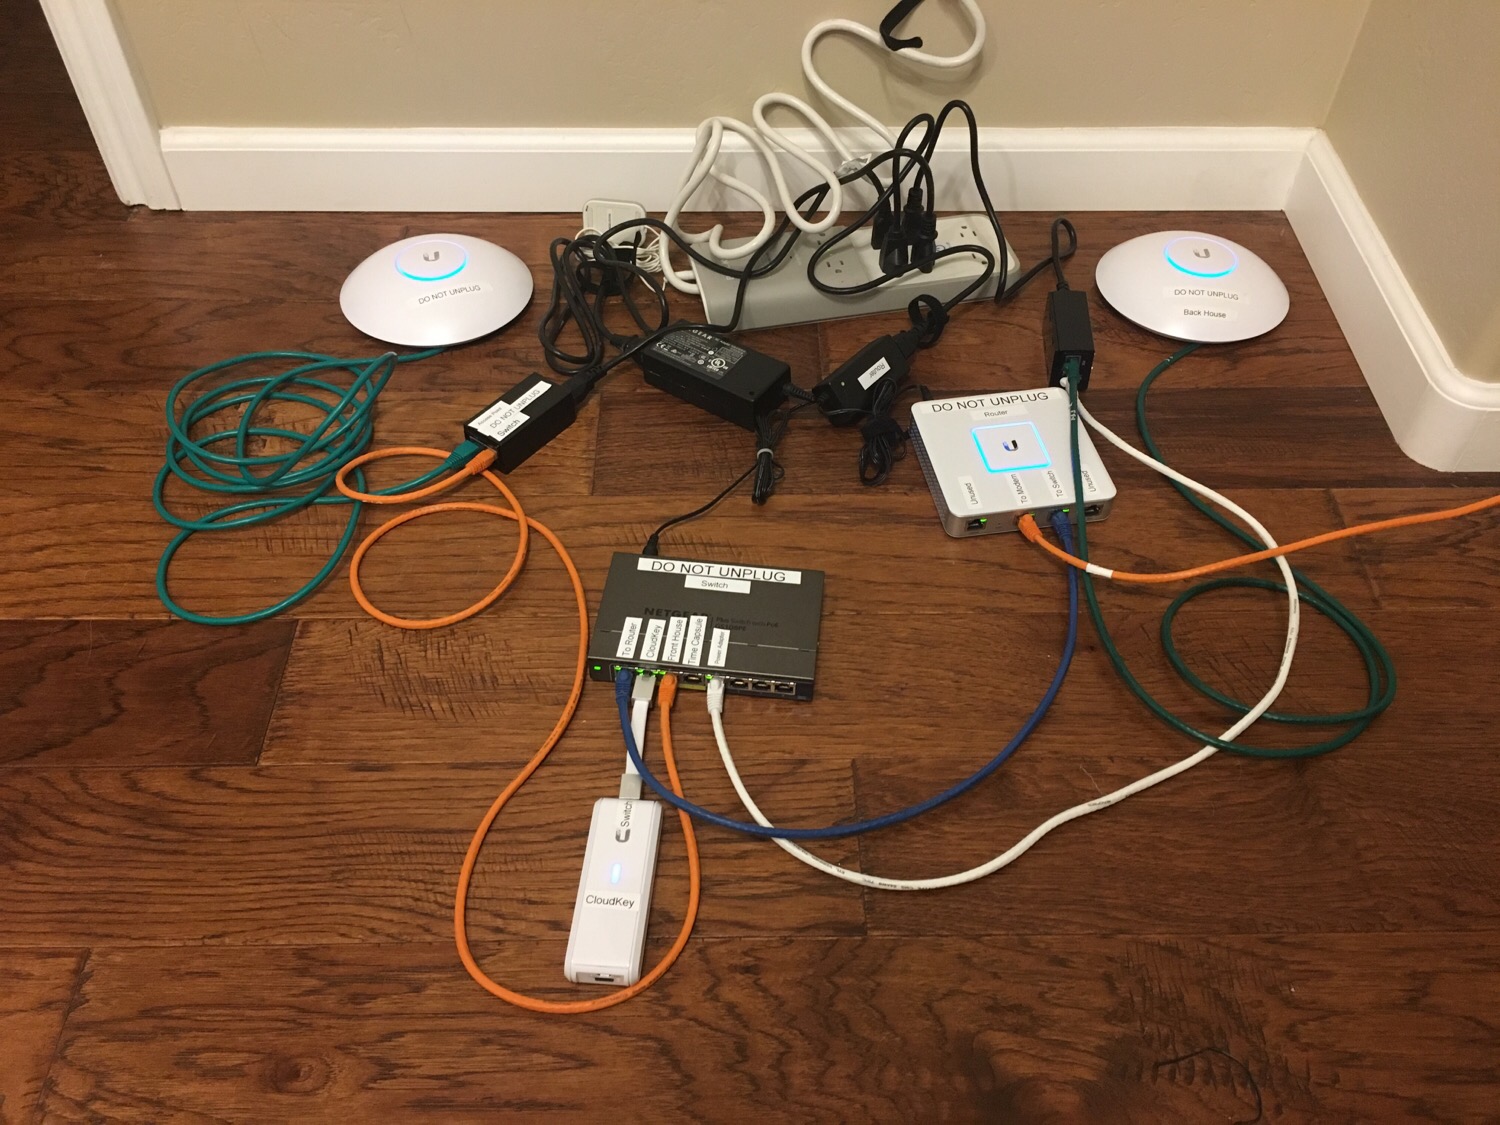
While my dad doesn’t have an equipment rack like I do, his collection of equipment keeps gettin bigger!

IMG 0086

While the physical install was in process, I started the software setup and install. The initial setup was pretty straight forward. I hard reset the UniFi switch (it had my config on it) and adopted it. Then I set the switch to do 24V passive PoE (it is a UniFi switch) so that I didn’t have to use PoE adapters. Plugging in the NVR was easy and it started up without problems.

The NVR setup wizard had me setup a Ubiquiti account for my dad and then it locally discovered the NVR (using Chrome). I probably should have read the instructions, but I didn’t and had a little trouble with this. I thought that creating the Ubiquiti account would go through a process to adopt the local NVR; it really didn’t and I had to connect the NVR to my dad’s Ubiquiti account later.

Once I was able to access the NVR, it should have been a simple process to plug in each camera and adopt it. Unfortunately I didn’t read that I had to use ubnt/ubnt as the username and password. I simply left it blank and got no where. After a few resets of the camera and a web search, I properly entered the username and password and the cameras adopted without problems.

Image

Screen Shot 2018 02 18 at 11 58 26 AM

Driveway

Front

Fullscreen

After the software setup, I installed the iOS app, connected my Ubiquiti account (for testing I added a user for me) and was able to use the app to help adjust the cameras. The app needs work, but it is usable. As WiFi coverage on the outside of the house was spotty, the image kept freezing until I realized that I should just turn off WiFi and let the image stream over cellular.

Once we completed the install, I turned over the “keys” to my dad and let him configure the recording, motion detection, etc. I only gave him a basic overview as the software is pretty self explanatory which is great.

With the install completed, I decided to use the last camera for my own system and setup the UniFi video software on an Ubuntu virtual machine. The install was pretty straightforward and I decided to store the recordings on a Shared Folder (VMWare). I had to add the following to /etc/fstab:

    ./host:/ /mnt/hgfs fuse.vmhgfs-fuse allow_other,defaults,uid=109,gid=117 0 0

Where 109 and 117 are the uid and gid respectively of the unifi-video user. I also followed the instructions for installing a custom SSL certificate. I had some problems initially setting up the software as the UniFi Discovery Tool wouldn’t locate it, but after I connected directly to it instead of using https://video.ubnt.com, I was able to get it working. Will I keep it running? I still haven’t decided.

Pros

  • Unified interface for camera management including being able to change white balance, contrast, etc. on each camera.
  • Regular updates of the camera firmware and recording software.
  • A company concerned about security.
  • Free remote viewing system.
  • iOS app.
  • Decent video quality.
  • NVR is compact.

Cons

  • Remote browser viewing seems to require/prefer Chrome.
  • If you don’t already have a PoE switch, there is an extra cost involved. The 5 pack of cameras doesn’t come with PoE injectors. The PoE injectors are unwieldy if you have more than one camera as each requires an outlet.
  • Some discussion in the forums about quality of the iOS software.
  • Timeline won’t show multiple recordings at once.
  • Timeline feature needs some work.

Now that I have my dad’s whole system setup, I have to decide if it is worth replacing my 7 cameras with the UVC-G3 cameras. Since I already have a switch to power them and I’d run the software on a virtual machine, my cost is under $900. That’s a lot of money to spend when I have something that already works. I would get a better interface, easier remote viewing (right now I VPN into my home network to view the cameras), better video quality (my cameras are 720p), less concern over security issues in the cameras as Ubiquiti regularly updates the firmware and the recording software, and unified management of all the cameras (if I want to change the brightness or contrast on a camera, I have to connect directly to that camera and change the setting). However, the software I use now has a better timeline feature.

I’ll probably wait until something breaks before doing something; my system has been running (different hardware and software versions, but same cameras) for almost 5 years without a hiccup.

If you’re shopping for an NVR/camera setup, the Ubiquiti offering is interesting, but I think it needs a little work around the timeline feature and the iOS app before I can completely recommend it. While I don’t have much experience with other systems, this system takes a little technical know how as the switch has to be configured and the cameras adopted. For an installer to install this, I think it would be fine; for the average consumer I’d look elsewhere at least for now.

A year with my Impreza

It’s hard to believe that I bought my Subaru Impreza a year ago! My initial impressions of the car were pretty good. Now that I’ve put about 10,000 miles on it, I am convinced that I made the right choice with the car. We’ve taken it on a few road trips pushing, but mostly I’ve driven it around town.

I’ve never owned a “sports car” and this may be the closest I come to one. This car is truly fun to drive. I’ve been playing a lot with the paddle shifters especially going down mountains. Also, being closer to the ground, I definitely feel the acceleration.

Tech wise, CarPlay is now a requirement for every car I get. The interface is clean and Apple updates it periodically with new features, something car manufacturers are not known to do with the infotainment systems. Up-to-date maps and navigation alerts such as alternate routes and accidents are handy. My only problem with CarPlay is that I have to wait for the infotainment system to fully power up before I plug in my phone, otherwise CarPlay fails to start. However, I’m testing a theory that the Subaru STARLINK app crashes when I connect my phone to the car. The app is useless and I’m not sure why I left it on my phone until this week.

I was concerned about the smaller cargo capacity especially going on trips and camping, but those concerns have so far been unfounded. I’ve managed to cram everything in the car without having to use the roof box I bought. The gas mileage has been pretty good with some trips giving me close to 38 mpg. Unfortunately most of my driving is city driving and a hybrid would have done much better in those circumstances. If Subaru had a hybrid Impreza, I’d definitely be interested in that.

The car has had a few recalls which is expected on a new platform and I hope I get years of continued service out of it.

Overall this car was a very good purchase. It may not be for everyone; it is the right car for me!

Review: Running Buddy smartphone pouch

For many years, I’ve been using a Wahoo Fitness Sportband to hold my iPhone when I run. I’ve replaced it a few times and try my best to keep it in good shape. It appears that rinsing it after I run and adjusting the strap caused my last one to wear out prematurely. I can’t say that I’ve been disappointed with it, but when I heard a recommendation for the Running Buddy on MacBreak Weekly, I figured I’d give it a try.

The Running Buddy is a pouch that clips to my shorts using very powerful magnets. The pouch holds my iPhone 6s pretty snuggly the magnets ensure that it won’t move. When I first put my phone in the pouch and started running, I had my doubts about it as I thought my phone would fall. It was a weird feeling having the pouch on my waist. After a few miles of running, I forgot that I was still wearing it. One thing to note about the pouch is that if your shorts aren’t tight, then the pouch with your phone will pull down your shorts!

I’ve been running with the pouch for a few weeks and I can’t quite say if having the phone on my arm or on my waist is better. The pouch is slightly more comfortable as I don’t have pressure on my arm, but the pouch rubs against my stomach. The armband’s neoprene got quite disgusting because of the sweat. The different material of the pouch seems like it would repel sweat better.

I’m going to keep using the pouch as I’m starting to get used to how it feels.

Pros

  • Convenient way to hold iPhone while running.
  • No unsightly tan lines on my arm.
  • No pressure on my arm.
  • Material is easy to wipe off and doesn’t appear to retain sweat.

Cons

  • Feels kind of weird on my waist.
  • At first it feels like it is going to fall off.
  • Can’t glance at information on screen.
  • Unknown longevity as the part that comes in contact with my waist and shorts gets covered in sweat.
  • Material rubs against my abdomen and could cause irritation.

Summary

This case is an interesting solution to holding my phone. For people walking, I can definitely recommend it if you don’t have pockets or the pockets aren’t convenient. For runners, I think it takes getting used to and if you don’t like armbands, it is definitely worth a try.

Review: Western Digital MyBook Duo

Last year I was looking at options for adding storage to my Mac Pro that I use as a media center, Jenkins server, DVR, and security camera monitoring. The Mac Pro has a 1 TB SSD but storage is eaten up very quickly with everything running on it. I wanted at least 8 TB of usable storage and while I could use a RAID, I was more interested in configuring drives as JBOD (just a bunch of disks).

I decided to get the WD 8TB My Book Duo as the price was reasonable at the time and I could configure it as JBOD. I would have preferred Thunderbolt 2 but for the price I went with USB 3. When I got the drives I configured it as JBOD and then partitioned the drives. I was curious to know if I could take the drives out of the case (Western Digital makes it easy to do) and just connect them individually to my computer without the Western Digital case. Turns out you can’t. The case does some magic to manage the drives. I was disappointed in this as it now became a potential point of failure where I couldn’t just take the drives out if the case failed.

The setup worked fine for about a year and then I started noticing that sometimes I’d see error messages on my Mac Pro about the volumes unmounting. I tried plugging the case into a different USB port, but still saw these issues at times. Things started getting worse and I decided to see if the actual drives or the case was failing. I took the drives out of the case and put them in a Thunderbolt dual bay drive dock. This, of course, caused me to lose all my data because I didn’t have the special WD magic sauce on the dock. It appeared that one drive was fine and the other drive was on its way out. I used the one drive and a second 2 TB drive in the dock for a few weeks and didn’t have any of the problems I saw before.

In order to get warranty service on the Duo, I had to send it all back. Since I didn’t know the state of the data on the drives I wanted to do a secure erase on the drives. I individually did a secure erase on the drives which worked fine negating my previous analysis that one of the drives was bad. I put the drives back in the case, reconfigured them then did a drive check using the WD utilities. The drive check failed which indicated to me that the case and not the drives were bad as I had just done a full secure erase which writes zeros to the drive.

The drives and case are now on their way back to Western Digital for warranty repair/replacement. While I don’t know if I had bad luck with this, I’ve moved on to a different case which doesn’t add magic sauce to the drives. Definitely a much more expensive solution than the MyBook Duo, but I trust it a lot more than I do the WD case.

Pros

  • Reasonable price.
  • Easy to setup.
  • 3 year warranty.

Cons

  • Crappy WD software to configure.
  • JBOD configuration doesn’t let you remove a drive and use it in another mechanism.
  • Failed after 1.5 years.

Summary

If you’re looking to add storage to a machine, I’d steer away from this case. In addition, Toshiba drives have been rated better for long term quality and in this case where the drives are running 24/7, spending some extra money on better drives will give me a little peace of mind. If the case simply allowed the drives to show up separately and not add the WD magic, I might have just chalked this up to a drive failure and given it a second chance. However, since all my data is locked into this case, I can’t recommend it. Once my case and drives come back from warranty service, I’m not sure what I should do with it. Any ideas?

Review: BottlePro 2 – Adjustable and Extendable Car Cup Holder Adapter

Earlier this year I was given a Hydro Flask as a gift for being a Den Leader in my son’s Cub Scout Pack. Why did I need another water bottle? After ignoring it for awhile I decided to see what made it so special. I filled it up with ice and water. It held water and ice, no big deal. The next day I hadn’t finished the water and found the water to still be very cold. Since I like drinking cold water, this was the reason to use the water bottle. My only problem was that it didn’t fit in my cup holder in my car due to its large size.

After a few months of putting the water bottle on the floor in the back seat and having it roll around where I couldn’t use it, I decided to look for a solution. A quick search on Amazon came up with a number of options. The option I chose was the BottlePro 2 – Adjustable and Extendable Car Cup Holder Adapter. This bottle holder was designed to adjust to different cup holders by twisting the bottom and came with something that resembles a can coozie to make the fit a bit tighter.

I’ve been using this for a few months now and have absolutely no complaints about it. It does what it says and appears to be well made.

Pros

  • Adjusts to fit different cup holders.
  • With coozie on, it doesn’t rattle around.
  • Easy to get bottle in and out.

Cons

  • It sits very high because the entire bottle is basically sitting on top of the cup holder and not in it. (Not a flaw in the product, just how it works.)
  • Price is a bit high.

Summary

If you have a large bottle and want to have easy access to water in your car, this product is a winner. I would also recommend getting the Hydro Flask Hydro Flip Lid so that you don’t have to keep unscrewing the lid.

IMG 5710

Review: ZTE Mobley

Several years ago, I worked for a company that sold Sprint service. As part of my job, a “perk” was a company issued phone and then when the MiFi mobile hotspot was released, I got one of them for experimentation and use. (I use perk lightly because having a company issued phone or device is more of a tether keeping you connected all the time.) When I left the company in 2010, my boss said that I could use the company discount to purchase a device and plan; I purchased a MiFi and had a $45/month plan for 5 GB of data. After about a year, I realized that I wasn’t using the device much and cancelled the plan.

For the most part, I haven’t had a need or desire for a mobile hotspot and my iPhone’s mobile hotspot has worked fine when I needed it. Over the last year or so, I’ve heard advertisement after advertisement about “built in 4G/LTE” in cars which seemed like a way just to keep the kids in the back quiet and I ignored the ads. Earlier this year, I saw that AT&T was dropping the price of their “Connected Car” plans to $20/month for unlimited data (22 GB, in reality and then de-prioritization). Now things were starting to get interesting in pricing.

AT&T offered this plan on cars that had built in cellular, as well as with the ZTE Mobley which plugs into a car’s OBD-II port. The only problem with this, for me, is that I have an Automatic plugged into the port and only being able to use the device in the car had limited utility. Luckily, I read on forums that people were buying adapters to plug it into USB or AC. Since the cables looked like someone hand made them, I decided to make my own so that I could choose the parts. I picked up an OBDII Connector Cable Pigtail and a 5v to Dc 12v USB Converter (I picked this one because any heat generated from the electronics wouldn’t be right at the end of the cable). I soldered the pieces together and had a USB to OBD-II power cable.

I purchased the Mobley outright ($99) with no activation fee. When it arrived, I plugged it into my cable and into USB and it powered right up without problems. My first few uses of it were when I went to the car dealer and had to wait around; I plugged it into a USB battery (at peak power consumption, it uses something like 700 mW). It performed quite well and I got acceptable speeds without having to worry about jumping on an unknown WiFi network and dealing with my VPN.

The next test was when we drove about an hour to go camping; my wife was in the passenger seat and my son was in the back seat. My son had an iPad and was entertained for the trip. My wife started out the drive just saying that she would use her phone, but about 10 minutes down the road, she asked my son to hand up her iPad. From that point on, I think the hotspot gained a permanent place in our longer car rides! This past week we went on a driving vacation and covered about 1500 miles. The hotspot powered up when the car started (it was plugged into one of the USB ports; my car has 2 USB ports, but I bought a 2 port cigarette lighter to USB adapter, so I had a total of 4 ports) and was available wherever we had AT&T coverage which turned out to be maybe 75% of the total time in the car.

In one of the hotels we were staying, I was able to get over 20 Mbps down which to me is amazing considering my first cable modem was 5 Mbps down and the first cellular data links I worked with at QUALCOMM were 9.6 Kbps.

Screen Shot 2017 07 19 at 8 49 03 PM

While $20/month seems like an unnecessary expense for times that I won’t use it, I can justify the expense.

Pros

  • Easy to use (just plug it in and connect to WiFi).
  • Coverage wherever AT&T has coverage.
  • Hard to use up 22 GB a month in normal usage (we used about 17 GB on our last trip and that was using it in the car and hotel).
  • Device is reasonably priced ($99).
  • Monthly fee is reasonable ($20/month).
  • Automatically turns on when power is applied.

Cons

  • Have to buy or make a cable to use outside of the car.
  • Limited to 5 devices at a time. This seems like a lot of devices, but we had a total of 6 and some devices always stay connected to WiFi causing me to have to block/unblock a device).
  • Doesn’t support carrier aggregation which would support higher data rates.

Summary

As much as I didn’t want to think that a mobile hotspot would fit into my usage, it has proven to be an excellent device. I’m sure that my review (except for the auto power on) would be the same with any mobile hotspot, but the price of the device and the price of this plan make the ZTE Mobley a keeper. Even though you can turn your phone into a hotspot, it doesn’t stay on all the time and uses data from your plan. By having a separate device, you don’t have to worry about going over your usage and being throttled and don’t have to worry about turning on the hotspot.

I would be interested in trying out the other mobile hotspots that AT&T has to offer as they would look neater than my soldered set of cables and be more compact, but I have to check the terms and conditions to see if there is a problem moving my SIM to a different device and keeping the same plan.

Review: Apple AirPods

When Apple announced the AirPods last fall, I wasn’t impressed as I already had Bluetooth earbuds that I used for running that worked quite well. It took me a few weeks to realize the advantages of them over other ear buds such as no on/off switch, take one out to pause, pairing across all devices, easy charging, convenient carrying case, etc. After that, I was convinced that they were the sleeper hit of the event.

Once the AirPods became available to order, I immediately placed my order; the price didn’t phase me. When I received them a few weeks later (I didn’t get in on the first batch), my excitement quickly turned to disappointment. They appeared to be plagued with problems such as dropping constantly on phone calls and popping while listening to music on my walks. I found forums posts where people had similar issues and I went ahead with Apple’s online support so that they could get it on record that there was a problem with my combination of devices and AirPods (iPhone 6s, first generation Apple Watch). None of their suggestions worked, but I didn’t really expect them to as I had tried what others suggested in the forums.

Several weeks later, I received a call from Apple wanting to see if I had time to follow up with a support person collecting information for engineering. Sure, I said as my AirPods were basically useless at that point. I spoke with an Apple person for well over an hour during which the AirPods dropped and switched to the iPhone’s speaker many, many times (once every few minutes). I didn’t hear back from Apple, but saw some forum reports indicating that the beta iOS versions fixed the problems (I don’t normally install beta iOS versions on my device). When iOS 10.3 came out, I immediately installed it (I backed up first because the APFS update kind of scared me). I was more than pleasantly surprised about my AirPods; they now worked exactly as Apple had described. Over 2 months after I bought them, they had become completely usable!

Now that I had working earbuds, what impressed me with the AirPods? First off, charging is easy and convenient. Next, the charging case makes it easy to carry them. There is no on/off switch and taking the AirPods out of my ears pauses the music. They are so convenient that I find myself listening to music more when I walk the dog.

Pros

  • Convenient charging/storage case.
  • Fits well in my ears.
  • Easy to pair with all my devices.
  • Acceptable sound quality (I’m not an audiophile so it works for me).
  • Taking the AirPods out of the case immediately turns them on.
  • Removing one AirPod pauses the music.

Cons

  • Initial issues delayed my full use of the AirPods.
  • There are cheaper ear buds on the market.
  • Easy to drop or lose.
  • Batteries won’t last all day.

Summary

I’ve tried a number of Bluetooth ear buds and headsets over the years and besides my Plantronics BackBeat Fit that I use for running, I haven’t managed to keep using any one for all that long. I’m cautiously optimistic that the AirPods are going to be my ear buds of choice for the foreseeable future. While they are not the cheapest ear buds out there, I think that all the pros outweigh the cost.

Review: Ubiquiti UniFi Security Gateway

Sometime after I reviewed the Ubiquiti EdgeRouter Lite, Ubiquiti contacted me and offered me a few products to test and review. One of the products they sent me was the UniFi Security Gateway. At the time, I set the box aside as it didn’t have all the features of the EdgeRouter Lite. In January when my father was having trouble with his Internet, I put the USG into service. For that application, it was ideal as it integrated with the rest of the components and was simple to manage.

After the success of that install, I was kind of jealous and decided to purchase a USG and see what it would take to replace my EdgeRouter Lite; the UniFi team has done a lot of work on the controller (the GUI to manage the device) since I was originally sent the device. Replacing a router should not be rocket science. Unfortunately for me, my network is a little bit customized. Going from the EdgeRouter Lite, I had to move over the following:

  • Dynamic DNS (for my external IP address)
  • IPv6
  • VLANs
  • Firewall rules for the VLANs
  • OpenVPN server
  • Static DHCP entries
  • Static DNS host entries

Some of this is available in the controller, some of it isn’t.

The first step was to adopt the USG into my controller. I followed the instructions on how to integrate the USG into an existing network. Unfortunately, I was unable to adopt (meaning the controller can manage the device) the USG. I tried a few times with no success. Next I looked at an article that allows me to configure the USG to find the controller (instead of the controller finding it). I followed the SSH instructions and issued the commands:

    mca-cli
    set-inform http://ip-of-controller:8080/inform

This worked and I started getting somewhere. (After reading some more posts on Ubiquiti’s extremely helpful forum, it appears that an old firmware may have had issues adopting and that upgrading the firmware before adopting may have helped.)

After the USG was adopted into the controller, I plugged in the WAN connection, rebooted the cable modem (so that it would pick up the new MAC address) and was able to connect to the Internet. If I had a simple network, I’d be done, but nothing is ever easy for me.

Next up was setting static DHCP entries. While the current controller doesn’t let you assign DHCP entries until after a device has been seen, all my devices were online and showed up in the controller (I have UniFi switches which makes the controller populate with all devices it sees) using the addresses I had assigned from the EdgeRouter Lite. It was a simple matter of selecting each device, clicking the “Use fixed IP address” checkbox and clicking Apply. (Note there is a bug in the UI where the checkbox doesn’t stay checked even after applying.)

Screen Shot 2017 03 06 at 11 08 48 AM

Perfect, so now that was out of the way (tedious, but reasonable), I could move on or so I thought. The controller lets me assign static IP addresses for clients; switches and access points are not considered clients. I needed static IP addresses for the switches and access points so that I could use SNMP monitoring on them; the package I’m using, Observium uses host names to address the devices; in order to use host names, I had to first give devices static IP addresses. This is where the messiness begins. Ubiquiti has an article on how to customize the USG and have the changes persist across reboots. (The EdgeRouter Lite just lets you configure it using the command line and the changes persist.)

You start the process by doing something like this:

    configure
    set service dhcp-server shared-network-name LAN_10.0.1.0-24 subnet 10.0.1.0/24 static-mapping UniFi-LR ip-address 10.0.1.131
    commit
    save
    exit

and then

    mca-ctrl -t dump-cfg

At this point, you have to pick through what was dumped and only choose what you entered manually as the json file you create gets merged in with what is produced from the controller. This isn’t necessary if you have a standard config and the controller has all the options you need.

I then repeated this process for IPv6, static DNS entries and my OpenVPN server configuration.

There is a GUI for configuring the firewall and I setup rules that prevent IoT devices from talking to my LAN, my cameras from talking to anything except 1 device, and a few other rules. This was straightforward, but a little different than on the EdgeRouter Lite.

Screen Shot 2017 03 09 at 2 13 16 PM

Now that I had the USG setup like my EdgeRouter Lite, what did I get? The hardware is virtually identical, so I didn’t gain performance. The main thing I gained was being able to look at my entire network in 1 place. In addition, I get the ability to remotely manage/monitor my network through the UniFi cloud. Did I mention the pretty picture with the circles?

Screen Shot 2017 03 06 at 10 59 55 AM

People are going to ask, why go with a USG over an EdgeRouter Lite. Here’s my rundown:

USG

  • Easily integrates with other UniFi equipment.
  • Simplified configuration.
  • Remote access via UniFi mobile app.
  • Firewall configuration is slightly easier than on ERL, I think.

EdgeRouter Lite

  • UI has some more advanced configurations like being able to change any option using the configuration tree.
  • Firewall configuration in UI allows you to apply rules directly to VLANs.
  • Configuration via command line is a one step process; make change and save it vs USG which has multiple steps.
  • Core operating system is newer than USG.
  • Static DHCP reservations can be made prior to a device being on the network.

Conclusion

Pros

  • Easy setup for simple networks.
  • Full view of entire network in one spot.
  • Remote access to router from UniFi mobile app (using the UniFi cloud).
  • Easy configuration of firewall entries.

Cons

  • No IPv6 DPI (deep packet inspection).
  • DPI works across all interfaces and may not give you an accurate representation of WAN traffic (which is what interests me).
  • Not all configuration options are available via the GUI.
  • Initial setup into a non-trivial existing network is painful.
  • WAN speed test is only useful for up to 150 – 200 Mbps (according to a forum post; I have 300 Mbps down and can only get about 130 Mbps shown).
  • JSON configuration for command line options is a bit awkward as you have to use the command line first, export the options and then pair down the result to put in the JSON config so that settings persist.

Summary

As I’ve written about in the past, the UniFi line of networking products is easy to use and everything works well together. The USG fits in well and despite my rough start with it, I’m pleased with it. While there wasn’t a huge leap from the EdgeRouter Lite to the USG, being able to see my entire network configuration in one place makes it easier for me to manage. In the future, I plan on adding more firewall rules and possibly more VLANs to separate out more IoT traffic (a day doesn’t go by where you don’t here about some IoT device doing something shady).

If you already own an EdgeRouter Lite, moving to a USG is a tough decision. You gain no new functionality or performance, but an interface that works with other UniFi hardware. If you don’t already own an EdgeRouter Lite and either plan on getting UniFi access points or switches, I think it is a no brainer to get a USG. If you aren’t using other UniFi gear, a USG itself won’t buy you a whole lot. With the USG, I’m able to define VLANs once and have it apply to the WiFi access points and the switch ports; with the EdgeRouter Lite, I had to define VLANs in both places for proper routing.

UniFi employees are quite active on their forums and have posted their roadmap. I really like some of the features and their openness is refreshing. The features won’t really change how I use the device, but will help reduce the number of command line changes I have to make.

Curing home Internet problems with UniFi gear

For as many years as I can remember, I’ve been the goto person for my family when they have tech problems. Anyone that is in this situation knows that this gets old pretty fast! At the beginning of January, my father started having problems with his Internet connection where he said it kept going out. I told him to call the cable company and get them to come out. He wasn’t quite convinced that it was the cable company, so he spent about a week testing out his router/access point (Apple TimeCapsule) and my sister’s router (similar device). (My dad and sister live in separate houses on the same property.)

After no real change in the stability of the connection, my dad started the game of contacting his provider. He also told me that he wanted the same router and access points that I have. Initially I said absolutely not as I didn’t want to have to walk him through configuring the UniFi devices. While the UniFi controller is pretty easy to use, it isn’t aimed at consumers. I thought about this for a day and told my dad that I’d set him up with a new router and access points on the condition that I managed all of it remotely. Once the UniFi gear is setup, there is very little management needed.

I purchased 2 UniFi UAP AC LR Access Points, a UniFi CloudKey, and a UniFi USG. I had an old Netgear PoE switch that I threw into the mix.

Setup of the pieces was pretty easy. I put all the pieces on my floor, connected them, and then hooked my MacBook Pro up to the USG to create a separate network. In addition to configuring the devices, I labeled everything and put “DO NOT UNPLUG” on the devices as power cycling seems to be a popular way to “troubleshoot” Internet connections. As I hadn’t used the CloudKey before, I was slightly confused that I had to goto the web interface of the CloudKey as well as the web interface for the USG for initial setup. I don’t remember the exact steps, but it only took a few minutes to get things running.

UniFi Setup

I setup the UniFi Controller on the CloudKey to use my UniFi login so that I could remotely manage it.

My dad and I installed the USG, switch and 1 access point next to the cable modem which took a little while to make everything look neat. The USG and the switch have those dumb slots for screws that I can never get right on the first or second try. The access point, however, has a removable base that made it a snap to install in the closet where all the equipment lives.

Once I powered everything on, it just worked as I setup the wireless networks with the same SSIDs and passwords that were already used. The only slight problem was that I had to turn off WiFi on the Time Capsules as devices were connecting to the wrong access point.

The UniFi iOS app has come a long way since Ubiquiti started it. The app now has everything I need to remotely monitor and manage the network. Ubiquiti uses a protocol for remote management that works in Chrome (on the desktop), but currently not Safari, so using the iOS app is the only way to look at the remote setup from my iPad.

UniFi iPad App

While my dad’s Internet connection has been up and down over the last 12 days, the USG and access points have been rock solid. The cable modem has been rebooted a number of times, but none of the UniFi gear has been touched.

This type of setup isn’t cheap, but it seems to be on par with some of the newer mesh systems.

Pros

  • USG, CloudKey, and UAP AC LR are easy to setup for networking savvy people.
  • Mobile app can handle most of the monitoring and configuration.
  • UniFi Controller with the USG shows traffic statistics in pretty pictures!
  • Remote access works well.
  • Very stable.
  • Access points provide good coverage.

Cons

  • UAP AC LR uses passive 24V PoE. The PoE switch I installed is 802.3af which means that I had to use a power injector to power the access point (I could have bought an adapter from Ubiquiti to conver the 24V to 802.3af).
  • Average consumer cannot easily setup the equipment.
  • USG is missing some features such as GUI configuration for IPv6, static DNS entries, DHCP reservations (before device is seen on network).
  • Default guest network configuration uses client isolation such that guests can’t connect to other devices on the network, but the guests can scan for other devices. I changed the configuration to use a separate VLAN and give out IP addresses in a separate range for guests. I think that this may be a better setup for an out of the box configuration when the wizard asks if you want a guest network.
  • When I inserted the micro SD card into the CloudKey, it got stuck. I basically had to destroy the card to get it out. I’m not sure if this was a design issue or a manufacturing issue, but I put a new micro SD card in there and everything works fine.

Summary

While I was hesitant to set my dad up with the same networking equipment I have. I now believe that this will be the best long term strategy to supporting him. If he or my sister blame the router and access points for Internet problems, I can show them that it isn’t. Being able to remotely monitor and configure the devices (including performing upgrades) is a great benefit to anyone having to deal with someone’s Internet issues.

I hadn’t played much with the USG prior to this install as I use the EdgeRouter Lite. However, based on this and the periodic updates to the firmware and controller, I’m definitely going to be switching over to the USG in the near future (there are a few items on Ubiquiti’s roadmap that I want).

With Apple exiting the router market, people are looking for alternate solutions. If you are savvy with networking, I think the USG, UniFi Access Points, and CloudKey (unless you have an always on machine to run the controller) are a great combination. For a home setup, it may seem like a lot of money, but how much is my time worth?

Note: The USG was sent to me by Ubiquiti as a review unit. It has been sitting on my shelf for a year now simply because the controller software wasn’t exactly what I wanted at the time. The controller software has come a long way and if I had to choose between the Edge Router Lite and the USG, the USG would now be my choice.

First Impressions: 2017 Subaru Impreza

For the last year and half, I’ve been looking for a new car. My 2003 Toyota Highlander has been starting to show its age. It has low mileage, but I’ve had to do some maintenance on it. In addition, the only tech I have on it is a radio I installed about 2 years ago with Bluetooth. One of the features I’ve really wanted is Apple’s CarPlay as it would allow me to have a familiar interface in the car for navigation, media, and phone. While the number of cars with CarPlay available has been increasing, most haven’t been cars that I’d want to own.

In July, I happened to look at Apple’s CarPlay site and saw that the 2017 Subaru Impreza would have CarPlay. I looked online at the car and it looked like it could fit the bill. However, it wasn’t going to be available until the end of the year, so I’d have to wait. In the last few weeks, I started looking at inventory at the local dealers and saw that cars were in transit. I picked the color and options and used a car buying service to negotiate the price for me. Last Thursday was the day for me to test drive it and see if it really was the car.

Going from an SUV to a small car was definitely going to be a change, but I don’t really need an SUV (helpful a few times a year). Fuel economy was going to improve and a smaller car might be more fun to drive.

When I first got in the car, besides being much lower than my Highlander, I found that the side and rearview mirrors were larger than I expected. Last year I test drove an Audi A3 e-tron and the mirrors on that thing were tiny. I was worried that the smaller car wasn’t going to be able to accelerate on the freeway, but was pleasantly surprised how well it did. The tech, at first, was a bit distracting. There are 3 displays! One is behind the steering wheel, one is the center display for radio, maps, phone, and the third is an info display that can be used for radio info, weather, MPG, etc.

After the test drive, I was ready to buy; I promised my wife that I wouldn’t buy a car without her seeing it. We went back the next day and I left with a new car.

I’ve driven it for 3 days now on city streets and highways and have gotten a pretty good feel for the car. While I’ve tried to go through the manuals, there is far too much information in them for me to consume right now. I chose the Impreza 5 Door Limited with EyeSight. I’m a tech guy and not a car guy, so I picked the car based on the tech and specifications. The fact that it was pleasant to drive was almost a bonus!

My impressions are in no particular order.

Pros

  • Backup camera has lines showing where the car will go.
  • Blind spot detection; can be annoying at times as it lights up almost constantly on the freeway as people are passing.
  • Rear cross traffic alert. Getting out of a parking space at SeaWorld is a nightmare. This and the backup camera (and of course looking with my eyes), got me out of a space safely.
  • Impressive turning radius. Specs say less than 18′; my Highlander appears to have been about 38′!
  • CarPlay. Enough can’t be said about this. When I’ve gotten in the car, it knows where I’m going (based on my calendar) and offers to navigate. Phone integration is great and so is music. Controlling everything with Siri works well (better than Siri on my Bluetooth radio in my old car). One thing to be cautious about is if you use maps all the time, you’re going to use up some of your cellular data. After a few hours of driving, I used almost 12 MB of data for Maps alone. I’m going to keep an eye on this; even at 10 MB of data per day on maps, that won’t be a problem on my current plan. (I pay for 2 GB, buy AT&T has given me 2 GB bonus per month plus I have rollover. At a minimum I have 4 GB per month and the most I’ve used is 3 GB.) If someone streams music and uses Maps all the time, this could be costly.

IMG 5915

  • Speed adjusted volume. There is a setting to make the sound louder when the car is going faster. This is great for freeway driving. I’m still playing with the setting as I think the max setting is a little high as the volume increases even at lower speeds.
  • While not documented, it appears that there is a separate volume level for the radio, for navigation (using CarPlay), and for phone. If you adjust the volume while the navigation is speaking, there is a different icon on the display. This is great as I don’t need it really loud.
  • The keyless entry allows me to leave the key in my pocket. This is really neat and convenient. In addition, since the key uses proximity for unlocking, you have to be pretty close to the car to unlock it. While I can still push the button on the remote, I think the proximity is more convenient and potentially safer due to a potential replay attack.
  • Handling is good; while I haven’t gone zipping around that many curves, I like how it handles.
  • Acceleration is much better than I expected. Coming from a larger engine, I was worried about being able to get up to speed in traffic. I haven’t found that to be a problem.
  • Quiet. I know this is subjective, but it seems like the ride is quieter.
  • Lane departure warning; this feature is one that I hope to never use, but have already heard it beep when I was driving due to 2 lanes merging and I was slightly over the line. The system that actually keeps the car in the lane has to be turned on separately (it isn’t automatic).
  • While not specific to this car, Subaru put all the manuals in PDF on their website. Unfortunately they separated the manuals into 20 parts. It took me awhile to grab all the pieces and put it back together; I’d rather a 50 MB PDF than 20 smaller ones that are harder to search.

Cons

  • The STARLINK multimedia apps (not the system that gets help in an emergency) is a bit outdated for a system that supports CarPlay. With CarPlay, there is no reason (that I can think of) to use Subaru’s app. The whole system is truly a piece of crap. The iPhone app looks like iOS 3 or 4; the display in the car isn’t much better. The apps take forever to load (we’re talking 30 seconds) and the second time I tried the system, I couldn’t get the apps to come up (tried for about 20 minutes). Frankly I wish there was an option to completely hide it. This is NOT a selling point for the car. If the navigation system is anywhere near as bad as this, I’d steer clear of it. It appears that this system was designed by Clarion. I’ll be removing the app from my phone (it is required for the head unit piece to work). Even though CarPlay is limited (I’d like to see Navigon on it), the interface is well thought out and looks good.

IMG 5912IMG 5913IMG 5917IMG 5918

  • No lumbar support in seat.
  • Too many settings in too many places. Each of the 3 displays has a way to change settings.
  • It’s low to the ground. I’m not used to this and right now I’ll call it a con.
  • There are all kinds of warnings about cleaning the inside of the windshield to protect the cameras for the EyeSight system. The instructions say to use a piece of copy printer taped over the cameras when cleaning. Subaru should have provided a rubber boot that fits the system; this would have been less error prone and would have protected the camera better.
  • No good place to put my phone in the car. In order to use CarPlay, I have to plug in my phone to USB; the USB plugs are in the center console and allow me to route the cord outside of the console. For now, I leave my phone upside down in the cup holder. I’d love a dock (with Lightning connector) like I have on my desk (it would have to be a bit more secure, though).
  • Less cargo space. This is pretty obvious as I came from a larger vehicle. I think the only time I’ll have a problem is when we go camping. I’ll have to get a roof box for those few times a year.
  • No ability to remove some options from the multimedia menu. I just want CarPlay, radio, and settings to show up.
  • The button to lock all the doors is hard to find by touch. This could have been mitigated by an option to lock all the doors when the car is put in drive, but that doesn’t appear to exist.
  • Too much information can be distracting. I’m trying to find the settings I like that keep distractions down.
  • One of the information displays is right behind the steering wheel causing the analog speedometer to be moved to the right; this is partially obscured and I have found that I have to use the digital speedometer in the display in order to easily see my speed.
  • Not specific to the car, the mysubaru.com app and site don’t let you do an initial login on a phone as the page is too long to fit an iPhone 6s screen and it doesn’t screen. Also the app appears to just be the mobile website.

Things that would have been nice

  • Dual front climate control (manual talks about this, but didn’t appear to be an option).

Summary

I’m truly amazed at how many things this car got right. It has all the safety features I want, all the tech I want, and the price didn’t break the bank. In fact, I read an article that indicates the average selling price for a car is over $34,000! I’m not sure how people afford these cars or what they get for more money, but my Subaru came in at under this. I’m enjoying driving the car and I hope the fun continues.

Feel free to ask questions!

Scott and his car