Debugging Firebase Analytics on iOS

Once again I’ve been instructed to add analytics into an app. Anyone that has ever instrumented analytics knows that it is a royal pain as analytics requires various pieces of information in all kinds of places in apps. While there are ways to mitigate the number of places that code has to be modified, someone still needs to verify that the required events are fired and the necessary parameters are included.

Like many analytics systems, Firebase batches events and sends them off to the server every so often making it hard to see in real time what events are being fired. In order to facilitate analytics verification, Firebase has a method to enable near real time events. Unfortunately this requires access to the source as the parameter Google says to add is a runtime parameter (-FIRDebugEnabled). I was also told to look at an article about debugging, but clearly the author never actually tried the method described on iOS as it references the runtime parameter which is NOT available in TestFlight builds.

Just to make sure I wasn’t crazy that there was no documented way to enable debugging in a TestFlight build, I asked a friend to review the documentation. He confirmed what I thought, but pointed out the following:

This behavior persists until you explicitly disable Debug mode by specifying the following command line argument:

-FIRDebugDisabled

Immediately after he pointed this out, I got an idea that the runtime flag stored a parameter in the UserDefaults for the app. I ran my app in the simulator using the enabled runtime flag (and another flag) and then used ControlRoom to inspect the plist containing my user defaults. I then ran it again with the disabled flag and compared the results. I found the following 2 entries when the debugging was enabled:

    <key>/google/firebase/debug_mode</key>
    <true/>
    <key>/google/measurement/debug_mode</key>
    <true/>

In order to test my theory that these 2 preferences would turn on Firebase debugging, I added a hidden preference to the app to toggle it and ran the app.

UserDefaults.standard.set(true, forKey: "/google/firebase/debug_mode")
UserDefaults.standard.set(true, forKey: "/google/measurement/debug_mode")

Once I toggled the preference, I looked at the Firebase console and didn’t notice anything. Based on the fact that the Google used runtime parameters, I thought that maybe the values were only checked at startup. So I killed the app and re-ran it. Low and behold, data started showing up in the Firebase console! I fixed up my hidden debugging setting to call exit(0) after toggling the preference, built the app and tested on a device not connected to the debugger. It worked perfectly!

I suspect that Google wanted to keep this a runtime parameter so that it wasn’t accidentally turned on in the wild and cause extra load on the servers. However, it really makes it hard to debug the analytics without access to the source code.

Just after writing this article, I searched the web again for a way to do this and found a Stack Overflow answer that sets the runtime flags when the app is started. The answers are interesting, but should also have a mechanism to turn off the debugging! To be more complete, the answers should be more like:

    #if DEBUG || STAGING
    if UserDefaults.standard.bool(forKey: "firebaseDebug") == true {
        var args = ProcessInfo.processInfo.arguments
        args.append("-FIRAnalyticsDebugEnabled")
        args.append("-FIRDebugEnabled")
        ProcessInfo.processInfo.setValue(args, forKey: "arguments")
    } else {
        var args = ProcessInfo.processInfo.arguments
        args.append("-FIRAnalyticsDebugDisabled")
        args.append("-FIRDebugDisabled")
        ProcessInfo.processInfo.setValue(args, forKey: "arguments")
    }
    #endif

Then in some hidden debug screen, add a flag to turn on firebaseDebug UserDefault.
Always learning

Throughout my career I have always had to learn new technologies in order to survive and thrive. New technologies include programming languages, toolkits, and operating systems. While I learned many things in college, the one idea that has been most important to me is the ability to teach myself anything that I need to know.

In a field like technology where it is always changing, what I knew 5 years ago may no longer be relevant today. Recently I was asked about certain types of app architectures, MVC, MVVM and VIPER. At the moment I was asked, I had only used MVC and really didn’t know anything about the other 2 architectures. I’m sure this made me look like I wasn’t well versed in something that certain individuals may consider basic. Seeing a gap in my knowledge, I looked up information on what I didn’t know, consulted with a friend (and former colleague) and decided to teach myself MVVM. Within a day I had a basic understanding of MVVM and within 2 weeks, I had completely overhauled an application to use MVVM as that architecture was easy to understand and made a lot of sense moving forward.

In a job interview I’m sure employers are looking for what people know today and not what they can learn. Unfortunately they are potentially missing out on good, smart people. Technology will change; if people can’t learn they may not be able to produce apps in a few years. However, if you know COBOL and haven’t learning anything knew if 30 years, you still might be able to get a job.

While I’m definitely not at the forefront of using and knowing technologies like I mentioned above and new ways of writing apps such as SwiftUI, I have the skills to learn just about anything and quickly. Knowing technologies is great, but being able to quickly learn new ways of writing software is possibly more valuable to me.

Revisiting Open Source

I wrote about open source about a decade ago and how it can be good and bad. Recently I had a conversation with someone who said he wasn’t dogmatic against using open source in certain projects, but was quite cautious. I’d call this pragmatic and is what I’d like to say I am with respect to open source. In my current project, I am the sole developer working on 7 applications at once (6 iOS, 1 Mac) so my resources are quite limited. I use open source because I don’t have the time to write some code that isn’t central to the apps. However, there are other pieces such as networking, that I’ve spent the time to write from scratch so that I have full control over them.

If I was on a larger team or working on apps that couldn’t fail, i.e. health and safety, I’d be a lot more cautious about open source. If I chose to use open source, I’d make sure that every aspect of the code was reviewed and understood. For instance, just last week there was an issue with the Facebook SDK that caused apps that included it to crash. This kind of behavior should not be tolerated on apps that should not fail; my apps today aren’t going to harm anyone so while it would be inconvenient to have crashes, but wouldn’t be the end of the world.

In an ideal world, I’m not sure I’d use open source in my apps, but in the practical world, I don’t have a choice. There are definitely some great pieces of open source that exist today, but if people rely on them and don’t completely understand how they work, it will lead to failure. There are pieces of open source that are used as the fundamental building blocks of certain apps; in order to properly use them in my opinion, every developer must understand the inner workings of them so that they can debug if needed.

Dipping my toe in the world of Docker

A former co-worker of mine has talked about Docker for years and I’ve taken a look at it a few times, but have generally been uninterested in it. Recently with my interest in Home Assistant, I’ve decided to take another look as many of the installs of Home Assistant as well as Hass.io are based on Docker.

I’ve used virtual machines running on VMware Fusion for years with some Windows installs and some Linux installs. I’m very comfortable with Linux, but kind of dislike maintaining different packages. There are package managers that handle much of it for me, but then there are other packages that have special installations.

I had a few goals in mind for seeing if Docker could replace the current virtual machines I had running for Pi-hole and Observium. The goals were pretty simple that I wanted easy updates and be able to easily backup the data. In the Docker world, updates are dead simple and in many docker containers, the data is stored outside of the container making it easy to backup. As another goal, I wanted to be able to experiment with other containers to see what else I could add to my network.

With all this in mind, I started looking at how to setup Docker. Pretty quickly, I realized that Docker for the Mac was virtually useless for me as it didn’t handle all the networking that Docker running on Linux could. So that meant installing Docker on a Linux VM; that almost negated my goal of easy updates as I’d still have to update the virtual machine running Ubuntu. I could live with that if the rest of the setup was straight forward and didn’t have to remember how to update each container individually.

In order to make backups easy, I wanted to store the data on my Mac and not inside of the virtual machine. I’ve not had great luck with the VMWare tools for mounting volumes, so I decided to use CIFS (SMB) to mount a volume in Linux which works well except for the MariaDB (MySQL fork) Docker container. Not a big deal, I’d just add a cron job to dump the databases every few hours and store the dumps on the mounted volume. I added the following to /etc/fstab

    //myserver/account/Documents/Ubuntu /mnt/mediacenter cifs username=account,domain=WORKGROUP,password=password,rw,hard,uid=1000,gid=1000 0 0

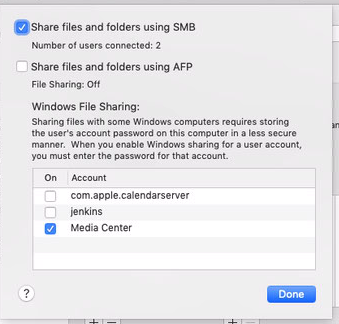
I also had to turn on Windows File Sharing options on the Mac.

Windows File Sharing

The crontab is:

    30 */2 * * * /usr/local/bin/backup_mysql

with the backup_mysql file being

    #!/bin/sh
    /usr/bin/mysqldump -h 127.0.0.1 -u root -ppassword --lock-all-tables --all-databases | gzip > /mnt/mediacenter/backups/mysql/mysql_backup_$(date +"%m-%d-%Y-%H_%M_%S").gz
    find /mnt/mediacenter/backups/mysql/* -mtime +3 -exec rm {} \;

The next hurdle was dealing with IPv6; most people don’t care about it, but I’m not most people! IPv6 is quite complicated (at least to me), so that took a bit of experimenting to get it to work in Docker. For future reference, ndppd lets the virtual machine tell the world that it handles IPv6 for the Docker containers (basically).

So where was I? After getting the Linux VM setup, it was on to setting up my containers. With docker-compose, I could setup one file that was the configuration for all my containers. Now this was great as I could modify it and test out different containers. After a few days of work, this is the core of my docker-compose file. There are a few other containers I’ve added including LibreNMS, but this is basically what I have. The nginx-proxy is great as I just add DNS entries for each service and it handles SSL and lets me run multiple web services on the same machine.

version: "2.3"
services:
  nginx-proxy:
   image: jwilder/nginx-proxy
   environment:
      - DEFAULT_HOST=pihole.exmple.com
   ports:
     - "80:80"
     - "443:443"
     - "::1:8080:80"
   dns:
     - 10.0.1.1
   volumes:
     - /var/run/docker.sock:/tmp/docker.sock:ro
     - '/mnt/mediacenter/docker/certs:/etc/nginx/certs'
   restart: always
   networks:
      default:
        ipv6_address: XXXX:XXXX:XXXX:XXXX:1::2

  pihole:
    image: pihole/pihole:latest
    ports:
      - "53:53/tcp"
      - "53:53/udp"
    environment:
      # enter your docker host IP here
      ServerIP: 10.0.1.200
      WEBPASSWORD: ''
      DNS1: 127.0.0.1
      DNS2: 10.0.1.1
      DNS3: XXXX:XXXX:XXXX:XXXX:XXXX:XXXX:XXXX:XXXX
      # IPv6 Address if your network supports it
      ServerIPv6: XXXX:XXXX:XXXX:XXXX:1::3
      VIRTUAL_HOST: pihole.example.com
    volumes:
      - '/mnt/mediacenter/docker/pihole/pihole/:/etc/pihole/'
      - '/mnt/mediacenter/docker/pihole/dnsmasq.d/:/etc/dnsmasq.d/'
      - '/mnt/mediacenter/docker/pihole/pihole.log:/var/log/pihole.log'
      # WARNING: if this log don't exist as a file on the host already
      # docker will try to create a directory in it's place making for lots of errors
      # - '/var/log/pihole.log:/var/log/pihole.log'
    restart: always
    cap_add:
        - NET_ADMIN
    networks:
      default:
        ipv6_address: XXXX:XXXX:XXXX:XXXX:1::3

  mariadb:
     image: mariadb
     ports:
       - 3306:3306
     volumes:
       - '/mariadb/data/:/var/lib/mysql/'
     environment:
       MYSQL_ROOT_PASSWORD: password
     restart: always
     user: "1000"
     networks:
       default:
        ipv6_address: XXXX:XXXX:XXXX:XXXX:1::4

networks:
  default:
      driver: bridge
      enable_ipv6: true
      ipam:            
        driver: default            
        config:                
            - subnet: 192.168.0.0/24                
            - subnet: "XXXX:XXXX:XXXX:XXXX:1::/120"                

Phew, that was a lot of work to get things running. However, I’m pretty pleased with how things are working. I now have the ability to experiment with other containers and can restore my data easily if things go awry. Is Docker the answer to everything? Probably not, but it appears to handle this job well.

Auto Layout in a UITableViewCell with an image

Auto Layout is an amazing concept for developing iOS apps as it allows for an application to more easily look good across different devices. In addition it makes using dynamic type so much easier; as someone that wears glasses I always increase the type size on my devices and when apps don’t take advantage of it, I get kind of annoyed. So when I develop apps, I try to use dynamic type and using auto layout makes things so much easier.

A common theme in apps I develop is to have a UITableView with a bunch of rows. The rows have different bits of text and the only sensible way to develop this is using auto layout. With the latest releases of iOS, a lot of code dealing with dynamic type, heights of cells, responding to device changes, etc. has been eliminated. However, there are still a few gotchas in making an app with a UITableView that behaves properly.

I’m going to go over the steps I used (and provide sample code) for how I handle this. I had a few requirements that make my implementation a little different than other tutorials on the web.

  • Each cell has an image that would be at most 1/3 the width of the screen.
  • The image must touch the top and bottom of the row.
  • The image had to be at least a certain height.
  • The image should attempt to have the aspect ratio of the original image. (Aspect Fit could leave white space; Aspect Fill could hide some of the image.)
  • Images are loaded asynchronously from the Internet.
  • Next to the image is up to 5 lines of text pinned to the top.
  • Next to the image is 1 line of text pinned to the bottom.
  • Each line of text could wrap to multiple lines.
  • Increasing the type sized must resize the rows.
  • The cell must have a minimum height.
  • Rotating the device must work.

Writing that out sure looks more complicated than it was in my head!

I’m not going to go over the initial project setup, but will jump right into Interface Builder after I created a UITableViewCell with xib. Note that I don’t use Storyboards and opt to create a separate xib for each view controller and each cell; Storyboards tend to bite me each time I use them as I like to re-use code as much as possible and by default the Storyboard for a UITableViewController puts the cell in the Storyboard making it harder to manage. I’m sure some would argue with me that Storyboards are great, but they just don’t work for me.

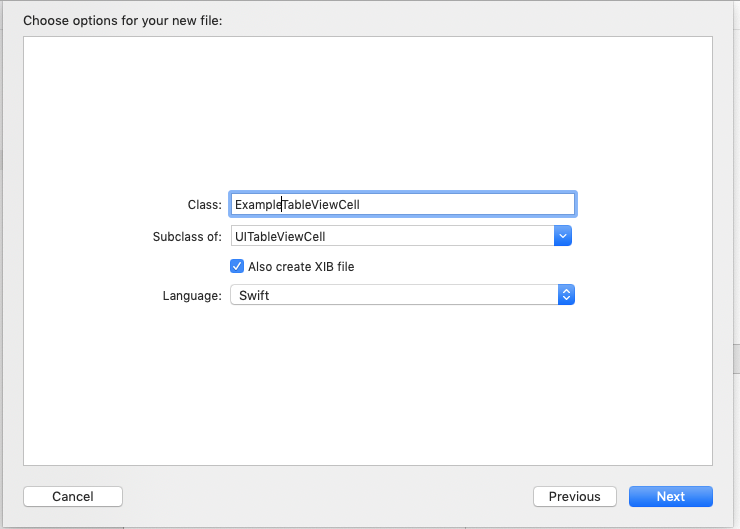
  1. Create a new UITableViewCell with a xib.
    Creating a UITableViewCell subclass
  2. In the xib, add a UIImageView to the left side that is pinned to the left, top, and bottom of the cell.
  3. Set the UIImageView to Aspect Fill and Clip to bounds.
  4. Give the UIImageView fixed width and height constraints. (We’ll change this later.)
  5. Add a vertical stack view pinned to 10 pixels from the UIImageView, pinned to 10 pixels from the top and 10 pixels from the right.
  6. Add 5 UILabels to the stack view. Each label should be set for “Automatically adjusts font” and a Font of Body. Set 1 or more of the labels to have 0 Lines so that it grows vertically. Also, set auto shrink to minimum font scale of 0.5.
  7. Add another vertical stack view pinned to the leading of the first stack view, 10 pixels from the right and bottom of the container and on the top to be >= 5 from the other stack view.
  8. Add a UILabel to this stack view. Set the font as above.
  9. Set the height constraint of the UIImageView to a priority of 250 (low).
  10. Add a UIActivityIndicator that is centered on the UIImageView (set the constraints).
  11. Create a UIImageView subclass that looks like this. The UIImageView uses the intrinsic size of the image in the absence of other constraints and we want more control of the height of the view.
    class ExampleImageView: UIImageView {
        var minimumHeight: CGFloat = 0
        override var intrinsicContentSize: CGSize {
            if minimumHeight == 0 {
                return super.intrinsicContentSize
            }
            return CGSize(width: 0, height: minimumHeight)
        }
    }
    
  12. Change the UIImageView class to ExampleImageView.

  13. Connect outlets for the 6 UILabels, the UIImageView (with the new class), the activity indicator and the height and width constraints on the UIImageView.

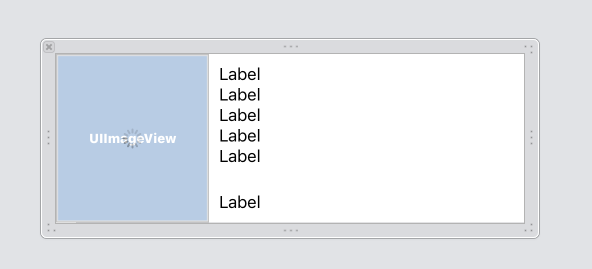
Your xib should look like this:

TableViewCell xib

Time to move into the source of the table view cell. I’m only going to cover the interesting parts here. See my example repo at for the full example.

  1. Setup a variable for the cell width. This is going to be set through the view controller so that rotation changes can change the width of the image.
    var cellWidth: CGFloat = 0 {
        didSet {
            maxImageWidth = cellWidth / 3
            setImageWidth()
        }
    }
    
    fileprivate var maxImageWidth: CGFloat = 120
    
  2. Add a method for setting the image width.
    fileprivate func setImageWidth() {
        if let image = cellImageView.image {
            let scale = image.size.height / contentView.frame.size.height
            var newWidth = image.size.width / scale
            if newWidth > maxImageWidth {
                newWidth = maxImageWidth
            }
    
            contentView.layoutIfNeeded()
            let animator = UIViewPropertyAnimator.init(duration: 0.1, curve: .easeOut) {[weak self] in
                guard let self = self else {return}
                self.cellImageViewWidthLayoutConstraint.constant = newWidth
                self.contentView.layoutIfNeeded()
            }
    
            animator.startAnimation()
        }
    }
    
  3. Next in the view controller, add the following to handle the change in width of the cell.
    override func willTransition(to newCollection: UITraitCollection, with coordinator: UIViewControllerTransitionCoordinator) {
        if let visibleCells = tableView.visibleCells as? [ExampleTableViewCell] {
            for cell in visibleCells {
                cell.cellWidth = tableView.frame.width
            }
        }
        super.willTransition(to: newCollection, with: coordinator)
    }
    

Believe it or not, I think that’s it! I’ve spent at least 4 weeks on this issue and keep running into some problem. Rotation and changing font sizes (Accessibility Inspector is great for testing) kept bringing up issues.

The example repo can be found here: https://github.com/sgruby/TableViewExample.

Feedback/changes are welcome! I’m sure I’m not doing something correct or there is an easier way; I just haven’t figured it out, yet.

Porting an iOS app to macOS

About six weeks ago (2 weeks or so before WWDC), my client asked me to port an enterprise app I wrote for iOS to macOS. I haven’t done macOS work for a long time, but how hard could it be? In the last few years, a number of iOS-like technologies have come to macOS; while they aren’t named the same, many things function similarly like NSViewController (UIViewController), NSTableView (UITableView), NSTableCellView (UITableViewCell), etc. All of my iOS apps for this client are written in Swift, so it made a lot of sense to use Swift for this macOS app.

Getting started with the project took about a week to get familiar with macOS again, but then things started moving. The first thing I did after the app ran was to make a version of my framework that I use across 5 iOS apps (models, networking, methods, etc.) over to the Mac which wasn’t difficult; I only had to do a few platform specific defines for the files I moved over (I didn’t move the UI pieces over). Once the basic app was running, I started the UI and had real data showing up within a few weeks from start. I took a number of pieces of the iOS app, copied the code and pasted it into the Mac app. The number of changes for these pieces were minimal (.stringValue instead of .text on the NSTextField vs UILabel), but I was quite pleased how I was able to reuse the code.

From start to basically feature parity with iOS took about 5 weeks. I’m sure that there are things that I’d change such as doing extensions on classes instead of copying/pasting code as I’ll have to maintain both apps going forward, but that could obscure how things work. I am extremely pleased with how well this project is going (it hasn’t been deployed, yet).

At WWDC Marzipan was revealed and it looks like it will allow many iOS apps to run on macOS. This, of course, would have helped me get my app up and running, but would it feel like a Mac app? While not every app is as straight forward as the one I ported, developers that want to move their apps to macOS today have nothing stopping them.

Dependency Management

With most software projects these days, including open source components is almost a given. There is no reason to reinvent the wheel and some components are so customized that it would take months to mimic the behavior. There are many ways to integrate these components into an application. One of my mantras when working on projects is that I just want to be able to checkout the project from a repository and build it; there shouldn’t be several steps and I shouldn’t have to worry about something outside of my control breaking the build.

Years ago when I worked on a particular project, there was a several step process to just get the source code which integrated open source components. This was extremely fragile as the references to the open source components was for an external repository that could go away at any time. When I became in charge of the project, I changed things so that we only relied on repositories that were under the control of the company (we had shared components).

In iOS development, there are now 2 (or 3) main systems for managing these external dependencies. The first is CocoaPods which is very popular, but relies on the external repositories to always be there and requires modifications to how the project is built. The newer entrant into this arena is called Carthage. Carthage gives me more control on the dependencies. The system makes it easy to store the dependencies in my repo and easily update them. In particular, I use the following command to update

carthage update --platform iOS --no-build

Basically I just let Carthage update the components and I have my project setup to do all the builds. When I checkout the project, it has everything in it and I just build. I think that this setup, at least currently, strikes the best balance to handling dependencies.

The other day I was reminded of this problem when a developer was describing dependencies on one of my projects; the developer basically said that he used a dependency management system that didn’t store the components with the source code. I’ve been writing software for awhile now and while open source makes it easier to get things done, many developers don’t consider the entire build process or risks involved in not having control over all the components.

Native vs Web App for IoT Devices

Recently I was chatting with a friend about a new WiFi router. I hadn’t heard of it and he sent me a link to it. The first thing I noticed about it was that the configuration was done via an iOS or Android app. As an iOS developer, I know that a native app is going to generally provide a better user experience than a web app. However, as a consumer, I shy away from devices that only have a native app interface. If the app stops working, isn’t updated quickly when an OS gets updated, or the company stops supporting the app, I’d be out of luck. In addition, I like being able to configure devices using my desktop machine and most devices don’t have a Mac app for configuration.

The native apps are great, but they have to be secondary to a web interface for any IoT device. I mentioned this to my friend and he understood right away my point. I look at the serial to Ethernet gateway I have that I bought used 3.5 years ago and is likely not made any more and am glad that it has a web interface. Granted it is a very specialized device on my network, but the web interface is the only reason that I’m still able to use it. If it were a device that I wanted to look at more often, like a router that I needed to control various aspects of it, the lack of a web interface makes the device a no go in my opinion.

I wish that more companies would implement web interfaces first for their IoT devices and have native apps as secondary interfaces. I’m not saying that all apps should be web apps; in fact, I believe that native apps provide a better user experience. I am saying that web apps should always be a backup option in case the native app isn’t available or doesn’t work.

When is zip not zip?

Like most experienced iOS developers, I use an automated build system. A colleague of mine and I have spent portions of the last 2 years building up our system so what we do looks like magic to others! As part of this system, we’ve written tools and put together scripts to package our application as an .ipa (iPhone application). An .ipa file is simply a zip file with the extension changed.

Well, it isn’t that simple. It appears that how the zip is created is just as important as the structure of the package. There are various flavors of zip, libraries that do zip, and other tools that zip. In one of our tools, we were using a zip library. It appears that Apple made a change in iOS 9.0.2 or 9.1 that caused applications created by our tool to not install on devices. However, the problem was only present if the app was installed over the air or through iTunes; installed through Xcode’s Devices window succeeded. After an arduous day of debugging trying to determine the failure point (provisioning is usually to blame for failures and they can be super frustrating), I switched our tool to use the command line zip (/usr/bin/zip) and amazingly the problem went away.

It would appear that iTunes, iOS itself, and Xcode use slightly different methods for unzipping and installing applications. Since Apple’s xcrun command for packaging (PackageApplication) uses /usr/bin/zip, I think it is a safe bet. It is invoked using something like:

/usr/bin/xcrun -sdk iphoneos PackageApplication -v MyApp.app -o MyApp.ipa" --sign "iPhone Distribution: Scott Gruby"

On a side note, it also appears that there is an error in the PackageApplication script found at:

/Applications/Xcode.app/Contents/Developer/Platforms/iPhoneOS.platform/Developer/usr/bin/PackageApplication

that has:

"--resource-rules=$destApp/ResourceRules.plist");

In Mac OS X 10.10 and higher, this line is no longer valid, so if you use this command, you need to modify the script.

The best, underutilized and poorly implemented accessibility feature

[Update – October 21, 2015: It looks like the issues with News have been fixed with the iOS 9.1 update. Yeah!]

iOS 7 brought a feature called dynamic type which moves away from developers specifying exact point sizes for text and instead uses a number of descriptions for fonts.

From UIFontDescriptor.h:

    // Font text styles, semantic descriptions of the intended use for a font returned by +[UIFont preferredFontForTextStyle:]
    UIKIT_EXTERN NSString *const UIFontTextStyleTitle1 NS_AVAILABLE_IOS(9_0);
    UIKIT_EXTERN NSString *const UIFontTextStyleTitle2 NS_AVAILABLE_IOS(9_0);
    UIKIT_EXTERN NSString *const UIFontTextStyleTitle3 NS_AVAILABLE_IOS(9_0);
    UIKIT_EXTERN NSString *const UIFontTextStyleHeadline NS_AVAILABLE_IOS(7_0);
    UIKIT_EXTERN NSString *const UIFontTextStyleSubheadline NS_AVAILABLE_IOS(7_0);
    UIKIT_EXTERN NSString *const UIFontTextStyleBody NS_AVAILABLE_IOS(7_0);
    UIKIT_EXTERN NSString *const UIFontTextStyleCallout NS_AVAILABLE_IOS(9_0);
    UIKIT_EXTERN NSString *const UIFontTextStyleFootnote NS_AVAILABLE_IOS(7_0);
    UIKIT_EXTERN NSString *const UIFontTextStyleCaption1 NS_AVAILABLE_IOS(7_0);
    UIKIT_EXTERN NSString *const UIFontTextStyleCaption2 NS_AVAILABLE_IOS(7_0);

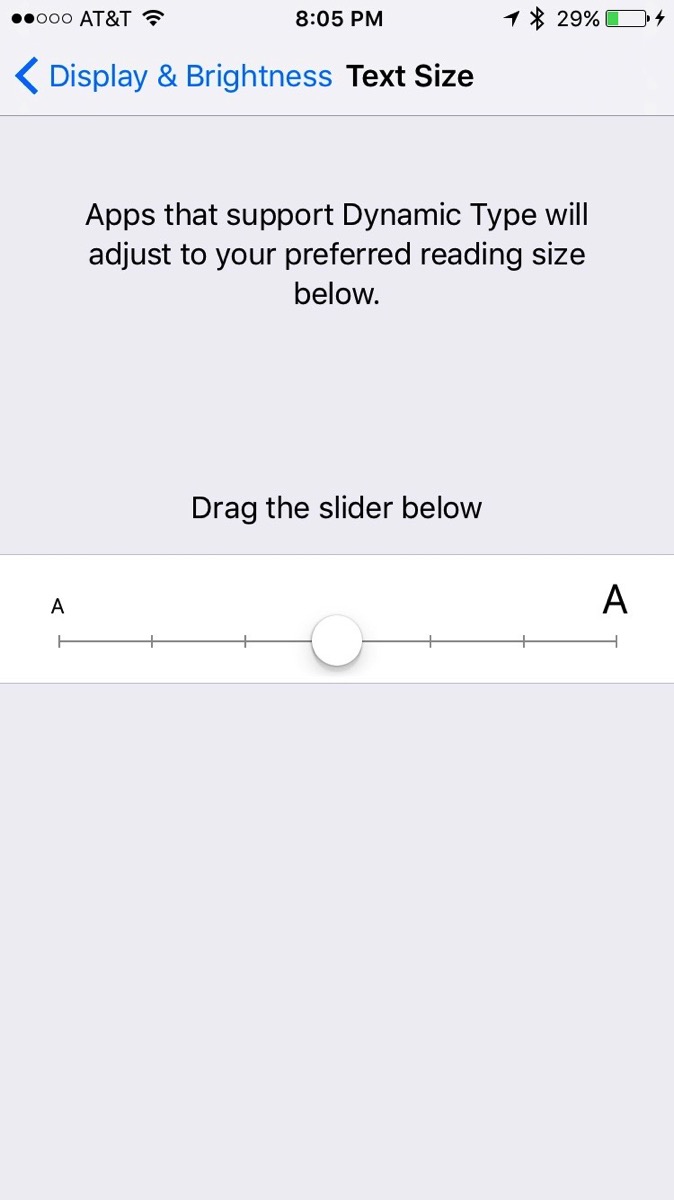
When developers use these instead of say Helvetica Neue 12, a user can change the font size in Settings->Display & Brightness->Text Size.

Text Size

This is generally thought of as an accessibility feature as it helps people who have trouble seeing. However, for people like me who can see well with glasses, larger type is just more comfortable to read. Implementing this is quite easy, but requires a few extra steps like listening for changes to the fonts and making sure that table rows resize to accommodate the text. These steps aren’t rocket science and don’t take much effort, but many developers are constrained by what their designers give them and many designers are still used to specifying exact fonts as well as spacing. This needs to change as it is hurting those that want to increase the font size and also makes it harder to adapt to different screen sizes.

I’ve implemented dynamic type in a few of the apps I’ve done and it worked out well; the extra effort was worth it in my opinion. Some developers just don’t care and other developers including Apple make an attempt, but fall short.

Here are images from the Apple News app. The first image is the standard text size; the second is the largest text size (largest before going into Accessibility and moving it to super large).

News - Standard Size News - Large Text

(I never knew there were images with the posts because they aren’t seen with the large text.) You can see that the text resizes along with the cells, but the title collides with the first part of the article. That’s pretty sloppy.

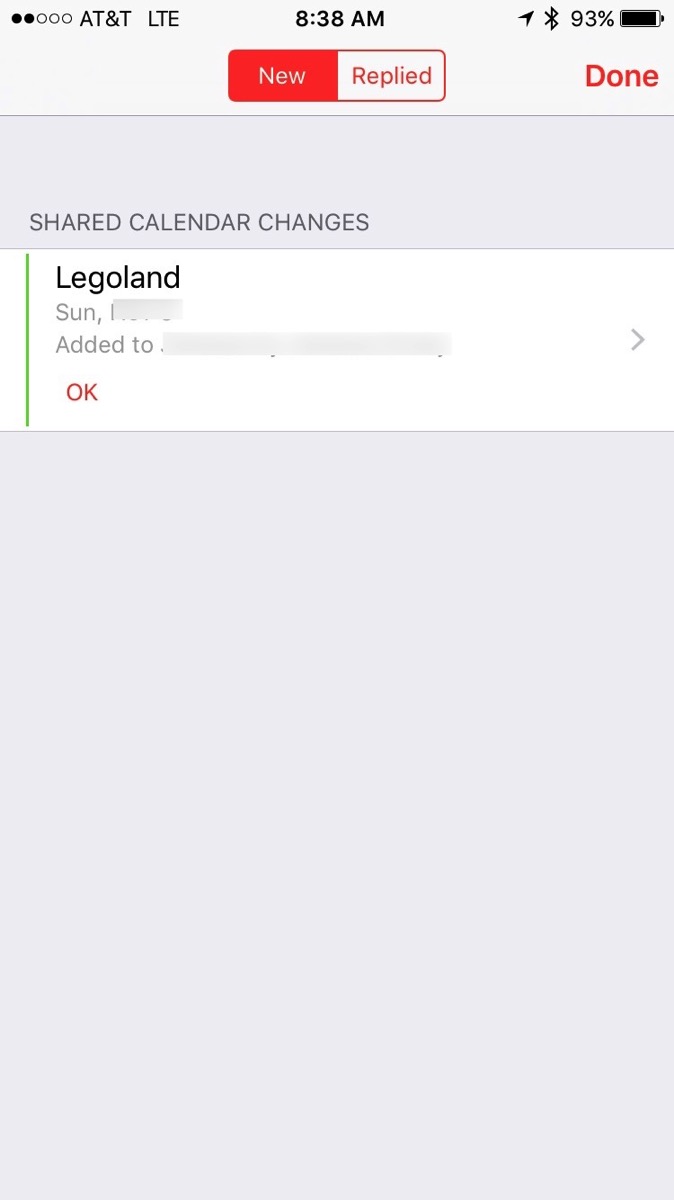
The next example is in Calendar. This one is worse than the first because the row is a fixed height and it looks like each row of text is also a fixed height so that when a larger font is used, it looks awful.

Calendar - Regular Font Size Calendar - Large Font Size

For a company that pays so much attention to accessibility, these examples show that individual teams making the apps aren’t doing enough to look at their apps. Maybe all the engineers have great eyes and can see the text, but this does need to get fixed. (Filed as Apple Radar 23196322.)

Outside of Apple, developers need to pay more attention to this; accessibility is hard and I’ll be the first to admit that I don’t do enough on accessibility. Handling dynamic type is an easy first step in making apps more accessible and easier for everyone to use.