iPhone 4 Antenna bar fiasco

I’ve been listening to the MacBreak Weekly podcast and the biggest topic lately is the iPhone 4 antenna mess. It seems that there are 2 technical problems with the iPhone 4 related to this. The first affects all iPhones going back a few years and that has to do with the number of bars. The second is the “death grip” that causes the bars to go down and to drop calls.

Everyone has discussed both of these to death, but I’d like to throw in my 2 cents. The number of bars is not a true indicator of anything. How do I know this? Well, I’m actually someone that has written code to display antenna bars. I wrote the Mac status software for Franklin Wireless. In that software, I read the RSSI value from the modem and put up the bars. Well, I was told to change the bar “calculation” a few times. When I say calculation, it was more like, “if it is in this range, display x bars”. There is absolutely no rocket science involved here; the modem gave me the dB of the RSSI and I displayed bars. So when Apple says they messed up the calculation, it is, in my opinion, a bunch of baloney. I believe it is more likely that someone either tweaked the value to make it look like there were more bars (AT&T says “more bars in more places”) or someone was given the wrong table (you could argue that the latter is actually the wrong calculation, but it was probably overlooked as it looked like there were more bars). So Apple’s upcoming fix will make AT&T look worse which they may deserve.

On the “death grip”, I think people are over reacting (we’ll know more on Friday when Apple has a press conference). The reported fix is to use a bumper or a case. I had ordered Apple’s bumper, but cancelled my order because it would take too long to arrive and the $35 (including tax and shipping) just didn’t sit right with me. So, I decided to go on eBay and see what they had. I picked 4 different cases for a total of under $5 including shipping, direct from China. All of the cases arrived this week and the case that I’m using right now is a silicone case that cost $0.99. If I, as a consumer, can get a case that effectively solves the “death grip” problem for $0.99 with shipping, Apple can easily get cases for half that. At this point (with the information at hand), I think that Apple should send everyone that is having a problem a free bumper. This would allow them to save face and move on. Going forward, they can include the bumper or coat the metal with something.

It’s amazing to me how blow out of proportion this has become; everyone knows about it, even those people that don’t care about the iPhone. I wish Apple the best of luck on a quick resolution, but for me, I’m quite pleased with my phone and haven’t had any issues with it.
Jesus Phone in hand

As I indicated in a previous post, I planned to get an iPhone 4. I pre-ordered it, but since I was late to the party, it wasn’t going to arrive until July 15th or so. I had wanted it sooner as I was going on 2 trips before then; I don’t travel all that much, so having it would have been convenient.

I tried Wal-Mart, but they didn’t have any on launch day. So, on Thursday night, right before the Apple Store closed in Fashion Valley, I called and asked about stock. The guy I spoke to said that they should get more on Friday and people would be lining up before they opened at 8 am. So, I decided to give it a try on Friday. I arrived at around 8:05 am and got in line. The employees that came out indicated that they had stock, so I waited. I spent about an hour and 10 minutes in line and finally got in the store. It took about another 15-20 minutes to process my order and I was out the door with my phone.

So I bought into the hype and lined up for a phone; however, I didn’t line up at 5 am like other people did. Apple constrains supply and I think fudges numbers to get on the news, which is what happened. If Apple had stock to sell me, why couldn’t they ship me a phone and have it delivered the day after launch? I guess that wouldn’t get them the free publicity.

Now that I have my phone in hand, I’m reasonably impressed with it. I’m less impressed with AT&T and their coverage, but we’ll see how that goes. I did find what I consider to be a very annoying bug with the cellular radio in the phone; if you go out of coverage area for an extended period of time, the phone stops searching for a signal. I had to put it into airplane mode and then turn off airplane mode to get it to search again. I understand power conservation, but you’d think that it would simply try less often to get a signal. What is also strange is that I had coverage, went inside a building, completely lost coverage (the building was a wood framed building, I believe) and never got a signal back. Someone else next to me had a Palm Treo on AT&T and had 2 bars of coverage.

The future of TV

A few weeks before Google announced Google TV, I experienced the future of TV, at least as I see it. We normally record our programs with the EyeTV hooked to a Mac Mini. However, sometimes the EyeTV has a fit and we don’t get everything recorded, but that’s another story. Since our media center is a Mac Mini, I simply used screen sharing to access the Mac, used a web browser, went online to CBS’s Web site (I think it was CBS), and played a show in HD. It streamed quite well on our TV and the commercials weren’t all that annoying. The only problem, however, is that the Flash ads sometimes pop the viewer out of full screen and require me to use my laptop to put it back. If I wanted to watch TV without my laptop on my lap, this would be a problem.

We’ve now started to watch more shows this way and it is convenient. It allows us to watch shows that we haven’t recorded; convenient during the summer when our standard shows aren’t on.

My hope is that Google TV will build upon this concept and allow people to use a television remote to watch TV on the web without having to pay a ton of money for cable. We’re a family that only subscribes to basic cable (it comes with HD for the broadcast channels as it is required by law), so the concept of Google TV could work for us if it let us watch shows that are already available online, free of charge.

A month of being self employed

I’ve now been self-employed for a month and things are going quite well. Right as I left my job, pieces fell into place which gave me steady contract work. My contract projects are going well with very little pressure (I don’t consider a deadline a lot of pressure as I simply have to get the work done). Every morning when I start my day, I look at the phone on my desk expecting to see a missed call. It still hasn’t happened; my work no longer consists of going from one emergency to the next.

The projects I’m working on are challenging in that I’ve taken over someone else’s code, but I like challenges. At the moment, I’m mostly just doing bug fixes, but that’s fine with me. I’m pretty much left alone; issues are assigned to me, I fix them. Everyone’s happy.

My stress level has gone down significantly and I feel like I’ve gotten my life back. I’m still probably in the honeymoon phase (I know I’ve said that before) of self-employment, but I’m hopeful that this feeling will continue.

iPhone Developer Provisioning Portal Tips

Recently I’ve been put on 2 different iPhone development projects and on both projects, I’m responsible for doing the builds. Any developer that has dealt with the provisioning portal knows how confusing and how much of a pain it is to use. It looks to me like there is a bit of confusion over the portal, so here are some tips.

  • There are 2 types of distribution mechanisms; one is through the AppStore and one is AdHoc distribution. So, they need to be differentiated in the project and on the portal to make it clear.
  • In your project, I recommend creating 3 configurations; Debug, AdHoc, and AppStore. This makes it clear what you’re doing.
  • Only the Team Agent (the person that signed up for the developer account) can create the distribution mobile provisioning files (AppStore or AdHoc). So if you as the developer didn’t set up the account, you either need to get the credentials of the person that signed up or bother that person when you need to add/remove devices for the AdHoc build.
  • Name your provisioning profiles in the portal with AdHoc and AppStore (respectively) so you can easily select the right profile in Xcode. Naming one Distribution is not very helpful.
  • Bundle the AdHoc mobile provisioning file with every build sent to testers; the file is small and then no one has to ask you for the file later.
  • Save yourself some headaches and check the mobile provisioning files into source control.
  • Export the private key and certificate used to create the distribution profiles as a .p12 file and check that into source control. Depending on how paranoid you are, you might also check in a file with the password for the .p12 file. The next developer that takes over your project will thank you for not making them jump through hoops.

While some of this may be obvious and I’m sure some people won’t agree with what I say, I think that these tips really make it easier to manage iPhone development.

iAm

When the iPhone first came out, it looked amazing, but I hoped it would fail. Why would I wish such a thing? It was quite simple; my work centered around writing synchronization software for smartphones and if the iPhone succeeded, then I’d have to find other work which is always a scary thing to do. Then about 2.5 years ago, my work transitioned away from sync software, so I was doing some iPhone work and was generally pleased with the device. Fast forward another year. I went to work for a company that sold Sprint service, so while I didn’t want the iPhone to fail, I couldn’t  really go around saying it was the coolest phone out there, now could I since Sprint didn’t sell it.

Another 18 months have passed since then and almost of all of my work is now iPhone development (and soon to be iPad development), so I can truly be excited about the iPhone without thinking that it will hurt my job nor will me saying I like the phone negatively reflect on my company. So now, I have an iPad, iPod Touch, and an iPhone 3GS (not activated).

When the iPhone 4 was announced, I had to make a decision if I was going to get one. For people that already have an iPhone, getting an iPhone 4 is a relatively minor additional cost. For me, an iPhone will cost around $2000 (the 2 year cost) as I don’t have AT&T service. It’s not practical for me to port my phone number and drop my Sprint plan as the plan I have is a family plan that is very cheap for what I have (over the years I’ve had a number of discounts applied and even the base plan you can’t get these days). My wife, said to go ahead and get the iPhone. As I don’t like spending large amounts of money, I hemmed and hawed over it and decided that if I’m going to say I’m an iPhone developer, it kind of makes sense for me to carry an iPhone.

So there you have it, iAm an Apple fan boy. I really like the products and enjoy writing software for them. Did I get my order in early enough to be one of the first to get one? Unfortunately no so I have to wait until mid July for mine to arrive.

How to print shipping labels from PayPal on a Mac


My wife does a lot of USPS shipping via PayPal for her jewelry business. She has been printing the labels on 8.5 x 11 on our laser printer, but to not waste labels, she would print the labels to PDF, put them in Word, crop them and print 2 to a page. This, of course, takes a lot of time. Things got even worse when she runs out of labels; she cuts out the label and tapes it to the shipping envelope.

I decided to look for a better solution and decided to get her a DYMO LabelWriter 4XL. The printer prints 4×6 labels. Unfortunately, PayPal’s Mac support for this printer is non-existent. After a lot of research, I came across an article that explained how to get PayPal to print to the printer. I started following the instructions, but had trouble installing CUPS-PDF on my wife’s Leopard machine. After I managed to get it installed and running (I finally found an older version), I was testing it and found a much simpler solution.

Here’s the quick and easy way to print shipping labels on the LabelWriter 4XL printer using a Mac.

  1. Install the DYMO drivers (make sure you grab them from the DYMO Web site as DYMO using strange numbering and version 8.2 isn’t the same as 8.2; the latest version is 8.2.2.1172. I had an 8.2 version that was earlier and didn’t support the 4XL.
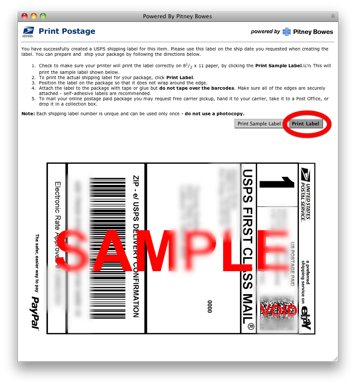
  2. Set PayPal to print labels to a laser printer or inkjet printer. From the PayPal home page, click Profile. Click Shipping Preferences. Click Edit Printer Settings. Select  Laser/Ink Jet Printer. Click Save.
  3. Print the label by clicking Print Label on the Print Postage Page.Label.png
  4. When you goto print, create a custom paper size called 4×6. However, configure it a little bigger than 4×6.Custom Paper Sizes.png
  5. Setup the printer to be landscape, print page 1 to 1 (sometimes there is a second page).Print.png
  6. Click Print.

The screenshots were taking on Snow Leopard, so Leopard is a little different. However, that’s the jist of how to “easily” print shipping labels from PayPal. Granted there are a few steps involved, but this sure is easier than taking the labels into word, cropping them, printing them and then cutting them out. This seems quite simple, so I’m not sure why no one else figured this out with other 4×6 printers. Granted the LabelWriter 4XL is a new printer, but there are other printers like it.

I hope this helps someone.


Review: JetPhoto Studio

Last August when I received the i-Got-U 120, I started looking for software to compliment the device. I found a number of products to make geotagging easy, but didn’t find many applications to actually do something with the geotagged data. One product that I found which could do something interesting with the photos was JetPhoto Studio and the accompanying JetPhoto Server. Up until now, my only experience with the software was under test conditions. This past weekend, I finally got to put the software through its paces when I got a chance to actually do something with geotagged photos.

The first thing that had me a little nervous about the software is that there are more Mac and Windows versions. In a lot of cases, the Mac versions are ports of the Windows version. As I’ve written about before, I’m not a huge fan of software ported to the Mac. The user interface doesn’t strike me as a Windows port, but doesn’t strike me as a potential winner of the (former) Apple Design Awards. I did a bit of digging into the application package, into the company, as well as the developer information on their site and it looks like the Mac version is the primary version and the Windows version is the port. Perfect, this lets the program pass the first cut and stay on my machine.

I decided to take the pictures from my recent ride on an airship and put it into the software. I noticed that I had to import the pictures into a new JetPhoto Studio album; I had already put them in iPhoto and had to copy them somewhere else. Unfortunately this eats up more disk space (this album is about 250 MB, so now I have 2 copies of all the pictures on my machine). I selected about 50 pictures and “starred” them so that they would be part of what I uploaded. I wanted to simply delete the pictures I didn’t want to recover some disk space, but couldn’t figure out how to do it, so I starred them. I had already geotagged the photos using PhotoLinker and some open source software for the i-Got-U, so I didn’t give the geotagging part a go. In addition, since I wanted my original photos geotagged, I had to do it outside of JetPhoto Studio (as I mentioned before, JetPhoto Studio copies the pictures into its own albums).

Now that I had an album put together, I had a few options for doing something with the pictures. I could export the photos as a Flash gallery, Lightbox gallery, Cover Flow Web Gallery, Google Map Gallery, or sync it to JetPhoto Server. The first options would effectively create a static site that if I wanted to modify, I’d have to re-upload the gallery. So, I went ahead and installed the JetPhoto Server. This was a simple installation that required creating a MySQL table, unzipping the server, and configuring a few items. I’ve installed so many Linux programs, that the whole process took under 5 minutes. I selected the Web Sync option, entered the credentials, and boom, the site was ready to go.

One of the features that I find extremely compelling is the “Google Maps” mashup which shows the GPS locations and when you click on a pin, it shows the picture at that location. This is almost exactly what I envisioned when I wanted to geotag my photos. This resembles what iPhoto does on its map; however, this method allows you to publish your photos on a Web site. In addition, the server lets you choose how you want the photos viewed (Lightbox, Flash Gallery, etc.) without having to re-upload the pictures.

I’m pretty impressed with the results of JetPhoto Studio, but the management interface is a bit awkward. If you wanted to store all of your photos in JetPhoto Studio instead of iPhoto, then maybe this would be less of an issue.


Pros

  • I really like the different output options for the web galleries.
  • The Google Maps gallery is a great way to handle geotagged photos. Once I get more geotagged photos from other areas, I think it will be more useful.
  • Installation of the server was quick and easy.
  • Web Sync worked with no hassle and worked well.

    Cons

    • Adding images to albums copies them using up extra storage.
    • The user interface could use a bit more polish.
    • If the application focused on just creating the output and less on the management of the photos, I think it could simplify the interface.

      Summary

      If I put on my blinders and simply use the software to upload certain albums, I can definitely see myself using it again as I really like the results. In most cases, I don’t overlook user interface, but I haven’t seen another application (maybe I need to look harder) that quickly and easily produces similar results. I’m not sure what the differences between the Pro version and the free version, but for ease of use, the $25 for the Pro version is likely worth it as Web Sync isn’t part of the free version. The developer’s blog indicates that some new features are coming to JetPhoto Studio; I can’t wait to see them.


      A ride of a lifetime


      Today, my wife and I got the opportunity to rid in a Zeppelin run by Airship Ventures. The other day, I realized that I’ve been on a number of different aircraft ranging from airplanes (commercial down to a homemade one my uncle built), a hot air balloon, and 4 separate helicopter trips. Today I got to add an airship to that list.

      The tour took us from San Diego’s Montgomery Field to the coast, south to downtown and then back to Montgomery field. The ride is some much different than any other type of aircraft as it’s quiet, moves pretty slowly (top speed is less than 80 mph), and flies relatively low. Like the other passengers, I didn’t stop taking pictures; I posted a bunch of pictures on my server. I didn’t realize that my GPS data logger wasn’t on until part way through the flight, so the map is missing some points. This site is using a product called JetPhoto Studio which I plan on reviewing at a later time (putting the site up with the map took just a few minutes, so that’s one feature that is really cool about it).


      airship.jpg

      It’s really hard to describe the flight other than amazing. While you can take a helicopter tour of San Diego, I don’t think you can beat this for getting a full view of the city and getting to take in the breathtaking views.


      Coding tip for if statements

      When I was a young engineer, a more senior colleague of mine taught me a lot about writing code and helped me adopt my own style. Just like an artist, every developer has his own style with no style being wrong. However, there is one coding convention that he taught me I think all developers should use. Here’s what developers shouldn’t do:

      if (something)
             dosomething;

      Instead they should do:

      if (something)
      {
            dosomething;
      }

      (or if you prefer, put the { on the if line).

      Why do I say is? It’s simple, if you come along later and add a line to the first statement, like:

      if (something)
              dosomething;
              dosomethingelse;

      you could have the wrong thing happen. If you wanted the “dosomethingelse” to only happen if the if statement was executed, that’s not what would happen (it would always execute). The brackets make it explicit what will happen on the if statement. I’ve seen this type of coding in a lot of code and it will definitely lead to failure at some point or another.

      I’m sure some people will take offensive with what I say, but this tip will save lots of time in debugging at some point.