Setting up a UniFi Security Gateway for an On Demand iOS VPN

[UPDATE – 18 May 2020] In some recent iOS update (not sure which), certificates are no longer required to have an on demand VPN work. So I switched to using the built in L2TP VPN in the USG which requires very little configuration. My VPN profile has also changed and can be found here. This profile does on demand like before, but also automatically connects if something on my phone tries to access certain internal resources (I have AdGuard setup to handle DNS on my network). I use this for connecting to Home Assistant without port forwarding or anything like that.

[UPDATE – 06 Feb 2019] With the latest release of the OpenVPN app, the identifier has changed from net.openvpn.OpenVPN-Connect.vpnplugin to net.openvpn.connect.app. Without this change, the VPN profile will NOT work.

Following up on my widely popular post about Setting up an EdgeRouter Lite for an On Demand iOS VPN, I’ve decided to write about the same procedure, but on a Ubiquiti UniFi Security Gateway. Much of the procedure is the same, but for completeness I’ll include all the steps here.

An on demand VPN will automatically fire up when you’re on certain WiFi networks and under certain circumstances. This is quite useful if you use unknown WiFi networks and are concerned about security (you should be!).

This is a really long setup, but it is straightforward. If you’re intimidated by command lines and editing text files, this process is not for you!

Certificate Setup

  1. SSH into the USG. You’ll use the same username and password for connecting to the UniFi Controller.
  2. Setup a new certificate authority that will be used to create new client certificates for the VPN. Issue the following commands, one per line. Follow the prompts when you run the commands.
    configure
    sudo su
    cd /usr/lib/ssl/misc/
    ./CA.sh -newca
    
  3. Create a new server certificate and sign it. Follow the prompts when you run the commands; you’ll need to enter a password for the new request. We’ll remove it in another step.
    ./CA.sh -newreq
    ./CA.sh -sign
    
  4. Copy the certificate authority key and certificate to an area of the router that will survive a firmware upgrade.
    cp demoCA/cacert.pem demoCA/private/cakey.pem /config/auth/
    
  5. Also copy the server certificate to the same place.
    mv newcert.pem /config/auth/server.pem
    
  6. Display the certificate authority certificate using cat /config/auth/cacert.pem and then copy it into BBEdit or another text editor on your local computer; save it to your hard drive.

  7. Remove the password on the private key for the server so that the VPN server can start automatically.

    openssl pkcs8 -in newkey.pem -out /config/auth/server-pem.key
    
  8. Generate the Diffie-Hellman Paramters; this takes a long time.
    openssl dhparam -out /config/auth/dhp.pem -2 1024
    
  9. The next part is generating the client certificates. The recommendation is to have 1 client certificate per client. However, this would require me to have 1 for my iPad and 1 for my iPhone complicating setup. While having 1 certificate for both may not be recommended, it is the route I chose. When prompted, enter a password for the new key and then the last line will remove it. Don’t enter a challenge password.
    ./CA.sh -newreq
    ./CA.sh -sign
    mv newcert.pem client-cert.pem
    openssl pkcs8 -in newkey.pem -out client-key.pem
    
  10. Display the certificate using cat client-cert.pem and past it into BBEdit and then saved it.

  11. Do the same thing with the key using cat client-key.pem and saved it to my Mac.
  12. On my Mac, do the following in Terminal (make sure you’re in the same directory as where you saved the certificate and key). When exporting, set a password that you’ll use later.

    openssl pkcs12 -export -out client1.p12 -inkey client-key.pem  -in client-cert.pem
    

Note that the /config directory survives firmware upgrades. If you need to add client certificates later and the certificate authority you created is gone, you may have to start the setup over.

OpenVPN Server Setup

  1. Create a file called config.gateway.json and place it in the data directory for your UniFi Controller. I run my controller on a Mac and the path is ~/Library/Application Support/UniFi/data/sites/default. It should basically be as shown below. You’ll want to configure the OpenVPN network (10.0.5.0/24) if you use a different numbering scheme; this cannot be a network defined in the UniFi Controller. You should also change the DNS to servers you use. I don’t know if the push-route commands are absolutely necessary, but I put them in anyway as they appear to work.
    {
      "firewall": {
        "group": {
          "network-group": {
            "open_vpn_network": {
              "description": "OpenVPN Network",
              "network": [
                "10.0.5.0/24"
              ]
            }
          }
        }
      },
      "interfaces": {
        "openvpn": {
          "vtun0": {
            "local-port": "1194",
            "mode": "server",
            "openvpn-option": [
              "--comp-lzo",
              "--push redirect-gateway",
              "--push dhcp-option DNS 10.0.1.2",
              "--push dhcp-option DNS 10.0.1.1",
              "--duplicate-cn"
            ],
            "server": {
              "push-route": [
                "10.0.1.0/24",
                "10.0.5.0/24",
                "10.0.0.0/16"
              ],
              "subnet": "10.0.5.0/24"
            },
            "tls": {
              "ca-cert-file": "/config/auth/cacert.pem",
              "cert-file": "/config/auth/server.pem",
              "dh-file": "/config/auth/dhp.pem",
              "key-file": "/config/auth/server-pem.key"
            }
          }
        }
      },
      "service": {
        "nat": {
          "rule": {
            "7000": {
              "description": "OpenVPN to WAN",
              "log": "disable",
              "outbound-interface": "eth0",
              "protocol": "all",
              "source": {
                "group": {
                  "network-group": "open_vpn_network"
                }
              },
              "type": "masquerade"
            }
          }
        }
      }
    }
    
  2. Force a reprovision of the USG by selecting the USG, then clicking on the Config tab.
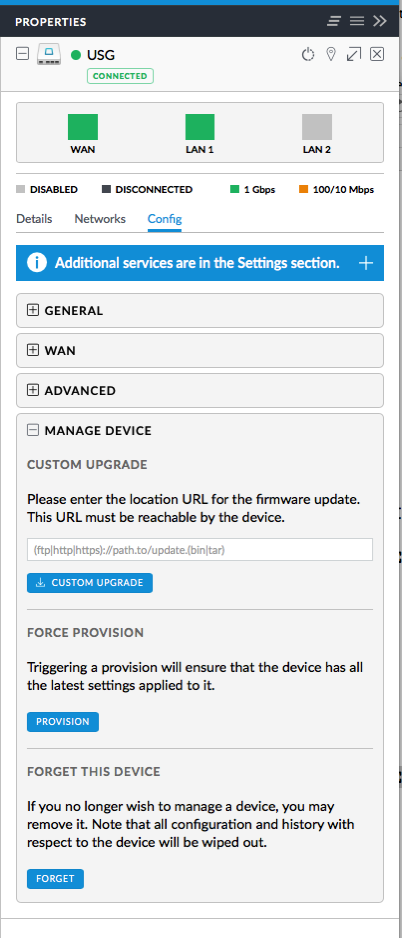
    Reprovision

  3. On the UniFi Controller, click on Settings and then Routing & Firewall.
  4. Click on Firewall at the top.
  5. Click Groups and add an OpenVPN port group.
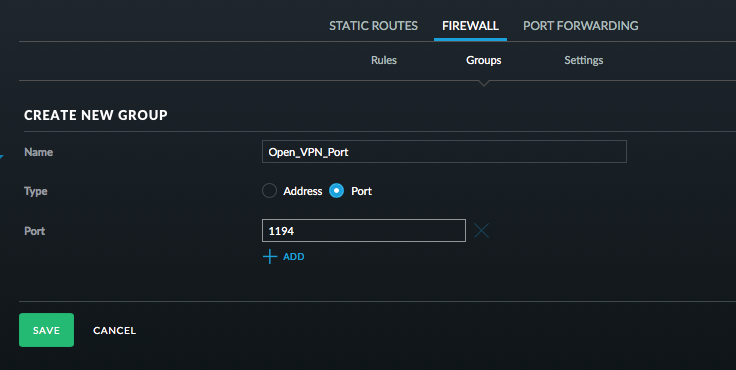
    Screen Shot 2018 02 09 at 1 18 49 PM
  6. Switch over to Rules and setup an OpenVPN rule.
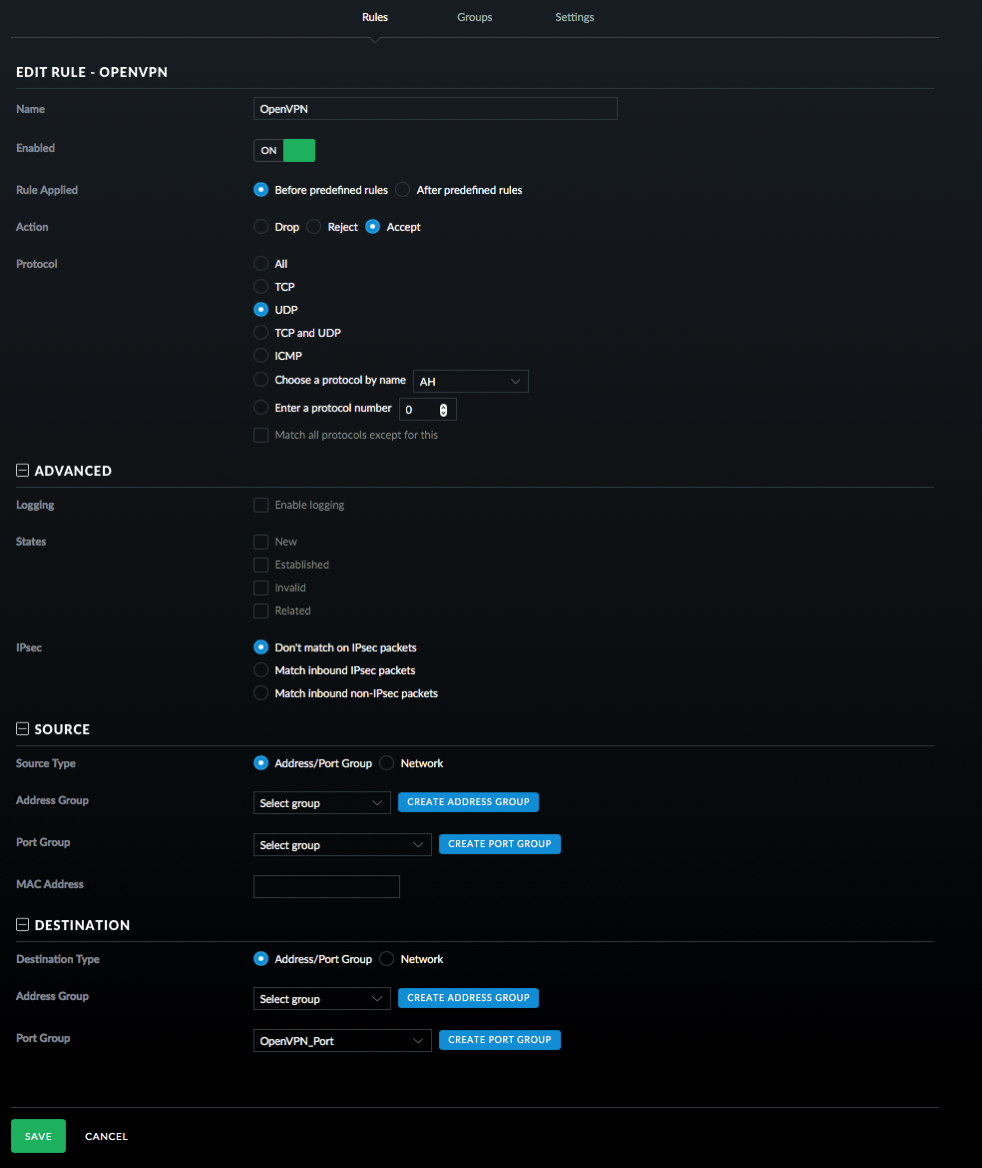
    OpenVPN Firewall
    Good work if you’ve followed along this far! Next up is the client setup which has a bunch of steps as well.

iOS Client Setup

  1. Locate the p12 file that you created on your Mac.
  2. Download Apple Configurator from the Mac App Store.
  3. Select New Profile from the File menu.
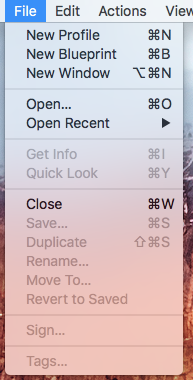
    New Profile

  4. Fill out the General information for the profile. You can leave the Identifier as is.
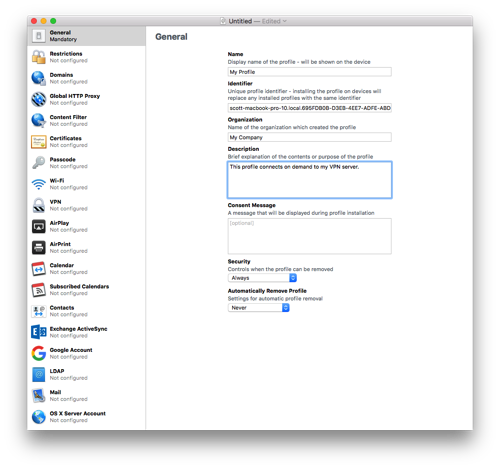
    General

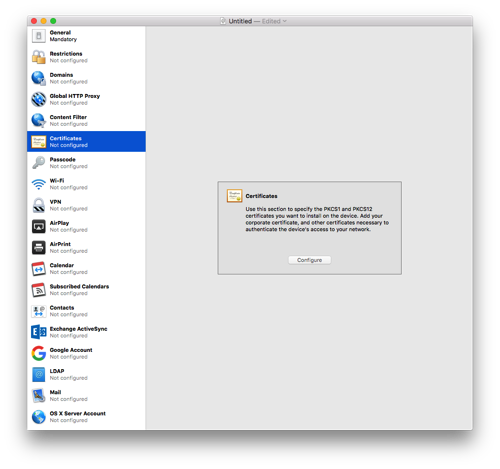
  5. Click on Certificates and then press Configure. Select the .p12 file you created way back in the first part of the instructions.
    Select Certificate
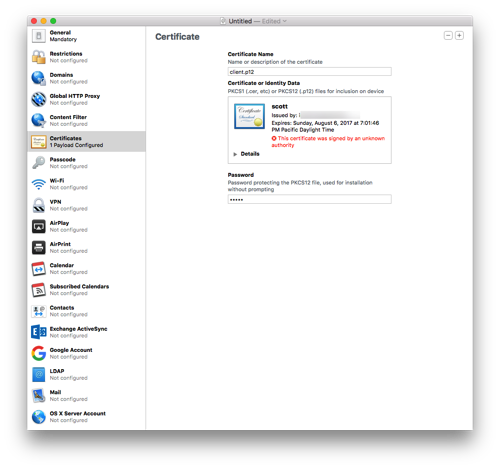
  6. Give the certificate a name and enter the password you used when exporting the p12 file.
    Certificate Selected
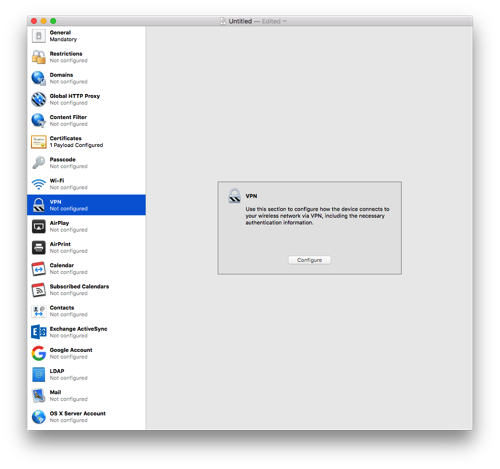
  7. Select the VPN section and click Configure.
    Configure VPN

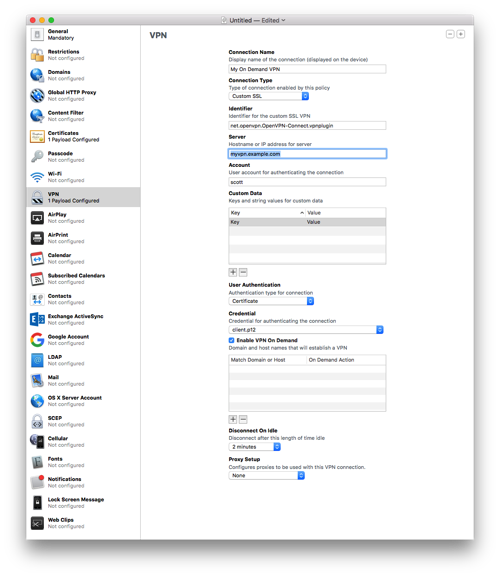
  8. Enter a name for the connection.

  9. Select Custom SSL for the Connection Type.
  10. Enter net.openvpn.connect.app for Identifier.
  11. Enter the hostname for the Server. I recommend your Dynamic DNS hostname here.
  12. Enter some username for the account; it won’t be used.
  13. Enter a placeholder key/value pair. You’ll edit this by hand later.
  14. Select Certificate for User Authentication and then pick the certificate you added earlier.
  15. Enable VPN On Demand. You’ll hand edit this later as well.
  16. Select a Disconnect on Idle value; I selected Never.
  17. Save the profile to your Desktop (or somewhere else). Don’t sign it as signing it will prevent you from editing it by hand which is needed to properly setup the VPN On Demand. Configurator doesn’t handle all the options present in current iOS versions.
    VPN Setup
  18. Open the .mobileconfig file in BBEdit. BTW, if you haven’t bought BBEdit, you should definitely buy it. While the current version offers basic functionality for free, this is a tool that should always remain in your tool belt.
  19. Look at the section called VPN. Mine is basically below. You’ll need to change a few entries.

        <key>VPN</key>
        <dict>
            <key>AuthName</key>
            <string>scott</string>
            <key>AuthenticationMethod</key>
            <string>Certificate</string>
            <key>DisconnectOnIdle</key>
            <integer>0</integer>
            <key>OnDemandEnabled</key>
            <integer>1</integer>
            <key>OnDemandRules</key>
            <array>
                <dict>
                    <key>Action</key>
                    <string>Disconnect</string>
                    <key>SSIDMatch</key>
                    <array>
                        <string>My Network 5 GHz</string>
                        <string>My Network</string>
                    </array>
                </dict>
                <dict>
                    <key>Action</key>
                    <string>Disconnect</string>
                    <key>InterfaceTypeMatch</key>
                    <string>Cellular</string>
                </dict>
                <dict>
                    <key>Action</key>
                    <string>Connect</string>
                    <key>InterfaceTypeMatch</key>
                    <string>WiFi</string>
                </dict>
                <dict>
                    <key>Action</key>
                    <string>Ignore</string>
                </dict>
            </array>
            <key>PayloadCertificateUUID</key>
            <string>SOME_IDENTIFER</string>
            <key>RemoteAddress</key>
            <string>vpn.example.com</string>
        </dict>
        <key>VPNSubType</key>
        <string>net.openvpn.OpenVPN-Connect.vpnplugin</string>
        <key>VPNType</key>
        <string>VPN</string>
        <key>VendorConfig</key>
        <dict>
            <key>dev</key>
            <string>tun</string>
            <key>proto</key>
            <string>udp</string>
            <key>remote</key>
            <string>vpn.example.com 1194</string>
            <key>cipher</key>
            <string>BF-CBC</string>
            <key>resolv-retry</key>
            <string>infinite</string>
            <key>nobind</key>
            <string>NOARGS</string>
            <key>persist-key</key>
            <string>NOARGS</string>
            <key>persist-tun</key>
            <string>NOARGS</string>
            <key>comp-lzo</key>
            <string>NOARGS</string>
            <key>link-mtu</key>
            <string>1542</string>
            <key>ca</key>
            <string>-----BEGIN CERTIFICATE-----\nMIID...bAqZZCQYgHwAh9bW\n-----END CERTIFICATE-----\n</string>
        </dict>
    </dict>
    
  20. Change the vpn.example.com references to your VPN address.

  21. For the section that starts with BEGIN CERTIFICATE for the ca, find the cacert.pem that you saved to your hard drive. Open that in BBEdit and remove all the returns in the file. After the first line replace the return with \n. Before the last line put a \n and then another one after the line. You should end up with a big long line!
  22. The OnDemandRules are described in Apple’s documentation. My setup basically says that if I’m on a trusted network, disconnect the VPN. When on cellular, also disconnect the VPN (I trust the cellular network for now). If I’m on any other network, connect the VPN. The last item just falls through, but I suspect it will never get there. In my example, change the names of the trusted SSIDs.
  23. The VendorConfig section are the OpenVPN options that should match the server.
  24. Save the file.
  25. Transfer the .mobileconfig file to your iOS device. I drop the file on AirDrop to my devices. If the formatting of the file is correct, the iOS device will ask you to install the file.
  26. In the VPN section in iOS Settings, Connect and cross your fingers. That’s it! Now when you wonder onto an unknown WiFi network, the VPN should automatically connect. It may take a few seconds for the connection to come up.

If you’ve made it this far, congratulations! I spent a few days working on this and hopefully I captured all the steps. Please send me corrections or feedback.

Notes

  1. I’ve noticed that sometimes iOS connects to my VPN even when it is on my network. The On Demand connection is evaluated when the network changes and I suspect iOS gets confused and starts evaluating the On Demand rules prior to getting an SSID.
  2. The default certificates are good for 1 year. So you’ll need to renew then after a year. I’ll cross that bridge when I come to it.
  3. If the certificate is compromised, I don’t know how to do certificate revocations.
  4. Treat the certificate and keys just as if they were passwords. This goes for the .mobileconfig file as well. The mobileconfig file has the password to the p12 file in clear text and anyone with that file can connect to your VPN and access your network.
  5. The OnDemand rules are evaluated when the device changes networks and may take a few seconds to bring up the VPN. I always wait for the VPN icon to come up before doing anything on my device.
  6. OpenVPN runs on UDP port 1194 by default. You can configure it for TCP 443, but I won’t go into that because it seems like a pain and requires more changes.
  7. In the latest iOS version (11.2.x), if your VPN is on demand, you cannot manually connect with it. You have to go into iOS Settings->General->VPN, tap the Info button next to the VPN and turn off “Connect On Demand”.
  8. Savvy readers will notice that I put the client certificate as a p12 file in the mobileconfig file and put it in the OpenVPN specific settings. There appears to have been a change to the OpenVPN client on iOS where the p12 certificate no longer works. You may be able to remove the certificate from the configuration, but I left it.
Preserving Metadata in Photos

During my recent task of scanning the rest of the photos that I had lying around, I found a CD that my parents had made with some photos on it. They burned it using iPhoto 6 (burning a CD was a feature of iPhoto years ago). I thought that I’d just be able to put the CD in and open the library in Photos with all the metadata preserved. Unfortunately Photos couldn’t read the library, so I was stuck with a bunch of JPEGs that had no metadata on them and the file dates aren’t the actual dates of the pictures. While I was able to drag all the pictures into Photos, I really would have preferred that the metadata be attached to the photos.

Apple has taken the approach that the original photos should not be modified and that any changes like the date or metadata should be stored in a database. This is great as long as the database doesn’t become corrupted and the application remains supported. I encountered the same type of issue when I was developing Paperless where I was allowing users to add a bunch of metadata to PDFs and I stored it in a database. Unlike Apple, I realized pretty quickly that if something happened to the database, I stopped supporting the application, or a user wanted to switch to another application, I wanted users to still have all the metadata associated with the PDFs. I discovered that PDFs can have keywords attached to them and I used this mechanism to write the data directly into the PDFs.

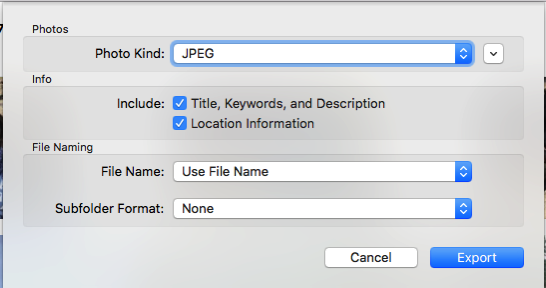
With Photos, if you drag a photo out of it and into the Finder, you get a copy of the original photo with none of the metadata that you enter in Photos attached to it. However, if you choose to export the photo there is an option to include the metadata which writes it as EXIF to the photo.

Screen Shot 2017 12 19 at 9 06 19 AM

This was the key to my concern about having the metadata in the photos themselves. I created a smart album which contained all photos that didn’t have a camera set on them (the assumption is that all photos that have the camera set in the EXIF have the correct photo date), exported all the photos, deleted the photos in Photos and re-imported them. Somewhat roundabout way to accomplish what I wanted, but my photos now have dates on them that will survive if Photos ever goes belly up.

A year with my Impreza

It’s hard to believe that I bought my Subaru Impreza a year ago! My initial impressions of the car were pretty good. Now that I’ve put about 10,000 miles on it, I am convinced that I made the right choice with the car. We’ve taken it on a few road trips pushing, but mostly I’ve driven it around town.

I’ve never owned a “sports car” and this may be the closest I come to one. This car is truly fun to drive. I’ve been playing a lot with the paddle shifters especially going down mountains. Also, being closer to the ground, I definitely feel the acceleration.

Tech wise, CarPlay is now a requirement for every car I get. The interface is clean and Apple updates it periodically with new features, something car manufacturers are not known to do with the infotainment systems. Up-to-date maps and navigation alerts such as alternate routes and accidents are handy. My only problem with CarPlay is that I have to wait for the infotainment system to fully power up before I plug in my phone, otherwise CarPlay fails to start. However, I’m testing a theory that the Subaru STARLINK app crashes when I connect my phone to the car. The app is useless and I’m not sure why I left it on my phone until this week.

I was concerned about the smaller cargo capacity especially going on trips and camping, but those concerns have so far been unfounded. I’ve managed to cram everything in the car without having to use the roof box I bought. The gas mileage has been pretty good with some trips giving me close to 38 mpg. Unfortunately most of my driving is city driving and a hybrid would have done much better in those circumstances. If Subaru had a hybrid Impreza, I’d definitely be interested in that.

The car has had a few recalls which is expected on a new platform and I hope I get years of continued service out of it.

Overall this car was a very good purchase. It may not be for everyone; it is the right car for me!

Digitally Preparing for an Emergency

The recent fires in Southern California have me thinking about what would I do if I had to evacuate. I’d grab the family and the dog, but what else? While I have a collection of personal mementos such as product boxes from my career, I’d probably just take my Eagle Scout award which is sitting on a shelf in my office. What about all the documents in my file cabinet? They could be important in the future.

Eleven years ago, I started on a journey to scan everything and go “paperless”. I’ve been pretty good at scanning in things that come into the house, but missed a number of documents over the years and never went back prior to eleven years ago. This week, I’ve gone through my entire file cabinet and used my Fujitsu ScanSnap iX500 to finish the task. I put all the documents into Paperless for easy organization. In addition to all the paper, I used the scanner to scan over 1000 photos! The scanner is a workhorse and scans in everything I throw at it. Some would have used a professional service for the photos to save time, but I just plugged away and used the ScanSnap at 600 dpi to scan in the photos.

Now that I have all my photos and documents in a digital form, the question about what I’d take in case of fire gets a little easier. I’d grab my MacBook Pro and my Akitio Thunder2 Quad with 24 TB of storage. This drive has all my media as well as backups from all the computers in the house. Of course, I need to bring a Thunderbolt 2 to Thunderbolt 3 dongle and a cable!

Would I be devastated if something happened to my house and belongings? No doubt I would, but as long as my family is safe everything else is just “stuff” and by going digital with my documents, I have peace of mind that I at least have copies of important documents.

Setting up WAN Failover on a USG

For many years, I’ve been intrigued about routers that have cellular backup to maintain connectivity when the primary Internet does down. I’ve never pursued setting this up as my Internet connection has been quite reliable with downtime measured in hours over the last few years. The cost to set this up could never be justified for my home setup.

One of the features of the latest UniFi Controller is the ability to turn an unused Ethernet port on the USG to be a WAN failover. This is a great addition for a enterprise class router, but overkill for my needs.

About a year ago I purchased a HooToo Travel Router to experiment with setting up a VPN when I travel. I had some success with it, but ultimately gave up and have just been using it as a battery for other devices. I’ve been reading forums about the Mobley and saw that the Mobley could be tethered to a router and not just used as a hotspot. Now I had a mobile hotspot and a router that maybe I could put together to be a WAN failover.

The forums talking about the Mobley mentioned router firmware called ROOter that supports various routers and modems. There happened to be firmware for a router similar to my portable router, so I decided to give it a try. Worst case is that I’d brick the router and this exercise would be over.

After a bit of fiddling, I got everything working. The below steps detail what I did. There are a large number of steps, but they’re pretty simple. There should be very few, if any, changes for different LTE modems.

  1. I grabbed firmware for the HooToo TripMate Nano router.
  2. I then flashed the firmware onto the router. This is going to vary based on the current firmware on the router.
    Screen Shot 2017 10 29 at 4 29 41 PM
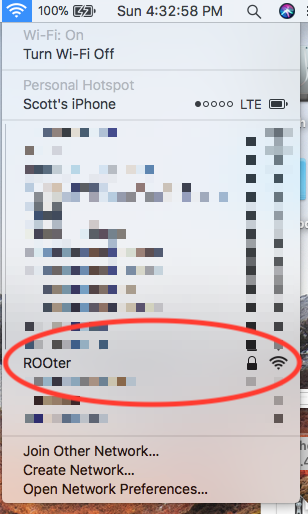
  3. Select the ROOter SSID on your computer. Use the default WiFi password of rooter2017.
    Screen Shot 2017 10 29 at 4 32 54 PM
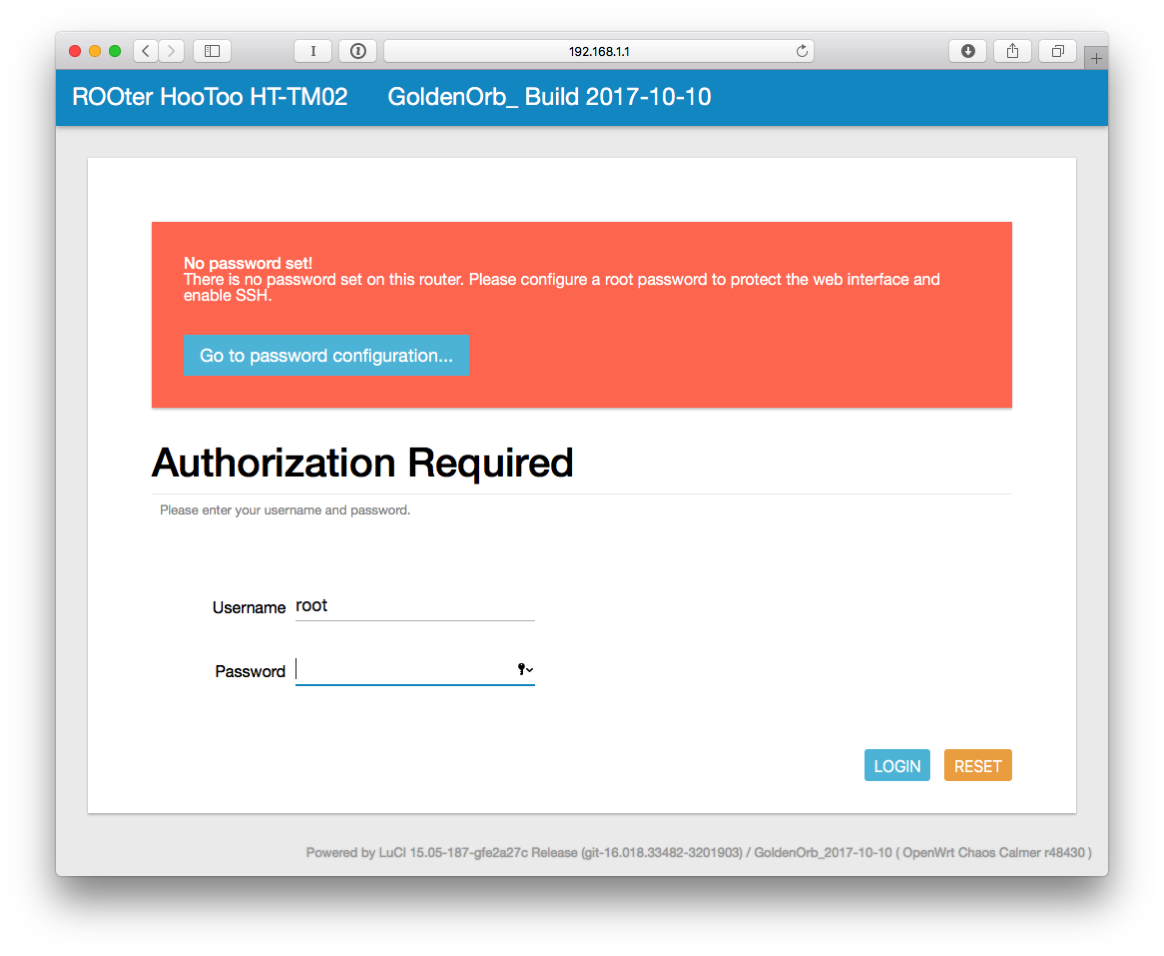
  4. Goto Safari and enter 192.168.1.1.
    Screen Shot 2017 10 29 at 4 35 16 PM
  5. Click Login.
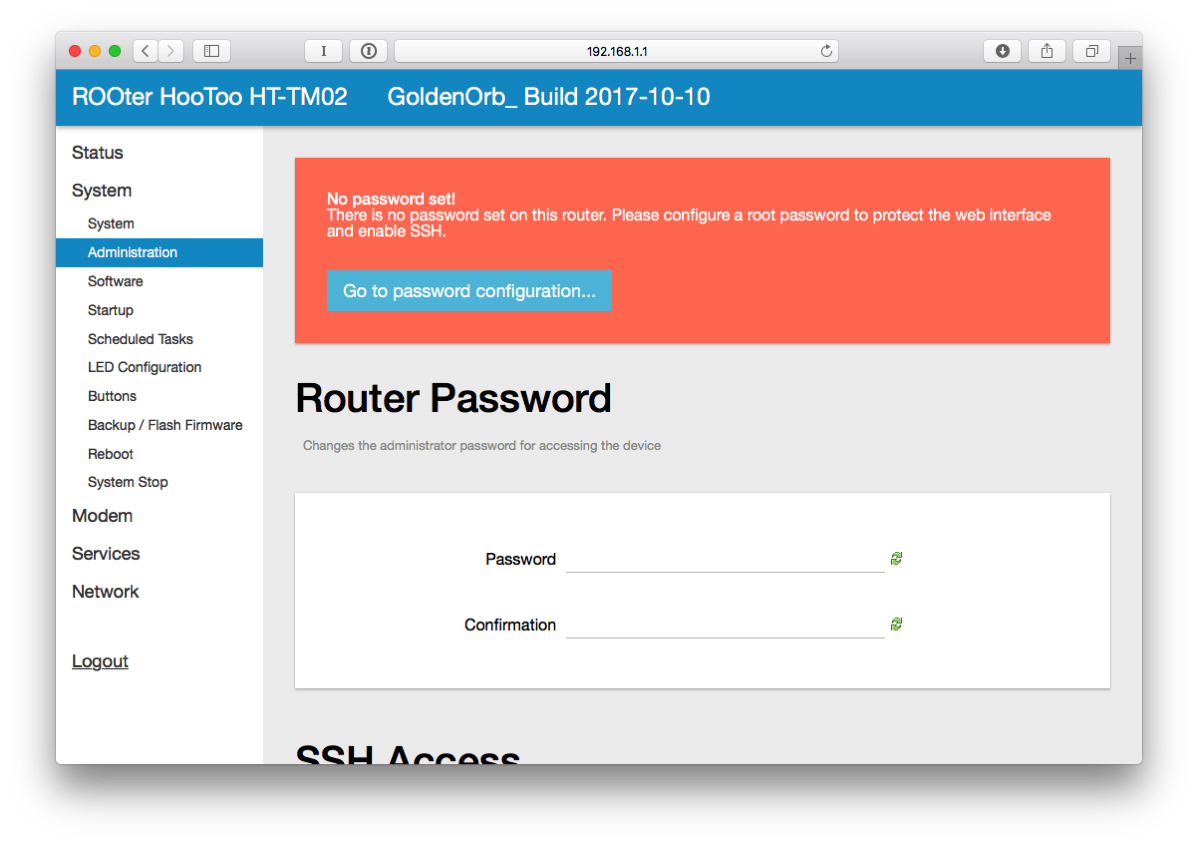
  6. Click on “Go to password configuration…”
  7. Enter a password and confirm it.
    Screen Shot 2017 10 29 at 4 36 25 PM
  8. Click SAVE & APPLY at the bottom of the page.
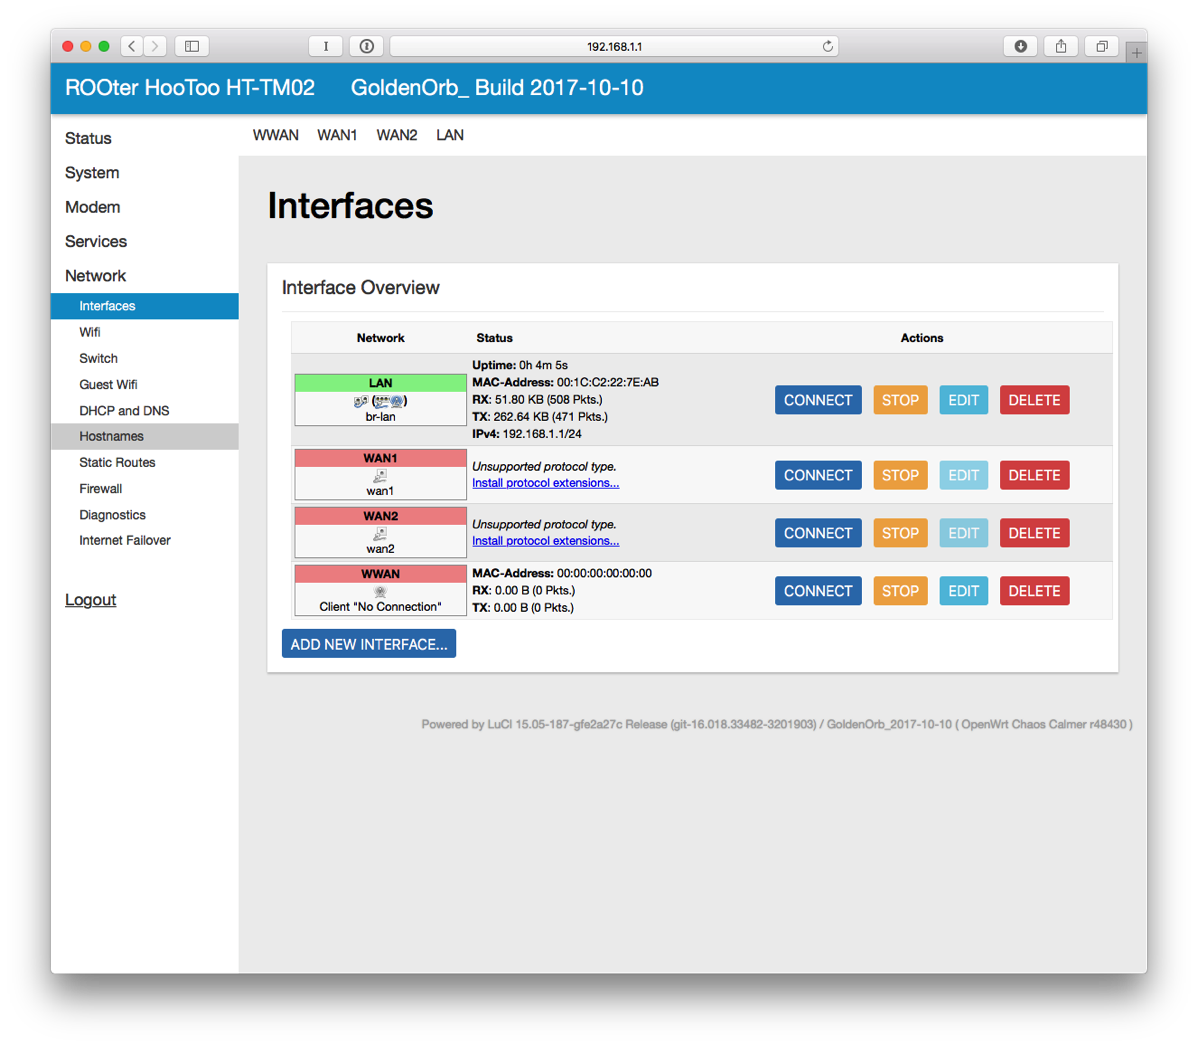
  9. On the left side, click on Network and then Interfaces.
    Screen Shot 2017 10 29 at 4 37 35 PM
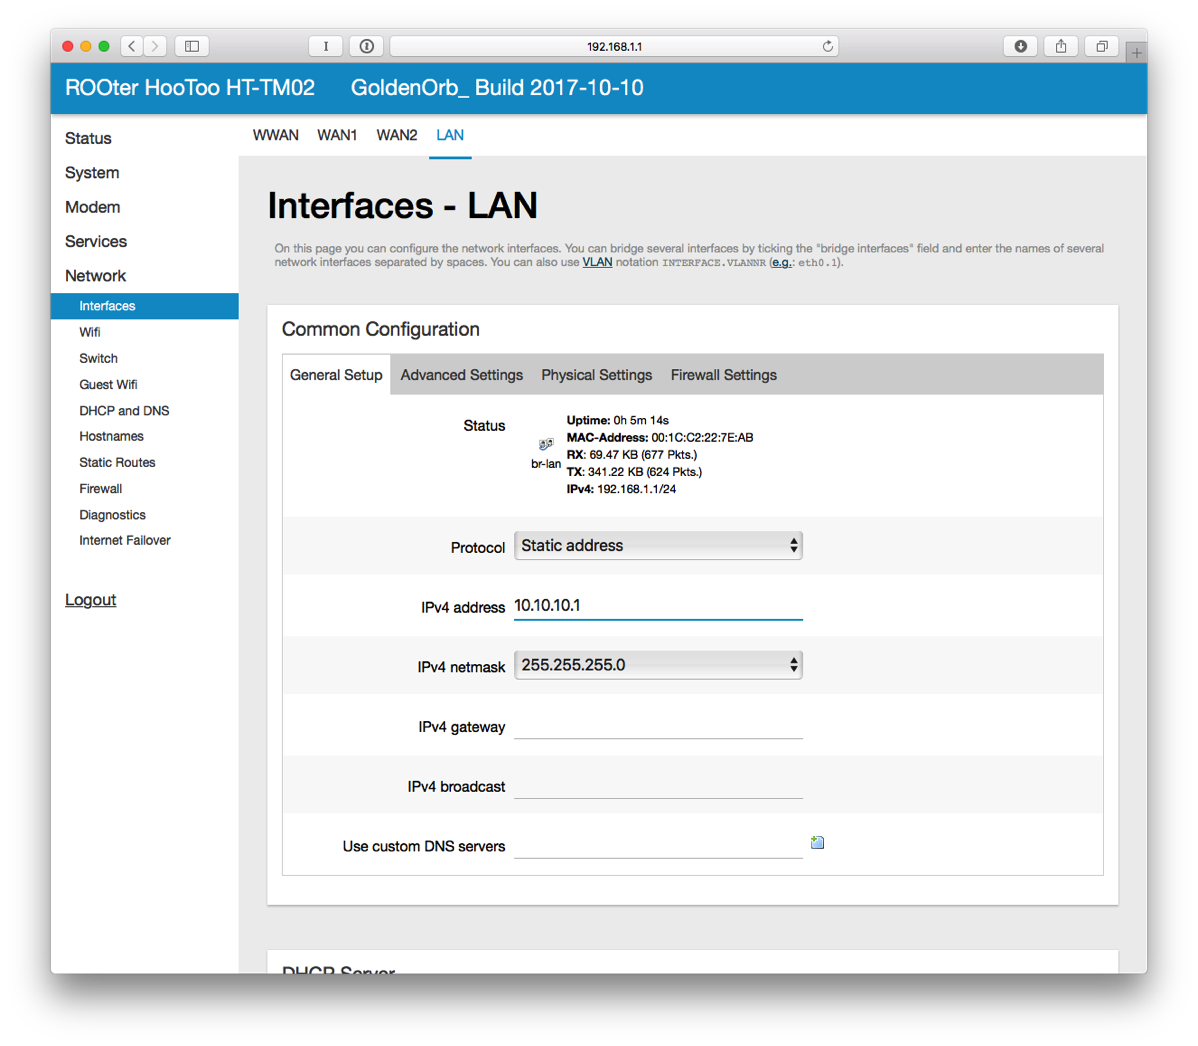
  10. Next to LAN, click on EDIT.
  11. For the IPv4 address, enter 10.10.10.1 (it has to be a different subnet than the hotspot and I like this numbering scheme). At the bottom of the page, click SAVE & APPLY.
    Screen Shot 2017 10 29 at 4 38 43 PM
  12. The router will apply the settings and knock you off the network. I did have to disconnect from WiFi and reconnect to get assigned a new IP address.
  13. In Safari, connect to 10.10.10.1. Login.
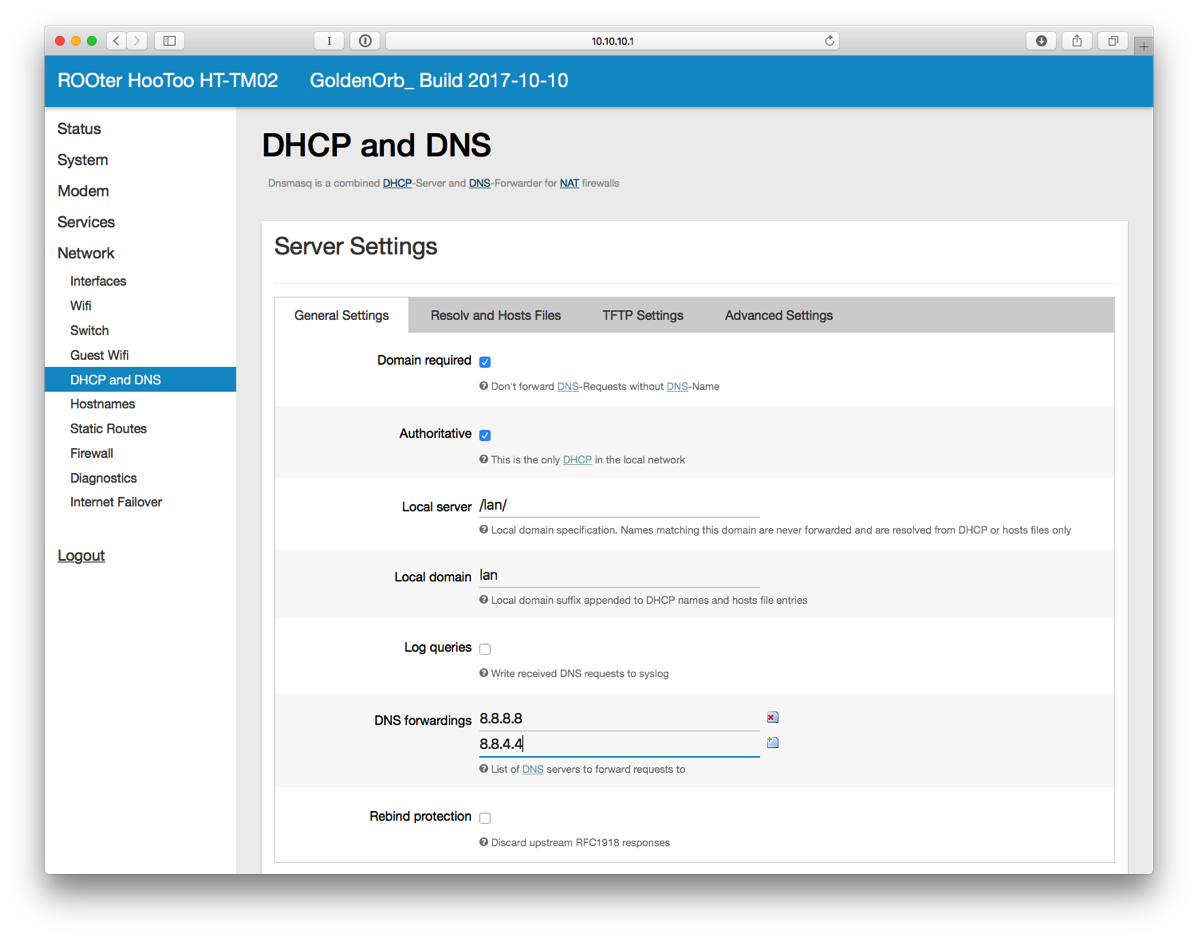
  14. On the left side, select DHCP and DNS.
  15. Enter 8.8.8.8 and 8.8.4.4 for DNS Forwardings. Click SAVE & APPLY at the bottom.
    Screen Shot 2017 10 29 at 4 43 11 PM
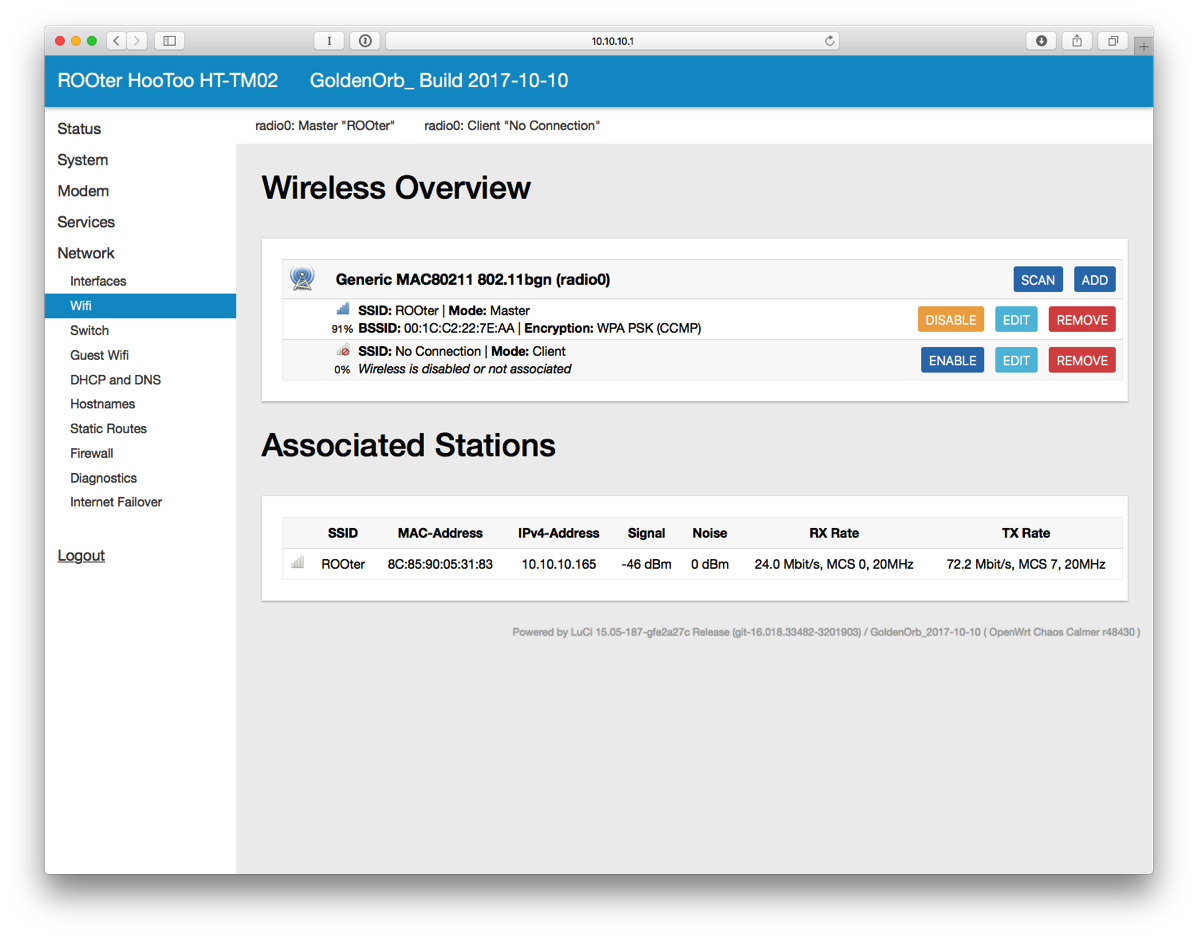
  16. On the left side, Select Wifi under Network and then click EDIT next to ROOter.
    Screen Shot 2017 10 29 at 4 44 54 PM
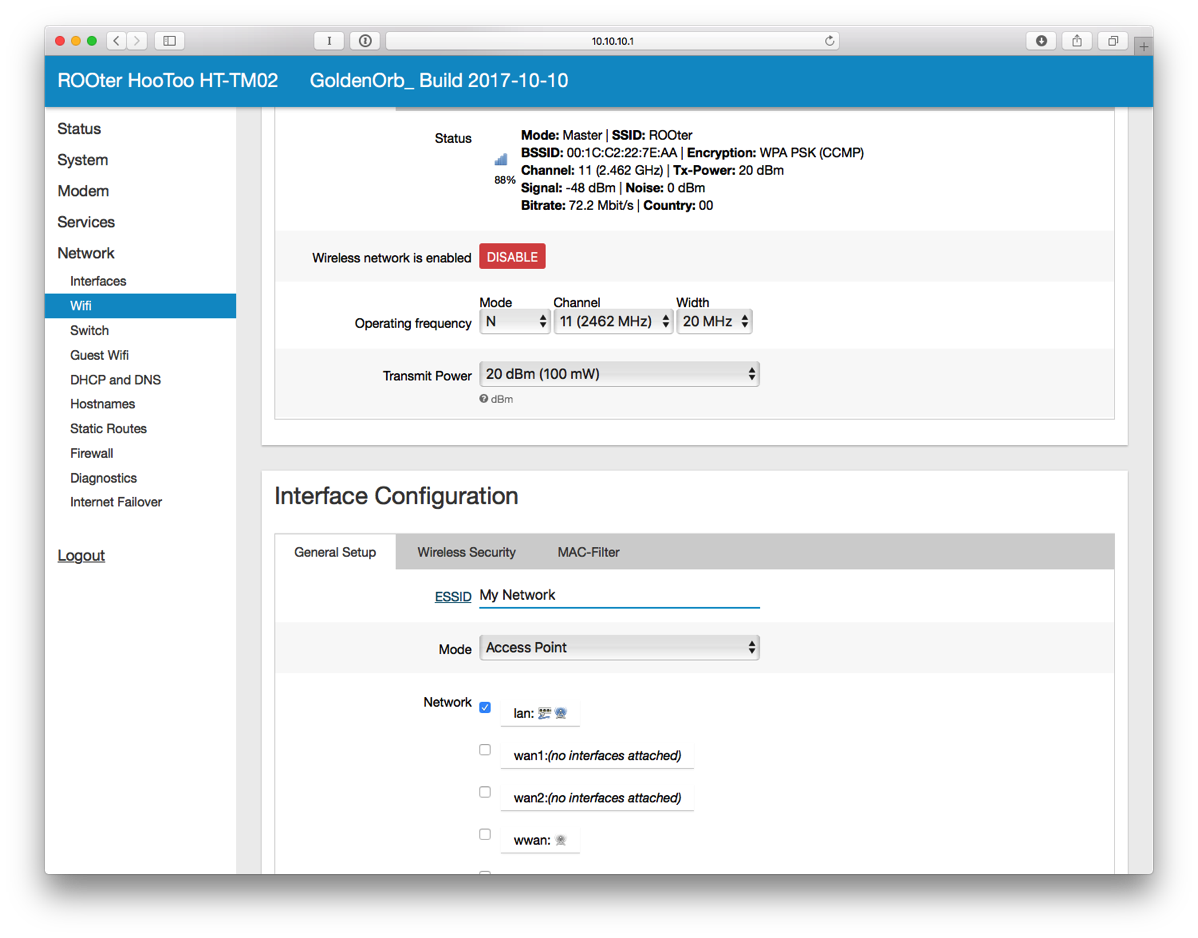
  17. Change the ESSID to whatever you want.
    Screen Shot 2017 10 29 at 4 46 26 PM
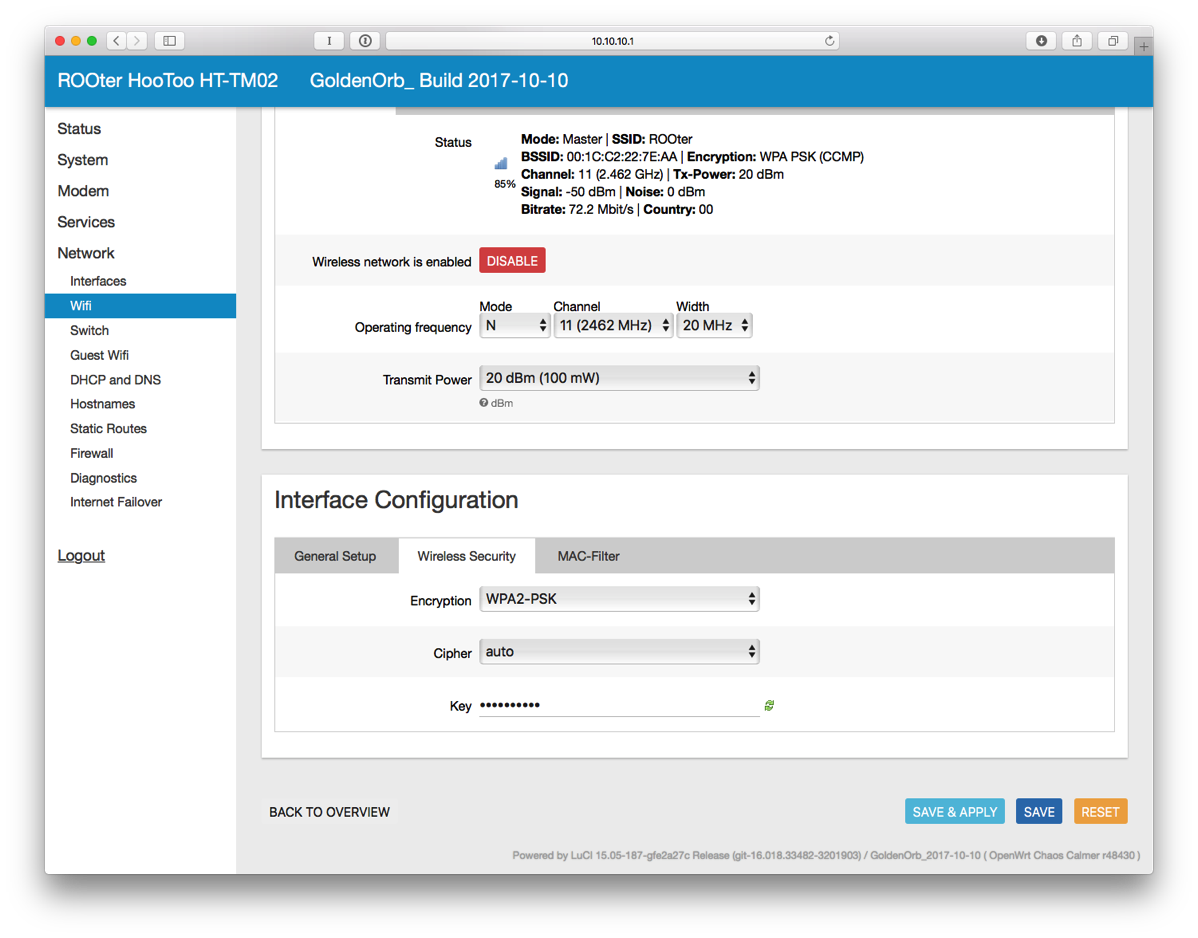
  18. Click on Wireless Security.
  19. Change Encryption to WPA2-PSK. Change the Key as well. Click SAVE & APPLY.
    Screen Shot 2017 10 29 at 4 47 40 PM
  20. You’ll have to reconnect to WiFi for the new SSID that you just set.
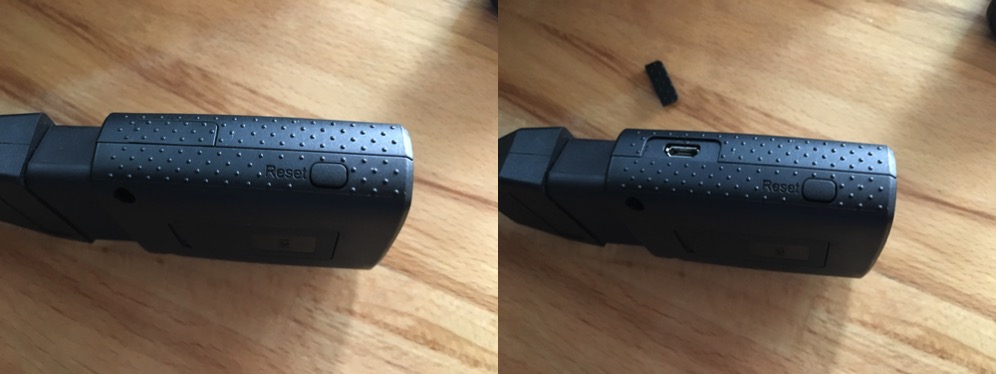
  21. Power on the Mobley. It can’t be plugged into the USB port of the TripMate as there is a separate USB port on the Mobley for tethering.
  22. On the Mobley, peel off the little cover on one side to reveal a micro USB port.
    Mobley
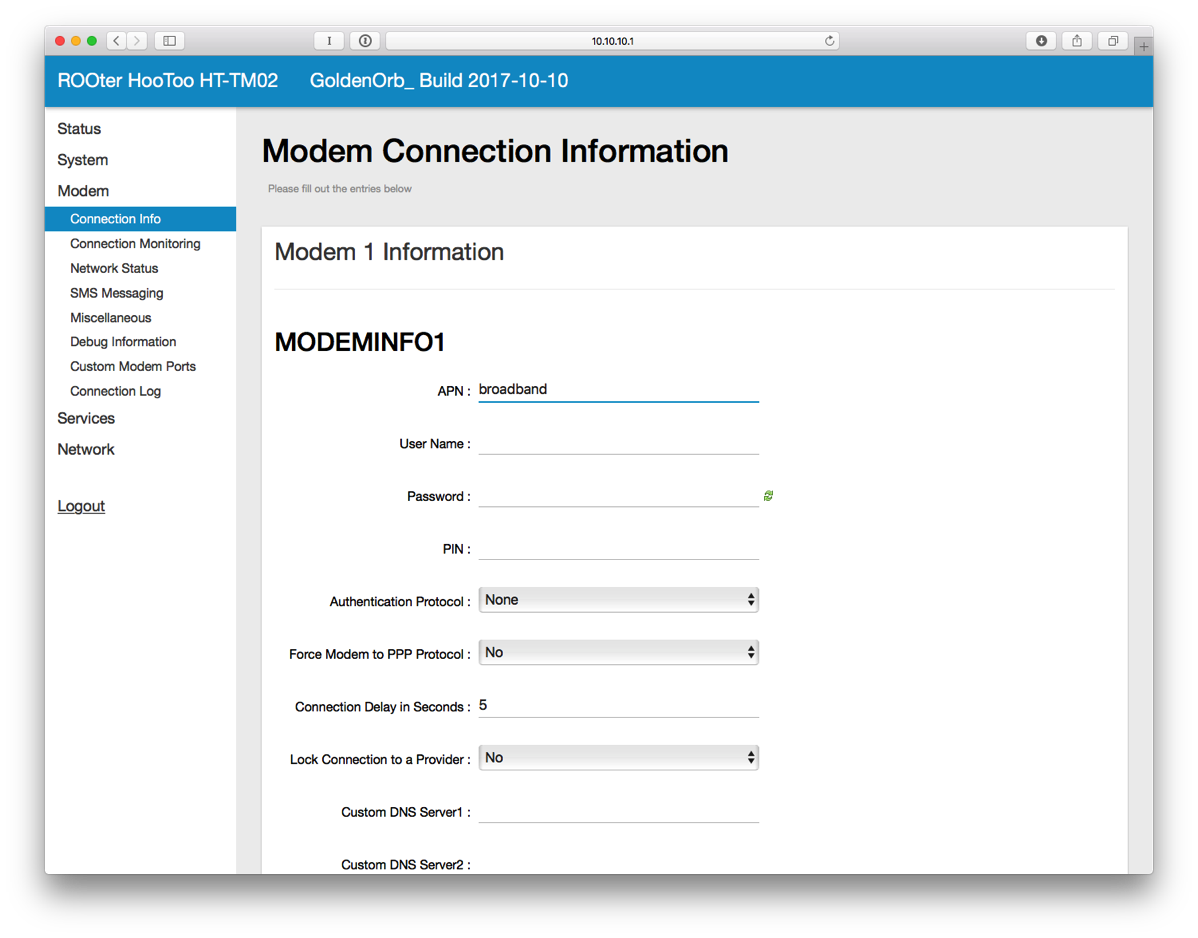
  23. On the left side of the interface, click on Modem and then Connection Info.
  24. Enter broadband next to APN and click SAVE.
    Screen Shot 2017 10 29 at 5 05 55 PM
  25. Plug in a micro USB cable from the router to the Mobley.
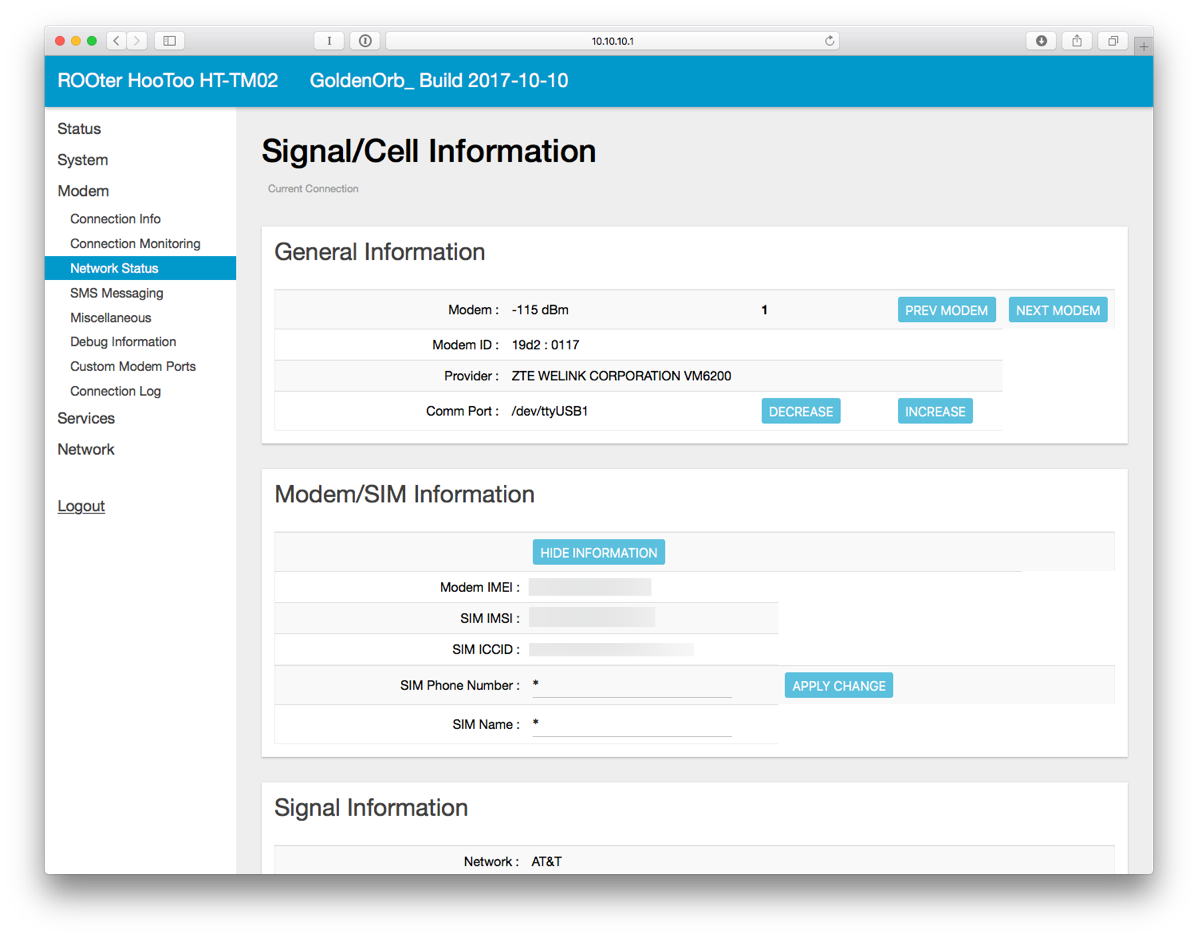
  26. On the left side, click on Network Status. Wait a little bit until the connection is established. Once connected, it will look like this.
    Screen Shot 2017 10 29 at 5 07 40 PM
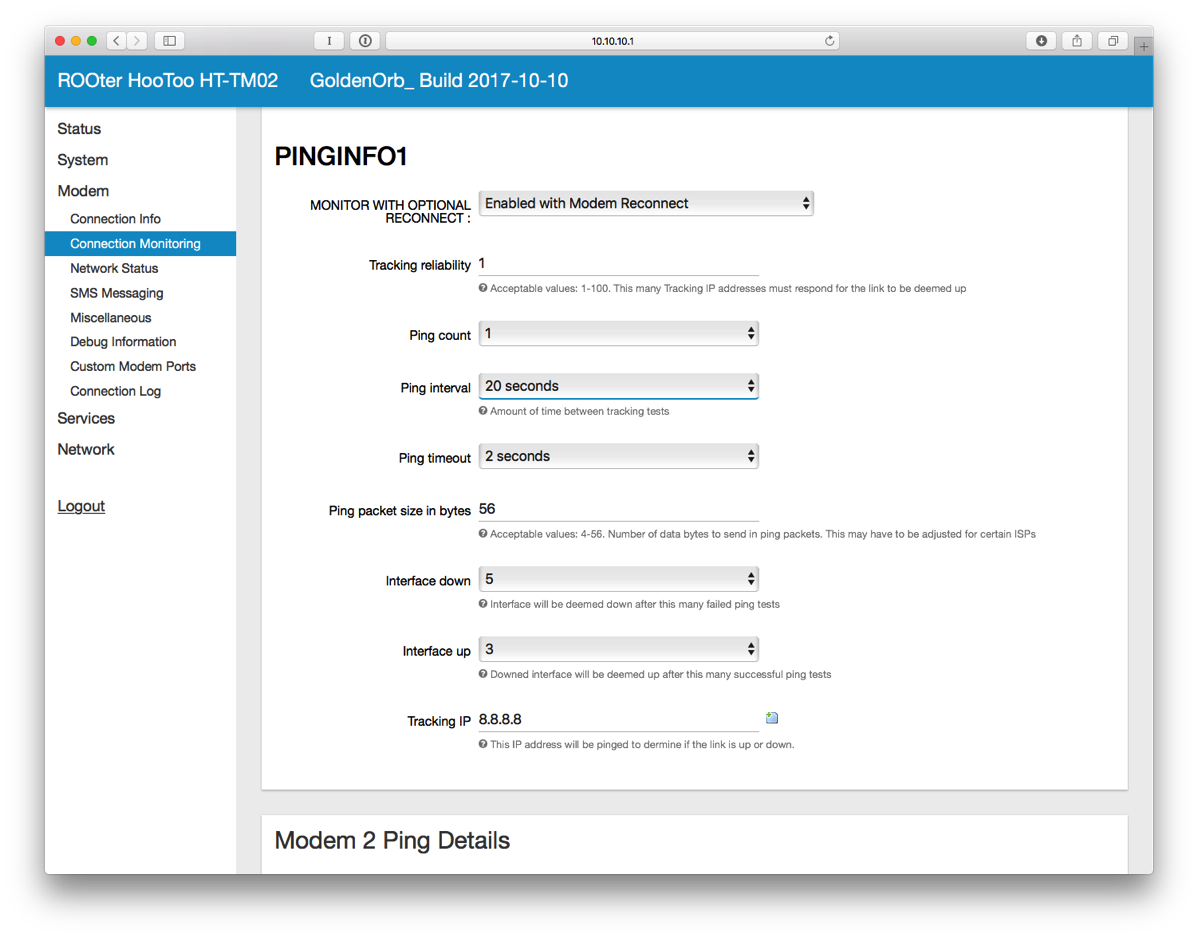
  27. You may also want to setup Connection Monitoring which will attempt to reconnect the modem in case of network failure.
    Screen Shot 2017 10 29 at 5 15 05 PM
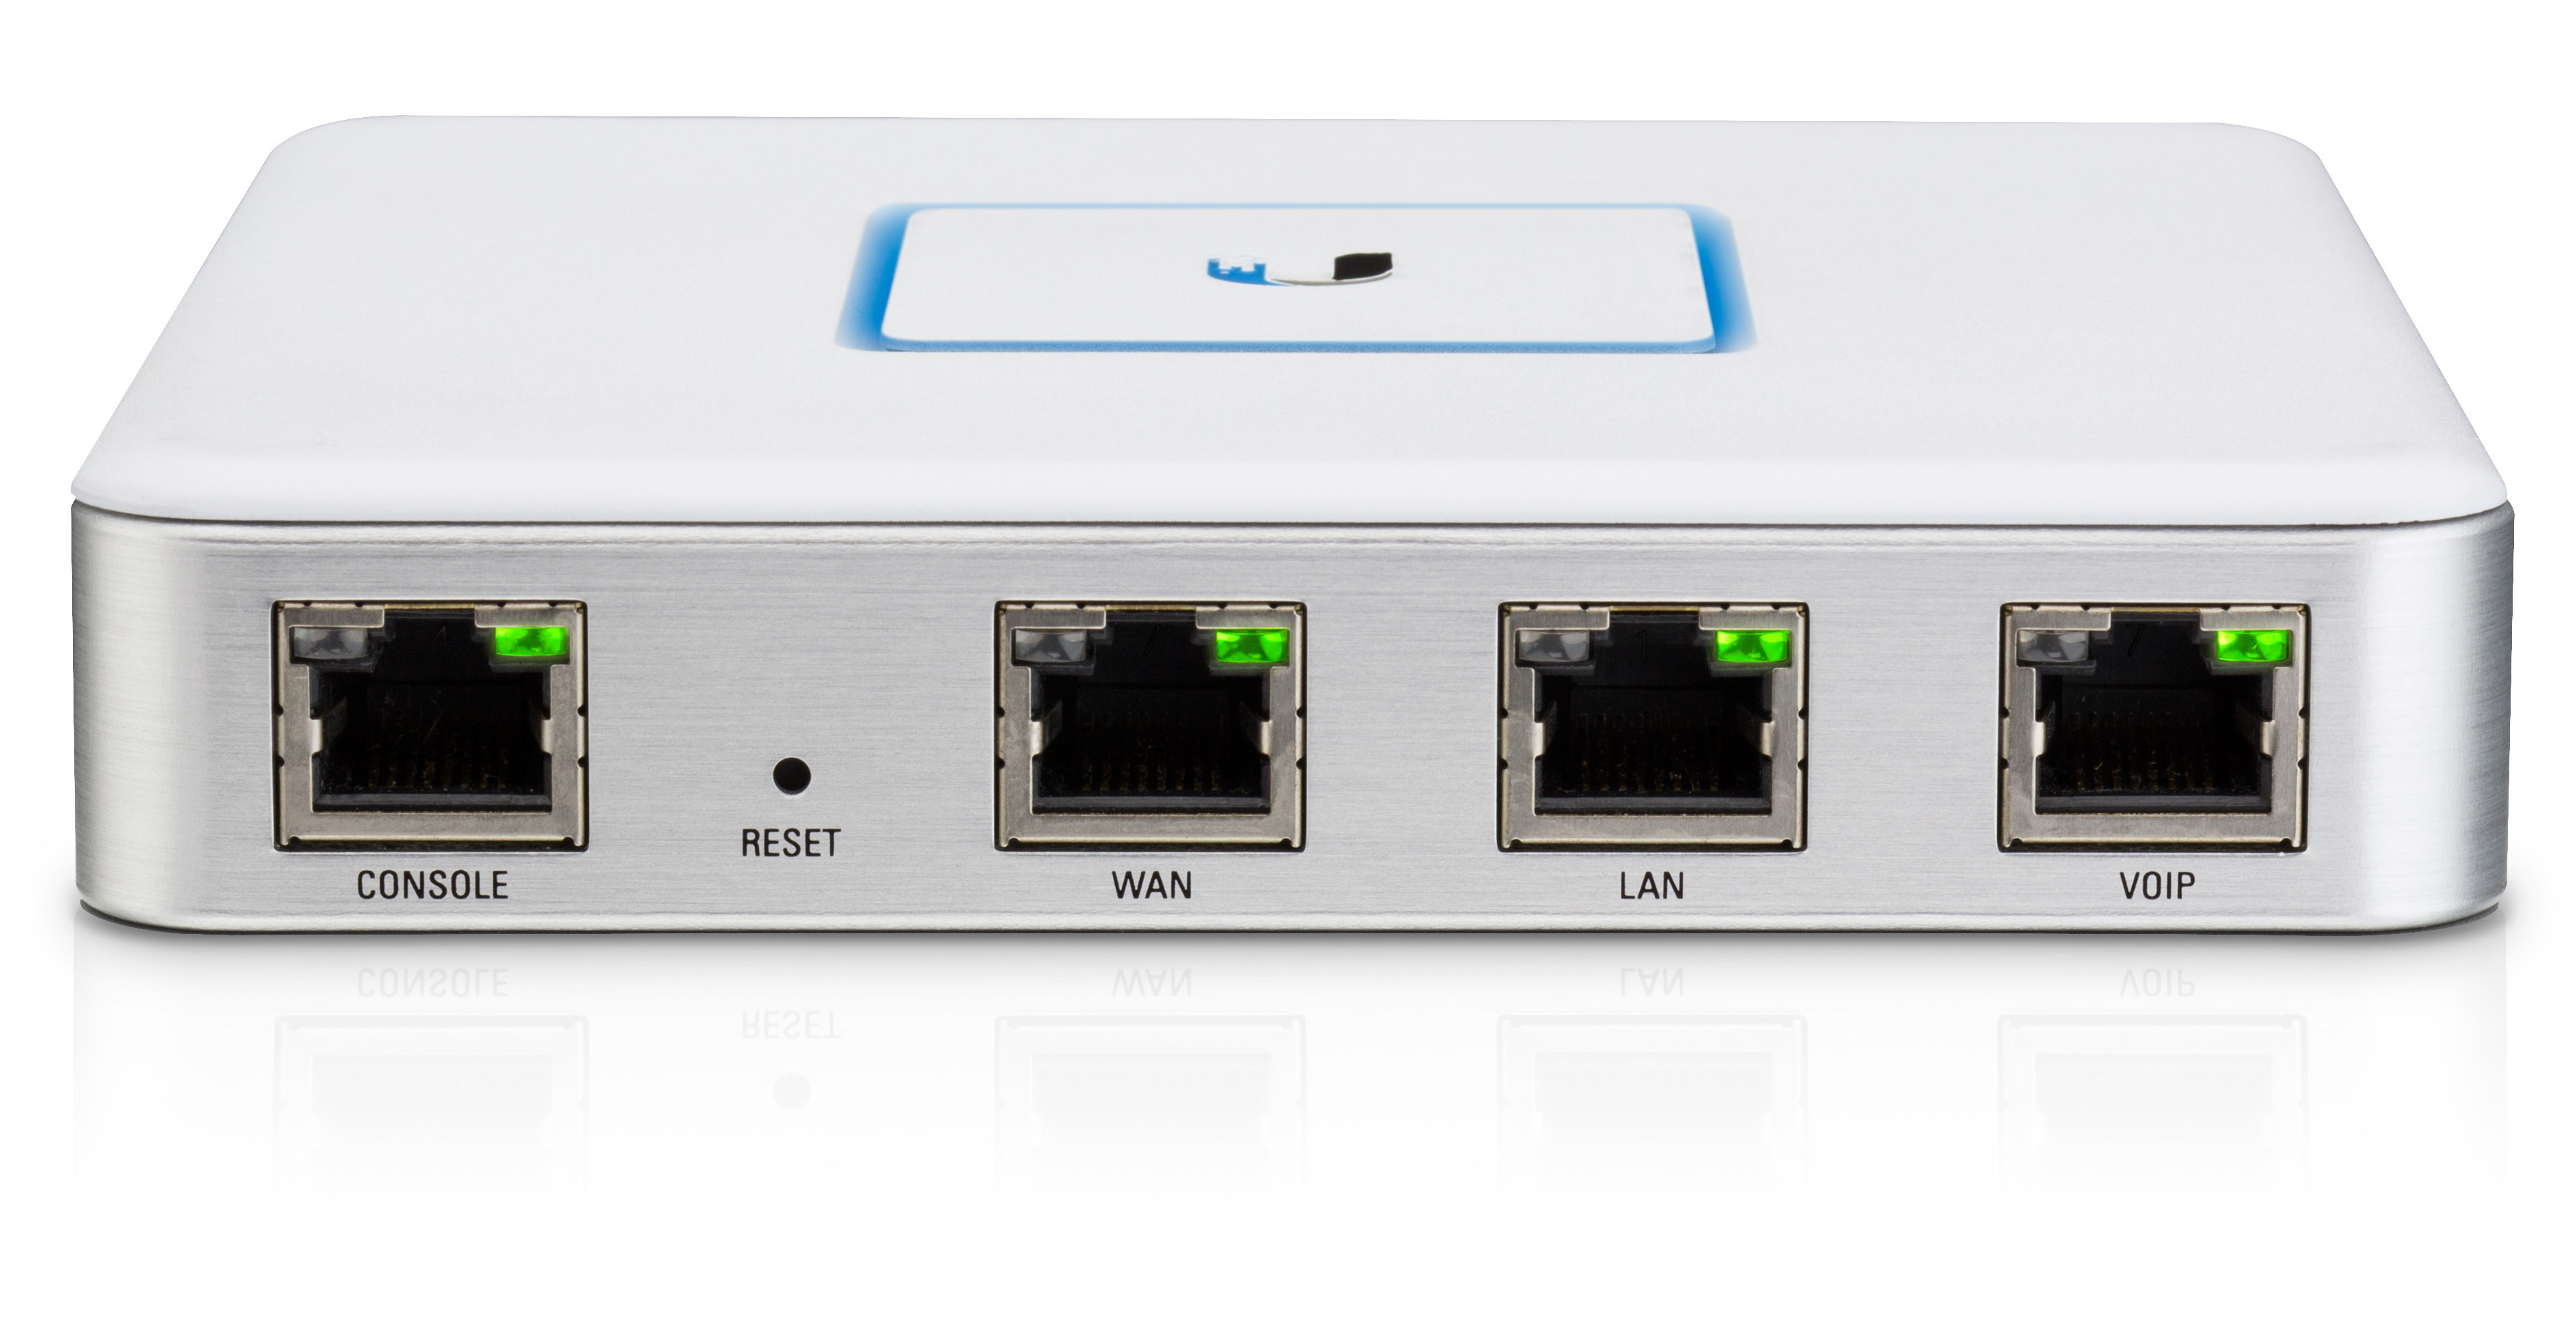
  28. Plug in an Ethernet cable from the router to the VOIP port (or LAN2 depending on the model) of the USG.
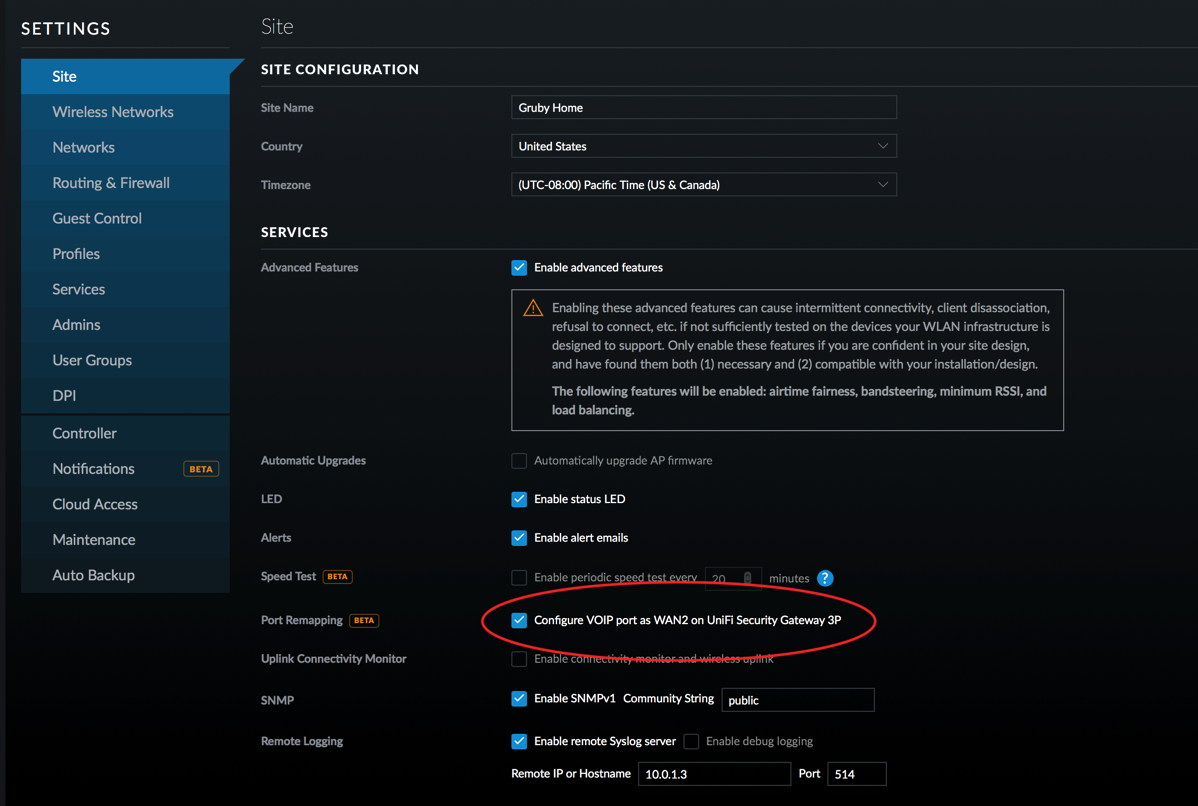
  29. On the UniFi Controller, setup the VOIP port to be WAN2. Wait for the USG to re-provision.
    USG Site Configuration
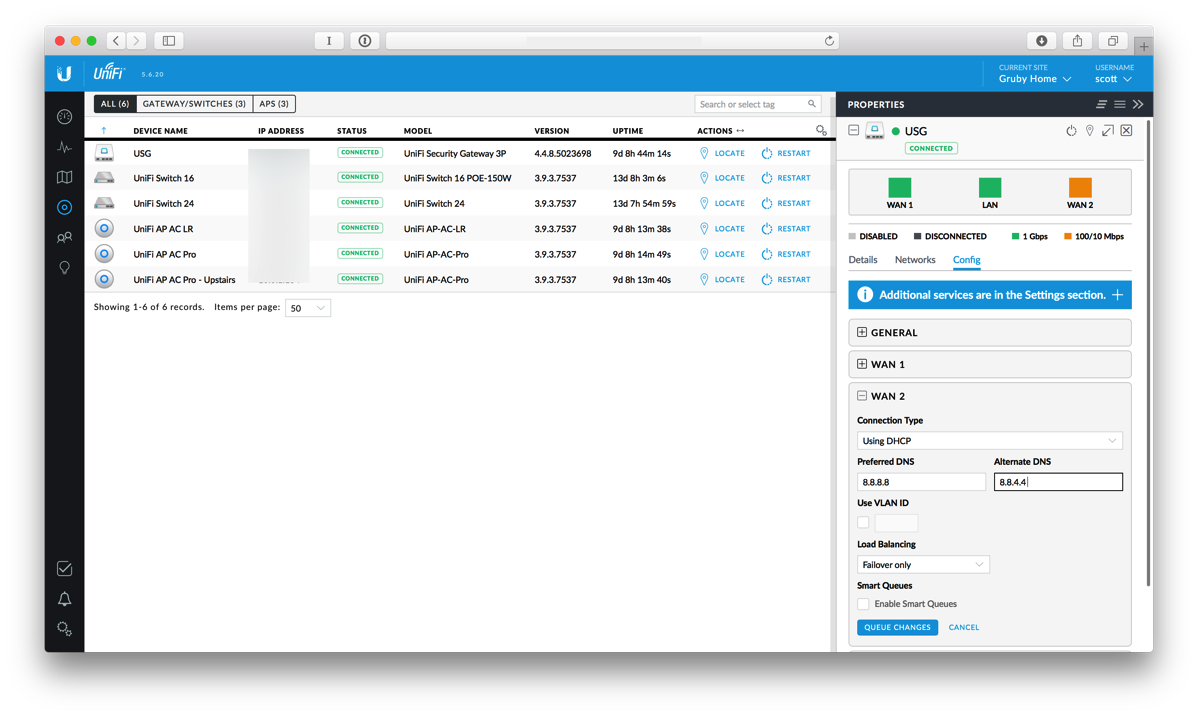
  30. Click on the devices icon and select the USG.
  31. Select WAN2 and enter DNS settings. I’ve used Google’s DNS, 8.8.8.8 and 8.8.4.4.
  32. Make sure Load Balancing is set to Failover Only and then click QUEUE CHANGES. Then click APPLY CHANGES.
    Screen Shot 2017 10 29 at 7 02 03 PM

In order to verify that things are working, SSH into the USG using your admin username and password.

Type show load-balance status and you’ll see something like this:

    Group wan_failover
      interface   : eth0
      carrier     : up
      status      : active
      gateway     : x.x.x.x
      route table : 201
      weight      : 100%
      flows
          WAN Out : 624
          WAN In  : 0
        Local Out : 2

      interface   : eth2
      carrier     : up
      status      : failover
      gateway     : 10.10.10.1
      route table : 202
      weight      : 0%
      flows
          WAN Out : 0
          WAN In  : 1
        Local Out : 0

This tells you that eth0 is the main connection and eth2 is the failover.

Next type show load-balance watchdog and you’ll see something like this.

Group wan_failover
  eth0
  status: Running 
  pings: 62
  fails: 0
  run fails: 0/3
  route drops: 0
  ping gateway: ping.ubnt.com - REACHABLE

  eth2
  status: Running 
  failover-only mode
  pings: 15
  fails: 0
  run fails: 0/3
  route drops: 1
  ping gateway: ping.ubnt.com - REACHABLE
  last route drop   : Sun Oct 29 19:05:59 2017
  last route recover: Sun Oct 29 19:06:36 2017

This shows that both eth0 and eth2 have working network connections.

In order to test, I unplugged the WAN connection and waited a few minutes. Much to my delight, the connection switched over to cellular and everything continued to work on my network.

When the primary WAN goes down, show load-balance watchdog will show something like this:

Group wan_failover
  eth0
  status: Waiting on recovery (0/3)
  pings: 84
  fails: 3
  run fails: 3/3
  route drops: 1
  ping gateway: ping.ubnt.com - DOWN
  last route drop   : Sun Oct 29 19:13:16 2017

  eth2
  status: Running 
  failover-only mode
  pings: 53
  fails: 0
  run fails: 0/3
  route drops: 1
  ping gateway: ping.ubnt.com - REACHABLE
  last route drop   : Sun Oct 29 19:05:59 2017
  last route recover: Sun Oct 29 19:06:36 2017

Doing a show load-balance status yields:

Group wan_failover
  interface   : eth0
  carrier     : down
  status      : failover
  gateway     : unknown
  route table : 201
  weight      : 0%
  flows
      WAN Out : 1140
      WAN In  : 0
    Local Out : 4

  interface   : eth2
  carrier     : up
  status      : active
  gateway     : 10.10.10.1
  route table : 202
  weight      : 100%
  flows
      WAN Out : 192
      WAN In  : 1
    Local Out : 1

While I have no plans to keep this connected all the time, it is good to know that if my Internet connection goes out, I have a backup mechanism. For enterprise applications, I’d recommend a beefier router and a dedicated LTE modem.

Feel free to send corrections or ask questions.

Things to note

  • The router does NAT, so you won’t be able to connect from the outside world to your USG or internal network. It will work for outgoing connections which may be more important.
  • This particular modem has to be powered separately from USB and the router has to be powered. You’ll need two USB cables to power this setup.
  • If you unplug the Ethernet cable on the second WAN port and leave it disconnected, the USG may failover when it can’t ping the Ubiquiti host that is used for failover checking. This may be intermittent and could cause your network to go down. I’d suggest disabling the failover if you’re not going to keep the second WAN connection.
  • The router I’m using has a 10/100 Mbit port, so the connection isn’t going to use the full bandwidth of the LTE. In addition, the router is pretty underpowered and will definitely impact performance.
  • A user on the Ubiquiti forums suggests a modification to the config.gateway.json to ping an IP address instead of ping.ubnt.com by adding and then forcing a re-provision on the USG:
      "load-balance": {
        "group": {
          "wan_failover": {
            "interface": {
              "eth0": {
                "route-test": {
                  "type": {
                    "ping": {
                      "target": "8.8.8.8"
                    }
                  }
                }
              }, 
              "eth2": {
                "route-test": {
                  "type": {
                    "ping": {
                      "target": "8.8.8.8"
                    }
                  }
                }
              }
            }
          }
        }
      },
    

A new diet

Several years ago I wrote that I went gluten free to help with some intestinal issues. Doing that combined with my ulcerative colitis medicine has kept me in check for awhile. Unfortunately things changed earlier this year and my colitis acted up.

When I was fighting my latest flare up, my wife suggested I look at changing my diet again. She is a great wife and did research to see what diets could help people with ulcerative colitis. She found the Specific Carbohydrate Diet and while it seemed quite restrictive, I felt like I didn’t have any other choice. I started this diet about three months ago and have been quite good at closely sticking to it. The basic gist of the diet is to eliminate grains, beans, and complex sugars. Looking at my diet prior to this, I had been eating a lot of grains, beans and definitely a lot of complex sugars!

The hardest part of the diet started out being the sugars as I love sweets. I’ve replaced sugars with lots and lots of fruit as well as nuts. Luckily I live in San Diego and fresh fruit is pretty plentiful all year round. Going to the store is a different experience as I closely look at labels and look for things that really shouldn’t exist in my food such as sugar in the Kirkland Salsa or rice in the crunchy snap peas.

One side effect that is probably pretty obvious is that I lost over 10 pounds on this diet not that I needed to do it.

People have asked me if I feel better because of the diet. I guess the diet and the medication have made me feel normal again. I’ve always had a lot of energy and been pretty fit so that hasn’t changed. I have no plans to get off this diet as it seems to be agreeing with me. Watching what I put in my body is definitely not a bad thing and has made me more closely examine the labels for foods to see what hidden ingredients lie in our processed foods.

Review: Running Buddy smartphone pouch

For many years, I’ve been using a Wahoo Fitness Sportband to hold my iPhone when I run. I’ve replaced it a few times and try my best to keep it in good shape. It appears that rinsing it after I run and adjusting the strap caused my last one to wear out prematurely. I can’t say that I’ve been disappointed with it, but when I heard a recommendation for the Running Buddy on MacBreak Weekly, I figured I’d give it a try.

The Running Buddy is a pouch that clips to my shorts using very powerful magnets. The pouch holds my iPhone 6s pretty snuggly the magnets ensure that it won’t move. When I first put my phone in the pouch and started running, I had my doubts about it as I thought my phone would fall. It was a weird feeling having the pouch on my waist. After a few miles of running, I forgot that I was still wearing it. One thing to note about the pouch is that if your shorts aren’t tight, then the pouch with your phone will pull down your shorts!

I’ve been running with the pouch for a few weeks and I can’t quite say if having the phone on my arm or on my waist is better. The pouch is slightly more comfortable as I don’t have pressure on my arm, but the pouch rubs against my stomach. The armband’s neoprene got quite disgusting because of the sweat. The different material of the pouch seems like it would repel sweat better.

I’m going to keep using the pouch as I’m starting to get used to how it feels.

Pros

  • Convenient way to hold iPhone while running.
  • No unsightly tan lines on my arm.
  • No pressure on my arm.
  • Material is easy to wipe off and doesn’t appear to retain sweat.

Cons

  • Feels kind of weird on my waist.
  • At first it feels like it is going to fall off.
  • Can’t glance at information on screen.
  • Unknown longevity as the part that comes in contact with my waist and shorts gets covered in sweat.
  • Material rubs against my abdomen and could cause irritation.

Summary

This case is an interesting solution to holding my phone. For people walking, I can definitely recommend it if you don’t have pockets or the pockets aren’t convenient. For runners, I think it takes getting used to and if you don’t like armbands, it is definitely worth a try.

Dealing with the IoOT

No, the title is not a typo. I’m coining the acronym Internet of Outdated Things! I’ve written in the past about keeping devices updated and the recent KRACK attack brings this issue back to the forefront. I’ve already updated by UniFi access points and am waiting for updates from Apple and Amazon for clients that I have connecting over WiFi. The only other devices that I have on my WiFi network are a few old SlimDevices Squeezeboxes.

These Squeezebox Radios are now over 5 years old, but still going strong. All our music in the house is streamed through 3 other Squeezebox devices that are hard wired, so I’m not concerned about those. Since Logitech stopped supporting these devices several years ago, I can’t realistically expect to get a firmware update to fix this WiFi issue. However, should I just toss the devices because I can’t get a firmware update? For some devices I’d take the opportunity to upgrade, but our music system has been running so well for so long that I’m not going to touch it. Where does that leave me? While the KRACK attack is mostly theoretical right now and the attacker must be in close proximity, I decided I had to figure out a way to mitigate this just for my own piece of mind.

I decided to start with the work I documented last year on blocking my IP cameras from talking to the Internet and modify it for this situation. This is a little different because I only want the Squeezebox devices talking to my Media Center running the Logitech Media Server and I want the devices to be able to talk to the Internet in order to stream music. Unlike last year, this exercise is all being done in the UniFi controller since I’m using a USG and UniFi access points.

So let’s begin:

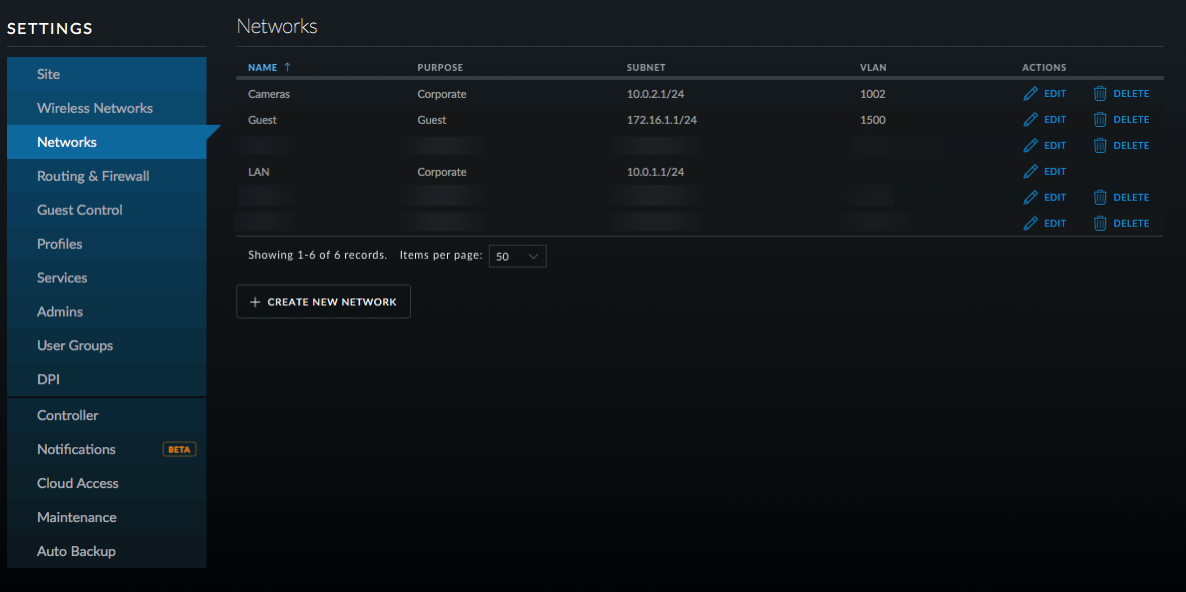
  1. In the UniFi controller, go into Settings and select Networks.
    Screen Shot 2017 10 23 at 5 17 31 PM
  2. Click on Create New Network.
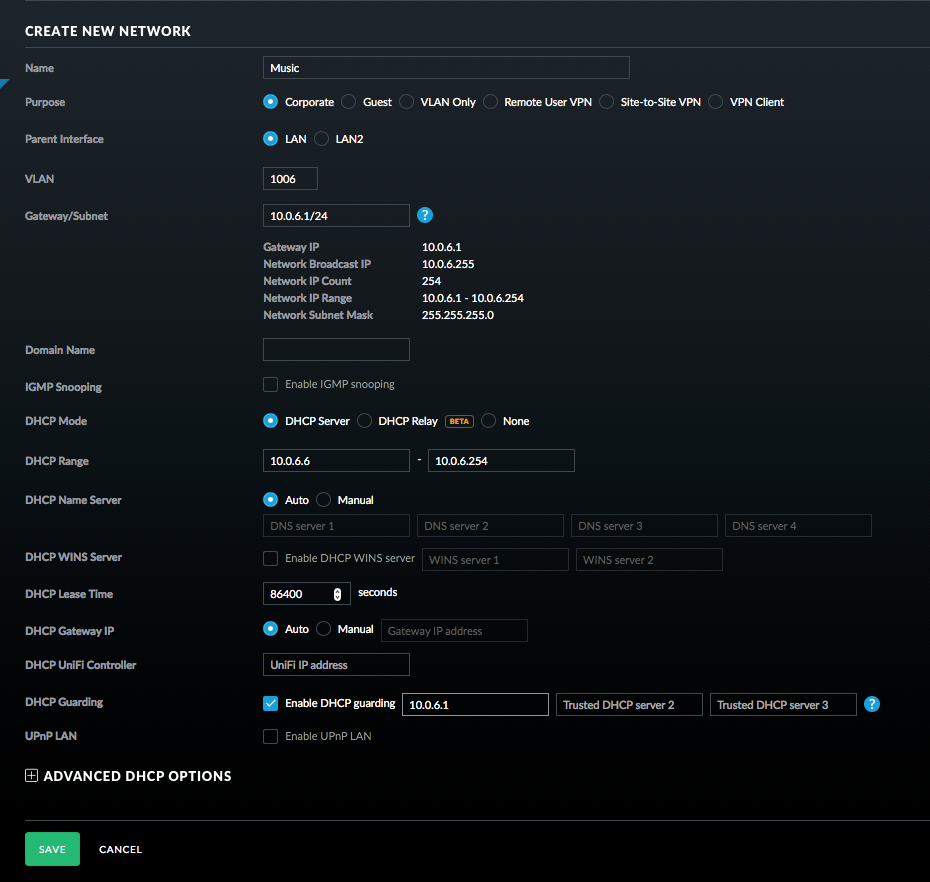
  3. Enter a name for the network; I chose Music.
  4. Leave it on Corporate and LAN1.
  5. Enter a VLAN number; I chose 1006 and then enter the gateway as 10.0.6.1/24 or something similar depending on your network. Click on Update DHCP Range.
  6. You can enable DHCP guarding if you like so that only the USG is recognized as a DHCP server.
    Screen Shot 2017 10 23 at 5 20 11 PM
  7. Click Save.
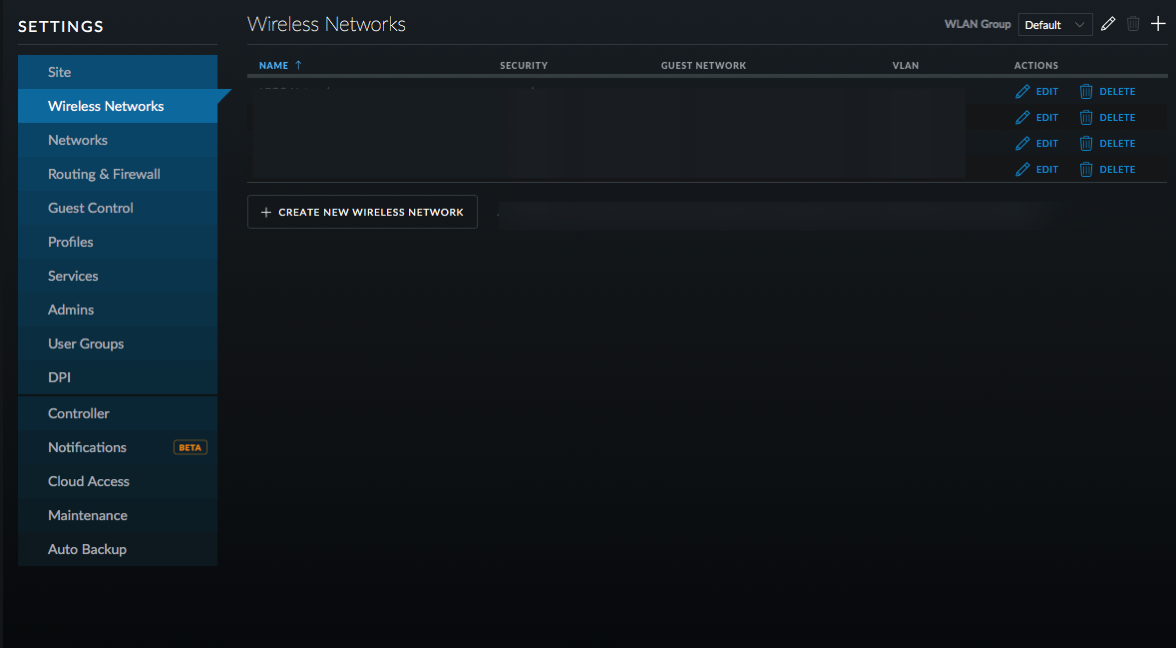
  8. Click on Wireless Networks and then Create New Wireless Network.
    Screen Shot 2017 10 23 at 5 22 42 PM
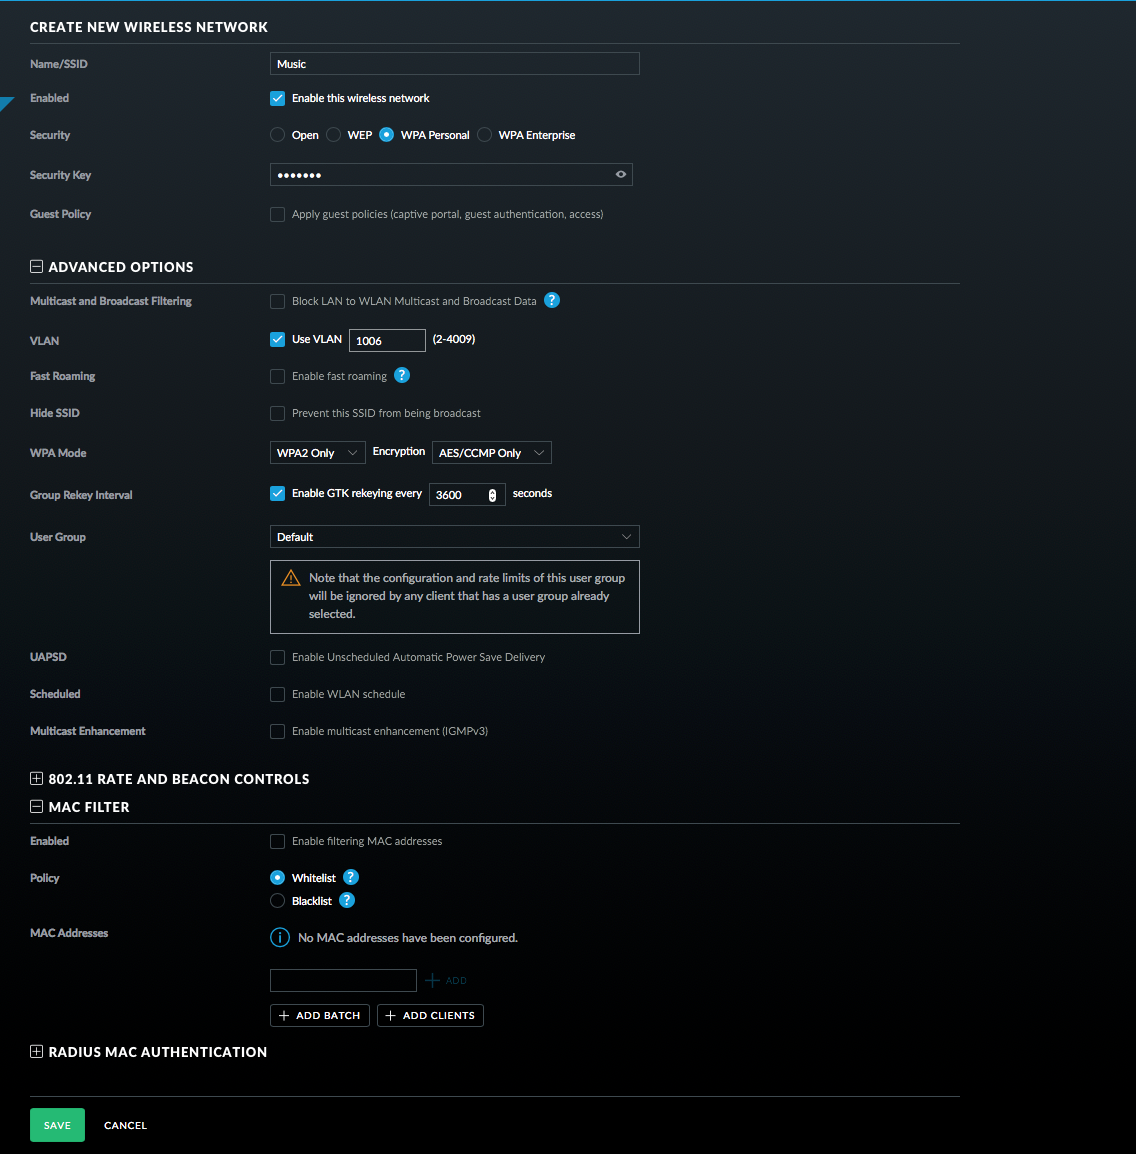
  9. Name the new network and turn on WPA Personal Security with a Security Key.
    Screen Shot 2017 10 23 at 5 26 18 PM
  10. Select Use VLAN and enter the VLAN you setup before.
  11. Click on Advanced Options and then on MAC Filter (note this may not be in all versions of the controller software).
  12. Whitelist your devices that you want to connect (this is not necessary and MAC addresses can be spoofed, but it can’t hurt).
  13. Click Save.
  14. Click on Routing & Firewall, Firewall, and then Select Groups. These groups will be used later in the firewall rules.
    Screen Shot 2017 10 23 at 5 28 57 PM
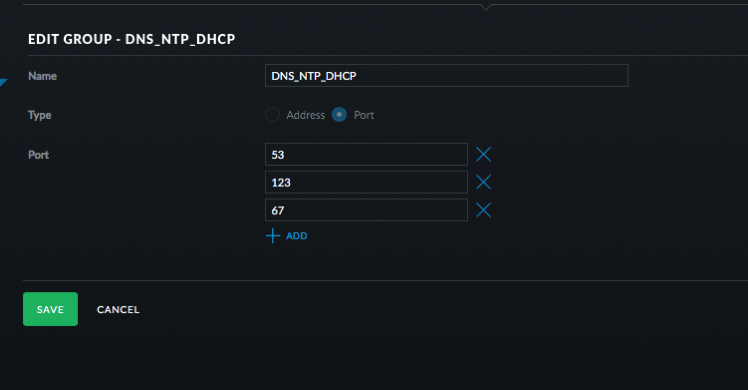
  15. Click Create New Group. Set it up as a Port group with 53, 123, and 67 as the ports. Name it DNS _ NTP _ DHCP.
    Screen Shot 2017 10 23 at 5 31 12 PM
  16. Click Save.
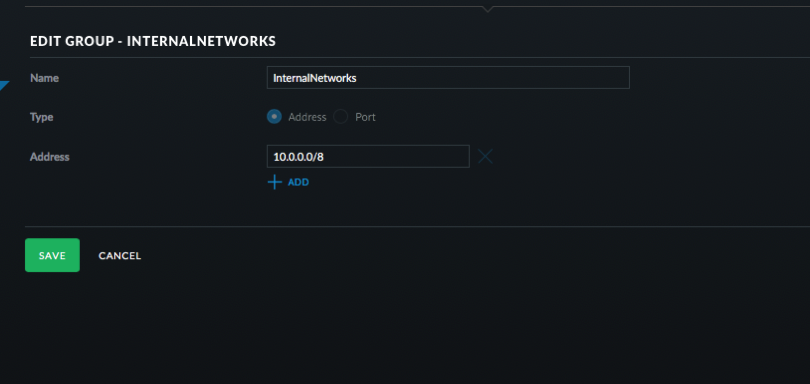
  17. Click Create New Group. Address group and use 10.0.0.0/8 and then click Save.
    Screen Shot 2017 10 23 at 5 32 23 PM
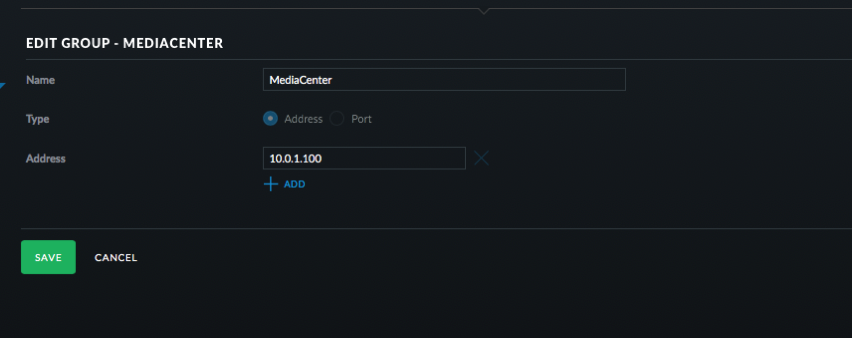
  18. Click Create New Group. Address group and use 10.0.1.100 or whatever is the address of your Logitech Music Server. Click Save.
    Screen Shot 2017 10 23 at 5 33 45 PM
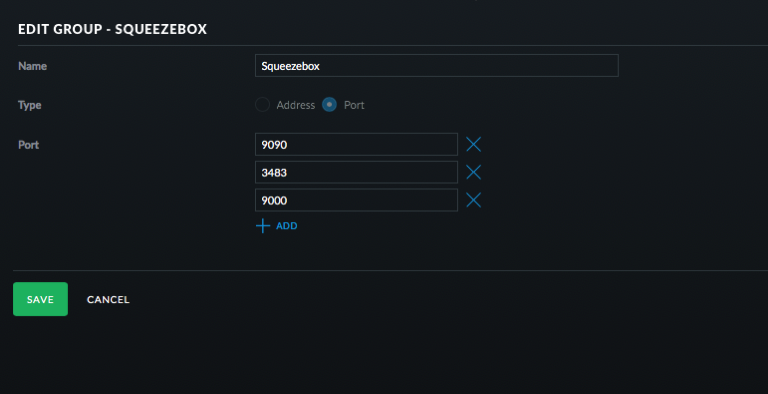
  19. Click Create New Group. Port group and use 9090, 3483, and 900. Click Save.
    Screen Shot 2017 10 23 at 5 34 05 PM
  20. Click on Rules and then LAN Local.
  21. Click Create New Rule.
    Screen Shot 2017 10 23 at 5 38 26 PM
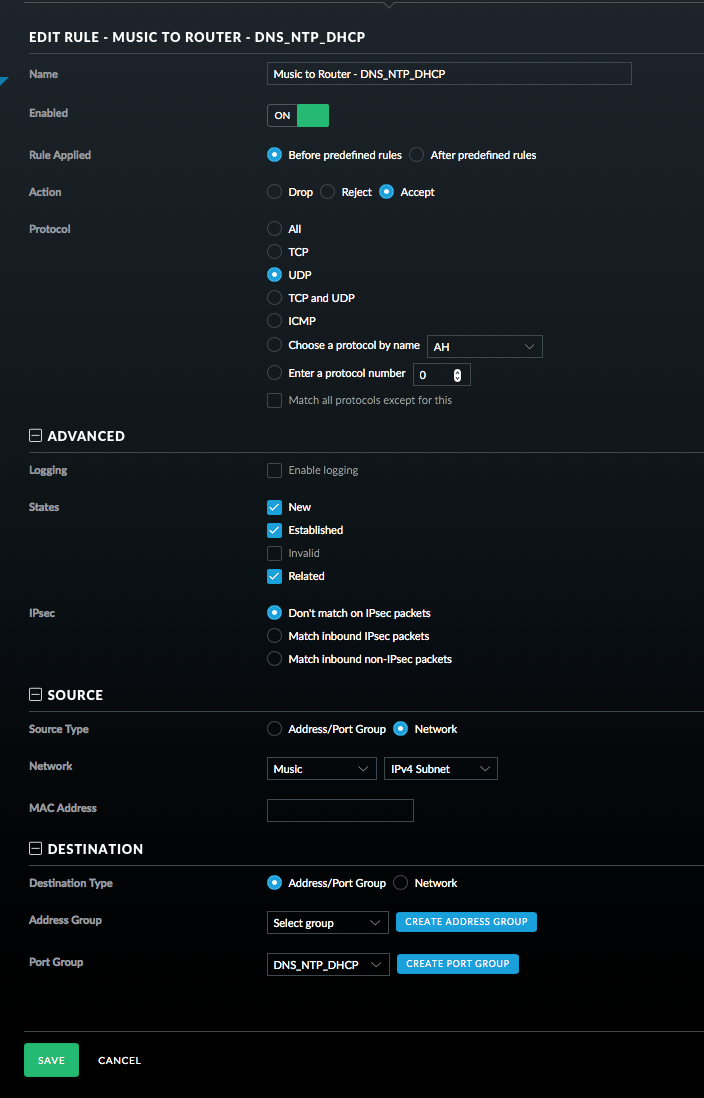
  22. Configure this rule to allow DNS, NTP, and DHCP requests from the Squeezebox devices to the router. Select UDP, New/Established/Related. Then select the Music Network and then the DNS _ NTP _DHCP port group as seen in the picture. Click Save.
    Screen Shot 2017 10 23 at 5 40 16 PM
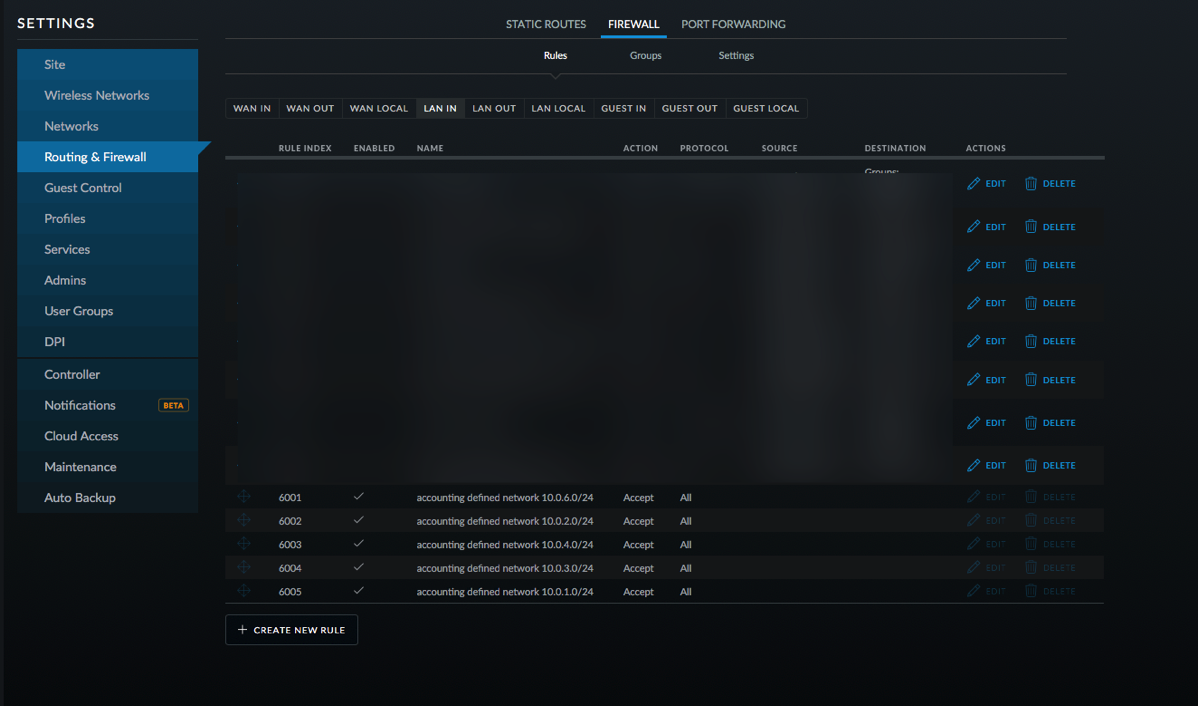
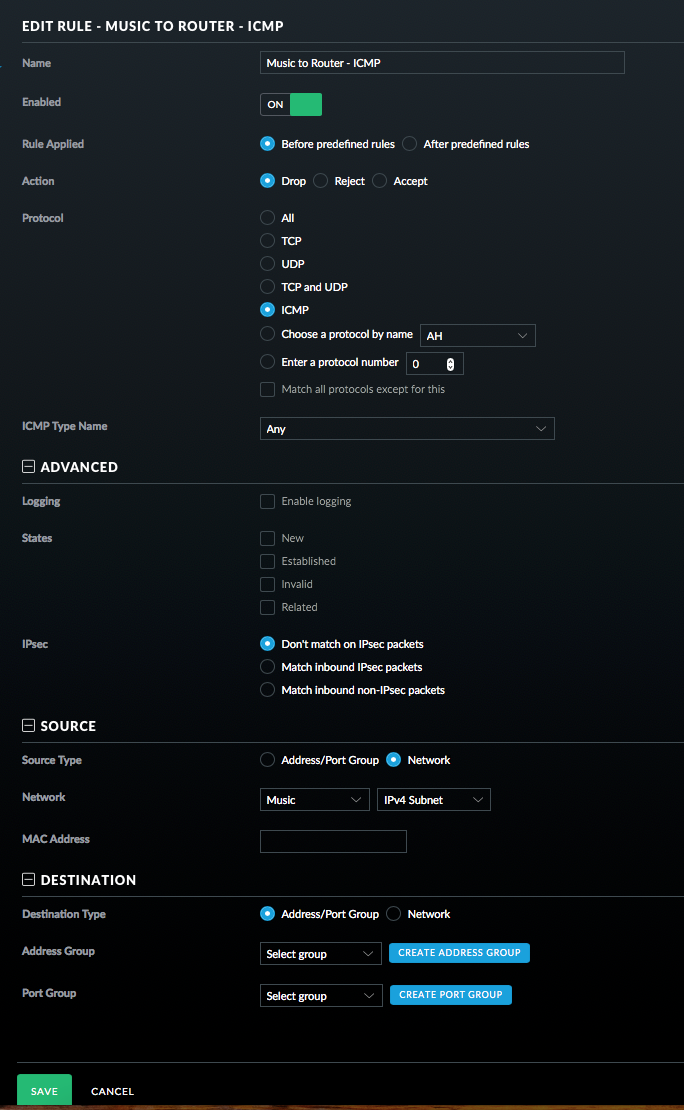
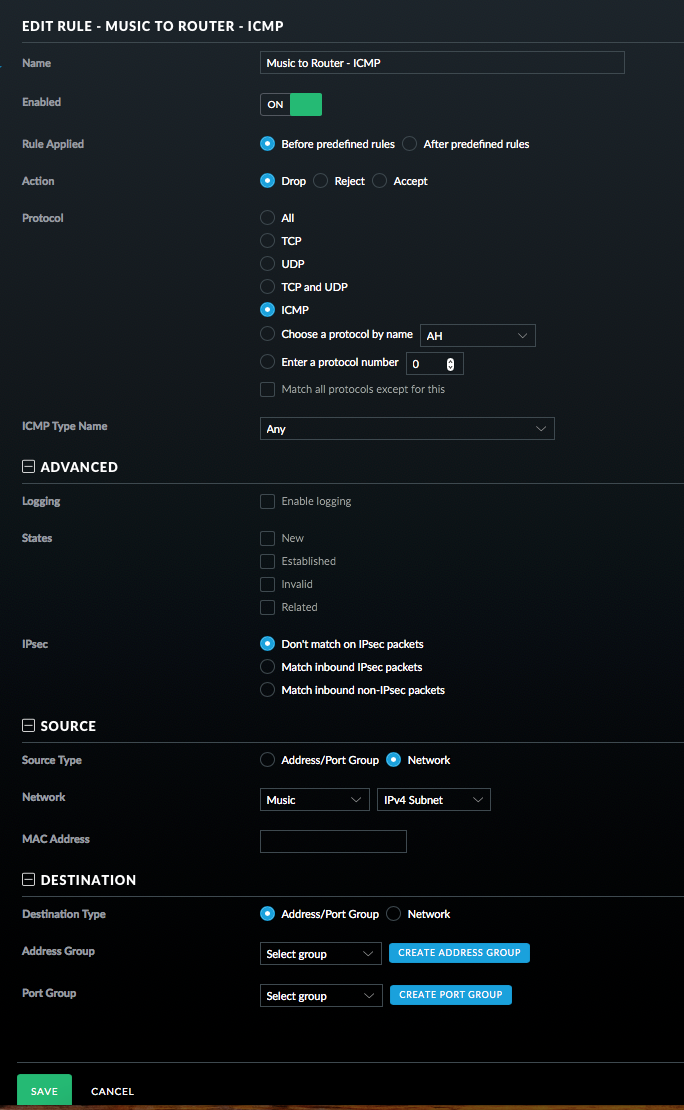
  23. Add a Rule for ICMP packets. See picture.
    Screen Shot 2017 10 23 at 5 43 41 PM
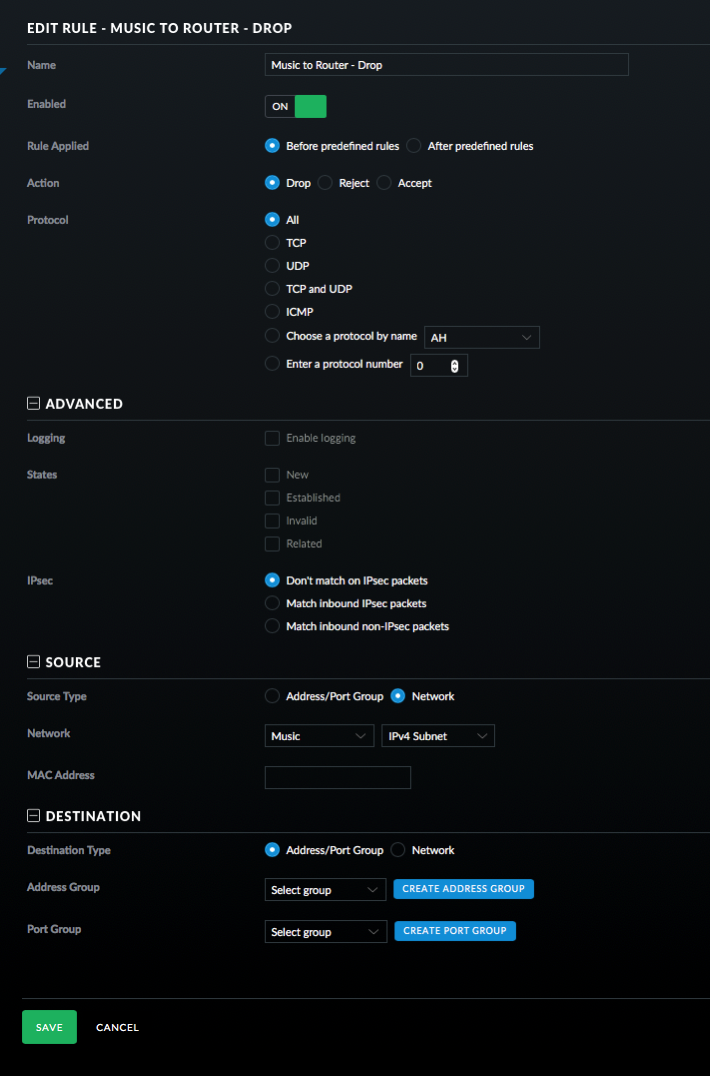
  24. Finally for this section, add a rule to drop all other traffic. This must be the last rule in this set.
    Screen Shot 2017 10 23 at 5 44 49 PM
  25. Click on LAN IN and then Create New Rule.
  26. This rule allows traffic from the Squeezebox to the Media Center.
    Screen Shot 2017 10 23 at 5 43 41 PM
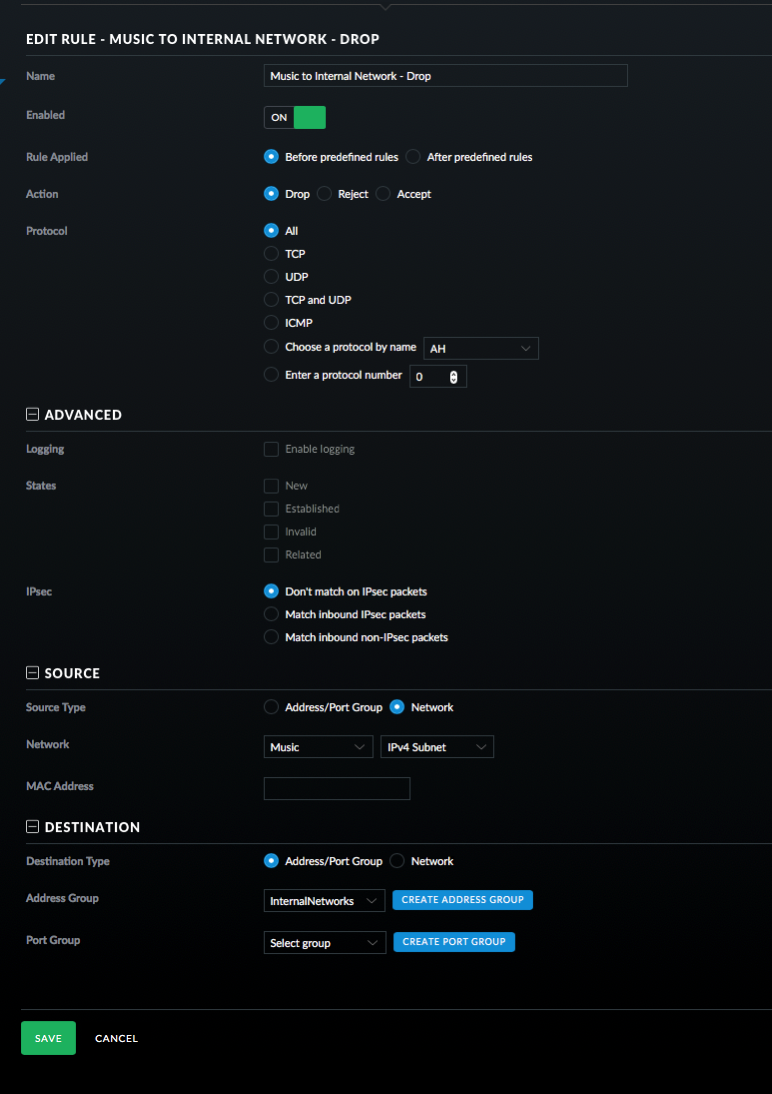
  27. And finally the last rule to drop all traffic from the Squeezebox to the internal network.
    Screen Shot 2017 10 23 at 5 47 36 PM
  28. On the Squeezeboxes, you have to enter the IP address of your Logitech Media Server as device discovery won’t work over subnets without some extra steps.

Still here? The process for creating rules is quite tedious, but once you get the hang of it things start moving faster. What I’ve done is restricted traffic from the Squeezebox devices so that they can only talk to the Logitech Music Server on certain ports and can only talk to the router on certain ports. I also didn’t setup rules for WAN traffic letting the Squeezeboxes talk to the Internet.

Will this fix KRACK? No. Will I be a target for KRACK? Probably not. Is isolating network traffic a good thing? Absolutely. If you have the know how to do this and a little time, I think it is worth it. I’ve gradually been moving pieces of my network to VLANs.

If there are any mistakes, please let me know! I’m not a network engineer, so it is quite possible I missed something.

Developing Consumer Apps (MyNumberBlocker)

I love writing software and routinely create programs to meet my needs. In many cases my applications are very focused and have a market of one, so I don’t bother polishing them or releasing them. There have been several exceptions to this including ReceiptWallet (now called Paperless and NotifyMail (NotifyMail was not quite consumer friendly, but did well in the enterprise). My latest application, MyNumberBlocker follows in the footsteps of my other apps in that it is very focused. This app is a one trick pony, but it solved my need to block the increasing number of phone calls that look like they come from the same prefix as my phone.

When I started MyNumberBlocker, I was able to get it running very quickly and decided that I could use it as an experiment to see how the current App Store operates. As an individual I’ve only put one app on the Apple App Store and that was many years ago. Making the app user friendly wasn’t difficult, but took me awhile because I like tackling different types of problems and presenting a user interface with instructions was not fun. Another challenge was setting up a website and putting together some instructions.

I know that MyNumberBlocker isn’t going to bring in enough money to change my life so I’ve set a very modest sales goal. The next step is figuring out how to market the app with little to no marketing budget!

Repairing a Time Machine backup

Apple’s Time Machine can be considered a revolution in creating backups for average users. Plug in a hard drive, set it for Time Machine and it just works. When Apple introduced the Time Capsule routers, they brought this ease of use to devices that didn’t have a dedicated external hard drive for backups. For the most part, this worked as well but there are sometimes issues.

When using Time Machine connecting to a Time Capsule, NAS, or other file server, a disc image in the form of a sparse bundle is created for each machine that is connected to the server. The sparse bundle is basically a wrapper that contains the hard drive. Inside of the wrapper are many files called bands that contain the data. This bundle grows as more data is added which is great. Unfortunately if something happens such as unplugging a computer from the network or closing the computer while the disc image is in use, the entire image can become corrupt.

Yesterday I disconnected my Mac from my Thunderbolt Display which was connected to Ethernet during a Time Machine backup. This caused the disc image to become corrupt. Up until now I had just accepted that I’d have to start over with the backup. I spent last week getting a new backup strategy in place and didn’t want to start over again. I did some searching and found a few articles on repairing corrupted sparse bundles. I started with this article but instead of trying to perform the repair on the network, I screen shared to my Mac Pro and attempted to do the recovery locally. Unfortunately the steps outlined failed to repair my disc image. Another article had similar commands but didn’t quite work either. Combining information from the two, I came up with my own steps to repair the image:

Attach to the disc image, but don’t verify it or attempt to mount it. Note the readwrite option as this was key for my repair.

sudo hdiutil attach -nomount -noverify -noautofsck -readwrite /Volumes/Backups/Shared\ Items/Backups/Scott’s\ MacBook\ Pro.sparsebundle

Look at the output that will be something like:

/dev/disk6 Apple_partition_scheme
/dev/disk6s1 Apple_partition_map
/dev/disk6s2 Apple_HFS

Make a note of the disk for the last entry that has HFS in it.

Perform the verification and repair using:

sudo fsck_hfs -drfy /dev/disk6s2

I had to do the above item twice to get a message that the volume was repaired successfully. This will take awhile depending on the damage and size of the disc image.

Once the volume has been repaired, issue the final command

sudo hdiutil detach /dev/disk6s2

After that I did a Time Machine backup and everything worked again! I tested out restoring a file and that worked as well. Now I have a way to fix the disc images when this happens in the future. Apple really needs to do something about this issue as the articles I referenced are 6 and 9 years old meaning this isn’t a new problem.