Dealing with the influx of scooters

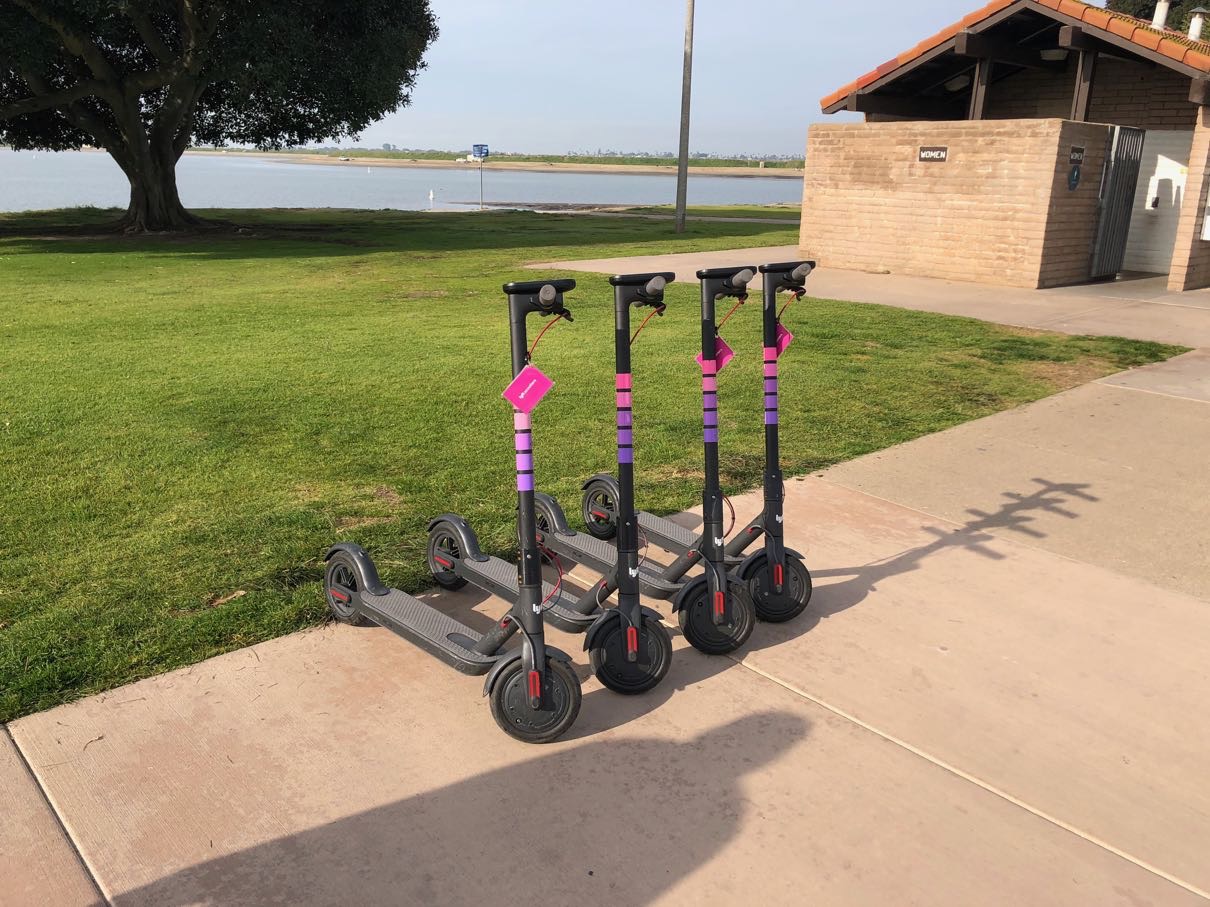
I try to get out and run 3-4 times a week down by Mission Bay as there is a nice path and I don’t have to be afraid of vehicle traffic. I used to run on the sidewalk where there was one and on dirt when there wasn’t; however with traffic whizzing by at 55 mph (speed limit is 45 mph), I got smart and decided that I’d just drive to a nice place and run. Last year on one of my runs, I noticed electric scooters parked in groups along the path. Over the course of the next few months, the scooters started appearing just about everywhere I went in the city.

The scooters are an interesting solution to the last mile problem and appear to be useful for a lot of people. However, the companies that are running the scooters have taken the approach that they’ll just “disrupt” transportation and simply do what they want and deal with the fallout and laws later. This has been a big topic on the news with injuries happening all the time, lawsuits (currently San Diego is facing a lawsuit about disabled access on the sidewalks), and some riders disobeying laws.

The San Diego mayor and city council have been working on ways to handle these scooters so that they can co-exist with everyone in the city. While this may seem like the right thing to do, I’d argue that instead of spending time trying to handle these scooters, how about taking a look at the problems they are causing and what laws already exist to handle them.

In my view, there are a number of issues that I’ve seen:

  1. Scooters are parked on the sidewalk either by the companies (or their contractors) or the riders.
  2. Scooters are being ridden on the sidewalk and the riders are getting into accidents with innocent pedestrians.
  3. Scooter riders are riding in the street in the wrong direction and not stopping at traffic lights and/or stop signs.
  4. Parent and child riding on a scooter.
  5. Kids riding the scooters.

The scooters, themselves, aren’t the problem in my opinion. It is the riders (mostly) that don’t know what they are supposed to do or frankly don’t care.

Let’s take a closer look at my list.

Scooters parked on sidewalks

This is already illegal under California Vehicle Code 21235:

(i) Leave a motorized scooter lying on its side on any sidewalk, or park a motorized scooter on a sidewalk in any other position, so that there is not an adequate path for pedestrian traffic.

While people may argue what is an adequate path, unless the sidewalk is really wide, a scooter on the sidewalk won’t allow 2 people to pass one another comfortably.

Scooters ridden on the sidewalk

This is already illegal under CVC 21235:

(g) Operate a motorized scooter upon a sidewalk, except as may be necessary to enter or leave adjacent property.

If we consider the path around Mission Bay a bike path and not a sidewalk (scooters can be ridden on bike paths), San Diego Municipal Code §63.20.7 states:

Driving Vehicles On Beach Prohibited; Exceptions; Speed Limit On Beach
(a) Except as permitted by the Director and except as specifically permitted on Fiesta Island in Mission Bay, no person may drive or cause to be driven any motor vehicle as defined in the California Vehicle Code on any beach, any sidewalk or turf adjacent thereto; provided, however, that motor vehicles which are being actively used for the launching or beaching of a boat may be operated across a beach area designated as a boat launch zone. Original

A scooter is defined as a motor vehicle under California Vehicle Code and the path around Mission Bay is adjacent to a beach thereby making it illegal to ride a scooter on the path.

CVC 21230 states:

Notwithstanding any other provision of law, a motorized scooter may be operated on a bicycle path or trail or bikeway, unless the local authority or the governing body of a local agency having jurisdiction over that path, trail, or bikeway prohibits that operation by ordinance.

Meaning that San Diego (as they have done) can regulate scooters on bike paths.

Scooters ridden recklessly

As scooter riders must have a driver’s license (or permit) and scooter are classified as motor vehicles, the riders must follow all the rules of the road including which direction they ride on the street, stopping at stop signs or traffic lights, yielding, etc. This is already covered under California Vehicle Code.

Parent and child riding on a scooter

Again, illegal under CVC 21235:

(e) Operate a motorized scooter with any passengers in addition to the operator.

(c) Operate a motorized scooter without wearing a properly fitted and fastened bicycle helmet that meets the standards described in Section 21212, if the operator is under 18 years of age.

Kids riding the scooters

Illegal under CVC 21235:

(d) Operate a motorized scooter without a valid driver’s license or instruction permit.

As I wrote in the beginning, I don’t have a problem with the scooters if they are operated in a safe and respectful manner (just like driving). I do, however, have a major problem with scooters blocking the sidewalk when parked and riders zipping by me when I’m walking on the sidewalk. In addition, driving is already dangerous enough without having to take into account a scooter rider on the road not obeying the law.

Instead of trying to add more regulations for scooters, how about the city enforce the current laws on the books? This would go a long way at solving the problems. The companies that operate the scooters could possibly do more to make their riders understand how to properly operate them. As much as I’d like to blame these companies, it is the riders that are causing the problems. The companies, however, need to stage their scooters in appropriate locations to not block sidewalks and need to pick them up in a reasonable amount of time as they look like trash scattered all over.

I am not a lawyer and this is not legal advice. This article is based on my interpretation of the laws.

Automating my TV

One of the lazy things that I’ve tried to do was have the Amazon Echo turn my TV on and off. When I had Home Assistant running on my Raspberry Pi, I used a component that controlled the TV and Apple TV via HDMI CEC. Unfortunately it wasn’t quite reliable and I lost the ability to use it when I migrated to a VM for Home Assistant.

In a recent release of Home Assistant, support was added for Roku and since I have a TCL Roku TV, I decided to give it a try. The component itself works, but has a few major limitations for me. First off it initializes on Home Assistant startup. In order to conserve a little energy, I have my TV, Apple TV, and sound bar on a Z-Wave controlled outlet. The outlet doesn’t turn on until the afternoon, so most of the time when Home Assistant restarts (I have it restart at 6 am so that my audio distribution units initialize as they also turn off at night), the TV isn’t turned on. The second issue has to do with the TV going to sleep. It has a deep sleep and a fast start mode; fast start uses more energy, so I leave it off. The Roku component uses HTTP commands to control the device or TV; when the TV is in deep sleep, it doesn’t respond to HTTP commands. This, of course, makes it impossible to turn on the TV with the component.

After thinking about this problem for awhile, I came up with some Node-RED flows to turn on the TV and handle status updates. The TV, it turns out, responds to a Wake-On-LAN packet as I have it connected via Ethernet and Home Assistant has a WOL component that lets me send the packet.

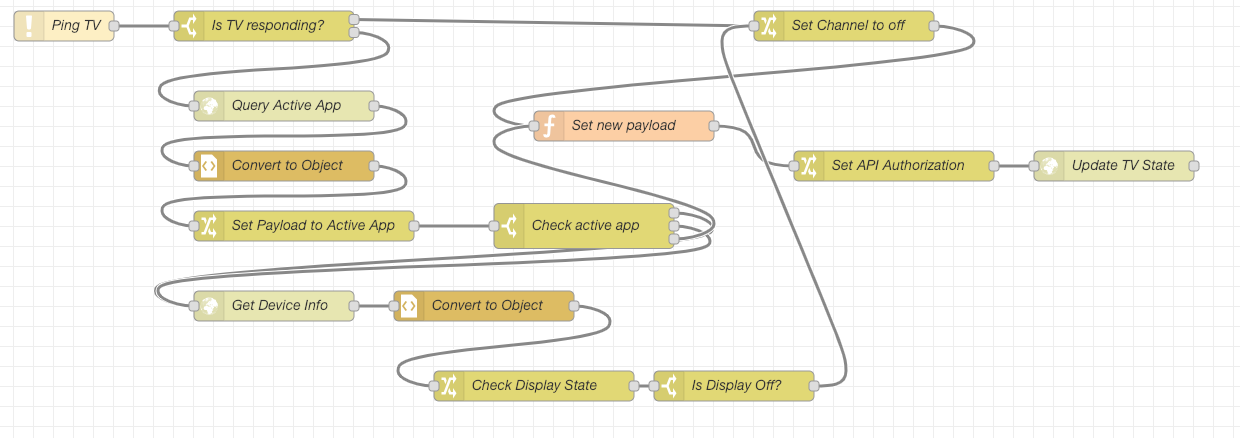
My flow to check on the TV state is a bit complicated.

  1. First it pings the TV. The ping is done every 10 seconds.
  2. If the TV responds, it sends an HTTP request to the TV.
  3. When the response comes back, it is parsed, the current application running is checked. This also lets me know what Roku channel is currently active. I have noticed that my TV reports that the Davinci Channel is active when I turn the TV off, so I special case that.
  4. If the channel is not null and not the Davinci Channel, I then send a command to check to see if the display is off.
  5. After I figure out the app and if the display is off, I craft a new payload with the current channel in it.
  6. The payload is then sent in an HTTP request back to Home Assistant’s HTTP Sensor API
  7. If the TV doesn’t respond to the ping, I set the payload to off and then send the state to the Home Assistant API.

Tv state flow

Turning on the TV is a bit less complicated.

  1. Send WOL packet to TV.
  2. Pause.
  3. Send HTTP command to turn on TV.
  4. Send HTTP command to set input to HDMI3 (my Apple TV).

Turning off the TV is even easier.

  1. Send HTTP command to turn off TV.

Tv on off flow
When I turn on the TV outlet, the state of the TV gets updated pretty quickly as the ping command from above is running every 10 seconds.

I’ve posted the Node-RED flows below that can be imported and modified for your situation.

Download Node-RED flow to turn Roku TV on/off

Download Node-RED flow to get current TV state

Adding Energy Monitoring to Home Assistant

Now that I have Home Assistant running pretty well, I’ve started seeing what else I can add to it. There are several components for monitoring energy usage, but sadly none for my Rain Forest Automation Eagle Energy device. After a quick search, I found a Node-RED flow that looked promising. It would query the local API of the device (or the Cloud one) and give me an answer. The next step was seeing how to get that into Home Assistant. I found the HTTP Sensor which would let me dynamically create sensors. (There is so much to explore in Home Assistant, it will keep me entertained for awhile.)

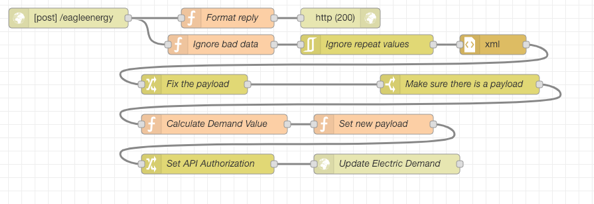
With all the pieces in place, I set the Node-RED flow to repeat every 15 seconds and then use the Home Assistant API to add the usage. This worked well for a few hours, but then I stopped receiving updates only to discover that the Eagle device had stopped responding. When I checked the developer documentation, it indicated that the local API was not supported for my older device. However, an Uploader API was available that would push the data to me. That sounded interesting, so I created a flow in Node-RED that listened for a connection and then parsed the data using the flow I found before. The only problem was how do I get the device to push me the data. The Eagle device has options for cloud providers, but something I missed before is that there is the ability to add a new one. I added my Node-RED install using: http://10.0.3.100:1880/eagleenergy and the data starting flowing!

So far this new method has been working for almost 24 hours, so I have a lot more confidence that this will keep working.

The Node-RED flow is below:

Eagle energy flow

    [{"id":"b7dc8932.f85388","type":"xml","z":"15825822.ae8e1","name":"Convert to
    Object","property":"payload","attr":"","chr":"","x":310,"y":1440,"wires":[["21269998.3f97e6"]]},{"id
    ":"c85cb9e0.0ba818","type":"http request","z":"15825822.ae8e1","name":"Query Active
    App","method":"GET","ret":"txt","url":"http://10.0.3.41:8060/query/active-app","tls":"","x":310,"y":
    1380,"wires":[["b7dc8932.f85388"]]},{"id":"b35dc59a.083738","type":"ping","z":"15825822.ae8e1","name
    ":"Ping
    TV","host":"10.0.3.41","timer":"10","x":90,"y":1300,"wires":[["e2decb33.dc36e8"]]},{"id":"e2decb33.
    dc36e8","type":"switch","z":"15825822.ae8e1","name":"Is TV
    responding?","property":"payload","propertyType":"msg","rules":[{"t":"false"},{"t":"else"}],"
    checkall":"true","repair":false,"outputs":2,"x":290,"y":1300,"wires":[["6b2354bd.8306ec"],["c85cb9e0
    .0ba818"]],"outputLabels":["","Is awake?"]},{"id":"a59cc790.158f68","type":"http
    request","z":"15825822.ae8e1","name":"Update TV
    State","method":"POST","ret":"txt","url":"https://homeassistant.com:8123/api/states/sensor.tv_state"
    ,"tls":"","x":1140,"y":1440,"wires":[[]]},{"id":"208bd98e.9ed806","type":"change","z":"15825822.
    ae8e1","name":"Set API
    Authorization","rules":[{"t":"set","p":"headers","pt":"msg","to":"{\"Authorization\":\"Bearer
    INSERT_BEARER\"}","tot":"json"}],"action":"","property":"","from":"","to":"","reg":false,"x":920,"y"
    :1440,"wires":[["a59cc790.158f68"]]},{"id":"21269998.3f97e6","type":"change","z":"15825822.ae8e1","
    name":"Set Payload to Active
    App","rules":[{"t":"set","p":"payload","pt":"msg","to":"payload.active-app.app[0]._","tot":"msg"}],"
    action":"","property":"","from":"","to":"","reg":false,"x":330,"y":1500,"wires":[["6d6fdcd0.004714"]
    ]},{"id":"71eea783.5158f8","type":"function","z":"15825822.ae8e1","name":"Set new
    payload","func":"var channel = msg.payload\nif (channel == \"Davinci Channel\") {\n    channel =
    \"Idle\"\n}\nvar newPayload = {\"state\":channel,\"attributes\":{\"icon\":\"mdi:television\",
    \"friendly_name\":\"TV\"}}\nmsg.payload = newPayload\n\nreturn
    msg;","outputs":1,"noerr":0,"x":650,"y":1400,"wires":[["208bd98e.9ed806"]]},{"id":"6b2354bd.8306ec",
    "type":"change","z":"15825822.ae8e1","name":"Set Channel to
    off","rules":[{"t":"set","p":"payload","pt":"msg","to":"off","tot":"str"}],"action":"","property":""
    ,"from":"","to":"","reg":false,"x":870,"y":1300,"wires":[["71eea783.5158f8"]]},{"id":"ee5484a0.
    bf69c8","type":"http request","z":"15825822.ae8e1","name":"Get Device
    Info","method":"GET","ret":"txt","url":"http://10.0.3.41:8060/query/device-info","tls":"","x":300,"y
    ":1580,"wires":[["dfba9256.d0175"]]},{"id":"6d6fdcd0.004714","type":"switch","z":"15825822.ae8e1","
    name":"Check active app","property":"payload","propertyType":"msg","rules":[{"t":"eq","v":"Davinci
    Channel","vt":"str"},{"t":"null"},{"t":"else"}],"checkall":"true","repair":false,"outputs":3,"x":610
    ,"y":1500,"wires":[["ee5484a0.bf69c8"],["ee5484a0.bf69c8"],["71eea783.5158f8"]],"outputLabels":["
    Davinci
    Channel","Null",""]},{"id":"dfba9256.d0175","type":"xml","z":"15825822.ae8e1","name":"Convert to
    Object","property":"payload","attr":"","chr":"","x":510,"y":1580,"wires":[["37ef8802.728648"]]},{"id
    ":"37ef8802.728648","type":"change","z":"15825822.ae8e1","name":"Check Display
    State","rules":[{"t":"set","p":"payload","pt":"msg","to":"payload.device-info.power-mode[0]","tot":"
    msg"}],"action":"","property":"","from":"","to":"","reg":false,"x":560,"y":1660,"wires":[["adaad7e0.
    489ba8"]]},{"id":"adaad7e0.489ba8","type":"switch","z":"15825822.ae8e1","name":"Is Display
    Off?","property":"payload","propertyType":"msg","rules":[{"t":"eq","v":"DisplayOff","vt":"str"}],"
    checkall":"true","repair":false,"outputs":1,"x":760,"y":1660,"wires":[["6b2354bd.8306ec"]]}]

All In with Home Assistant

I’ve spent parts of the last 9 months playing with Home Assistant and have written about some of my adventures. A few weeks ago, I finally decided to go all in with Home Assistant and ditch my Vera. I bought an Aeotec Z-Stick Gen5 Z-Wave dongle and starting moving all my devices over to it. Within a few days, I had all my devices moved over and unplugged my Vera. Everything was running great on my Raspberry Pi B, but I noticed that the History and Logbook features were slow. I like looking at the history to look at temperature fluctuations in the house.

History graph

I had read that switching from the SQLite database to a MySQL database would speed things up. So I installed MariaDB (a fork of MySQL) on my Raspberry Pi and saw a slight increase in speed, but not much. Next was to move MariaDB to a separate server using Docker. Again, a slight increase in speed, but it still lagged. At this point everything I read pointed to running Home Assistant on an Intel NUC or another computer. I didn’t want to invest that kind of money in this, so I took a look at what I had and started down the path of installing Ubuntu on my old Mac mini which was completely overkill for it (Intel Quad Core i7, 16 GB RAM, 1 TB SSD). Then I remembered that I had read about a virtual machine image for Hass.io and decided to give that a try.

After some experimenting, I managed to get Home Assistant installed on a virtual machine running in VMWare on my Mac Pro. (A few days after I did this, I saw that someone posted an article documenting this.) I gave the VM 8 GB of RAM, 2 cores (the Mac Pro has 12) and 50 GB of storage. Wow, the speed improvement was significant and history now shows up almost instantly (the database is running in a separate VM)! I was so pleased with this, I decided to unplug the Raspberry Pi and make the virtual machine my home automation hub. There were a few tricks, however. The virtual machine’s main disk had to be setup as a SATA drive (the default SCSI wouldn’t boot), suspending the VM confused it, and the Z-Wave stick wouldn’t reconnect upon restart. After much digging, I found the changes I needed to make to the .vmx file in the virtual machine:

    suspend.disabled = "TRUE"
    usb.autoConnect.device0 = "name:Sigma\ Designs\ Modem"

(The USB auto connect is documented deep down on VMWare’s site.)

I’ve rebooted the Mac Pro a few times and everything comes up without a problem very quickly, so I’m now good to go with this setup. Z-Wave takes about 2.5 minutes to finish startup vs. 5 or 6 on the Pi. A friend asked if I was OK with running a “mission critical” component on a VM. I said that I was because the Mac Pro has been rock solid for a long time and my virtual machines have been performing well. I could change my mind later on, but I see no reason to spin up another machine when I have a perfectly overpowered machine that is idle 95% of the time.

What next? Now that I have more power for my automation, I may look at more pretty graphs and statistics. I may also just cool it for awhile as I’ve poured a lot of time into this lately to get things working to my satisfaction. This has definitely been an adventure and am glad that I embarked on it.

Dipping my toe in the world of Docker

A former co-worker of mine has talked about Docker for years and I’ve taken a look at it a few times, but have generally been uninterested in it. Recently with my interest in Home Assistant, I’ve decided to take another look as many of the installs of Home Assistant as well as Hass.io are based on Docker.

I’ve used virtual machines running on VMware Fusion for years with some Windows installs and some Linux installs. I’m very comfortable with Linux, but kind of dislike maintaining different packages. There are package managers that handle much of it for me, but then there are other packages that have special installations.

I had a few goals in mind for seeing if Docker could replace the current virtual machines I had running for Pi-hole and Observium. The goals were pretty simple that I wanted easy updates and be able to easily backup the data. In the Docker world, updates are dead simple and in many docker containers, the data is stored outside of the container making it easy to backup. As another goal, I wanted to be able to experiment with other containers to see what else I could add to my network.

With all this in mind, I started looking at how to setup Docker. Pretty quickly, I realized that Docker for the Mac was virtually useless for me as it didn’t handle all the networking that Docker running on Linux could. So that meant installing Docker on a Linux VM; that almost negated my goal of easy updates as I’d still have to update the virtual machine running Ubuntu. I could live with that if the rest of the setup was straight forward and didn’t have to remember how to update each container individually.

In order to make backups easy, I wanted to store the data on my Mac and not inside of the virtual machine. I’ve not had great luck with the VMWare tools for mounting volumes, so I decided to use CIFS (SMB) to mount a volume in Linux which works well except for the MariaDB (MySQL fork) Docker container. Not a big deal, I’d just add a cron job to dump the databases every few hours and store the dumps on the mounted volume. I added the following to /etc/fstab

    //myserver/account/Documents/Ubuntu /mnt/mediacenter cifs username=account,domain=WORKGROUP,password=password,rw,hard,uid=1000,gid=1000 0 0

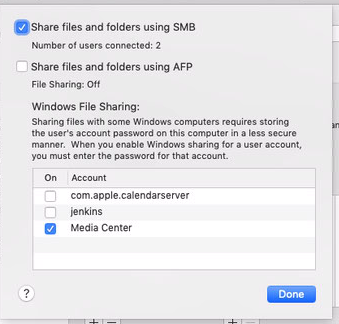
I also had to turn on Windows File Sharing options on the Mac.

Windows File Sharing

The crontab is:

    30 */2 * * * /usr/local/bin/backup_mysql

with the backup_mysql file being

    #!/bin/sh
    /usr/bin/mysqldump -h 127.0.0.1 -u root -ppassword --lock-all-tables --all-databases | gzip > /mnt/mediacenter/backups/mysql/mysql_backup_$(date +"%m-%d-%Y-%H_%M_%S").gz
    find /mnt/mediacenter/backups/mysql/* -mtime +3 -exec rm {} \;

The next hurdle was dealing with IPv6; most people don’t care about it, but I’m not most people! IPv6 is quite complicated (at least to me), so that took a bit of experimenting to get it to work in Docker. For future reference, ndppd lets the virtual machine tell the world that it handles IPv6 for the Docker containers (basically).

So where was I? After getting the Linux VM setup, it was on to setting up my containers. With docker-compose, I could setup one file that was the configuration for all my containers. Now this was great as I could modify it and test out different containers. After a few days of work, this is the core of my docker-compose file. There are a few other containers I’ve added including LibreNMS, but this is basically what I have. The nginx-proxy is great as I just add DNS entries for each service and it handles SSL and lets me run multiple web services on the same machine.

version: "2.3"
services:
  nginx-proxy:
   image: jwilder/nginx-proxy
   environment:
      - DEFAULT_HOST=pihole.exmple.com
   ports:
     - "80:80"
     - "443:443"
     - "::1:8080:80"
   dns:
     - 10.0.1.1
   volumes:
     - /var/run/docker.sock:/tmp/docker.sock:ro
     - '/mnt/mediacenter/docker/certs:/etc/nginx/certs'
   restart: always
   networks:
      default:
        ipv6_address: XXXX:XXXX:XXXX:XXXX:1::2

  pihole:
    image: pihole/pihole:latest
    ports:
      - "53:53/tcp"
      - "53:53/udp"
    environment:
      # enter your docker host IP here
      ServerIP: 10.0.1.200
      WEBPASSWORD: ''
      DNS1: 127.0.0.1
      DNS2: 10.0.1.1
      DNS3: XXXX:XXXX:XXXX:XXXX:XXXX:XXXX:XXXX:XXXX
      # IPv6 Address if your network supports it
      ServerIPv6: XXXX:XXXX:XXXX:XXXX:1::3
      VIRTUAL_HOST: pihole.example.com
    volumes:
      - '/mnt/mediacenter/docker/pihole/pihole/:/etc/pihole/'
      - '/mnt/mediacenter/docker/pihole/dnsmasq.d/:/etc/dnsmasq.d/'
      - '/mnt/mediacenter/docker/pihole/pihole.log:/var/log/pihole.log'
      # WARNING: if this log don't exist as a file on the host already
      # docker will try to create a directory in it's place making for lots of errors
      # - '/var/log/pihole.log:/var/log/pihole.log'
    restart: always
    cap_add:
        - NET_ADMIN
    networks:
      default:
        ipv6_address: XXXX:XXXX:XXXX:XXXX:1::3

  mariadb:
     image: mariadb
     ports:
       - 3306:3306
     volumes:
       - '/mariadb/data/:/var/lib/mysql/'
     environment:
       MYSQL_ROOT_PASSWORD: password
     restart: always
     user: "1000"
     networks:
       default:
        ipv6_address: XXXX:XXXX:XXXX:XXXX:1::4

networks:
  default:
      driver: bridge
      enable_ipv6: true
      ipam:            
        driver: default            
        config:                
            - subnet: 192.168.0.0/24                
            - subnet: "XXXX:XXXX:XXXX:XXXX:1::/120"                

Phew, that was a lot of work to get things running. However, I’m pretty pleased with how things are working. I now have the ability to experiment with other containers and can restore my data easily if things go awry. Is Docker the answer to everything? Probably not, but it appears to handle this job well.

Setting up a Leviton VRCZ4-M0Z for use with Home Assistant

I’ve been so pleased with Home Assistant that I decided to see if I could migrate completely away from Vera and run all my Z-Wave devices on Home Assistant. Currently Home Assistant uses OpenZwave as the base and has basic support for a lot of Z-Wave devices. While OpenZwave isn’t as mature as Vera in its implementation, I found that with the exception of 4 Leviton VRCZ4-M0Z zone controllers, everything worked well. I’ve read that some people have had problems with Z-Wave on Home Assistant, but so far things have been going quite well for me using an Aeotec Z-Stick Gen5 as the controller. I suspect that my success is due to the type of devices I have (only outlets, switches, 1 light bulb, 2 portable MiniMote controllers and these VRCZ4s); I don’t have any sensors and only 2 of my devices are battery powered.

In order to complete my transition away from Vera, I had to get the 4 VRCZ4s to work. A Google search turned up very little information on how to do this with the exception of one post that gave me some clues. The post uses a third party piece of software that I don’t have to program the controllers, so that was pretty much out. However, the post did talk about the SCENE_CONTROLLER_CONF Z-Wave command class. With this information in hand, I decided to see if I could program my controllers.

Here’s what I eventually did.

Controller Programming

  1. Sign up for a developer account on Silicon Labs.
  2. Download the Z-Wave Developer kit, specifically the Z-Wave PC Controller software. (Windows only, but works fine in VMWare Fusion)
  3. Reset the VRCZ4 by pressing and holding the left side of buttons 1 & 3 until it blinks amber and then remains a solid red.
  4. Press left side of buttons 1 & 3 of the VRCZ4.
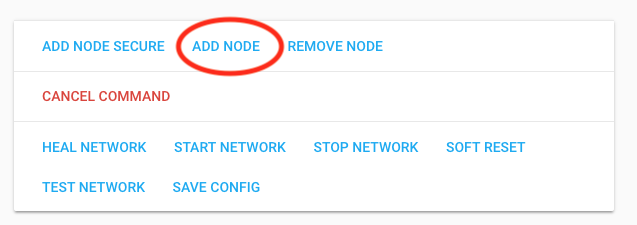
  5. Add node in Z-Wave config in HA
    Add Node
  6. Wait until node is added. I like to look the the OZW_Log.txt to check status. The node will say Complete next to it when it is done.
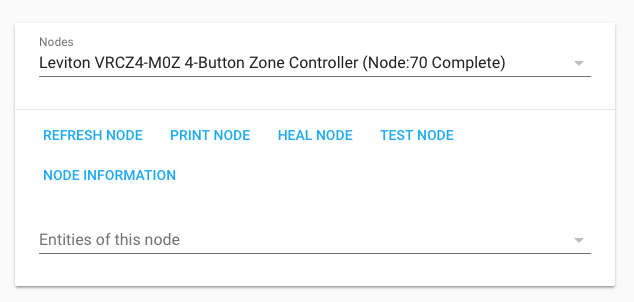
  7. Select node in Z-Wave config called Leviton VRCZ4-M0Z. Make a note of the node number.
    VRCZ4 Node
  8. Rename Entity by going to Node Information, selecting the gear and entering a new node.
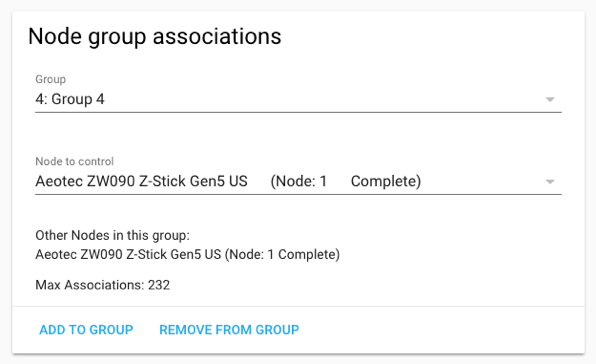
  9. Under Node Group Associations, select Group 1
  10. Make sure Aeotec Z-Stick (node 1) is selected and click Add to Group.
    Screen Shot 2019 01 03 at 9 33 22 AM
  11. Repeat the above 2 steps for Groups 2-4. The VRCZ4 needs to know where to send commands when the buttons are pressed.
  12. If you have other devices you want to control such as lights or outlets and they support Z-Wave association, associate the devices with the VRCZ4 now. Groups 1-4 corresponds with buttons 1-4. So if you want button 1 to control an outlet, associate it with the outlet.
  13. If all the buttons on the VRCZ4 are going to be associated with other devices, you can stop here as the associations will cause the buttons to turn on/off the associated devices. You can even associate more than 1 device to a button (i.e. 2 backyard lights).
  14. If you want of the buttons to control scripts or automations on Home Assistant, you’ll have to do some more steps.
  15. Shutdown the HA box (not just HA, but the entire box).
  16. Connect Aeotec Z-Stick to computer with Z-Wave PC Controller software.
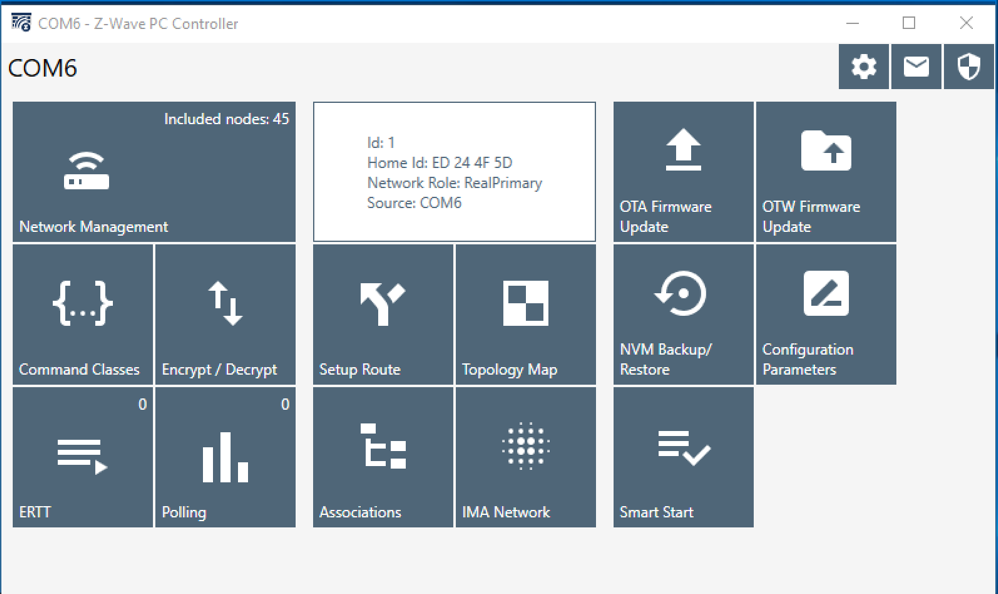
  17. Launch PC Controller software.
    Z-Wave PC Controller
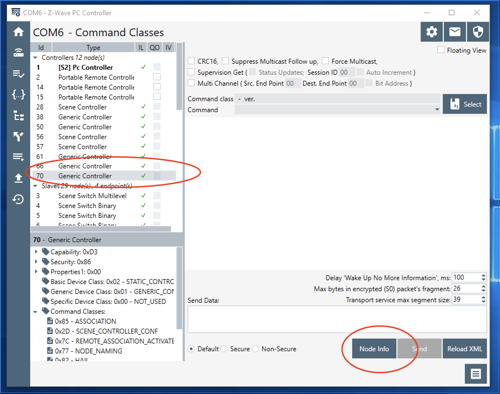
  18. Click Command Classes
  19. Locate node of controller on left side.
  20. Click on it and then click Node Info.
    Command Classes
  21. Double click SCENE_CONTROLLER_CONF in the lower left.
  22. Change command to SCENE_CONTROLLER_CONF_SET.
    Change Command Class
  23. Click the button in the lower right to show the log.
  24. At this point, you need to program each button where you are not using associations to control devices.
  25. The Group IDs for the buttons are as follows:
    Button 1 on - 1
    Button 2 on - 2
    Button 3 on - 3
    Button 4 on - 4
    Button 1 off - 5
    Button 2 off - 6
    Button 3 off - 7
    Button 4 off - 8
    
  26. For each group ID, you have to assign a scene ID. Apparently the scene IDs should be unique across the entire Z-Wave network, but for my case I assigned the same scene IDs for each controller and can distinguish between the controllers in Home Assistant. You can choose whatever numbering scheme you want, but I went with the following:
    Button 1 on - 1
    Button 1 off - 2
    Button 2 on - 3
    Button 2 off - 4
    Button 3 on - 5
    Button 3 off - 6
    Button 4 on - 7
    Button 4 off - 8
    
  27. For each group ID, assign a scene ID and click send.
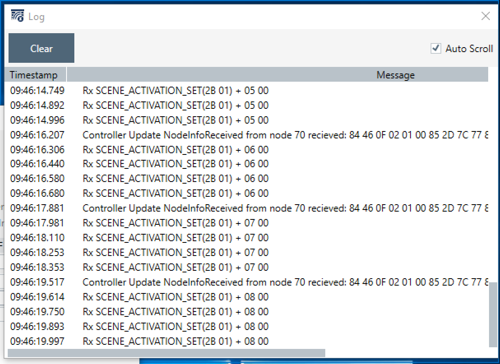
  28. You’ll see some message in the logs.
  29. To verify that the scene IDs are set, press a button and in the log you will see a SCENE_ACTIVATION_SET message with the scene ID.
    Z-Wave Log
  30. Note that the group IDs and the scene IDs are in hex. Since I’m only using 1-8, it doesn’t matter but if you use different scene IDs, be aware of this.
  31. Repeat for each button you want to set.
  32. Unplug the Aeotec Stick from the computer and plug it back into HA and reboot HA.

Using the Scenes

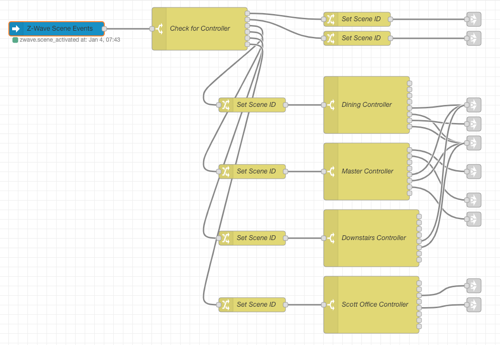
The programming has now been done, so the next step is to use the new commands in Home Assistant. I use Node-RED and have setup a sequence that handles all of my controllers.

Node-RED Sequence
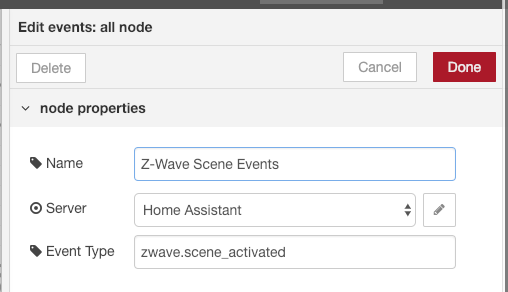
1. Drag an events node (top left in Home Assistant) to the workspace and set it up to only look at zwave.scene_activated events.
Scene Events
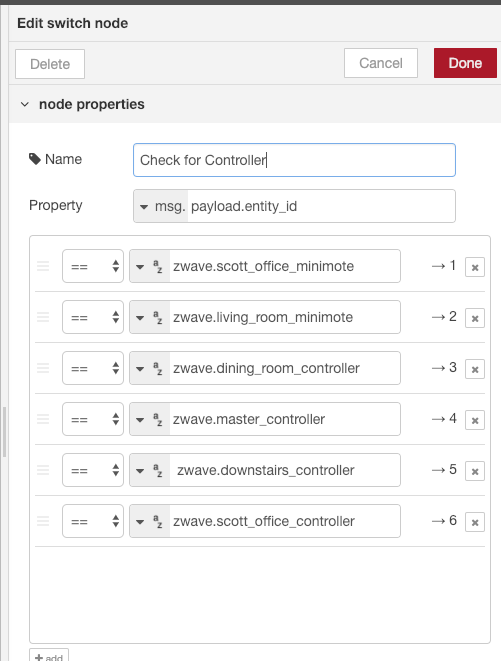
2. Use a switch node to differentiate between the controllers.
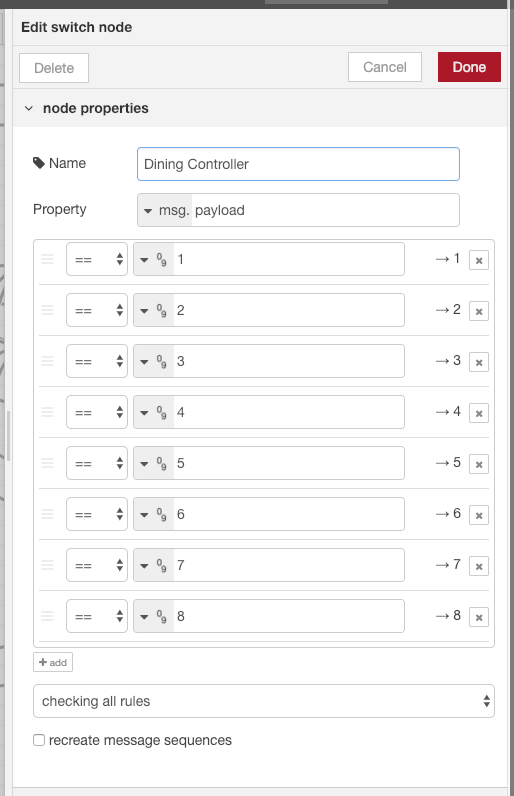
Switch Node
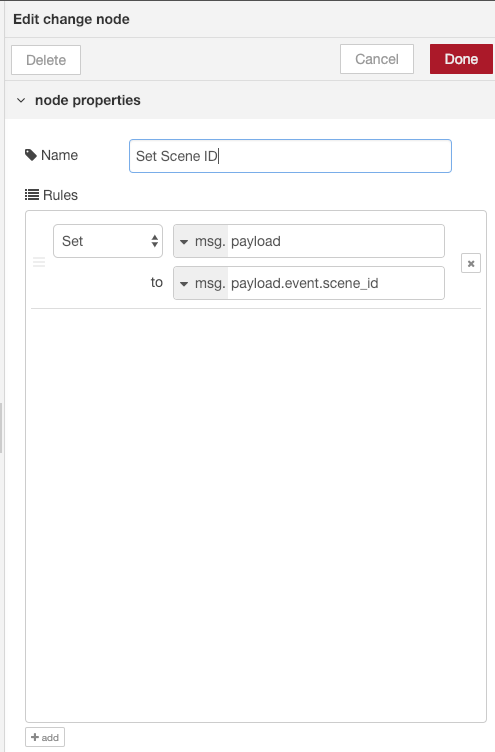
3. Use a change node to extract the scene ID.
Extract Scene ID
4. Next use a switch node to separate out the scenes. If you didn’t follow my scene numbering, you will have to enter whatever scene IDs you used.
Separate out scenes
5. Connect up nodes for each scene.

While this seems like a lot of work, I probably took longer for me to write this up then to actually configure a controller! I’m not an expert in Home Assistant, Node-RED or Z-Wave so send feedback if you have any.

Enjoy!

Auto Layout in a UITableViewCell with an image

Auto Layout is an amazing concept for developing iOS apps as it allows for an application to more easily look good across different devices. In addition it makes using dynamic type so much easier; as someone that wears glasses I always increase the type size on my devices and when apps don’t take advantage of it, I get kind of annoyed. So when I develop apps, I try to use dynamic type and using auto layout makes things so much easier.

A common theme in apps I develop is to have a UITableView with a bunch of rows. The rows have different bits of text and the only sensible way to develop this is using auto layout. With the latest releases of iOS, a lot of code dealing with dynamic type, heights of cells, responding to device changes, etc. has been eliminated. However, there are still a few gotchas in making an app with a UITableView that behaves properly.

I’m going to go over the steps I used (and provide sample code) for how I handle this. I had a few requirements that make my implementation a little different than other tutorials on the web.

  • Each cell has an image that would be at most 1/3 the width of the screen.
  • The image must touch the top and bottom of the row.
  • The image had to be at least a certain height.
  • The image should attempt to have the aspect ratio of the original image. (Aspect Fit could leave white space; Aspect Fill could hide some of the image.)
  • Images are loaded asynchronously from the Internet.
  • Next to the image is up to 5 lines of text pinned to the top.
  • Next to the image is 1 line of text pinned to the bottom.
  • Each line of text could wrap to multiple lines.
  • Increasing the type sized must resize the rows.
  • The cell must have a minimum height.
  • Rotating the device must work.

Writing that out sure looks more complicated than it was in my head!

I’m not going to go over the initial project setup, but will jump right into Interface Builder after I created a UITableViewCell with xib. Note that I don’t use Storyboards and opt to create a separate xib for each view controller and each cell; Storyboards tend to bite me each time I use them as I like to re-use code as much as possible and by default the Storyboard for a UITableViewController puts the cell in the Storyboard making it harder to manage. I’m sure some would argue with me that Storyboards are great, but they just don’t work for me.

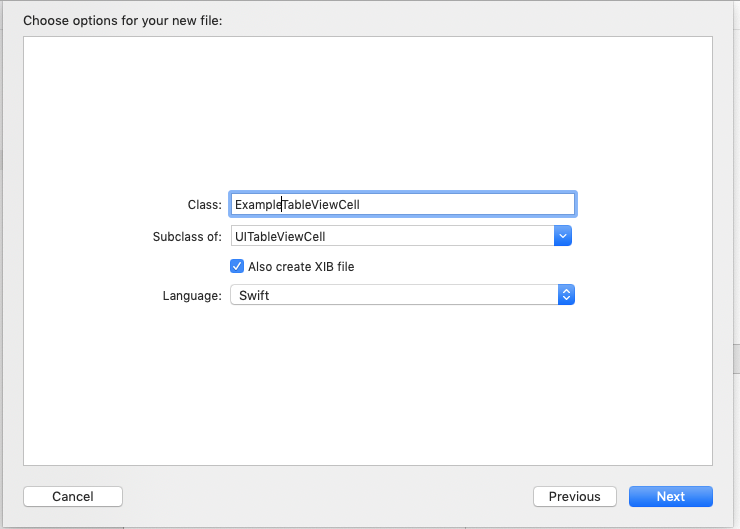
  1. Create a new UITableViewCell with a xib.
    Creating a UITableViewCell subclass
  2. In the xib, add a UIImageView to the left side that is pinned to the left, top, and bottom of the cell.
  3. Set the UIImageView to Aspect Fill and Clip to bounds.
  4. Give the UIImageView fixed width and height constraints. (We’ll change this later.)
  5. Add a vertical stack view pinned to 10 pixels from the UIImageView, pinned to 10 pixels from the top and 10 pixels from the right.
  6. Add 5 UILabels to the stack view. Each label should be set for “Automatically adjusts font” and a Font of Body. Set 1 or more of the labels to have 0 Lines so that it grows vertically. Also, set auto shrink to minimum font scale of 0.5.
  7. Add another vertical stack view pinned to the leading of the first stack view, 10 pixels from the right and bottom of the container and on the top to be >= 5 from the other stack view.
  8. Add a UILabel to this stack view. Set the font as above.
  9. Set the height constraint of the UIImageView to a priority of 250 (low).
  10. Add a UIActivityIndicator that is centered on the UIImageView (set the constraints).
  11. Create a UIImageView subclass that looks like this. The UIImageView uses the intrinsic size of the image in the absence of other constraints and we want more control of the height of the view.
    class ExampleImageView: UIImageView {
        var minimumHeight: CGFloat = 0
        override var intrinsicContentSize: CGSize {
            if minimumHeight == 0 {
                return super.intrinsicContentSize
            }
            return CGSize(width: 0, height: minimumHeight)
        }
    }
    
  12. Change the UIImageView class to ExampleImageView.

  13. Connect outlets for the 6 UILabels, the UIImageView (with the new class), the activity indicator and the height and width constraints on the UIImageView.

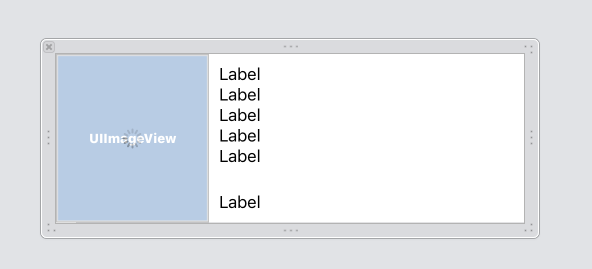
Your xib should look like this:

TableViewCell xib

Time to move into the source of the table view cell. I’m only going to cover the interesting parts here. See my example repo at for the full example.

  1. Setup a variable for the cell width. This is going to be set through the view controller so that rotation changes can change the width of the image.
    var cellWidth: CGFloat = 0 {
        didSet {
            maxImageWidth = cellWidth / 3
            setImageWidth()
        }
    }
    
    fileprivate var maxImageWidth: CGFloat = 120
    
  2. Add a method for setting the image width.
    fileprivate func setImageWidth() {
        if let image = cellImageView.image {
            let scale = image.size.height / contentView.frame.size.height
            var newWidth = image.size.width / scale
            if newWidth > maxImageWidth {
                newWidth = maxImageWidth
            }
    
            contentView.layoutIfNeeded()
            let animator = UIViewPropertyAnimator.init(duration: 0.1, curve: .easeOut) {[weak self] in
                guard let self = self else {return}
                self.cellImageViewWidthLayoutConstraint.constant = newWidth
                self.contentView.layoutIfNeeded()
            }
    
            animator.startAnimation()
        }
    }
    
  3. Next in the view controller, add the following to handle the change in width of the cell.
    override func willTransition(to newCollection: UITraitCollection, with coordinator: UIViewControllerTransitionCoordinator) {
        if let visibleCells = tableView.visibleCells as? [ExampleTableViewCell] {
            for cell in visibleCells {
                cell.cellWidth = tableView.frame.width
            }
        }
        super.willTransition(to: newCollection, with: coordinator)
    }
    

Believe it or not, I think that’s it! I’ve spent at least 4 weeks on this issue and keep running into some problem. Rotation and changing font sizes (Accessibility Inspector is great for testing) kept bringing up issues.

The example repo can be found here: https://github.com/sgruby/TableViewExample.

Feedback/changes are welcome! I’m sure I’m not doing something correct or there is an easier way; I just haven’t figured it out, yet.

Home Assistant and Node-RED, automation perfected?

Earlier this year I started experimenting with Home Assistant and wrote some thoughts about it. It brought together enough pieces that I keep tinkering with it. A friend of mine had mentioned a project called Node-RED which is supposed to more easily link together IoT components and perform actions based on different inputs. At the time, I brushed it off as I didn’t want to bother figuring out how to install it.

Fast forward to last week when I noticed that Home Assistant had a Node-RED add-on. Installing the add-on was quite easy and I was presented with a blank canvas. After a few minutes, I figured out how to make a simple sequence that took the state of a door sensor (at the time connected via my Vera) and turned on a light. Nothing too fancy, but I was able to hook it up, hit Deploy and test. It worked! This was light years ahead of the YAML based automations in Home Assistant and much faster to setup than Vera. I was hooked almost immediately. Could I convert all my automation logic to this? I spent the next few days trying.

Wiring some basic automations was quite easy as in this example that turns off lights in my bathroom if there is no motion. Node-RED resets the timer if there is more motion, making the sequence very straightforward.
Basic Node-RED Sequence

Unfortunately not all my automations are this simple.

The most important sequences deal with my front and back motion sensors. I could just use something like the above sequence, but I only want the lights on at night, I want to be able to disable the motion sensors (for example on Halloween if we’re not home, I don’t want lights coming on), and if I turn on the lights manually I don’t want them turning off a few minutes after there is motion. The tricky part here was to determine if the lights were manually turned on or triggered by a motion sensor. After a bit of experimenting, I decided to record the last time there was motion into a variable. Then when the lights turn on I check the variable to see how long ago it occurred. If it was less than 30 seconds ago, call it triggered my motion. With that, I was able to set on off timer based on how the lights came on. The one bit of “code” I had to write was to determine how long ago the motion was tripped.

    var motionTimestamp = flow.get('lastFrontMotion') || -1;
    var difference = (Date.now() - motionTimestamp) / 1000;
    if (motionTimestamp === -1)
    {
        difference = -1
    }
    msg.payload = difference;
    return msg;

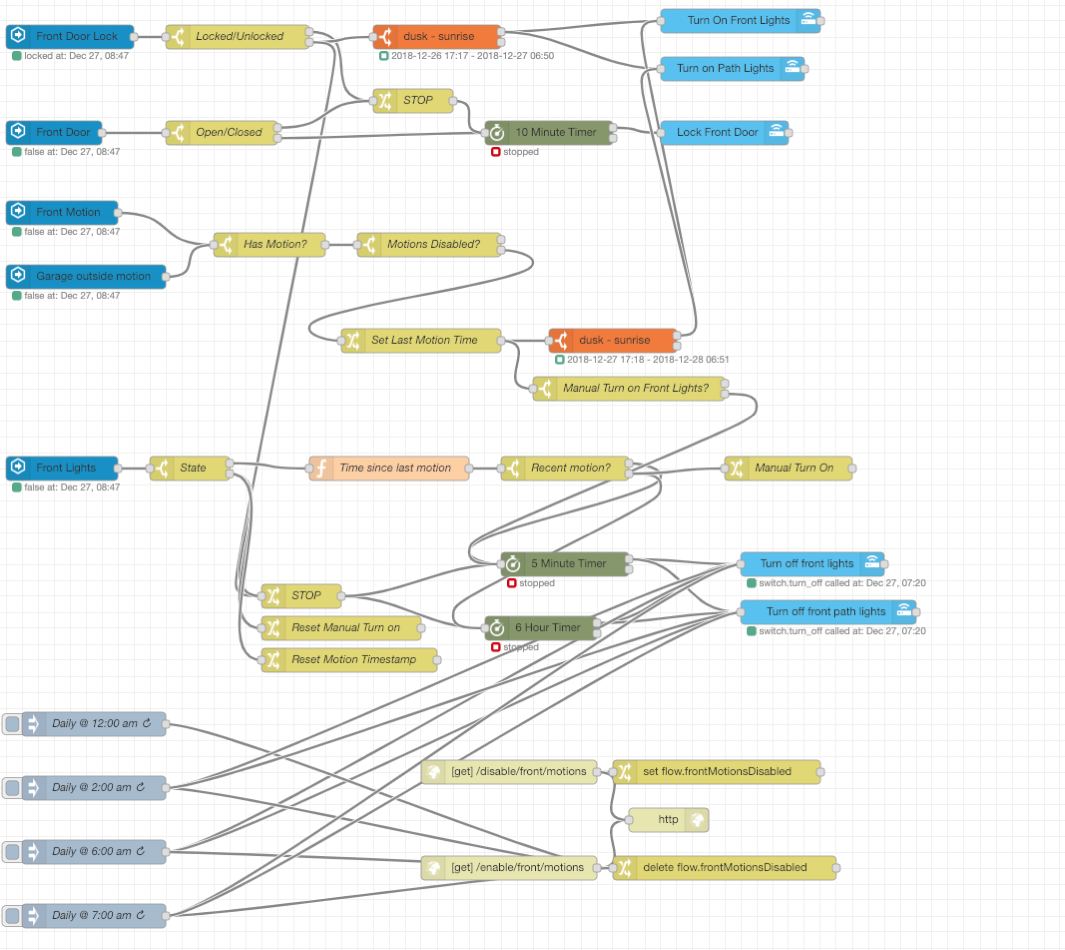
The flow may look complicated, but to me it is quite readable.

Complicated Node-RED Flow

The visual aspect of Node-RED makes it easier to setup automations, but calling automation simple is far from the truth as I’ve shown above. As a professional software developer, writing code doesn’t scare me but for a hobby, this visual approach (with a little code as necessary) is much nicer. When I come back to this in 6 months, I have no doubt that I can read what is going on and troubleshoot as necessary.

For the last 5 years, I’ve been using my Vera to control everything using a plugin called PLEG which stands for Program Logic Event Generator. It has worked quite well, but it has been so long since I setup most of the automations, I have no idea what I did. PLEG, while functional, was a bit difficult for me to wrap my head around and it pained me every time I had to touch it. Also, when I touched it, I seem to recall having to restart Vera and wait only to find out that I needed to change something.

I’m so impressed with Node-RED that I’ve decided to see if I can move all my Z-Wave devices to Home Assistant using an Aeotec Z-Stick Gen5 plugged into the Home Assistant. The goal with this move is to speed up messaging; right now the Home Assistant polls (I think) Vera all the time looking for changes. This isn’t very efficient and pressing a button can take a second or two to have the message reach Home Assistant. Will this work? I hope so!

I know that I’m just scratching the surface with this, but I am very excited over the prospects!

Non-secure network connections in Carnival Cruise’s app

This past summer my family took a cruise on Carnival Cruise Lines to the Eastern Caribbean. There were a total of 17 of us and we had a good time. One of the suggested ways for everyone to stay in touch was to use the Carnival Hub App which is basically their goto app for up to date information on the ship which has a messaging component. For $5 per device for the cruise, it didn’t seem all that unreasonable except that just about everything on the cruise costs extra!

The chat app, like most chat apps, has push notifications. In iOS, there are 2 types of push notifications, local and remote. The remote ones require a persistent connection to Apple’s Push Notification Service (APNS). I suspected that the app used local notifications and stayed open in the background as having several thousand devices connected to either Apple or Google’s push servers over a satellite link would not make much sense. So I pulled out my trusty copy of Charles Proxy and decided to see what traffic was being sent. What I saw just about shocked me.

Connections using the app were NOT using SSL! Since the WiFi was unprotected (it would be cumbersome to give out the WiFI password to so many users), anyone with rudimentary hardware/software could sniff all the traffic. SSL certificates are cheap and easy to deploy, so there is no excuse for every service not to be using them (I use them internally on all services running at my house).

Is it so bad that the app isn’t using SSL as no credit card data is flowing through the app? Absolutely! People could be chatting about which rooms they are in and when they are going to meet giving criminals information about when to go into their rooms. People could also tell their friends/family what they have in their rooms making them targets for criminals (“I put the laptop/camera under the bed”, for example). Not only was chat not SSL protected, all other aspects of the app’s communication were sent in clear text.

Example requests and responses

This request has my Folio number and name; those 2 pieces of information could allow anyone to charge to my room. While they should look at the ship ID (you are given basically a name badge that is your room key and used for purchases), I don’t know if the staff always looked at them. My cabin number was also in the request.

GET /FHMA-leviathan/api/Guest?isKiosk=false HTTP/1.1

{
    "ChatPassword": "efabb219324c47dfbfef469523b495d0",
    "Nickname": "SCOTT GRUBY",
    "DiningRoom": "Northern Lights Upr",
    "DiningTime": "E",
    "DiningTable": "494",
    "MusterStation": "B4",
    "LoyaltyNumber": "XXXXXXX",
    "LoyaltyLevel": "BLUE",
    "NumCruises": "1",
    "DateOfBirth": "",
    "Age": "45",
    "BookingNumber": "XXXXX",
    "BookingSequenceNumber": "18",
    "FolioNumber": "8540",
    "FolioActiveIndicator": "A",
    "FolioType": "G",
    "FolioAccountNum": "8829",
    "ResponsibleParty": "Y",
    "AlcoholRestricted": "N",
    "AtRisk": "",
    "CashBalance": "85.25",
    "AccountType": "MIXED",
    "FolioLimit": "",
    "TotalCharges": "43.66",
    "CabinNumber": "2309",
    "CrewInfoNumber": "",
    "VoyageStartDate": "2018-08-04T10:01:55",
    "VoyageEndDate": "2018-08-11T10:01:55",
    "Duration": "7",
    "FacebookId": null,
    "InitialLogin": "2018-08-04T14:08:02.963",
    "ChatPurchased": "2018-08-04T14:10:15.9",
    "InitialUserAgent": "funhub/2587 CFNetwork/902.2 Darwin/17.7.0",
    "IsResponsibleParty": true,
    "IsFolioCancelled": false,
    "IsFolioDeactivated": false,
    "FirstName": "SCOTT",
    "LastName": "GRUBY",
    "VoyageId": "MC20180804007",
    "AvatarUrl": "http://leviathan.cclfunhub.com/FHMA-leviathan/Avatars/2811.jpg?636690028868502174",
    "IsChatProvisioned": true,
    "IsChatPurchased": true,
    "AcceptedPixelsTerms": false,
    "ChatId": 2811,
    "SelfieUrl": null,
    "DecurtisGuestId": "445911",
    "DismissedPixelsSurvey": null,
    "CompletedPixelsSurvey": true
}

Want to know who I have on my chat list? Bingo! (Names were removed.)

GET /FHMA-leviathan/api/contacts HTTP/1.1

[{
    "Relationship": "Chat contact request",
    "IsMinor": false,
    "FirstName": "XXXXXXX",
    "LastName": "XXXXXXX",
    "VoyageId": "MC20180804007",
    "AvatarUrl": "http://leviathan.cclfunhub.com/FHMA-leviathan/Avatars/1248.jpg?636690701830901659",
    "IsChatProvisioned": true,
    "IsChatPurchased": true,
    "AcceptedPixelsTerms": null,
    "ChatId": 1248,
    "SelfieUrl": null,
    "DecurtisGuestId": null,
    "DismissedPixelsSurvey": null,
    "CompletedPixelsSurvey": null
}, {
    "Relationship": "Chat contact request",
    "IsMinor": false,
    "FirstName": "XXXXXXX",
    "LastName": "XXXXXXX",
    "VoyageId": "MC20180804007",
    "AvatarUrl": "http://leviathan.cclfunhub.com/FHMA-leviathan/Avatars/2074.jpg?636690009457720910",
    "IsChatProvisioned": true,
    "IsChatPurchased": true,
    "AcceptedPixelsTerms": null,
    "ChatId": 2074,
    "SelfieUrl": null,
    "DecurtisGuestId": null,
    "DismissedPixelsSurvey": null,
    "CompletedPixelsSurvey": null
}, {
    "Relationship": "Chat contact request",
    "IsMinor": false,
    "FirstName": "XXXXXXX",
    "LastName": "XXXXXXX",
    "VoyageId": "MC20180804007",
    "AvatarUrl": "http://leviathan.cclfunhub.com/FHMA-leviathan/Avatars/2075.jpg?636690046360212793",
    "IsChatProvisioned": true,
    "IsChatPurchased": true,
    "AcceptedPixelsTerms": null,
    "ChatId": 2075,
    "SelfieUrl": null,
    "DecurtisGuestId": null,
    "DismissedPixelsSurvey": null,
    "CompletedPixelsSurvey": null
}, {
    "Relationship": "Chat contact request",
    "IsMinor": false,
    "FirstName": "XXXXXXX",
    "LastName": "XXXXXXX",
    "VoyageId": "MC20180804007",
    "AvatarUrl": null,
    "IsChatProvisioned": true,
    "IsChatPurchased": true,
    "AcceptedPixelsTerms": null,
    "ChatId": 2396,
    "SelfieUrl": null,
    "DecurtisGuestId": null,
    "DismissedPixelsSurvey": null,
    "CompletedPixelsSurvey": null
}]

Want to know what my room charges were?

GET /FHMA-leviathan/api/guest/AccountSummary HTTP/1.1

{
    "TotalCharges": "346.17",
    "TotalCash": "0",
    "TotalCredits": "60.92",
    "BalanceDue": "0",
    "AvailableCash": "0",
    "AvailableCashAtFolio": "0",
    "MaxCashForDeposit": "9999",
    "CashBalance": "85.25",
    "AccountType": "MIXED",
    "GuestList": [{
        "GuestCharges": "134.31",
        "GuestChargesLessGrats": "43.66",
        "LastName": "GRUBY",
        "FirstName": "SCOTT",
        "MiddleName": "ALLEN",
        "FolioNumber": "8540",
        "VoyageNumber": "MC20180804007",
        "BookingNumber": "8GM8F5",
        "PaxSeqNumber": "18"
    }, {
        "GuestCharges": "91.65",
        "GuestChargesLessGrats": "1",
        "LastName": "GRUBY",
        "FirstName": "XXXXXX",
        "MiddleName": "XXXXXX",
        "FolioNumber": "8538",
        "VoyageNumber": "MC20180804007",
        "BookingNumber": "8GM8F5",
        "PaxSeqNumber": "20"
    }, {
        "GuestCharges": "120.21",
        "GuestChargesLessGrats": "29.56",
        "LastName": "GRUBY",
        "FirstName": "XXXXXXX",
        "MiddleName": "XXXXX",
        "FolioNumber": "8539",
        "VoyageNumber": "MC20180804007",
        "BookingNumber": "8GM8F5",
        "PaxSeqNumber": "19"
    }],
    "FolioCharges": [{
        "LastName": "GRUBY",
        "FirstName": "SCOTT",
        "MiddleName": "ALLEN",
        "ChargeDate": "8/4/2018",
        "ChargeTime": "11:28:17AM",
        "ChargeLocation": "INTERNET ACCESS",
        "ReceiptNumber": "379101",
        "ChargedAmount": "0",
        "IsReceiptAvailable": "Y"
    }, {
        "LastName": "GRUBY",
        "FirstName": "SCOTT",
        "MiddleName": "ALLEN",
        "ChargeDate": "8/4/2018",
        "ChargeTime": "11:40:45AM",
        "ChargeLocation": "NON-REFUNDABLE ONBOARD CREDITS",
        "ReceiptNumber": "020620",
        "ChargedAmount": "-25",
        "IsReceiptAvailable": "N"
    }, {
        "LastName": "GRUBY",
        "FirstName": "SCOTT",
        "MiddleName": "ALLEN",
        "ChargeDate": "8/4/2018",
        "ChargeTime": "11:40:46AM",
        "ChargeLocation": "REFUNDABLE ONBOARD CREDITS",
        "ReceiptNumber": "020620",
        "ChargedAmount": "-3.64",
        "IsReceiptAvailable": "N"
    }, {
        "LastName": "GRUBY",
        "FirstName": "SCOTT",
        "MiddleName": "ALLEN",
        "ChargeDate": "8/4/2018",
        "ChargeTime": "2:14:49PM",
        "ChargeLocation": "CHAT PLAN",
        "ReceiptNumber": "381964",
        "ChargedAmount": "5",
        "IsReceiptAvailable": "Y"
    }, {
        "LastName": "GRUBY",
        "FirstName": "SCOTT",
        "MiddleName": "ALLEN",
        "ChargeDate": "8/4/2018",
        "ChargeTime": "2:51:38PM",
        "ChargeLocation": "BLUE IGUANA BAR",
        "ReceiptNumber": "382739",
        "ChargedAmount": "10.07",
        "IsReceiptAvailable": "Y"
    }, {
        "LastName": "GRUBY",
        "FirstName": "SCOTT",
        "MiddleName": "ALLEN",
        "ChargeDate": "8/6/2018",
        "ChargeTime": "6:18:33PM",
        "ChargeLocation": "NORTHRN LS UPPER SVC served in Main Dining Room",
        "ReceiptNumber": "419829",
        "ChargedAmount": "10.64",
        "IsReceiptAvailable": "Y"
    }, {
        "LastName": "GRUBY",
        "FirstName": "SCOTT",
        "MiddleName": "ALLEN",
        "ChargeDate": "8/7/2018",
        "ChargeTime": "8:37:19AM",
        "ChargeLocation": "LAUNDRY SELF-SERVICE",
        "ReceiptNumber": "429017",
        "ChargedAmount": "3",
        "IsReceiptAvailable": "Y"
    }, {
        "LastName": "GRUBY",
        "FirstName": "SCOTT",
        "MiddleName": "ALLEN",
        "ChargeDate": "8/7/2018",
        "ChargeTime": "11:31:37AM",
        "ChargeLocation": "TOWELS,ROBES&BOOKS",
        "ReceiptNumber": "430321",
        "ChargedAmount": "14.95",
        "IsReceiptAvailable": "Y"
    }, {
        "LastName": "GRUBY",
        "FirstName": "SCOTT",
        "MiddleName": "ALLEN",
        "ChargeDate": "8/9/2018",
        "ChargeTime": "2:04:26PM",
        "ChargeLocation": "SERVICE GRATUITY",
        "ReceiptNumber": "876839",
        "ChargedAmount": "90.65",
        "IsReceiptAvailable": "Y"
    }]
}

It appears that the chat application was using the Jabber protocol (XMPP) running on port 5222 (non SSL port). I only grabbed a little of the traffic, but the XMPP protocol would have all the chat conversations appearing in it.

<stream:stream xmlns:stream='http://etherx.jabber.org/streams'
xmlns='jabber:client' xml:lang='en-US.UTF-8' id='1B9C3F49DB9F71'
from='chat.cclfunhub.com'
version='1.0'><stream:features><mechanisms
xmlns='urn:ietf:params:xml:ns:xmpp-sasl'><mechanism>PLAIN</
mechanism><mechanism>CISCO-VTG-TOKEN</mechanism></mechanisms></
stream:features><success
xmlns='urn:ietf:params:xml:ns:xmpp-sasl'/><stream:stream
xmlns:stream='http://etherx.jabber.org/streams'
xmlns='jabber:client' xml:lang='en-US.UTF-8' id='1B9C3F49DB9F71'
from='chat.cclfunhub.com' version='1.0'><stream:features><bind
xmlns='urn:ietf:params:xml:ns:xmpp-bind'/><session
xmlns='urn:ietf:params:xml:ns:xmpp-session'/></stream:features><
iq id='0E579D08-88CC-4A8E-8A80-C730BA9B0505' type='result'><bind
xmlns='urn:ietf:params:xml:ns:xmpp-bind'><jid>2811@chat.
cclfunhub.com/FA8CEBAF-6EDF-4B10-8D1E-7E6AF213F07C</jid></bind><
/iq><iq id='63D67AE8-2A53-4047-A9BE-A3E429953B7E'
type='result'/><presence
from='505c1c79-24c3-41d6-89c3-31e687ad3ab4@conference-2-
standalonecluster61f84.chat.cclfunhub.com/3940#ad29759f-2e4d-
4428-bbd2-23f953c285d2' id='tlDWA-7797'
to='2811@chat.cclfunhub.com/FA8CEBAF-6EDF-4B10-8D1E-7E6AF213F07C
'><x xmlns='http://jabber.org/protocol/muc#user'><item
affiliation='owner'
jid='3940@chat.cclfunhub.com/8f1c3bd92d91ad29'
role='moderator'/></x><c hash='sha-1'
node='http://www.igniterealtime.org/projects/smack'
ver='A1TcJY4mFaFrO9M5ctJsIPdHhsU='
xmlns='http://jabber.org/protocol/caps'/><delay
stamp='2018-08-10T04:05:07.36362Z' xmlns='urn:xmpp:delay'/><x
stamp='20180810T04:05:07.36362'
xmlns='jabber:x:delay'/></presence><presence
from='505c1c79-24c3-41d6-89c3-31e687ad3ab4@conference-2-
standalonecluster61f84.chat.cclfunhub.com/2508#4faf58be-ee9d-
4d80-8ee2-2ee662f6629a' id='vj32Z-86255'
to='2811@chat.cclfunhub.com/FA8CEBAF-6EDF-4B10-8D1E-7E6AF213F07C
'><x xmlns='http://jabber.org/protocol/muc#user'><item
affiliation='owner'
jid='2508@chat.cclfunhub.com/887e88d21b5f8201'
role='moderator'/></x><c hash='sha-1'
node='http://www.igniterealtime.org/projects/smack'
ver='A1TcJY4mFaFrO9M5ctJsIPdHhsU='
xmlns='http://jabber.org/protocol/caps'/><delay
stamp='2018-08-10T03:02:13.862187Z' xmlns='urn:xmpp:delay'/><x
stamp='20180810T03:02:13.862187'
xmlns='jabber:x:delay'/></presence><presence
from='505c1c79-24c3-41d6-89c3-31e687ad3ab4@conference-2-
standalonecluster61f84.chat.cclfunhub.com/1248#-iOS-00689BAE-
CC73-43A3-A258-4E9F8BA160A2'
to='2811@chat.cclfunhub.com/FA8CEBAF-6EDF-4B10-8D1E-7E6AF213F07C
'><x xmlns='http://jabber.org/protocol/muc#user'><history
maxchars='0'/><item affiliation='owner'
jid='1248@chat.cclfunhub.com/E22C11CA-B399-4D9B-A3D9-
BE9C35B5A1DD' role='moderator'/></x><delay
stamp='2018-08-10T03:57:54.660208Z' xmlns='urn:xmpp:delay'/><x
stamp='20180810T03:57:54.660208'
xmlns='jabber:x:delay'/></presence>

WiFi Issues

The security of the app wasn’t the only issue in using it. I suspect that the WiFi was also overloaded; with something like 6000 people on the ship, there were several thousand devices connected at all times even if they weren’t communicating at the same time. This made using the app very frustrating; messages didn’t get through and notifications were delayed, if they were received at all. Imagine all the people annoyed that his or her significant other wouldn’t respond even though he or she actually did. I stopped relying on the app in the first few hours of using it!

Recommendations to Carnival

  • Deploy a wildcard SSL certificate that is issued by a major SSL vendor (no self-signed certificates) to each internal server on each ship.
  • Add more WiFi capacity to every ship.
  • Perform load testing of the apps (iOS and Android).
  • Perform load testing of the WiFi network.

I’m not sure if the app has been updated, but here was the information about the version:

System Name: iOS
System Version: 11.4.1
Application Version: 2.2.3 (Build 0)
Ship Name: Magic
Hostname: http://leviathan.cclfunhub.com/FHMA-leviathan
Voyage ID: MC20180804007

Conclusion

While the concept of being able to communicate with others on a cruise especially if you have a large party is great, Carnival’s implementation needs work. In the future, I’m inclined to bring FRS radios; they definitely won’t work everywhere, but could be more reliable in certain situations. Also, meeting your group each morning and going over plans even if people go their separate ways (like people did before technology!) might also be in the cards.

If Carnival wants to get in touch with me about these issues or wants help with the app, I’m available!
HDMI ARC and HDMI CEC

Several years ago, I purchased a Vizio 5.1 soundbar system. At the time, the way to get the best audio from it was to use the optical input. This worked fine, but required me to use 3 remotes for watching TV; 1 for the TV, 1 for the soundbar, and 1 more for the Roku I had at the time. When the Apple TV 4 came out, I learned about HDMI CEC which is basically a protocol that lets devices talk to each other and have some control. The Apple TV remote then let me turn on the TV and put it in standby without touching the TV remote. That brought me down to 2 remotes. The Apple TV remote could also control the soundbar using IR which brought me down to 1 remote.

This setup worked fine for years, but had a few slight problems. The first is that when I powered on the Apple TV and TV using the remote, I’d have to hit the volume up button a few times to wake up the soundbar and then would have to lower the volume. Second is that putting the Apple TV and TV in standby did nothing for the soundbar; it went into low power mode after awhile, however. The last complaint, albeit minor is that I couldn’t use my iPhone or iPad to control the volume.

I’d read about HDMI Audio Return Channel (ARC) where instead of using optical audio out, an HDMI cable could be used which would give better audio. My soundbar didn’t have this option (the TV which was older than the soundbar did have it) so I was stuck with the optical audio. In addition, if the devices supported HDMI CEC, the volume could be controlled using another device’s remote.

A few weeks ago, I finally decided to upgrade my soundbar to one that supports Dolby Atmos and purchased the Vizio SB36512-F6 which was on sale at Costco. While I have no idea if I’ll be able to hear the Dolby Atmos (I need content to support it), I’m pretty pleased with the purchase. This soundbar is connected via HDMI and allows me to use the Apple TV remote (and my iPhone/iPad) to completely control my entertainment devices. In addition, the sound on the bar seems crisper and can now hear the rear speakers much better. It may be that HDMI ARC works better than optical or maybe makes it easier to configure. I am excited to be able to try out Atmos and see if that lives up to the hype in the room I watch TV (it may not as the ceiling isn’t that high and due to the layout, it is just part of a larger room).

I love when devices work together and with this new soundbar, I may have found the perfect combination for my viewing experience.

One last thing, the iPhone app for the soundbar is a piece of garbage. I used it to upgrade the firmware on the soundbar and promptly deleted it. Why is is so hard to make a basic app for controlling the settings of a device?