My New Adventure

When I was laid off, people kept telling me that there was nothing to worry about and take some time for myself. For the first few weeks, I tried to heed the advice and took it easy while at the same time leisurely looking for a job. I treated the first month as the sabbatical that I didn’t have the opportunity to enjoy and managed to make it through my inbox, my todo list, and ran out of things to do around the house.

After about a month, I started to get antsy as I’d never been away from a job for that long in my 20+ year career. I applied for a few jobs, but didn’t hear back on most of them. This had me quite nervous even though I knew I didn’t have to get a job for awhile. Would I be able to find a job? Would I have to take the first job offered to me even if it wasn’t the job i wanted? Would I have the motivation to start working again?

This period of unemployment also had me thinking about what happens for older workers; all of their experience comes at a higher price tag and many companies aren’t willing to pay for it. I don’t consider myself an older worker (however, the federal laws about employment consider older workers over 40, I believe), but when I started talking to people and explained that I have 20 years in mobile app development, I started to date myself.

My job search, luckily, only took about 6 weeks from the time I was laid off (actually it was a total of about 10 weeks as I started even before I was told I was being laid off). I saw a job posting for a mobile architect and decided to apply even though the job description was vague. After talking with the recruiter, I felt like the job was perfect for me based on my experience. My interviews went well and the rest is history!

User Experience vs User Interface Design

Once upon a time, I claimed that I could do UI design of applications. This was back in the Newton and Palm OS days where the apps didn’t do a whole lot and the developer guides had pretty clear guidelines that everyone followed. For Palm OS, it even had the number of pixels from the edges for buttons which made it quite easy to know exactly where to place objects.

Moving forward 20 years, it is clear to me that I can follow guidelines, but I need help designing an interface. This is where I’ve learned a ton working with professionals that do design. So far I’m being vague about what I mean by design, because I think that there is a clear misunderstanding of what is mobile design (or application design in general).

There are 2 main areas that I see referenced in mobile design. They are User Interface (UI) and User Experience (UX). While they sound very similar and some people treat them the same, they are very, very different. I’ve had the opportunity to work with a very talented individual that makes both look easy and has taught me the differences.

In general terms (at least to me), user experience is how the user navigates through an app, uses the features, and generally interacts with it. User interface is about drawing the pretty pictures, identifying the typefaces for styling, and picking the colors. In working with a designer on our team, I saw how he meticulously mapped out how everything would work in the application by putting together flowcharts of what every button would do, how you got back somewhere, what was the recovery for every error, how it interacted with hardware, what to do while the user was waiting for a network operation to finish, etc. The actual user interface was secondary to the user experience; for the most part we used standard controls, a standard color palette, etc. This type of design really impressed me as our designer identified so many things that are easy to ignore when simply writing an app. (How many apps just display “Error” with a number with no way to recover from it?)

On the flip side, I worked on a project where the designers were user interface designers trying to do both UX and UI design. Their UX design made the app hard to use, didn’t consider different screen sizes, didn’t consider navigation, didn’t consider how to display data that wasn’t in their sample, and was really about how pretty they could make it look. This frustrated me to no end as they wanted all kinds of custom interactions that would require end user training and were hard to use. In addition, they didn’t consider dynamic typefaces which I feel are important in consumer apps as people like me increase the type sizes to make the text easier to read. I pushed back on some of it and made the app work the best I could. I’m definitely not any type of designer, but having been in this business long enough, I know what doesn’t work!

As a user of apps, I find that a good user experience is paramount for me wanting to keep using an app. However, without an appealing visual appearance, I probably won’t enjoy looking at an app. Keeping these ideas in mind makes killer apps. I feel quite lucky to have worked with a designer that has taught me so much about design; I think that seeing how he did the design and how he considered all the interactions will be a huge benefit to me in the future when I work on new apps.

Non Standard iOS Navigation

In my years of being an iOS developer and user, I’ve seen a lot of apps that try to come up with their own ways of doing navigation that don’t follow Apple’s Human Interface Guidelines. Over this time, Apple has changed their guidelines, but usually don’t adopt some of the concepts that apps have inflicted on us.

I do most of my news reading on my iPad (and sometimes on my iPhone), so I’ve taken a look at the different news apps. Some people pan Apple’s News, however it is one of the easiest to use, has consistent navigation, and has a number of hidden features that make it convenient to use. For example, you can scroll up and down using the arrow keys on an iPad Pro keyboard, scroll page by page using option and the arrow keys and navigate back from an article using command and the left arrow key.

Using News, I’m able to take care of my tech, national and world news craving. So that leaves local news. The local news apps seem to shun standard navigation. One app uses an X in the upper which seems more cutesy than useful. If you’re browsing away with an iPad on a stand, you get used to swiping to the right to go back or at worst, tapping the back arrow.

X for close

This is pretty annoying; using the same app on the iPhone is worse because it prevents one handed news browsing. You have to reach up and hit the X button. The X for close is very much a desktop metaphor.

If we take a look at another news app, they at least kept the back button in the upper left, but because they want to show other articles, you can’t swipe right to go back.

Left Hand Navigation

I keep asking myself if the designers and developers use these apps or have done user studies (it’s hard for me to use a lot of apps I’ve worked on because they don’t apply to me, especially enterprise apps). Just watching a user use the app gives huge insight into what can be improved. One of the best experiences I had in the last year was watching someone use one of my apps; this was an enterprise app and thing that I thought were obvious weren’t obvious to the user.

By sticking to standard design paradigms as well as the Apple Human Interface Guidelines reduces user frustration, decreases training time (especially in enterprise apps) and increase the time that people use the apps.

Guest Network with EdgeRouter Lite and UniFi Access Points

Last year, I wrote about setting up a guest network with the EdgeRouter Lite. The post was focused on using an Apple Time Capsule as the wireless access point. Since then I’ve switched away from the Time Capsule and am now using Ubiquiti UniFi APs, so parts of the post are no longer relevant to me and a few people have asked me how to do this with the EdgeRouter Lite and the UniFi APs.

While the UniFi controller software has the option to do a guest network, as far as I can tell, it isn’t exactly what I want. With my setup, you can’t just use the checkbox to turn on the guest network as the current firmware apparently slows things down. So if you don’t check the box, my instructions appear to still be needed.

All of the EdgeRouter Lite steps are taken from my original post, so they may look familiar.

Here are the steps:

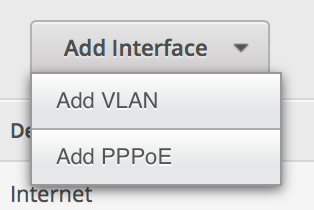
  1. On the EdgeRouter Lite’s Dashboard, click Add Interface and select VLAN.

    Add VLAN Image

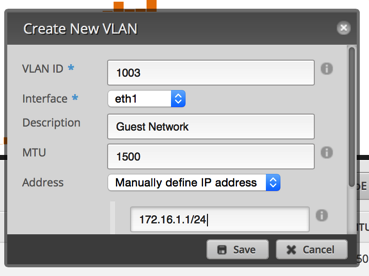
  2. Set up the VLAN as 1003 and attach it to the physical interface of your LAN. Give it an IP address in the range of a private IP block, but make sure you end it in a /24 to specify the proper subnet. (Make sure it is different than your normal private IP block.)

    Setup VLAN

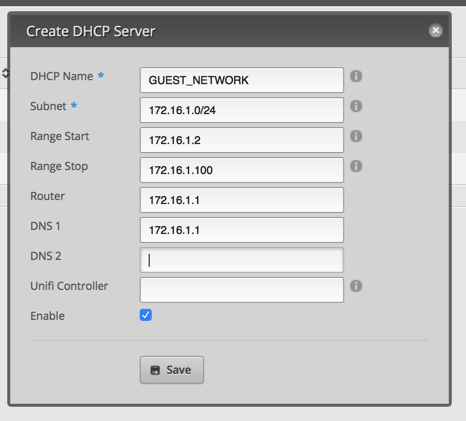
  3. Click on the Services tab. Click Add DHCP Server. Set it up similar to the image below.

    Add DHCP Server

  4. Click on the DNS tab under services. Click Add Listen interface and select the VLAN interface. Make sure you hit save.

    Setup DNS

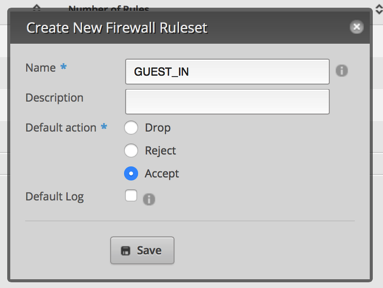
  5. Click on Firewall/NAT and then click on Add Ruleset. This is for packets coming into the router destined for somewhere else (not the router). Set up the default policy for Accept. Click Save.

    Add Firewall Rules

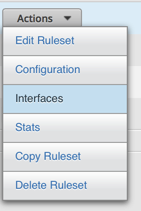
  6. From the Actions menu next to the Ruleset, click Interfaces.

    Select Interfaces

  7. Select your VLAN interface and the in direction.

    VLAN In Direction

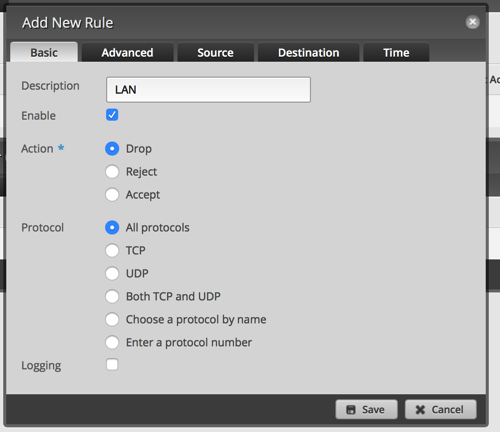
  8. Click Rules and then Add New Rule. Click on Basic and name it LAN. Select Drop as the Action.

    Add Rule

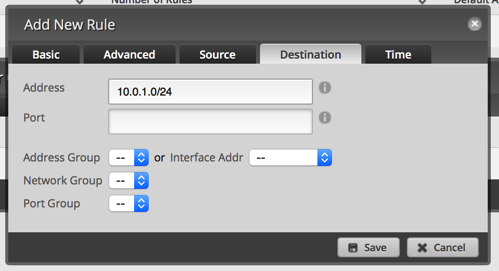
  9. Click Destination and enter 10.0.1.0/24 or whatever your LAN IP range is. Then click Save. This will drop all packets from the VLAN destined for your LAN. Save.

    Destination Selection

  10. Repeat 1 and 2 above (name it GUEST_LOCAL). From the Interface, select the VLAN interface and the local direction.

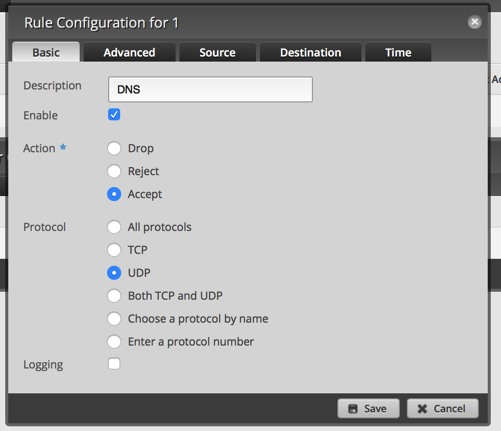
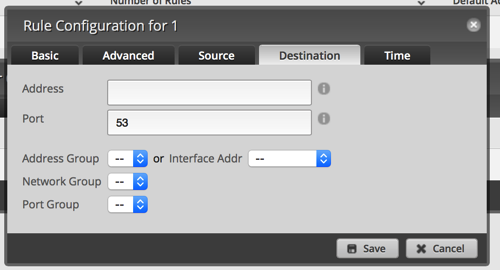
  11. Add a new rule. Set it to Accept on UDP port 53 (DNS).

    Rule Configuration

    Rule Destination

  12. Save.

Now it’s time to move over to the UniFi Controller.

  1. After you login to the controller, click the Settings in the lower left.

    Settings

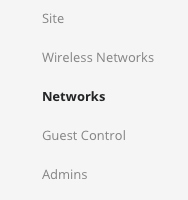
  2. If you’re using your UniFi AP connected to a UniFi Switch, you have to setup the switch to pass traffic for your guest network. If you aren’t, you can skip to step 5.

    Networks

  3. Click Create New Network

    Create New Network

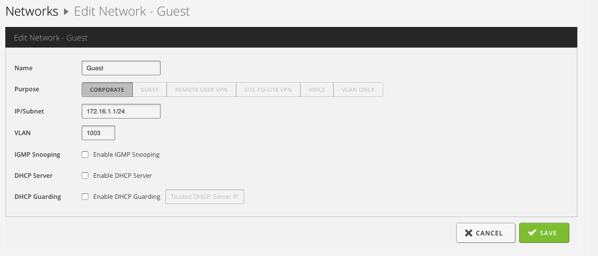
  4. Setup the network as indicated in the next image and then click Save.

    New Network

  5. Select Wireless Networks on the left side.

    Wireless Networks

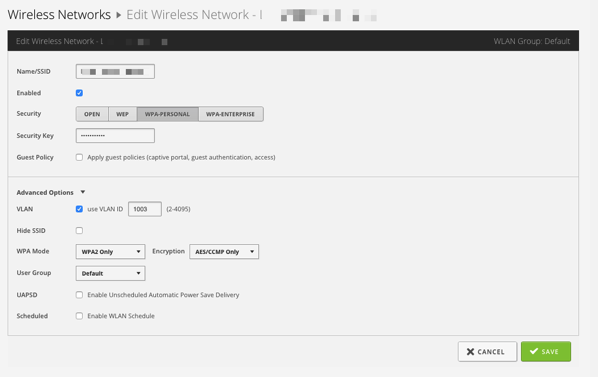
  6. Configure the network similar to the next picture. Note that I didn’t turn on guest policy.

    Wireless Configuration

Now you can test this by connecting to the guest network and accessing the Internet. Then try connecting to a device on your LAN or connecting to the EdgeRouter Lite. Both actions should fail.

I know that there are a lot of steps to configure this, but they’re not that difficult and you only have to do it once!

I’ve tested this and it is working well on my network; if I’ve missed anything, please let me know!

Ineffective Stop Signs

Soon after we moved into our house (about two and a half years ago), the city installed stop signs at the end of our street. This seemed like a great idea as traffic would speed down the hill perpendicular to our street and make it dangerous to get out of our street.

Over the time we’ve been here, we’ve seen people stop at the signs, slow down at the signs, and simply ignore the signs. I filled out a traffic engineering request to see what the city could do to get people to actually stop. Soon after I did this, I saw the cables on the ground across the traffic lanes that measure traffic. I thought that this was great and that the city was going to do something about people stopping.

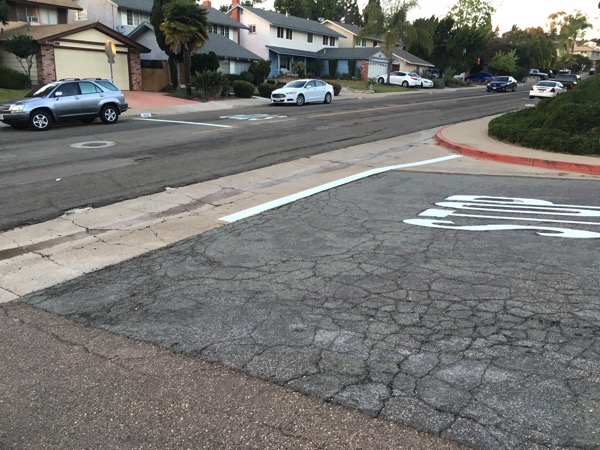
Unfortunately I saw the result not too long after that. The result was that the word STOP was repainted larger on the ground in all 3 directions. This solution, of course, is quite laughable.

Stop Sign

Last week I received a call from a traffic engineer (I think) and he explained that the council rep and the community planning group had requested a stop sign to slow down the traffic. The city’s job was done and traffic was slower most of the time; I do have to admit that if this was the goal, it has worked. The engineer suggested that I call the police and try to get them to come out and ticket people. Our police are overworked and they have better things to do than sit at a stop sign; the reasoning was that the route is used by locals and after a few tickets are issued, people would get the message. I don’t believe it, but whatever.

I’ve done my part to try to get people to do the right thing with respect to actually stopping, but without enforcement, the practice will continue. In speaking with a few neighbors who run it, they say that they can see in all directions and it isn’t hurting anyone. That may well be the case, but there will be that one time when someone doesn’t stop and there will be a serious accident.

Conserving Water with Rain Barrels

A few months ago, my wife saw that the city and water district were offering rebates on rain barrels. The rebates were significant enough to pay the entire cost of the barrels, so I decided to purchase 2 of them at Home Depot. Installig the barrels was easy as all I had to do was make Some slight modifications to my downspouts, attach an overflow hose and replace the spigot with a brass one as the cheap plastic one that came with the barrel would break easily.

After a major rain, I was able to fill up and then empty the 2 50 gallon barrels. We had another rain that filled up the barrels, so now I have another 100 gallons of water to use.

This got me thinking about how little having these 2 barrels will do to conserve water. First off, here in San Diego, we typically get rain in a concentrated window which wouldn’t really allow me to collect and empty water more than a few times a year. If I had barrels that collected 600 gallons, I could probably water all our plants for the entire growing season. Second, if I can fill up 400 gallons of water a year (best case scenario), I would save about $2 based on the cost of water.

While the rain barrels look nice and let me collect a little water, they are not cost effective (if I had to pay for them) and really won’t put a dent in my water usage. I can just feel a little bit better knowing that I’m trying to help.

Conveniently Charging Devices

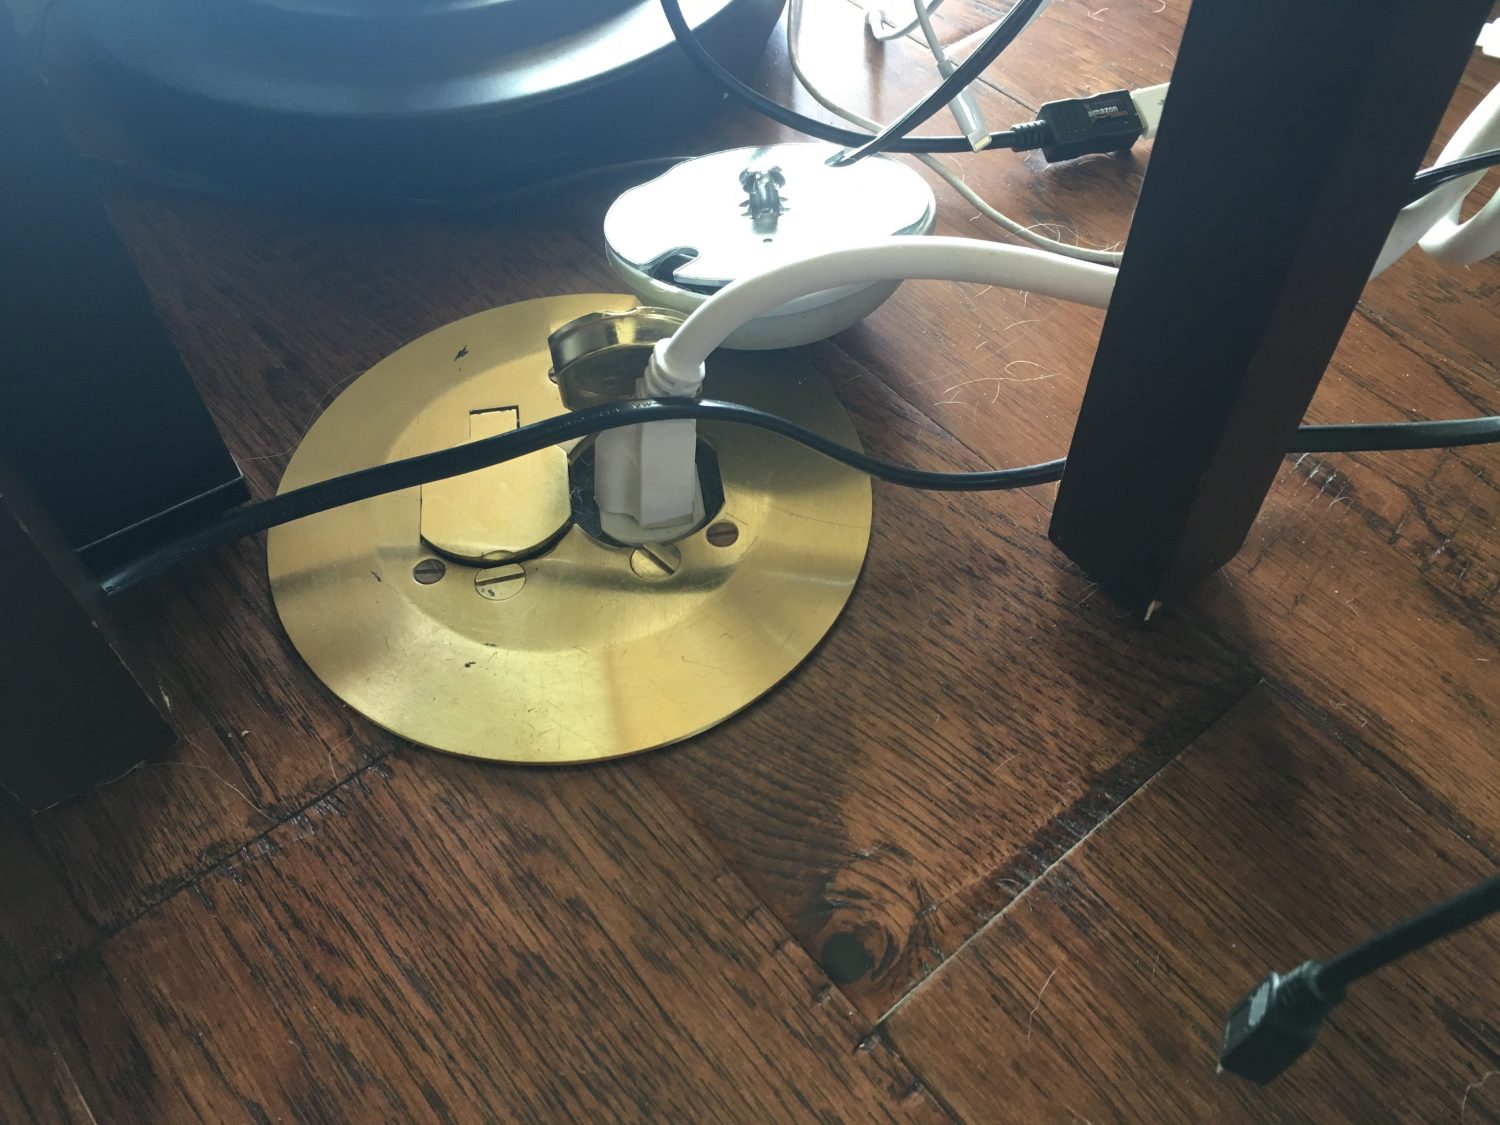
When we remodeled our house 3 years ago, we created a very open floor plan on our main living level by removing a wall. So now we have our kitchen, dining area (it isn’t a formal dining room as we never used one), and living room all together. This has worked out well, but during the planning stages, we realized that there would be a slight issue and that is based on how we wanted our couches, there would be no walls around them to plug in a lamp, charge devices, etc. We decided to put an outlet in the floor (the concrete had to be cut to put in the outlet which was being done anyway for our kitchen island). This outlet turned out to be a great decision.Floor Outlet

We started by plugging in a lamp into the outlet (the lamp is less harsh than the overhead lights) and then when I added a 5.1 surround system, I plugged the wireless subwoofer/rear speakers into the outlet. Of course, we only put a duplex outlet into the floor so when my wife wanted to charge her iPad there (she tends to use it most while sitting on the couch), I dug out a Y outlet and used that.

One device turned into 2 and then turned into more where we had to keep swapping out the cable. After purchasing a few of the Anker 5-Port USB Charger PowerPorts, I thought that using one of these on a table near the couch would solve my problem.

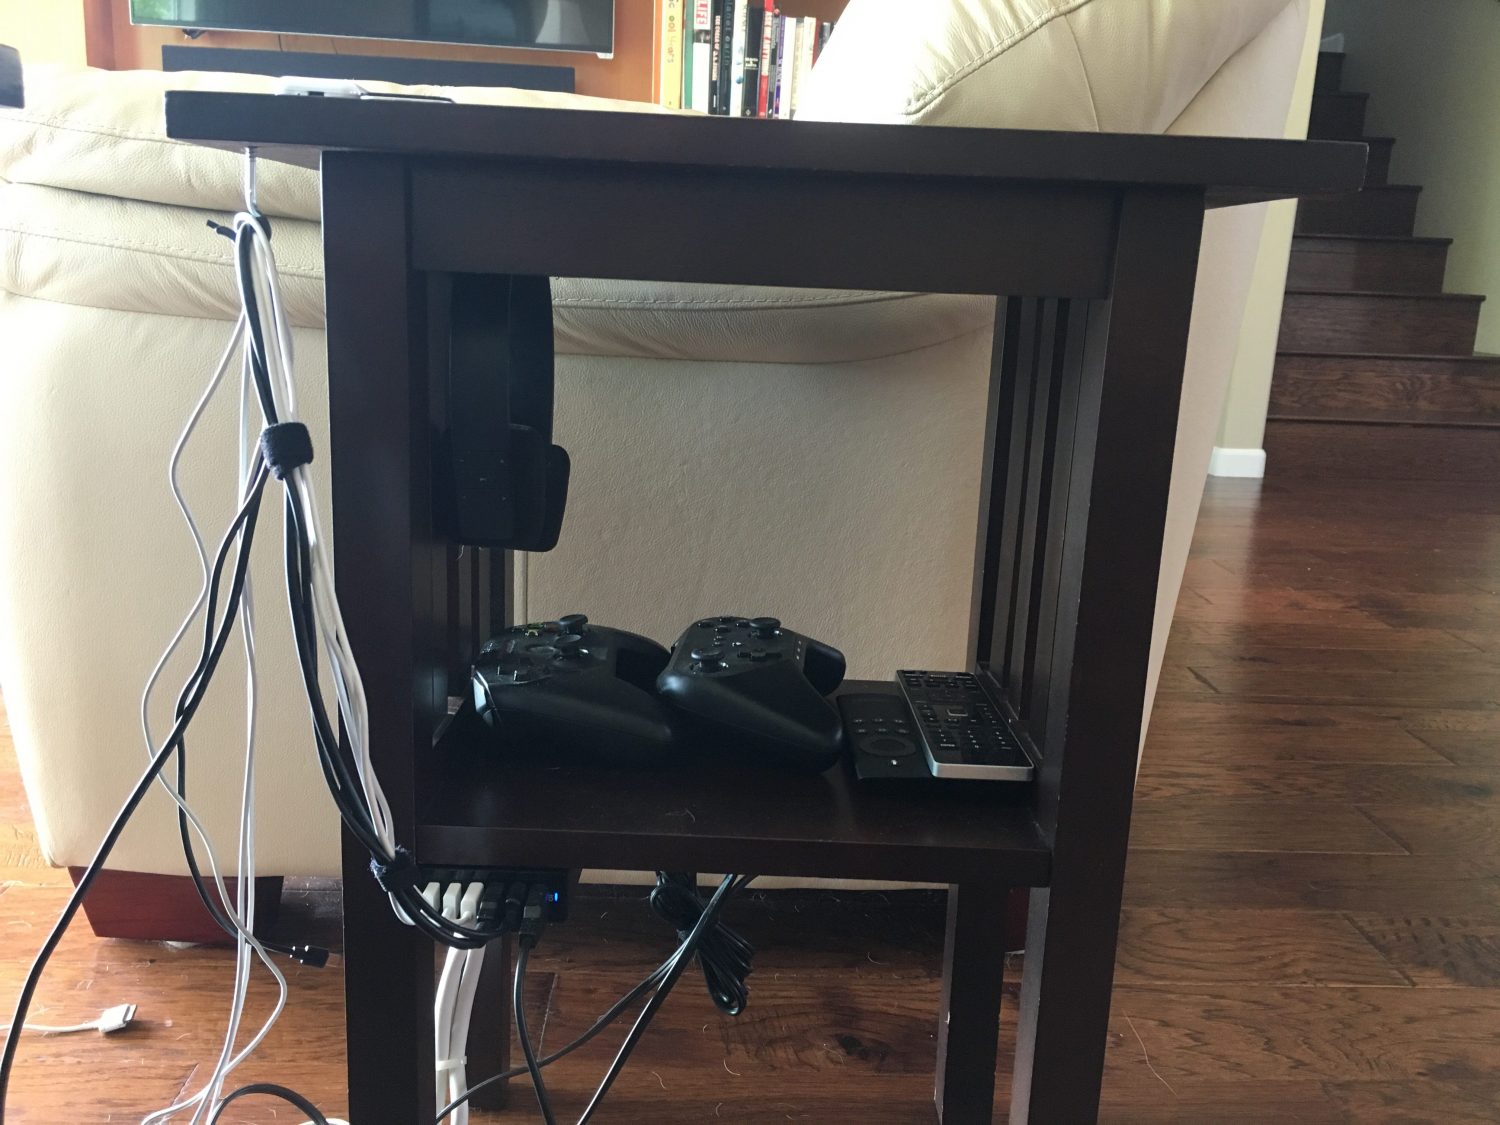
So I bought a small power strip, used industrial strength Velcro to mount it under an end table, and then mounted an Anker 6-Port USB Charger PowerPort under the table as well. Now I had 6 USB ports easily accessible near the couches.

I quickly realized that this solution was ingenious, if I do say so myself! It turns out we have a bunch of devices that occasionally need charging including an Apple TV Remote, a SteelSeries gaming controller, an Aeon Labs Z-Wave remote, an iPhone used as an automation remote, a pair of Bluetooth headphones that I sometimes use with the TV, and a few iPads. I’ve plugged in 2 30-pin cables, 2 lightning cables, a micro USB cable, and a mini USB cable into the Anker. This lets me easily grab a cable and be able to charge anything.

Device Power
Device Power

I’m still not quite sure what to do with the cables, but for now they’re all hanging together.

A New Chapter In My Professional Life

For the last 5 years, I’ve basically worked for the same company. My group was part of a sale about 5 months ago and I went along for the ride. Unfortunately all good things must come to an end and this chapter in my professional life has closed.

This time has been quite good to me and I’ve worked with some amazing people. I’ve worked on a variety of projects and learned all about technologies that I never imagined I’d ever encounter. I’ve also met some people that will remain good friends; in some ways I’m sad to be moving on, but in other ways, this is an opportunity for me to start anew.

I am quite nervous as I’ve only sent out résumés a few times in my 20 year career and never landed a job that I had applied through an ad. All my jobs have been a result of knowing someone or doing something (several were because of the software I’ve written).

Wherever I land, I’ll have to learn about new projects, new development styles, become more versed in a new language (Swift) and work with a new team. Transitions are always difficult, but like all transitions in my career, I’ll make it through this one just fine.

People have told me to take some time and enjoy my new freedom. That, of course, is much easier said than done. For now, I’m working through my ever growing todo list while actively pursuing job leads. Finding the right job is going to be a job in itself!

Review: UniFi Switch 8

Three years ago when we bought our house, I decided I wanted to put in surveillance cameras. When selecting the cameras, I decided that the cameras had to be powered by PoE (Power over Ethernet) so that I could change out the cameras later on if I wanted to and didn’t have to worry about dragging a separate wire for power which could be different for different cameras. At the time I was looking, the number of small, fanless switches that did PoE was quite small. I decided on a Cisco SG300-10P which is a 10 port managed switch with 8 of the ports being PoE.

The managed switch was definitely overkill for what I wanted, but an unmanaged gigabit PoE switch without a fan was nowhere to be found. The switch has worked fine for my needs. Since then, I’ve experimented with other unmanaged PoE switches (a 16 port one with 8 PoE ports) as I needed more ports. The Cisco switch works fine, but I really didn’t do much with it.

Last year after I tried out Ubiquiti’s UniFi AC Access Points, they asked if I wanted to test their new UniFi Switch 8 port switch that was coming out. Of course, I said yes! The switch, like other products in the UniFi line is controlled by the UniFi controller software. As I’ve mentioned before, the software is quite utilitarian, but works well. The switch easily integrates with my access points and is simple to setup.

One of the things I dinged the UniFi access points for (not the Pro) was the lack of 802.3af PoE requiring the use of a power injector. Well, like other switches in Ubiquiti’s line of switches, the 8 port switch provides passive PoE to individual ports if configured which will power the UniFi access points. So now that I had a UniFi switch, that negative point of having to use a power injector no longer applied.

My needs of a switch are pretty minor; I just need PoE provided to cameras and I need it to pass VLAN traffic for my guest WiFi network. The UniFi Switch 8 easily does that and a whole lot more. The controller interface works and I love being able to see statistics and have control over much of my network from one screen.

I really would like 10 ports and the switch has 2 SFP ports. Normally SFP ports are used for fiber connections, but they also support copper modules. I’m in the process of trying to get working copper modules from Fiberstore which is proving to be difficult; of the 6 I ordered, only 1 worked. Their support is good, but being in China, it takes a long time to get replacements. I would rather have had a combo RJ-45/SFP port like the Cisco switch has, but the SFP modules will eventually work.

One of the things I’ve overlooked until recently in a managed switch is the ability to use SNMP and monitor traffic. There is no real use for watching the traffic, but I find it interesting. I have monitoring for my access points and my Cisco switch as well.
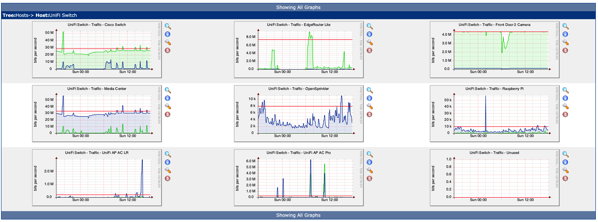
Cacti

With a retail price of $199, who should buy this switch? For most home users, there is no reason to purchase this switch. However, if you’ve bought into the UniFi line of products (which I’m quickly doing as unified management is excellent and gives me lots of control), then getting a UniFi switch should be a no brainer. To me, multiple 8 port switches beat out the 24 port switch due to the lack of fans. Yes, it would cost more, but in my setup, I try to keep noise at a minimum.
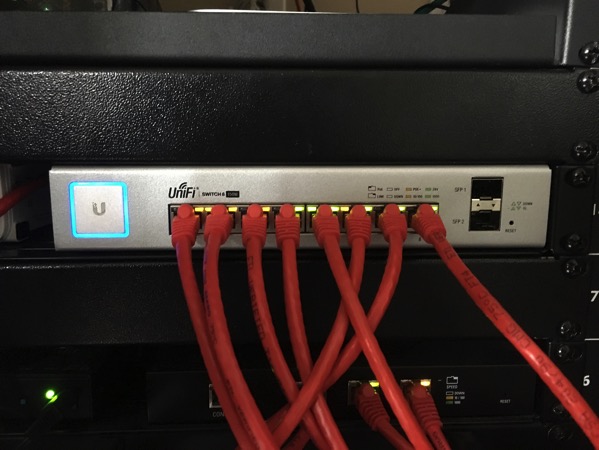
IMG 5572

Pros

  • Integrates well into the UniFi line
  • Silent operation
  • Powers all the UniFi access points (802.3af or passive PoE)
  • Controller software is easy to use (but utilitarian)

Cons

  • Not rack mountable; the Cisco switch I have has really long ears to mount it which Ubiquiti could have done. In my case, I put it on a Raxxess RAX Rack Tray
  • No combo RJ-45/SFP Ports
  • A little pricey

Summary

While the UniFi Switch 8 isn’t for everyone, I’ve been quite happy with the Ubiquiti products and plan to purchase one of the 8 port switches to replace my Cisco switch (I’m waiting until the SFP modules work properly as I actually need 19 ports between my 2 main switches). The unified controller makes things very easy to manage. The Cisco switch has lots more options exposed, the UniFi switch can do a bunch with the command line; however, I haven’t had to touch it.

Standardizing on UniFi switches will also allow me to possibly use their UniFi Video cameras including their new 1080p as those are powered by 24V passive PoE which the switch will provide (if you’re listening, Ubiquiti, I have 7 cameras and would need an NVR to go with it :-)).

If you’re going all in on Ubiquiti products, getting one of their switches should be a no-brainer.

Note:The UniFi Switch 8 was provided to me by Ubiquiti at no cost for testing and review. It should be clear that my review is not biased by this as I plan on purchasing another switch with my own money.
Plateau for Mac processors?

Recently my dad asked me what he could do to make his 2007 iMac faster. The machine is running a 2.4 GHz Intel Core 2 Duo processor which by today’s standards is woefully outdated. We had already maxed out the RAM at 6 GB (specs say it can handle 4 GB, but 6 GB are recognized) and it had a 500 GB 3.5″ spinning hard drive (7200 RPM, I believe).

As we were looking for the most cost effective solution, I said that we should try an SSD drive in it. I told him to purchase the Samsung 850 EVO and a Newer Technology AdaptaDrive Bracket. The items arrived and then I was tasked with installing it (I actually had my dad get a different bracket which was wrong, so it was extra work, but let’s just pretend he got the right bracket). Since the iMac didn’t recognize my USB 3 docks to copy the data from his iMac to the new drive, I had to put the iMac in target disk mode, hook it to my Thunderbolt display via FireWire 800 and then copy the data to the new SSD hanging off my MacBook Pro. This process was long, but required no effort.

Opening up an iMac of this vintage was relatively straight forward, and I installed the new drive. After putting the machine back together, I booted it up to test it and was surprised at how well the machine performed. Before the drive replacement, the machine was far too slow for me to use. Boot time was long and opening up applications took too long. Now, the machine booted up a lot faster and applications opened quickly which seemed similar to my 2012 Retina MacBook Pro with a Quad Core Intel i7 processor.

So now I was comparing a nine year old computer to my 3.5 year old computer. My computer has a significantly faster processor and lots more RAM (16 GB), but the performance in opening apps (startup is still faster) and day to day operations seems reasonably close. Of course, I didn’t do any benchmarks on the 2 machines, but here you have about 6 years separating 2 computers and in everyday tasks, the performance seemed acceptable on both.

My dad runs VMWare Fusion on his iMac (for his accounting) and that is a pig; for that (Windows 10 running on 1 core of a 9 year old iMac is a recipe for pain). Other than that, my dad has been quite happy with his upgrade.

So the question I have to ask is if the processor speed in Macs matters much anymore for everyday tasks. It seems that the limiting factor may be drive speed. I’m not talking about compiling, running virtual machines, or transcoding video, but for web browsing, email, etc., how much speed do we really need? I’m not giving up my machine any time soon and if I can get my hands on a faster machine, I’ll definitely do that.