A former co-worker of mine has talked about Docker for years and I’ve taken a look at it a few times, but have generally been uninterested in it. Recently with my interest in Home Assistant, I’ve decided to take another look as many of the installs of Home Assistant as well as Hass.io are based on Docker.
I’ve used virtual machines running on VMware Fusion for years with some Windows installs and some Linux installs. I’m very comfortable with Linux, but kind of dislike maintaining different packages. There are package managers that handle much of it for me, but then there are other packages that have special installations.
I had a few goals in mind for seeing if Docker could replace the current virtual machines I had running for Pi-hole and Observium. The goals were pretty simple that I wanted easy updates and be able to easily backup the data. In the Docker world, updates are dead simple and in many docker containers, the data is stored outside of the container making it easy to backup. As another goal, I wanted to be able to experiment with other containers to see what else I could add to my network.
With all this in mind, I started looking at how to setup Docker. Pretty quickly, I realized that Docker for the Mac was virtually useless for me as it didn’t handle all the networking that Docker running on Linux could. So that meant installing Docker on a Linux VM; that almost negated my goal of easy updates as I’d still have to update the virtual machine running Ubuntu. I could live with that if the rest of the setup was straight forward and didn’t have to remember how to update each container individually.
In order to make backups easy, I wanted to store the data on my Mac and not inside of the virtual machine. I’ve not had great luck with the VMWare tools for mounting volumes, so I decided to use CIFS (SMB) to mount a volume in Linux which works well except for the MariaDB (MySQL fork) Docker container. Not a big deal, I’d just add a cron job to dump the databases every few hours and store the dumps on the mounted volume. I added the following to /etc/fstab
//myserver/account/Documents/Ubuntu /mnt/mediacenter cifs username=account,domain=WORKGROUP,password=password,rw,hard,uid=1000,gid=1000 0 0
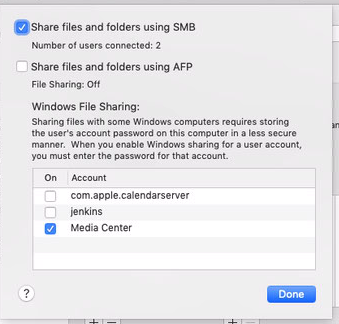
I also had to turn on Windows File Sharing options on the Mac.

The crontab is:
30 */2 * * * /usr/local/bin/backup_mysql
with the backup_mysql file being
    #!/bin/sh
    /usr/bin/mysqldump -h 127.0.0.1 -u root -ppassword --lock-all-tables --all-databases | gzip > /mnt/mediacenter/backups/mysql/mysql_backup_$(date +"%m-%d-%Y-%H_%M_%S").gz
    find /mnt/mediacenter/backups/mysql/* -mtime +3 -exec rm {} \;
The next hurdle was dealing with IPv6; most people don’t care about it, but I’m not most people! IPv6 is quite complicated (at least to me), so that took a bit of experimenting to get it to work in Docker. For future reference, ndppd lets the virtual machine tell the world that it handles IPv6 for the Docker containers (basically).
So where was I? After getting the Linux VM setup, it was on to setting up my containers. With docker-compose, I could setup one file that was the configuration for all my containers. Now this was great as I could modify it and test out different containers. After a few days of work, this is the core of my docker-compose file. There are a few other containers I’ve added including LibreNMS, but this is basically what I have. The nginx-proxy is great as I just add DNS entries for each service and it handles SSL and lets me run multiple web services on the same machine.
version: "2.3"
services:
  nginx-proxy:
   image: jwilder/nginx-proxy
   environment:
      - DEFAULT_HOST=pihole.exmple.com
   ports:
     - "80:80"
     - "443:443"
     - "::1:8080:80"
   dns:
     - 10.0.1.1
   volumes:
     - /var/run/docker.sock:/tmp/docker.sock:ro
     - '/mnt/mediacenter/docker/certs:/etc/nginx/certs'
   restart: always
   networks:
      default:
        ipv6_address: XXXX:XXXX:XXXX:XXXX:1::2

  pihole:
    image: pihole/pihole:latest
    ports:
      - "53:53/tcp"
      - "53:53/udp"
    environment:
      # enter your docker host IP here
      ServerIP: 10.0.1.200
      WEBPASSWORD: ''
      DNS1: 127.0.0.1
      DNS2: 10.0.1.1
      DNS3: XXXX:XXXX:XXXX:XXXX:XXXX:XXXX:XXXX:XXXX
      # IPv6 Address if your network supports it
      ServerIPv6: XXXX:XXXX:XXXX:XXXX:1::3
      VIRTUAL_HOST: pihole.example.com
    volumes:
      - '/mnt/mediacenter/docker/pihole/pihole/:/etc/pihole/'
      - '/mnt/mediacenter/docker/pihole/dnsmasq.d/:/etc/dnsmasq.d/'
      - '/mnt/mediacenter/docker/pihole/pihole.log:/var/log/pihole.log'
      # WARNING: if this log don't exist as a file on the host already
      # docker will try to create a directory in it's place making for lots of errors
      # - '/var/log/pihole.log:/var/log/pihole.log'
    restart: always
    cap_add:
        - NET_ADMIN
    networks:
      default:
        ipv6_address: XXXX:XXXX:XXXX:XXXX:1::3

  mariadb:
     image: mariadb
     ports:
       - 3306:3306
     volumes:
       - '/mariadb/data/:/var/lib/mysql/'
     environment:
       MYSQL_ROOT_PASSWORD: password
     restart: always
     user: "1000"
     networks:
       default:
        ipv6_address: XXXX:XXXX:XXXX:XXXX:1::4

networks:
  default:
      driver: bridge
      enable_ipv6: true
      ipam:
        driver: default
        config:
            - subnet: 192.168.0.0/24
            - subnet: "XXXX:XXXX:XXXX:XXXX:1::/120"
Phew, that was a lot of work to get things running. However, I’m pretty pleased with how things are working. I now have the ability to experiment with other containers and can restore my data easily if things go awry. Is Docker the answer to everything? Probably not, but it appears to handle this job well.
One Reply to “Dipping my toe in the world of Docker”