The recent distributed denial of service attack is said to have been caused by the Mirai botnet which basically turns IoT devices in attackers. One of the devices that is vulnerable is an IP camera that has a default username and password. While I don’t have that brand of camera, my cameras have accounts that I can’t remove and apparently one ONVIF account with a username/password that can’t be changed. I’m pretty good at securing my network from people coming in, but what about things going out? A lot of these IoT devices talk to a server for firmware updates or whatever. Since my IP cameras only need to talk to my server that is recording video, there is absolutely no need for them to connect to the Internet. I decided to see what I could do to isolate the traffic; this is something I’ve wanted to do for 3.5 years ever since I got a Cisco router that did VLANs, but couldn’t figure out a reason and didn’t have the knowledge to do it. However, times have changed.
In my case, I now have managed switches UniFi Switch 8 and the 16 port version as well as an EdgeRouter Lite. Using this equipment, I was easily able to separate out the camera traffic on a VLAN that has no access to the Internet. Here’s what I did:
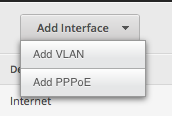
- On the EdgeRouter Lite, setup a new VLAN. From the Dashboard, click on Add Interface and then Add VLAN.
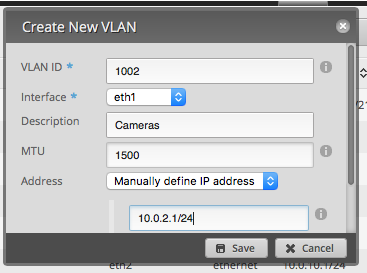
- Setup the VLAN similar to the picture. The 1002 is the VLAN ID. Select the Interface for your LAN port. Enter the IP address for this subnet.
- Click Save.
- Switch to the Firewall/NAT tab. Select Firewall Policies.

- Click Add Ruleset.
- Set it up similar to this picture.
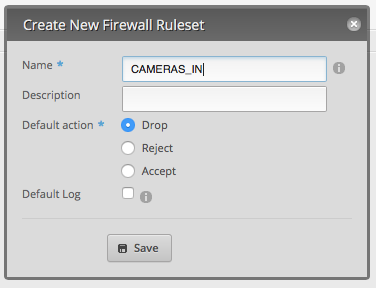 . Repeat for CAMERAS_OUT and CAMERAS_LOCAL (in is for data coming from the camera subnet, out is for data going to the camera subnet, and local is data to and from the router.
 - After the rules are saved, select Actions to the right of the IN rule. Choose Interfaces.
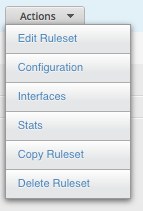
- Select the VLAN (ethernet port + VLAN ID) and the direction. Click on Save Ruleset. Then close the dialog.

- Repeat the above steps for the OUT and LOCAL rulesets.
- IN and OUT are now complete; basically we have just made all traffic from this new VLAN never goto the Internet or receive data from the Internet.
- To the right of the LOCAL ruleset, click on Actions and select Edit Ruleset.
- Click Add New Rule.
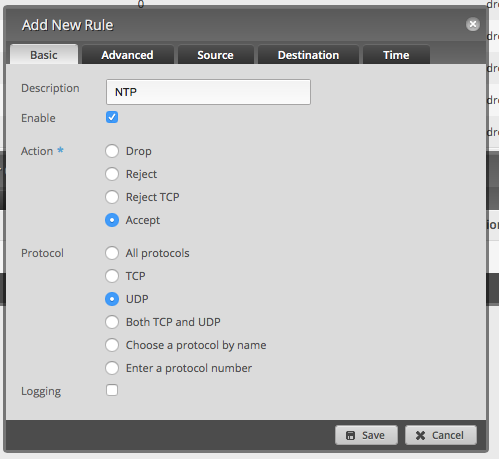
- Enter NTP for the description and select Accept. Select UDP for the Protocol.
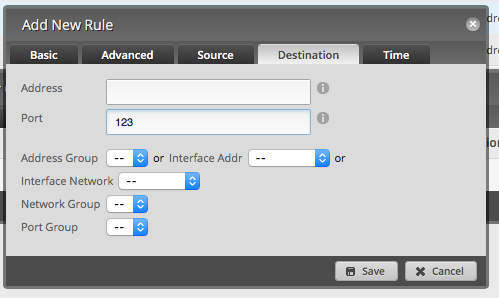
- Click on Destination. Enter 123 for the port.
- Click Save.
- Create a new rule for DNS using UDP port 53.
- Create a new rule for DHCP using UDP port 67.
- Click Services at the top of the Edge Router interface.
- Click Add DHCP Server.
 1.
1. - Set it up like in this picture.
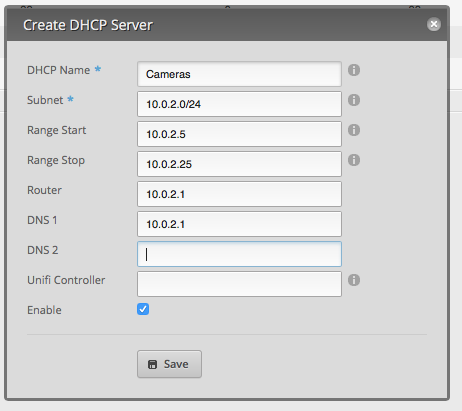
- After setting up the DHCP server, you may want to Configure Static Map to assign specific IP addresses for each MAC address.
- Before leaving this area, click on DNS and add the VLAN as a Listen Interface and click Save.
- Now move over the UniFi Controller.
- Goto Settings and choose Networks.
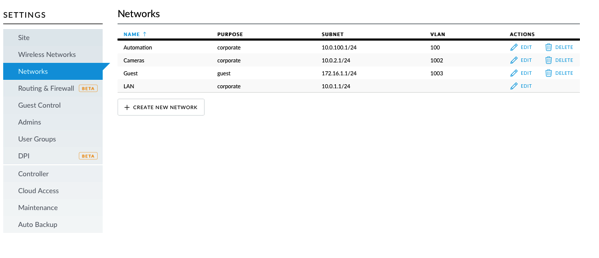
- Click Create New Network. Set it up similar to this picture.
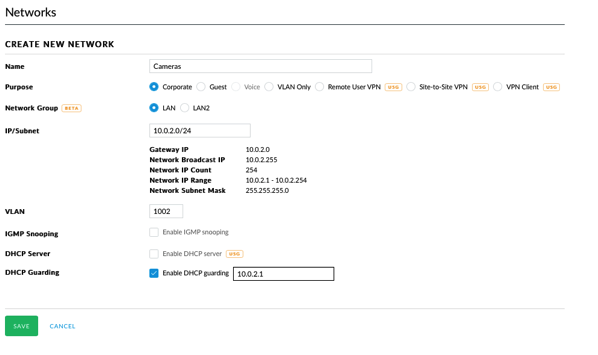
- Click save.
- Goto Devices and select the UniFi Switch. Click Ports and locate a port with a camera. Click the Pencil.
- Change the VLAN to the Cameras VLAN. Click save.
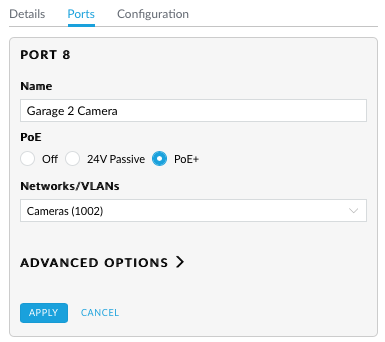
- Power cycle that port and the device will come up on the new VLAN.
- On my Mac (the machine recording video), go into Network settings, click the gear and select Manage Virtual Interfaces.
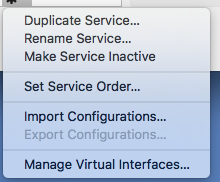
- Click the + button and select New VLAN.
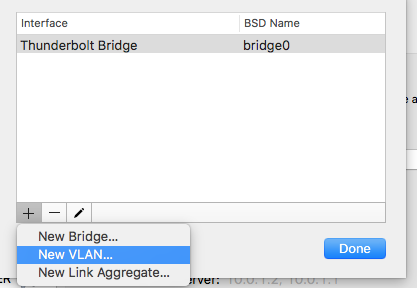
- Enter the VLAN ID for the Tag and give it a name.
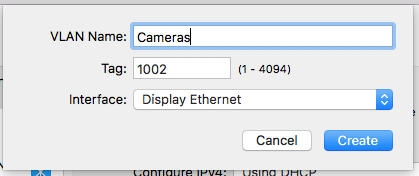
- Click Create and then click Done.
- Select the new interface, select Configure IPv4 Manually. Alternatively you can use DHCP.
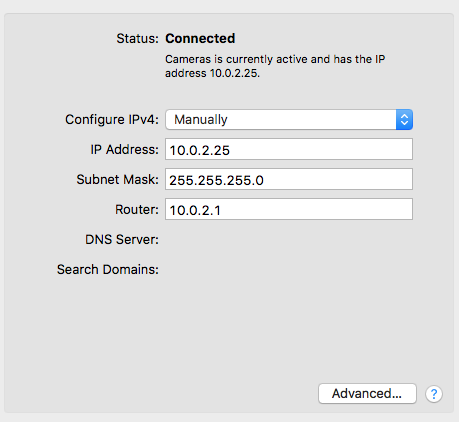
- Re-configure your security software (in my case SecuritySpy) with the new IP addresses.
- I also changed the NTP address in the cameras to be 10.0.2.1 as the router will now block all traffic trying to go outside. The EdgeRouter Lite happens to be running an NTP server which is quite convenient.
Yes, there are a lot of steps here, but this makes me feel a bit safer. Without a managed switch and a router that can handle VLANs, this would be difficult, if not impossible. Unfortunately most people won’t be able to do this and their IoT devices will be targets. I have no idea how we’re going to solve the problem of IoT devices getting hacked, used to launch hacks, or generally cause havoc on the Internet.
Please let me know if I missed anything or there are any mistakes.
You don’t need a managed switch. Any sufficiently featureful internet router will do. (In other words you only need one of the two things you mentioned.)
For example, using iptables on a Linux router: http://serverfault.com/questions/684441/iptables-block-client-ip-internet-access-and-keep-lan-access
The managed switch does provide some benefit: it means that someone who hacks your router alone cannot fully undo your configuration; they also have to hack your switch.
Good point. However, the VLAN and managed switches allow you to have a separate DHCP range specifically for those devices which may make things a little easier to manage. The EdgeRouter Light could be configured with those same rules with source and destination addresses being the IP cameras.
Using a Pepwave Surf SOHO, I can set a firewall rule to prevent the camera’s IP address from sending data out to the Internet. Much simpler and no need for a VLAN. Does need the cameras IP address to be static, but the router can do that too, as can many routers.
That said, if I wanted to isolate the camera and the server it writes to into their own VLAN, the Surf SOHO can do this on its own, no need for a managed switch. A regular dumb switch can be plugged into a LAN port on the router and that port can be its own VLAN. Each VLAN gets its own IP subnet. Again, simpler.
Not to be too negative, I applaud your goals here.
There are definitely many ways to accomplish this same task. For me, I have the equipment and the know how to accomplish this through VLANs. This also gave me a good excuse to use a VLAN!
“It’s simpler but less secure. What would prevent your cameras to fake a different IP address and retry?” – it was a respond to Michael’s comment that we don’t need VLANs.
I found your blog while investigating on how to set up IP Camera on their own network. I’m gonna pull the trigger on the ERL. I want to wait for your review on the USG but it just seems like it is not there quite yet but maybe with another year of updates…
My question is was there any reason for choosing this route instead of using the ERL in the WAN+2LAN configuration and keeping all cams/nvr on lan 2? Is it easier to access the VLAN from your home network? I was going to use the UNIFI 16 port switch to connect to LAN 2 to connect to the cameras and Blue Iris CPU but am now thinking about going this route because of this post
Just wondering the benefits of VLAN vs WAN+2LAN configs.
Thanks for all your posts on this stuff and looking forward to the USG review!
Hi Darren,
At the time I put my cameras on a VLAN, I already had my Ooma on the second LAN port of the ERL. Now I’ve gone further with my VLANs and moved my Ooma to a VLAN, put IoT devices on a VLAN, and have the camera VLAN. If all I wanted to do was isolate the cameras, the second LAN would work fine. I don’t know if VLAN traffic will pass from switch port to switch port without going through a router; in my setup, all the VLAN devices are either talking to the Internet or going to my LAN, so traffic is going through the router.
I’ve actually ordered a USG and will be switching to it. The core is the same as the ERL, it just doesn’t have the same GUI. I want to completely move my IoT things to a VLAN and add more firewall rules, but that’s going to take time as each IoT box connects to who knows what; initially the VLAN will keep the IoT devices from talking to my LAN (except for certain services) and then I’ll expand this so that each device has a limited set of external services it can hit. I’m going to the USG to have a central interface for my network; right now I have to redefine all the VLANs in the UniFi controller so that the traffic passes through my switch.
I don’t know if the USG’s second LAN port (labeled VOIP) has been changed in the UniFi controller to be a generic LAN port, yet. I know it is on the roadmap.
Not sure if you went to the USG yet, but Chris from Crosstalk Solutions on youtube does a video comparing the ERL to the USG. You may want to watch that. The USG does allow integration to the unifi interface, however which the ERL does not (yet). For my IOT devices that need to access the internet (thermostats for example) I did a Vlan and unifi Vlan tagging as well and isolated them from my network, providing ONLY internet access so I can remotely manage them. Ubiquiti makes Vlans so simple, especially being able to have multiple SSID’s and separate Vlans on each. Thanks for the blog, Scott.
I haven’t watched the video, but will check it out.
I have also setup a VLAN for IoT devices and only allow them to talk outside, but have some additional rules that allow internal management. While it is easy to setup, my concern about IoT devices is for the average person; they’re pretty much at the mercy of the IoT vendors providing updates and securing their devices.
your message is written very well.
However,
the VLAN and managed switches allow you to have a separate DHCP range specifically for those devices which may make things a little easier to manage.
The EdgeRouter Light could be configured with those same rules with source and destination addresses being the IP cameras.