My wife does a lot of USPS shipping via PayPal for her jewelry business. She has been printing the labels on 8.5 x 11 on our laser printer, but to not waste labels, she would print the labels to PDF, put them in Word, crop them and print 2 to a page. This, of course, takes a lot of time. Things got even worse when she runs out of labels; she cuts out the label and tapes it to the shipping envelope.
I decided to look for a better solution and decided to get her a DYMO LabelWriter 4XL. The printer prints 4×6 labels. Unfortunately, PayPal’s Mac support for this printer is non-existent. After a lot of research, I came across an article that explained how to get PayPal to print to the printer. I started following the instructions, but had trouble installing CUPS-PDF on my wife’s Leopard machine. After I managed to get it installed and running (I finally found an older version), I was testing it and found a much simpler solution.
Here’s the quick and easy way to print shipping labels on the LabelWriter 4XL printer using a Mac.
- Install the DYMO drivers (make sure you grab them from the DYMO Web site as DYMO using strange numbering and version 8.2 isn’t the same as 8.2; the latest version is 8.2.2.1172. I had an 8.2 version that was earlier and didn’t support the 4XL.
- Set PayPal to print labels to a laser printer or inkjet printer. From the PayPal home page, click Profile. Click Shipping Preferences. Click Edit Printer Settings. Select Laser/Ink Jet Printer. Click Save.
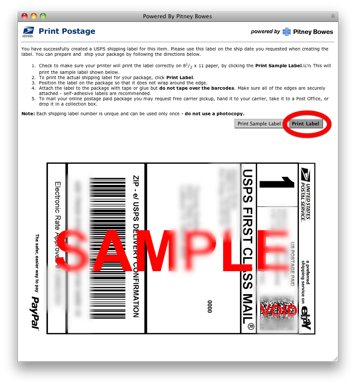
- Print the label by clicking Print Label on the Print Postage Page.

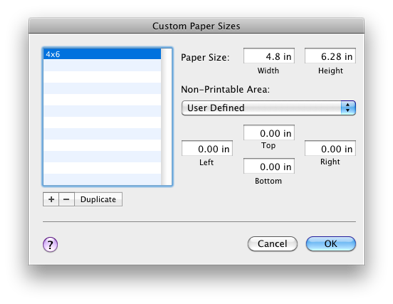
- When you goto print, create a custom paper size called 4×6. However, configure it a little bigger than 4×6.

- Setup the printer to be landscape, print page 1 to 1 (sometimes there is a second page).

- Click Print.
The screenshots were taking on Snow Leopard, so Leopard is a little different. However, that’s the jist of how to “easily” print shipping labels from PayPal. Granted there are a few steps involved, but this sure is easier than taking the labels into word, cropping them, printing them and then cutting them out. This seems quite simple, so I’m not sure why no one else figured this out with other 4×6 printers. Granted the LabelWriter 4XL is a new printer, but there are other printers like it.
I hope this helps someone.
How about I offer you some tips.
Paypal has it so labels occupy half the page when printed. The other half by default, is the shipping label receipt. You can disable this in options.
Disable the receipt in options, then print as normal, the label will only take up half the page. There are a lot of labels out there on sale that are precut perfectly for Paypal Shipping Labels.
Using those labels, you would print 1 label on one sticker, flip it around, put it back in the printer, and use the other sticker.
Thanks for the tips. However, the Dymo printer is working wonderfully and printing from PayPal like a champ.
I just converted over to an iMac and seem to be having an issue printing in paypal now. I have to reprint my label each time for it to print. Moreover, I also have to select printing preferences and have it print 1 page now as well. Before, on my PC, everything printed just fine. I would follow click print label and (with the settings of only printing the label and not the receipt, would be fine.
Is there a different setting necessary for Mac’s?
I gave up on this and now my wife uses Endicia for printing labels.
Thank you for posting this.
I have a small problem tho, whenever I print it ends up printing just a portion on the corner of the label. A rectangle that is about 1/4 of the label. It does it when i print offline too (photoshop). the labels work properly only when I import the image to their software and then print, which is a pretty long process. I’m not sure if it’s preferences or settings , I’m running on snow leopard. What are the exact settings you use? is there a way to fix this. please let me know any info, it will help greatly.
Thank you
Unfortunately something changed and I had to write a complex automator action that prints the label to a PDF, opens it in Preview, crops it and then prints it. It’s not pretty, but it works. Too bad it doesn’t just work out of PayPal on a Mac.
Thank you for the reply. i thought something was wrong with my printer for awhile. Could you shed a light on the automator process? How complex is it? Did you create a print plugin? Do you have the process posted?
Sorry for so many questions, I really wanna get my Dymo 4xl to work with my mac n paypal efficiently. Many Many thanks I really, truly I appreciate it ^_^
I’ve uploaded a copy of my automator workflow here. It takes a little while to run for each each (make sure you set it to print to 8.5×11 as the action does cropping and such). You may have to change things based on your printer name. This isn’t perfect, but appears to work.
Much Thanks ^_^ Im going to give it a try
Thanks so much. That totally did the trick for me!
I’m going to try this and hope it works…I’ve been paying for Endicia/Mac service for over a year, and there are slow months when I really can’t justify the expense, and yet I’m a slave to their service since I could not print to Paypal from my Mac/Dymo 4XL. Here’s to hoping it works! By the way, I did the inkjet sticky labels my first few years, but the thermal labels are just much more professional looking, especially when you wholesale and want buyers to respect you as a legit business….
While this method worked at one time, I wasn’t able to get it to work anymore. My wife went with Endicia as it easier to print the labels and makes it so that she doesn’t have so many individual items in her PayPal account for shipping; saves me time when doing her accounting!
I got the trying to print USPS on a Mac blues. Endicia seems like a rip off $15/mo I might as well go buy a PC! 🙂 Can you print from Csv file with endicia?
Thanks
If you print enough, Endicia is a life saver and well worth the cost. My wife spends a few hundred dollars a month in shipping and Endicia saves a ton of time.
Thanks for the great advice!
The only thing you left out, or rather did not emphasize is the fact that you should not select print “all” pages and rather select print only the first page. If you do not choose only the first page, the Dymo 4xl will print a second page with the scissor and dotted line graphics – thus wasting an extra label. Your screenshot illustrates this point but your written directions don’t mention this essential step.
I was just about to return my dymo 4xl until I came across your article! Thank you so much for literally saving my life!!
Hi Kelly,
That’s excellent! I didn’t know this method still worked. For printing a lot of postage, Endicia is the way to go; the monthly cost is offset with the time you save.